

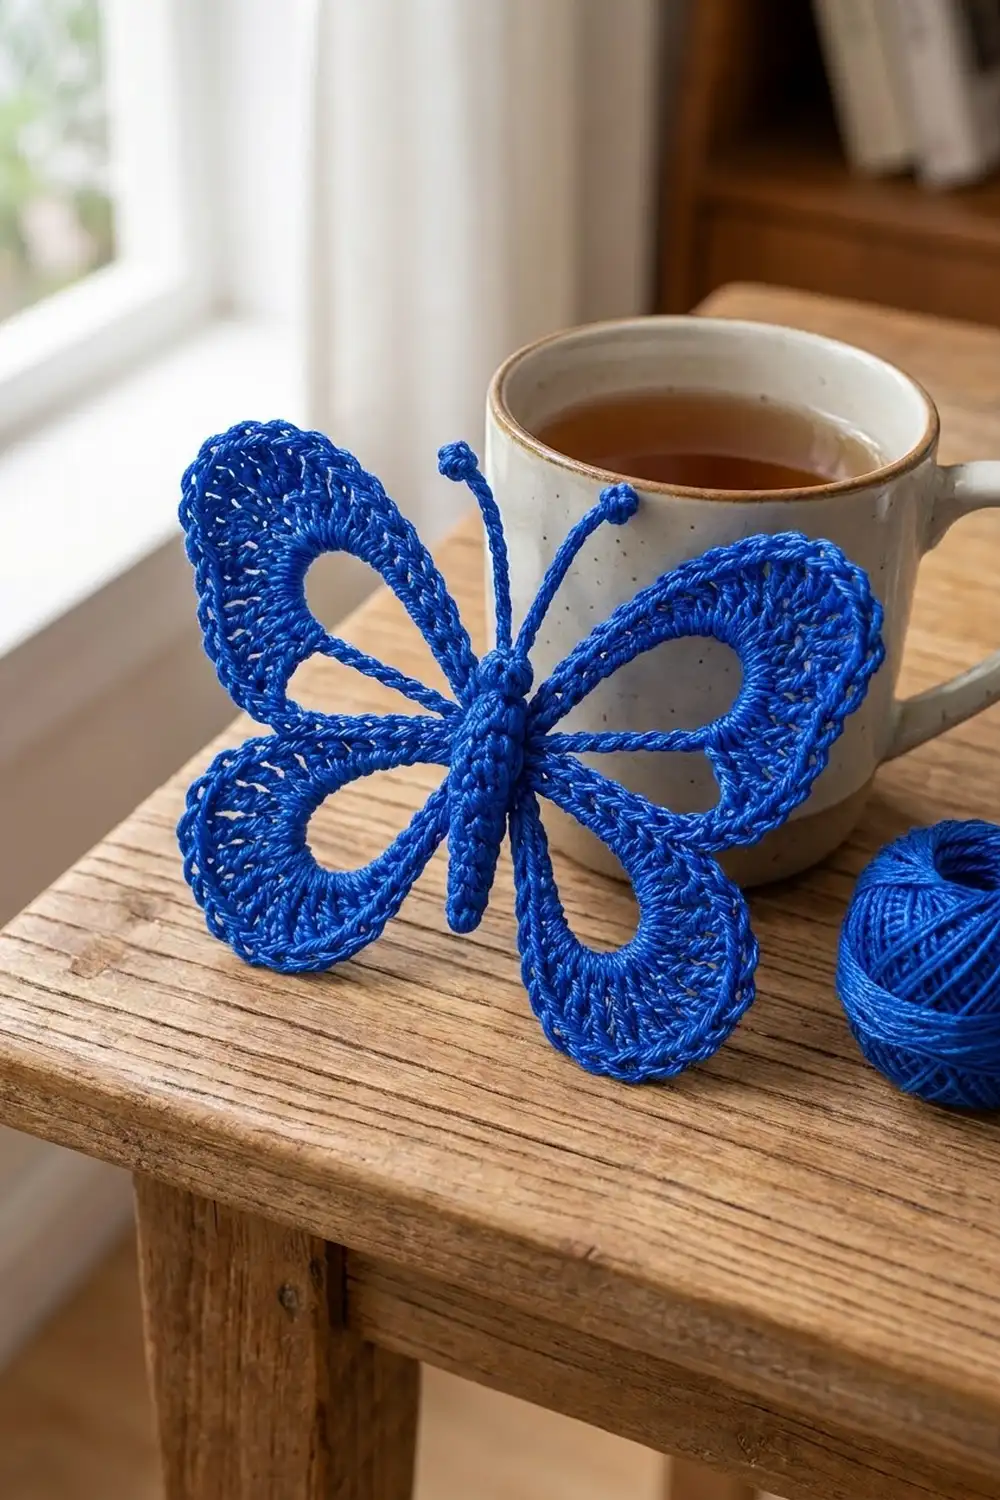
This butterfly is a single crocheted motif in one bold cobalt blue. Each of its four wing lobes has a large open teardrop “window” in the middle, outlined by a smooth corded edge. A fan of double crochet makes a crescent around the outer side of each window, and the whole wing is finished with a fine picot scallop.
Down the center sits a raised, three-dimensional body with a round head, a short thorax, and a long tapered abdomen. Two corded antennae with tiny bobble tips curve up from the head. With just one color, the look stays crisp and graphic, and the open windows and texture carry the design.
The pattern uses US crochet terms. The finished butterfly measures about 5 in (12.7 cm) wide and 4 in (10.2 cm) tall across the wings, not counting the antennae. You can use it as an appliqué, a curtain or wall ornament, a gift topper, or a brooch.
The construction is simple. The wings are worked as one piece from a small center ring. Four chain loops become the windows, and three rounds build out around them. A picot border then goes around everything. The body and antennae are made separately and sewn over the center ring.
Finished Size and Construction
- Finished size: 5 in (12.7 cm) wide x 4 in (10.2 cm) tall, wings only
- Antennae: extend about 1.25 in (3.2 cm) above the head
- Skill level: Intermediate (working over chain loops, shaping in fans)
- Terminology: US
- Yarn weight: Sport weight (#2) mercerized cotton
- Hook: 2.5 mm (US B/1 or C/2)
- Number of pieces: 1 wing piece + 1 body + 2 antennae, assembled into one motif
- Layout: four wing lobes around one ring, in this order: upper left, lower left, lower right, upper right
- Piece size: body 2.25 in (5.7 cm) long, 0.5 in (1.3 cm) across
- Size before border: 4.5 in (11.4 cm) x 3.5 in (8.9 cm)
- Border depth: 0.25 in (0.6 cm) on every edge
Materials
Use a smooth, tightly plied mercerized cotton in sport weight. Its sheen shows off the corded edges, and cotton holds the open windows flat after blocking. Avoid fuzzy or very splitty yarns, because they blur the windows.
- Cobalt blue: 12 g, about 37 m (40 yd)
This is enough for one butterfly, including the body, antennae, and sewing tails. The quantities include a margin of about 20 percent, so you will have some left over.
Tools:
- 2.5 mm crochet hook
- Tapestry needle
- Scissors
- Stitch markers (2-3)
- A small pinch of matching scrap yarn for stuffing the body
- Blocking mat, rust-proof pins, and a spray bottle
- Ruler or tape measure
Abbreviations (US Terms)
- ch chain
- sl st slip stitch
- sc single crochet
- hdc half double crochet
- dc double crochet
- sc2tog single crochet 2 together
- sp space
- st(s) stitch(es)
- MR magic ring
- rnd round
Special stitches
- Picot: ch 3, sl st in the 3rd ch from hook. A picot does not count as a stitch.
- Bobble: [yo, insert hook in st, yo and pull up a loop, yo and pull through 2 loops] 3 times in the same st, yo and pull through all 4 loops on hook.
- Working over a loop: insert the hook into the chain-loop space, not into the individual chains. This wraps the chain and gives each window its smooth corded outline.
Gauge and Checkpoints
Gauge: 22 sc x 24 rows = 4 in (10.2 cm), or 5.5 sc per 1 in (2.5 cm), on a 2.5 mm hook.
Gauge matters here because the wing rounds are worked over chain loops of a set length. If your stitches are too loose, the loops gape. If they are too tight, the wings cup. Make the wing piece first and measure it before you make the body.
Checkpoints:
- After Rnd 2: each upper window is about 1.75 in (4.4 cm) long and 1 in (2.5 cm) wide. Each lower window is about 1.25 in (3.2 cm) long and 0.75 in (1.9 cm) wide.
- After Rnd 4: the wing piece is 4.5 in (11.4 cm) x 3.5 in (8.9 cm), lightly pressed flat.
- After the border: 5 in (12.7 cm) x 4 in (10.2 cm).
If your piece is too big, go down to a 2.25 mm hook, or keep the hook and chain the loops more tightly. If it is too small, go up to a 2.75 mm hook. Change the hook, not the stitch counts, because the counts are what keep the fans flat.

Wing Piece
The wings are worked in joined rounds without turning. Each round goes around all four lobes in order: upper left, lower left, lower right, upper right.
Center ring: Ch 6, sl st to the first ch to form a ring.
Rnd 1 (window loops): Ch 1, sc in ring, ch 30 (upper-left loop), sc in ring, ch 22 (lower-left loop), sc in ring, ch 22 (lower-right loop), sc in ring, ch 30 (upper-right loop), sl st to the first sc to join.
Count: 4 sc on the ring and 4 chain loops (two ch-30, two ch-22).
Lay the piece flat and check that no loop is twisted before you go on.
Rnd 2 (corded outline): Work over each loop, into the loop space.
- Upper-left ch-30 loop: 4 sc, 4 hdc, 18 dc, 4 hdc, 4 sc. Sl st in the next ring sc.
- Lower-left ch-22 loop: 3 sc, 3 hdc, 12 dc, 3 hdc, 3 sc. Sl st in the next ring sc.
- Lower-right ch-22 loop: 3 sc, 3 hdc, 12 dc, 3 hdc, 3 sc. Sl st in the next ring sc.
- Upper-right ch-30 loop: 4 sc, 4 hdc, 18 dc, 4 hdc, 4 sc. Sl st in the first ring sc to join.
Count: 34 sts per upper lobe, 24 sts per lower lobe, 116 sts total. Slip stitches are not counted.
Push the stitches together evenly along each loop so the chain is fully covered. The sc at both ends of each lobe form the narrow “vein” strands that run from the center out to the wing. The dc section sits at the outer tip.
Rnd 3 (first fan): Sl st into the first sc of the upper-left lobe, ch 1 (does not count). Work into the Rnd 2 sts. Between lobes, skip the ring sc and go straight into the first st of the next lobe.
- Each upper lobe: sc in next 4 sts, hdc in next 4 sts, 2 dc in each of next 18 sts, hdc in next 4 sts, sc in next 4 sts. (52 sts)
- Each lower lobe: sc in next 3 sts, hdc in next 3 sts, 2 dc in each of next 12 sts, hdc in next 3 sts, sc in next 3 sts. (36 sts)
Sl st to the first sc to join.
Rnd 3 total: 176 sts (52 + 36 + 36 + 52).
Rnd 4 (second fan): Ch 1 (does not count). Work all the way around, with no skipped stitches between lobes.
- Each upper lobe: sc in next 4 sts, hdc in next 4 sts, [dc in next 2 sts, 2 dc in next st] 12 times, hdc in next 4 sts, sc in next 4 sts. (64 sts)
- Each lower lobe: sc in next 3 sts, hdc in next 3 sts, [dc in next 2 sts, 2 dc in next st] 8 times, hdc in next 3 sts, sc in next 3 sts. (44 sts)
Sl st to the first sc to join.
Rnd 4 total: 216 sts (64 + 44 + 44 + 64).
The increases are only in the dc sections. That keeps the band narrow near the body and lets it widen into a deep crescent at each outer tip. This gives you thin veins near the center and a solid, textured fan on the outside.
Checkpoint: Lay the piece flat. It should measure about 4.5 in (11.4 cm) x 3.5 in (8.9 cm). On each side, the upper and lower lobes should touch along their side edges. Do not fasten off.
Border (Picot Scallop)
Border gauge: The border is one round of sc with picots, worked at the same 5.5 sc per 1 in (2.5 cm). It adds 0.25 in (0.6 cm) on every edge.
Rnd 5: Ch 1 (does not count). Work 1 sc in each st around, adding picots across the fan sections only.
- Each upper lobe: sc in next 8 sts, [sc in next 4 sts, picot] 12 times, sc in next 8 sts. (64 sc + 12 picots)
- Each lower lobe: sc in next 6 sts, [sc in next 4 sts, picot] 8 times, sc in next 6 sts. (44 sc + 8 picots)
Sl st to the first sc to join. Fasten off, leaving a 6 in (15.2 cm) tail.
Rnd 5 total: 216 sc (1 per existing st) + 40 picots.
Why the math works: Rnd 4 has 48 fan sts in each upper lobe and 32 in each lower lobe. Both numbers divide evenly by 4, so the picots land at even intervals with no leftover stitches: 48 / 4 = 12 and 32 / 4 = 8. The 8 sc (upper) and 6 sc (lower) at each end of a lobe cover exactly the 4 sc + 4 hdc (upper) and 3 sc + 3 hdc (lower) from Rnd 4. That gives 8 + 48 + 8 = 64 and 6 + 32 + 6 = 44. The plain vein edges stay smooth, and the scallop sits only on the outer wing edge.
Optional tack: On each side, where the upper and lower lobes touch, use the tail to whipstitch them together for about 0.25 in (0.6 cm). This keeps the wing shape steady when the butterfly hangs.
Body
Work in continuous spiral rounds. Mark the first st of each round.
- Rnd 1: 6 sc in MR. (6)
- Rnd 2: [sc in next 2 sts, 2 sc in next st] twice. (8)
- Rnds 3-4: sc in each st around. (8) This is the head.
- Rnd 5: [sc in next 2 sts, sc2tog] twice. (6) This is the neck.
- Rnd 6: [sc in next 2 sts, 2 sc in next st] twice. (8)
- Rnds 7-12: sc in each st around. (8) This is the thorax and upper abdomen.
Stuff the head and thorax lightly with scrap yarn.
- Rnd 13: [sc in next 2 sts, sc2tog] twice. (6)
- Rnds 14-16: sc in each st around. (6)
Add a little more stuffing to the abdomen.
- Rnd 17: sc2tog 3 times. (3)
Fasten off, leaving a 12 in (30.5 cm) tail. Thread the tail through the last 3 sts and pull closed.
Checkpoint: The body is about 2.25 in (5.7 cm) long and 0.5 in (1.3 cm) across. It narrows visibly at the neck and tapers at the tip.
Antennae (Make 2)
Leave a 6 in (15.2 cm) starting tail. Ch 12. Make a bobble in the 2nd ch from hook, then sl st in each of the remaining 10 ch. Fasten off.
The sl sts firm the chain into a thin cord, and the bobble makes a small round knob at the tip. Each antenna is about 1.25 in (3.2 cm) long.
Assembly
- Center the body over the ring on the right side of the wing piece. The head should be level with the top ends of the upper vein strands.
- Using the body tail, sew the underside of the body down the center line, through the ring and the first sts of each lobe. Keep your stitches hidden under the body.
- Pull one antenna tail through the top of the head, slightly left of center. Do the same with the second antenna, slightly right of center. Together they should form a gentle V.
- Secure the antenna tails inside the head and weave in all ends.
Final Blocking
- Spray the butterfly evenly with water until it is damp but not dripping.
- Lay it on the blocking mat, right side up.
- Pin down the body first so it stays straight.
- Gently open each window with your fingers into a clean teardrop shape.
- Pin the outer tips of the four lobes to 5 in (12.7 cm) wide and 4 in (10.2 cm) tall.
- Pin each picot outward along the fan edges so the scallop is even.
- Shape the antennae into a soft outward curve, using one pin each.
- Let it dry completely, at least 12 hours, before you unpin it.
Final Quality-Control Checklist
- The wings measure 5 in (12.7 cm) x 4 in (10.2 cm).
- Both upper lobes match, and both lower lobes match.
- All four windows are open, untwisted, and fully covered with stitches.
- Each upper lobe has 12 picots, and each lower lobe has 8.
- The body runs straight down the center and covers the ring.
- The antennae are the same length and mirror each other.
- All ends are woven in and can’t be seen from the front.
Troubleshooting
- The chain shows through the outline: You worked too few sts or worked into the chains. Work into the loop space and push the sts together.
- The wings cup or ruffle: Check the Rnd 3 and Rnd 4 counts. Too many increases cause ruffling, and too few cause cupping. Blocking fixes small differences.
- The windows are too small: Your chain loops are too tight. Chain a little more loosely, or go up half a hook size for Rnd 1 only.
- The lobes overlap: The ring is too tight. Remake it with ch 7 instead of ch 6. The counts stay the same.
- The body leans: Sew it down along its full length, not just at the head and tip.
- The picots are uneven: Keep the ch 3 relaxed and pin each picot during blocking.
Care
Hand wash in cool water with mild soap, press the water out in a towel, and dry flat. If the windows lose their teardrop shape, pin them again to reshape.
Final Notes
The measurement chain is short and easy to follow. Match the gauge of 5.5 sc per 1 in (2.5 cm). After Rnd 2, check the windows: 1.75 in (4.4 cm) for the upper and 1.25 in (3.2 cm) for the lower. After Rnd 4, check that the wing piece is 4.5 in (11.4 cm) x 3.5 in (8.9 cm). The border then brings it to 5 in (12.7 cm) x 4 in (10.2 cm). Finish with the 2.25 in (5.7 cm) body and the 1.25 in (3.2 cm) antennae.
If every checkpoint matches, your butterfly will lie flat, the windows will stay open, and the scallops will be even. Make one for a gift tag, or make a few to pin along a sheer curtain.
Happy crocheting!