

This garland has six flat little gnomes hanging from a chunky crocheted cord. Each gnome has a cocoa-brown body that rises into a pointed hat, a cream triangle beard, a round peach nose and two cream feet peeking out at the bottom. Pearl beads and white embroidered snowflakes decorate every hat.
The colors are soft and neutral: cocoa brown, ivory cream, blush peach and pearl white. The style is Scandinavian with a rustic touch, and it looks right across a mantel, a shelf or a doorway. The pattern uses US crochet terms throughout.
Each gnome measures about 4 in wide x 6 in tall (10.2 x 15.2 cm), including the feet. The finished cord is 54 in (137.2 cm) long, with the six gnomes spaced 6 in (15.2 cm) apart, center to center.
You work each body flat in single-crochet rows from the bottom up, then add one edging round that also forms the hanging loop. You sew on the beard, nose and feet as appliqués, then add the embroidery and beads. Last, you chain the cord and join each gnome into it as you go.
Finished Size and Construction
- Finished garland: 54 in (137.2 cm) cord. Gnomes hang about 7 in (17.8 cm) below it.
- Skill level: Easy / advanced beginner
- Terminology: US crochet terms
- Yarn weight: Worsted (#4)
- Hook: 4.0 mm (G-6)
- Number of pieces: 6 gnomes + 1 cord. Each gnome is 1 body, 1 beard, 1 nose and 2 feet.
- Layout: 1 row of 6 gnomes, 6 in (15.2 cm) apart center to center, with a 12 in (30.5 cm) tail at each end
- Piece size: each gnome is 4 x 6 in (10.2 x 15.2 cm) with feet. The body alone is 4 x 5.5 in (10.2 x 14.0 cm).
- Size before border: the body rows measure 3.5 x 5.2 in (8.9 x 13.2 cm) before edging. The cord foundation chain is 54 in (137.2 cm).
- Border depth: the body edging adds about 0.25 in (0.6 cm) per side. The single sc row on the cord adds about 0.25 in (0.6 cm) of thickness.
Materials
Choose a smooth worsted cotton or cotton blend so the stitches look crisp and the gnomes lie flat. Acrylic also works, but it may need firmer blocking. The amounts below assume about 170 m per 100 g (186 yd per 100 g).
- Cocoa brown: 70 g, about 119 m (130 yd), for the bodies, edging and cord
- Ivory cream: 30 g, about 51 m (56 yd), for the beards and feet
- Blush peach: 5 g, about 9 m (9 yd), for the noses
- White: about 3 m (3 yd) of yarn or 6-strand embroidery floss, for the snowflakes
Tools:
- 4.0 mm (G-6) crochet hook
- Tapestry needle and a sharp embroidery needle
- 60 pearl beads, 4 mm (8 per gnome, plus spares)
- A small pinch of fiberfill or yarn scraps for the noses
- Stitch markers, scissors, pins, blocking mat and spray bottle
All quantities include a margin of about 20 percent for your swatch and tails.
Abbreviations (US Terms)
- ch – chain
- sl st – slip stitch
- sc – single crochet
- sc2tog – single crochet 2 together (decrease)
- MR – magic ring
- st(s) – stitch(es)
- [ ] – repeat the steps inside the brackets as stated
Special stitch: sc2tog. Insert the hook in the next st, yarn over and pull up a loop. Insert the hook in the following st, yarn over and pull up a loop. Yarn over and pull through all 3 loops on the hook. This turns 2 sts into 1.
The ch 1 at the start of each row never counts as a stitch.
Gauge and Checkpoints
Gauge: 18 sc and 20 rows = 4 in (10.2 cm) in rows of sc. That works out to 4.5 sc and 5 rows per inch.
Make one complete gnome body first and use it as your gauge swatch. Check these measurements as you go:
- After Row 5: 16 sc = 3.5 in (8.9 cm) wide
- After Row 11: 2.2 in (5.6 cm) tall
- After Row 26: 5.2 in (13.2 cm) tall
- After the edging: 4 x 5.5 in (10.2 x 14.0 cm)
- Beard: 2.7 in (6.9 cm) wide x 2.4 in (6.1 cm) tall
Too big? Switch to a 3.5 mm hook. Too small? Switch to a 4.5 mm hook. If only the height is off, you are probably pulling up loops that are too tall or too short, so even out your tension. Use the same hook for every piece, including the cord.
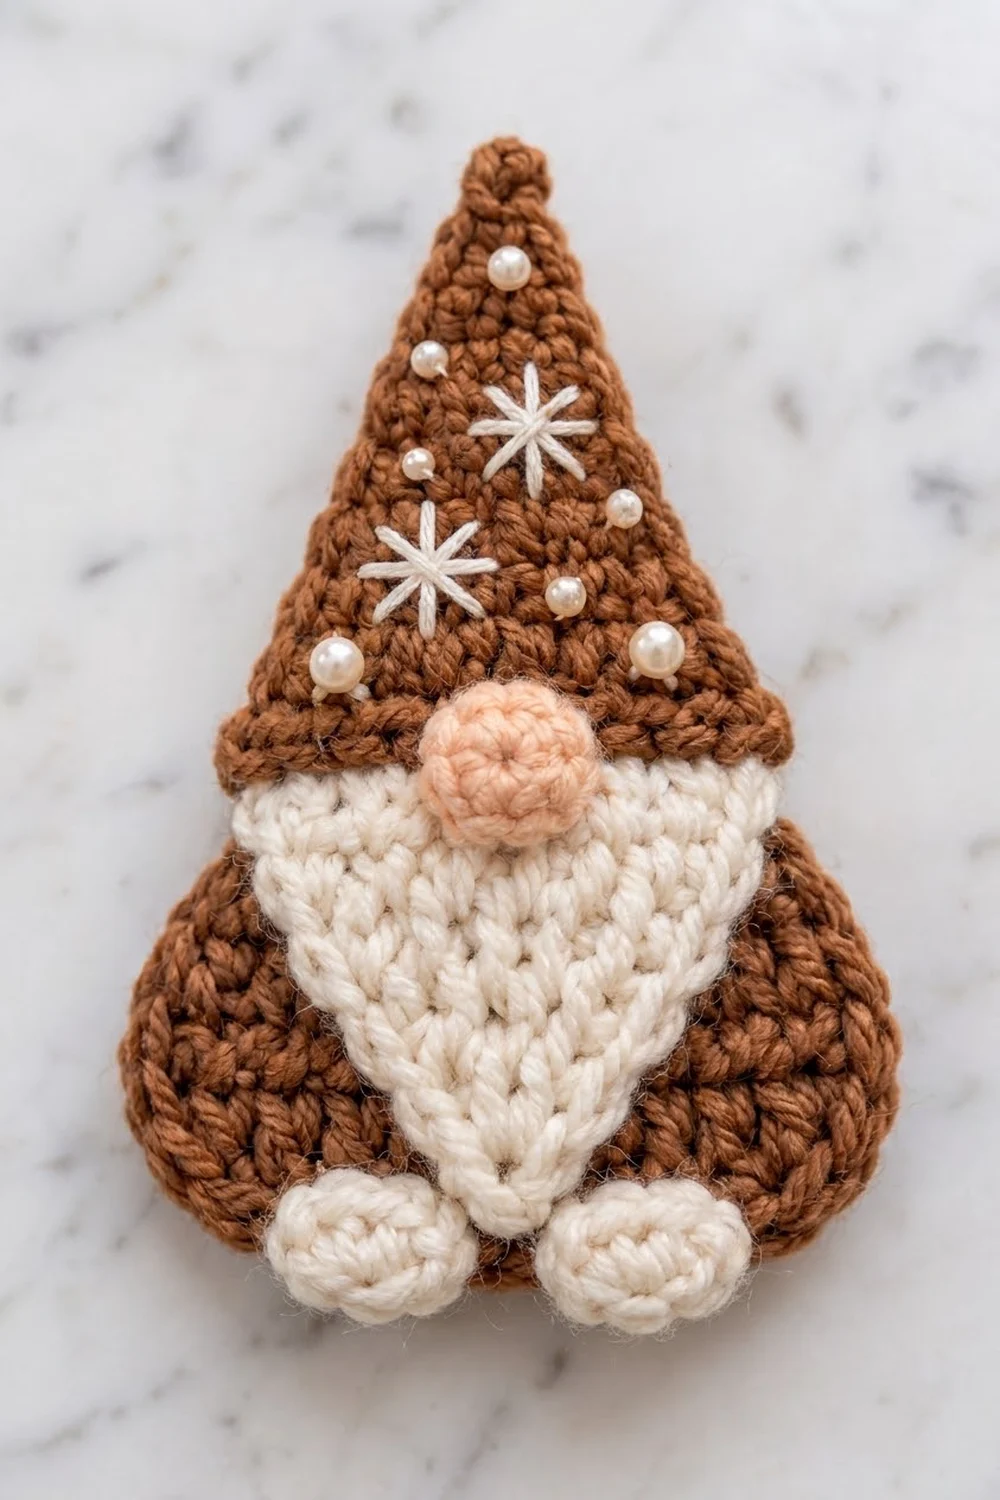
Gnome Body (Make 6, Cocoa Brown)
Increases on Rows 2–5 shape the rounded base. Decreases on every other row shape the pointed hat.
Row 1: Ch 9. Sc in the 2nd ch from the hook and in each ch across. (8 sc)
Row 2: Ch 1, turn. 2 sc in the first st, sc in the next 6 sts, 2 sc in the last st. (10 sc)
Row 3: Ch 1, turn. 2 sc in the first st, sc in the next 8 sts, 2 sc in the last st. (12 sc)
Row 4: Ch 1, turn. 2 sc in the first st, sc in the next 10 sts, 2 sc in the last st. (14 sc)
Row 5: Ch 1, turn. 2 sc in the first st, sc in the next 12 sts, 2 sc in the last st. (16 sc)
Rows 6–11: Ch 1, turn. Sc in each st across. (16 sc in each row)
Hat shaping: Each decrease row starts with ch 1, turn, and has one sc2tog at each end. Each plain row (Rows 13, 15, 17, 19, 21, 23 and 25) is ch 1, turn, sc in each st across, and keeps the count of the row before it.
Row 12: Sc2tog, sc in the next 12 sts, sc2tog. (14 sc)
Row 14: Sc2tog, sc in the next 10 sts, sc2tog. (12 sc)
Row 16: Sc2tog, sc in the next 8 sts, sc2tog. (10 sc)
Row 18: Sc2tog, sc in the next 6 sts, sc2tog. (8 sc)
Row 20: Sc2tog, sc in the next 4 sts, sc2tog. (6 sc)
Row 22: Sc2tog, sc in the next 2 sts, sc2tog. (4 sc)
Row 24: [Sc2tog] twice. (2 sc)
Row 26: Sc2tog. (1 sc) Do not fasten off.
Edging round with hanging loop: Do not turn. Ch 1. Work (sc, ch 8, sc) in the Row 26 tip stitch, which gives 2 sc plus the hanging loop. Work down the first side with 1 sc in the end of each row from Row 25 to Row 1 (25 sc). Along the foundation ch, work 2 sc in the first ch, sc in the next 6 ch, and 2 sc in the last ch (10 sc). Work up the second side with 1 sc in the end of each row from Row 1 to Row 25 (25 sc). Sl st to the first sc and fasten off.
Edging total: 2 + 25 + 10 + 25 = 62 sc, plus the ch-8 loop.
The body now measures about 4 x 5.5 in (10.2 x 14.0 cm). The loop stands about 0.9 in (2.3 cm) above the tip.
Beard (Make 6, Ivory Cream)
You work the beard from its top edge down to the point. It is 12 rows tall, so it covers exactly 12 body rows (Rows 2–13).
Row 1: Ch 13. Sc in the 2nd ch from the hook and in each ch across. (12 sc)
Every row from here on starts with ch 1, turn. The plain rows (2, 4, 6, 8 and 10) are sc across and keep the same count as the row before.
Row 3: Sc2tog, sc in the next 8 sts, sc2tog. (10 sc)
Row 5: Sc2tog, sc in the next 6 sts, sc2tog. (8 sc)
Row 7: Sc2tog, sc in the next 4 sts, sc2tog. (6 sc)
Row 9: Sc2tog, sc in the next 2 sts, sc2tog. (4 sc)
Row 11: [Sc2tog] twice. (2 sc)
Row 12: Sc2tog. (1 sc) Fasten off, leaving a 12 in (30.5 cm) tail for sewing.
The beard is 2.7 in (6.9 cm) across the top and 2.4 in (6.1 cm) tall.
Nose (Make 6, Blush Peach)
Rnd 1: 6 sc in a MR. Pull the ring closed. (6 sc)
Rnd 2: 2 sc in each st around. (12 sc)
Rnd 3: Sc in each st around. (12 sc) The edge will cup slightly. Sl st to the first sc and fasten off, leaving a 10 in (25.4 cm) tail.
The nose is about 0.8 in (2.0 cm) across.
Feet (Make 12, Ivory Cream)
Rnd 1: Ch 4. Sc in the 2nd ch from the hook, sc in the next ch, and 3 sc in the last ch. Turn the work and continue along the other side of the chain: sc in the next ch, then 2 sc in the last ch. (8 sc)
Rnd 2: 2 sc in the first st, sc in the next st, 2 sc in each of the next 3 sts, sc in the next st, and 2 sc in each of the last 2 sts. (14 sc) Sl st to the first sc and fasten off, leaving a 10 in (25.4 cm) tail.
Each foot is an oval about 1.1 x 0.8 in (2.8 x 2.0 cm).
Assembly and Embroidery
- Beard: Pin the beard point-down, with its top edge along body Row 13 and its point at Row 2. Leave an equal strip of brown showing on each side. Whipstitch all three edges.
- Nose: Center the nose over the top edge of the beard. Tuck a pinch of fiberfill under it and sew it down all the way around.
- Feet: Lay one foot horizontally on each side of the beard point, with 0.5 in (1.3 cm) hanging below the body. Sew down the part that overlaps the body.
- Snowflakes: Using white, embroider one snowflake about 0.5 in (1.3 cm) across and one about 0.3 in (0.8 cm) across. Each one is 4 straight stitches crossed at the center, making 8 arms.
- Pearls: Sew about 8 beads across the hat with doubled white thread, at least 0.25 in (0.6 cm) in from the edging.
Make All Pieces
- Cocoa brown: 6 bodies, each with a ch-8 loop
- Ivory cream: 6 beards and 12 feet
- Blush peach: 6 noses
- White and pearls: 12 snowflakes and 48 beads
Layout (single row, left to right):
ROW 1: TAIL – GNOME – GNOME – GNOME – GNOME – GNOME – GNOME – TAIL
All six gnomes are identical. Lay them side by side to check that they match in size before you join them.
Joining (Gnomes to Cord)
You join the gnomes while you chain the cord foundation. Each join counts as exactly 1 stitch.
Join stitch: Insert the hook front to back through a gnome’s ch-8 loop. Yarn over and pull through the loop on the hook. This is a sl st, and it counts as 1 st.
Foundation (cocoa brown):
- Ch 53, then join gnome 1. (54 sts = 12 in / 30.5 cm)
- [Ch 26, join the next gnome] 5 times. (27 sts per segment x 5 = 135 sts = 30 in / 76.2 cm)
- Ch 54. (54 sts = 12 in / 30.5 cm)
- Ch 1 more for turning. This chain does not count.
Total: 54 + 135 + 54 = 243 sts.
Turn every gnome to face forward before you make its join stitch. Chain at the same tension as your swatch. Tight chains make the gaps shrink, and the gnomes will crowd together.
Size checkpoint: Lay the chain flat without stretching it. The loops should be 6 in (15.2 cm) apart, each tail should be 12 in (30.5 cm), and the whole chain should measure 54 in (137.2 cm).
Border (Cord Finishing Row)
The border is one row of sc worked back along the full foundation. It thickens the cord and locks each gnome in place.
Border gauge: 18 sc = 4 in (10.2 cm), the same gauge as the bodies.
Border Row: Sc in the back bump of the 2nd ch from the hook and in the back bump of each ch across. At each join, sc into the top of the sl st and keep the gnome loop behind your work.
- Tail B: 54 sc
- Each of the 5 gnome segments: 27 sc (26 ch + 1 join)
- Tail A: 54 sc (53 ch + the gnome 1 join)
- Total: 54 + (5 x 27) + 54 = 243 sc
End loops: At the end of the row, ch 12, sl st into the last sc and fasten off. Join yarn at the first sc of the row, ch 12, sl st into that same sc and fasten off. Each loop hangs about 1.3 in (3.3 cm).
Why the math works: There is exactly 1 sc for every foundation stitch, so the cord stays at 243 sts. At 4.5 sc per inch, 27 sc = 6 in (15.2 cm) and 54 sc = 12 in (30.5 cm), so the cord is 12 + 30 + 12 = 54 in (137.2 cm). The joins add no extra stitches because each join sl st is already counted as 1 of the 27.
Final Blocking
- Weave in all remaining ends on the backs of the gnomes.
- Pin each gnome face down. Shape a smooth, curved base and a straight-sided hat point.
- Check that each body is 4 in (10.2 cm) wide and 5.5 in (14.0 cm) tall.
- Mist lightly. Do not soak the beads or the padded noses.
- Let everything dry completely, usually 4–6 hours.
- Lay the cord straight, mist it, pat it to an even 54 in (137.2 cm) and let it dry.
- Hang the garland and check how it drapes.
Final Quality-Control Checklist
- Every body has 62 edging sc and a ch-8 tip loop.
- Every beard runs straight along Row 13, with its point at Row 2.
- The noses are centered and padded evenly.
- The feet extend 0.5 in (1.3 cm) below each body and are even from side to side.
- The beads and snowflakes are secure.
- The gnomes are 6 in (15.2 cm) apart, center to center.
- The tails are 12 in (30.5 cm) each, and the cord is 54 in (137.2 cm).
- All the gnomes face forward.
Troubleshooting
The hat leans: You only decreased on one edge. Each decrease row needs one sc2tog at each end.
The base looks square: You missed increases on Rows 2–5, or you skipped the 2-sc corners in the edging.
The edging ruffles or pulls in: Work exactly 1 sc per row end, which gives 25 per side.
The beard is too wide: Your cream yarn is thicker than the brown. Use a 3.5 mm hook for the beard.
The gnomes twist: A gnome was joined facing the wrong way. Undo back to that join and redo it.
The cord is too short: Your chains are tighter than your sc. Go up half a hook size for the foundation chain only.
Care
Spot clean with cool water and mild soap, then lay flat to dry. Store the garland flat or loosely coiled so the hats keep their points.

Final Notes
Everything in this pattern comes from one gauge: 4.5 sc and 5 rows per inch. At that gauge, 16 sc make the body 3.5 in (8.9 cm) wide and 26 rows make it 5.2 in (13.2 cm) tall. The 62-sc edging brings it to 4 x 5.5 in (10.2 x 14.0 cm), and the feet add enough to reach 6 in (15.2 cm). The 12-row beard covers Rows 2–13. On the cord, 27 sts make each 6 in (15.2 cm) gap and 54 sts make each 12 in (30.5 cm) tail, for 243 sts = 54 in (137.2 cm) in total. Check each measurement as you go, and the garland will hang evenly.
Happy crocheting!