

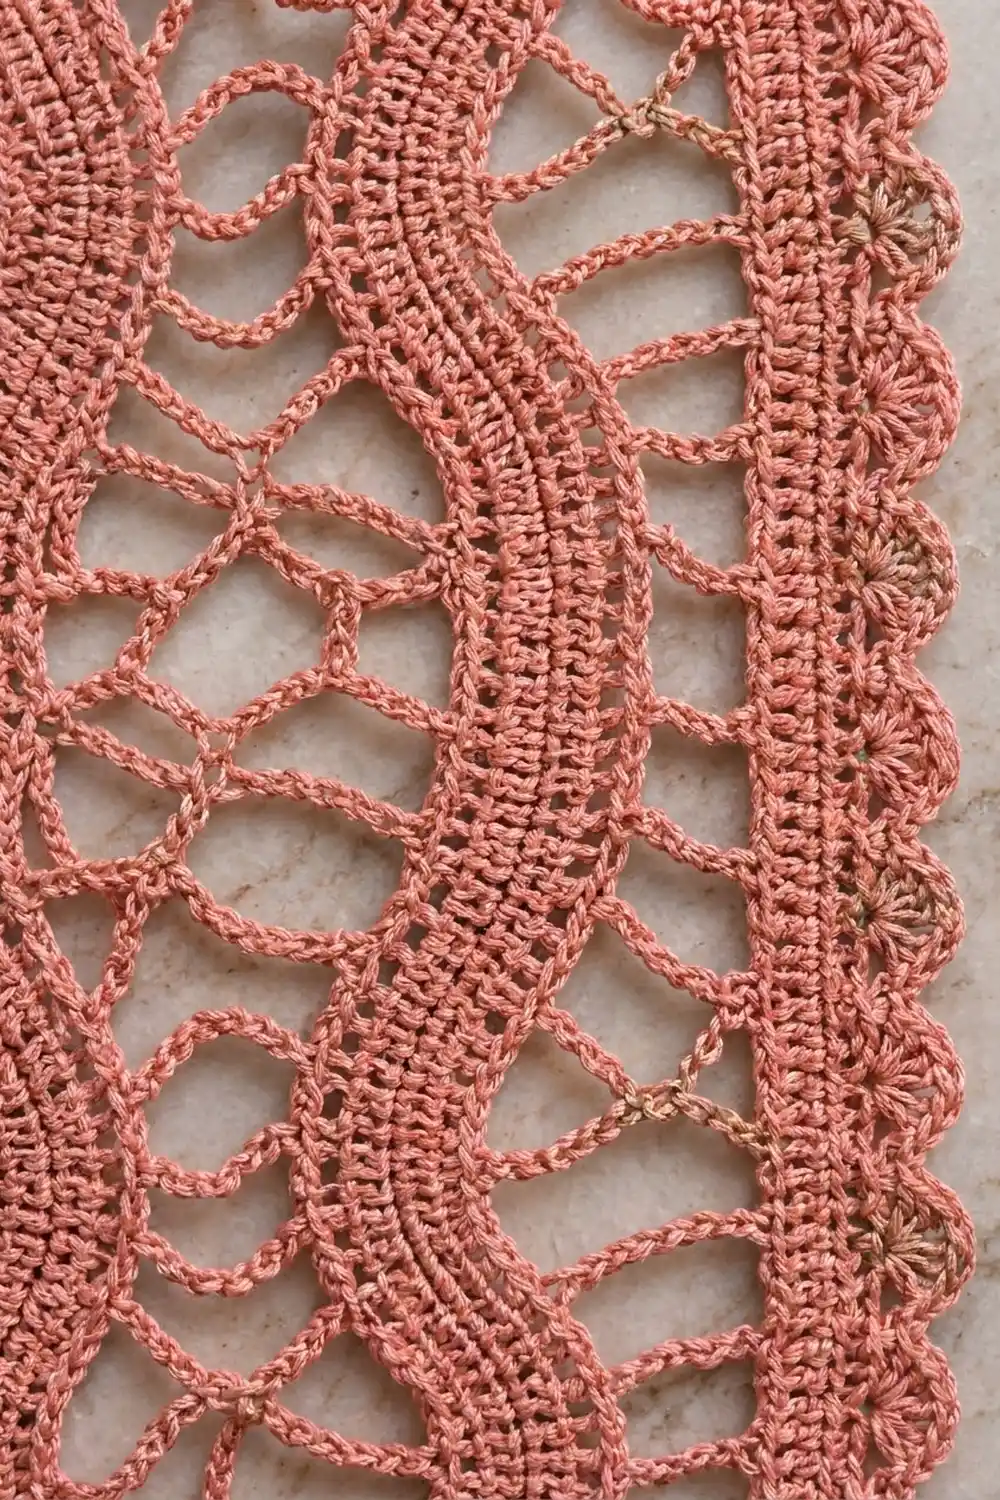
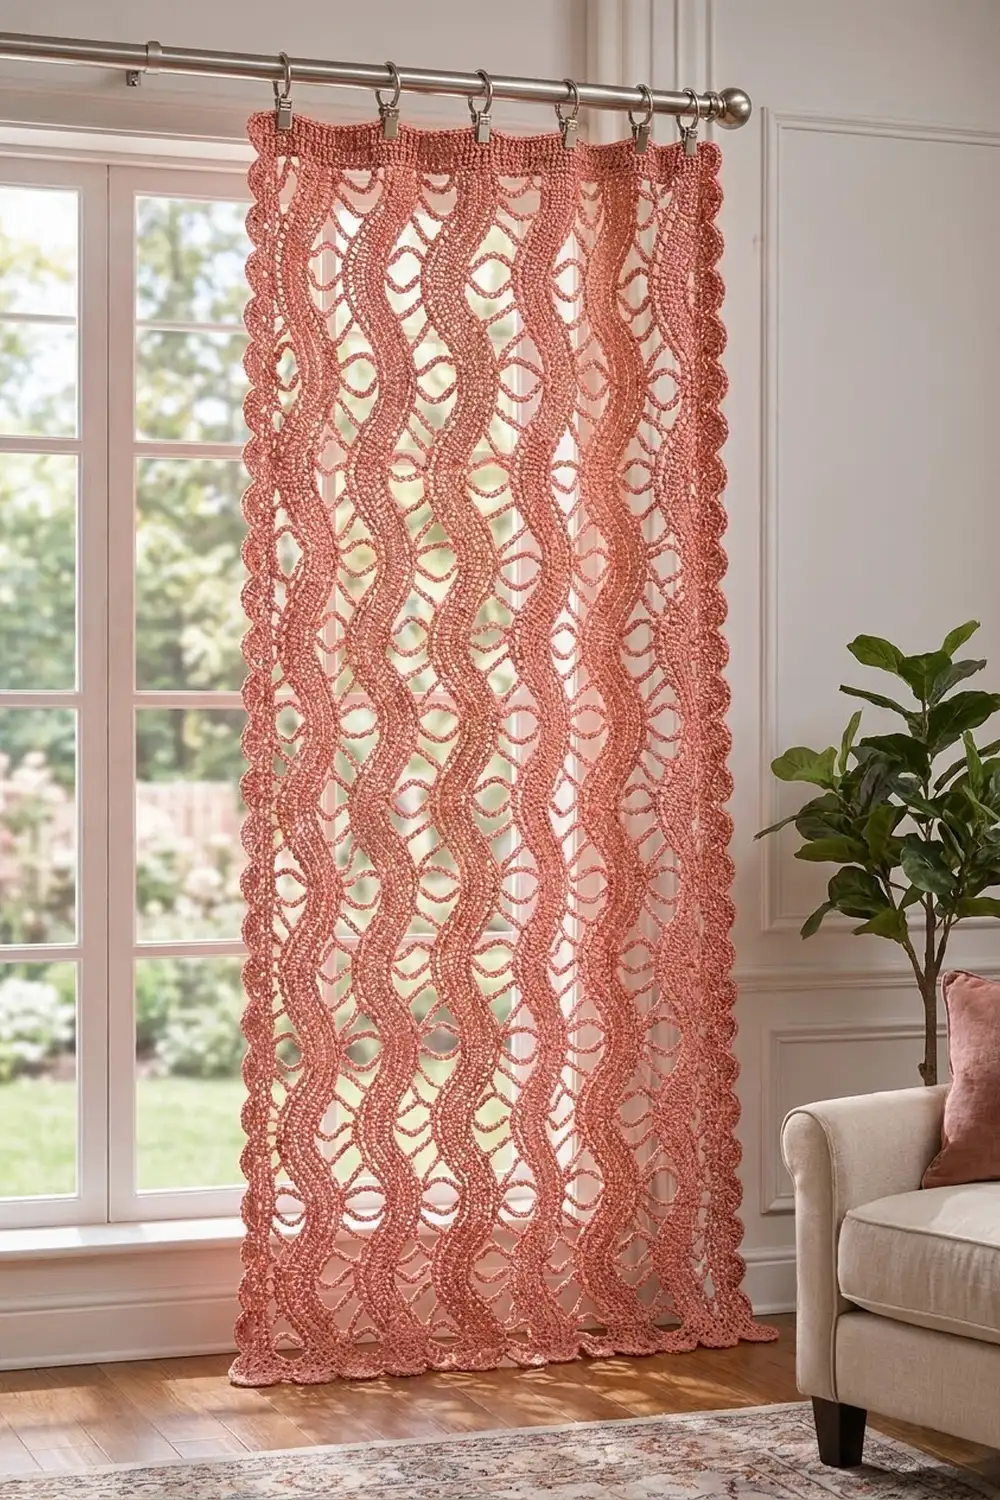
The Coral Ripple Lace Curtain Panel is made of soft, wavy columns of solid lace with an open chain lattice between them. Light comes through the oval gaps, and the curved tapes add gentle movement. A firm header across the top takes clip rings, and a small scalloped edge finishes the sides and bottom.
This pattern is worked in one warm coral-pink sport-weight cotton. It uses US crochet terms throughout.
The finished panel measures 30 1/2 in wide x 62 3/4 in long (77.5 x 159.4 cm) after blocking. You can lengthen it in steps of 12 in (30.5 cm), and the border math still works.
Here is how it is built. You make six identical tapes, each 2 in (5.1 cm) wide and 160 rows long. Short-row shaping with hdc makes each tape curve into an S-wave. Next, you join neighboring tapes with two passes of crossing chain bars. Then you add a 13-row single crochet header across the top, and finally a two-row scallop border down the sides and across the bottom.
Finished Size and Construction
- Finished size: 30 1/2 x 62 3/4 in (77.5 x 159.4 cm)
- Skill level: Intermediate
- Terminology: US
- Yarn weight: Sport (2), mercerized cotton
- Hook: 3.5 mm (E-4)
- Number of pieces: 6 tapes, joined into 1 panel
- Layout: 6 tapes side by side, with 5 lattice gaps between them
- Piece size: each tape is 2 in (5.1 cm) wide x 60 in (152.4 cm) tall, measured vertically along its wave
- Gap width: 3.4 in (8.6 cm)
- Size before border: 29 x 62 in (73.7 x 157.5 cm), including the header
- Border depth: 3/4 in (1.9 cm)
Materials
Yarn: Use a smooth, mercerized sport-weight cotton or cotton blend, about 155 m per 50 g. Cotton gives crisp curves and holds its shape when hung. Avoid fuzzy or very stretchy yarns, because the lattice will sag.
- Coral pink: 450 g (about 1,395 m / 1,526 yd), which is 9 balls of 50 g
This quantity includes a margin of roughly 15% for your gauge swatch and tension differences.
Tools:
– 3.5 mm (E-4) crochet hook
– Tapestry needle
– 10 locking stitch markers
– Scissors
– Tape measure
– Blocking mats, rust-proof pins, and a spray bottle
– 8 curtain clip rings for hanging
Abbreviations (US Terms)
- ch – chain
- sl st – slip stitch
- sc – single crochet
- hdc – half double crochet
- dc – double crochet
- sk – skip
- sp – space
- st(s) – stitch(es)
- RS – right side
Special stitch – Shell: work 7 dc in the same stitch.
Corner shell: work 9 dc in the same corner space.
Edge loop: the ch-5 made at the start of each tape row. It does not count as a stitch. It stays as a small arch at the tape edge.
Gauge and Checkpoints
- Dc fabric: 20 dc and 10 rows = 4 in (10.2 cm)
- Sc fabric: 20 sc and 26 rows = 4 in (10.2 cm)
- Chain: 5 ch = 1 in (2.5 cm), relaxed
Test one piece first. Make Rows 1–32 of Tape 1 (one full wave) and block it lightly. If it matches the checkpoints below, keep it and carry on with the tape.
Checkpoint 1: The tape is 2 in (5.1 cm) wide, which is 10 sts.
Checkpoint 2: One 32-row repeat makes a full S-curve. Laid flat, it spans about 12 in (30.5 cm) vertically, and the wave swings about 1 1/4 in (3.2 cm) to each side.
Checkpoint 3: The top and bottom of each repeat run straight up, not tilted.
Checkpoint 4: Six joined tapes measure 29 in (73.7 cm) across.
If your tape is too wide or the repeat is too long, go down a half size or full size in hook. If it is too narrow or too short, go up a size. If only the curve is wrong (too sharp or too flat), check that you are working exactly 3 hdc at the inner edge, not 2 or 4.
The Tape (Make 6)
The tape has two edges. Edge A is where the first loop sits; Edge B is the opposite edge.
Odd rows begin at Edge A and end at Edge B. Even rows begin at Edge B and end at Edge A. Each tape has 80 loops on each edge.
Curve shaping: Edge B is the inner edge of a Right Curve, and Edge A is the inner edge of a Left Curve. The 3 sts nearest the inner edge are hdc and the other 7 are dc, so the inner edge grows more slowly and the tape bends.
Row 1 (foundation, Right Curve): Ch 15. Dc in 6th ch from hook and in each of next 6 ch, hdc in last 3 ch. (10 sts) The 5 skipped ch form the first Edge A loop.
Right Curve rows:
– Odd row: Ch 5, turn, dc in each of first 7 sts, hdc in last 3 sts. (10 sts)
– Even row: Ch 5, turn, hdc in each of first 3 sts, dc in last 7 sts. (10 sts)
Left Curve rows:
– Odd row: Ch 5, turn, hdc in each of first 3 sts, dc in last 7 sts. (10 sts)
– Even row: Ch 5, turn, dc in each of first 7 sts, hdc in last 3 sts. (10 sts)
Turning chains are never worked into. Always work into the first real stitch.
Wave repeat (32 rows):
– Rows 1–8: Right Curve. The tape turns gently to the right.
– Rows 9–24: Left Curve. The tape swings through center to the left.
– Rows 25–32: Right Curve. The tape comes back to vertical.
The repeat is symmetrical, so each repeat starts and ends running straight up with no sideways drift. Rows 25–32 and the next repeat’s Rows 1–8 blend into one smooth 16-row Right Curve.
Work the 32-row repeat 5 times in total, for 160 rows. Each row has 10 sts. At the end, Edge A and Edge B each have 80 loops.
Checkpoint: About 60 in (152.4 cm) vertically, laid in its wave. Fasten off and weave in the ends.
Make All Pieces
Make 6 tapes in coral pink. Use about 50 g (155 m) for each tape, or 300 g in total.
Place a locking marker in loop 1 of each edge on every tape. Lay the tapes RS up with every Row 1 at the bottom so that all the waves curve in step.
Layout (one row of tapes, bottom edge down):
| T1 | gap | T2 | gap | T3 | gap | T4 | gap | T5 | gap | T6 |
  2"   3.4"  2"   3.4"  2"   3.4"  2"   3.4"  2"   3.4"  2"
Edge A of T1 and Edge B of T6 become the outer side edges of the panel.
Joining
Each gap is filled with two passes of chain bars that cross each other. In every pair, the left tape’s Edge B faces the right tape’s Edge A.
Number the loops 1–80 from the bottom up. B loops sit on even rows and A loops sit on odd rows, so neighboring loops are staggered by one row. That stagger is what makes the bars cross neatly.
Pass 1: Join yarn with sc in B loop 1 of the left tape. Ch 18, sc in the next even-numbered A loop of the right tape (A2, then A4…). Ch 18, sc in the next odd-numbered B loop of the left tape (B3, then B5…). Repeat from * up the gap and end with sc in A80. (80 sc, 79 bars) Fasten off.
Pass 2: Join yarn with sc in A loop 1 of the right tape. Ch 9, sl st around the middle of the Pass 1 bar you are crossing, ch 9, sc in the next even-numbered B loop of the left tape (B2, then B4…). Ch 9, sl st around the crossing Pass 1 bar, ch 9, sc in the next odd-numbered A loop of the right tape (A3, then A5…). Repeat from * and end with sc in B80. (80 sc, 79 bars) Fasten off.
The sl st tie in the middle of each crossing pulls the X shapes into the rounded diamond and oval openings.
Tension advice: Each bar of 18 ch is about 3.6 in (9.1 cm) long. The diagonal it crosses is slightly shorter, so the bar sags just enough to round out the openings. If your bars look tight, add 1 ch per bar. If they droop, take 1 away. Keep all five gaps the same.
Size checkpoint: After joining, lay the panel flat. It should measure 29 in (73.7 cm) wide, with each gap 3.4 in (8.6 cm). Use about 40 g for all joining.
Header
With RS facing, work across the top (Row 160) of all six tapes.
Row 1: Join yarn in the first st of T1. Sc in each of the 10 sts of the tape, ch 17 across the gap. Repeat from * 4 more times, then sc in each of the 10 sts of T6. (145 sts: 60 sc + 85 ch)
Row 2 (conversion row): Ch 1, turn. Sc in each sc and each ch. (145 sc = 60 worked into sc + 85 worked into ch, 0 extra)
Rows 3–13: Ch 1, turn, sc in each st. (145 sc)
Each 17-ch bridge equals 17 sts × 1/5 in = 3.4 in, which exactly matches the gap width. That gives 145 sts ÷ 5 = 29 in (73.7 cm). Thirteen sc rows give 2 in (5.1 cm).
Checkpoint: 29 x 62 in (73.7 x 157.5 cm) overall. Fasten off. You will use about 25 g.
Border
Border gauge: Work 3 sc in each edge loop. The loops sit every 2 rows, or 0.8 in (2.0 cm) along the tape edge. Work 1 sc in each header row-end.
Row 1: With RS facing, join yarn at the top-left corner of the header.
- Left side: Sc in each of 13 header row-ends, then 3 sc in each of 80 Edge A loops of T1. (13 + 240 = 253 sc)
- Ch 2 for the corner sp.
- Bottom: Sc in the base of each of 10 foundation ch of the tape, ch 17 across the gap. Repeat across and end with 10 sc on T6. (60 sc + 85 ch = 145 sts)
- Ch 2 for the corner sp.
- Right side: 3 sc in each of 80 Edge B loops of T6, then sc in each of 13 header row-ends. (253 sc)
Total: 651 sts plus 2 corner sp. The corner ch-2 sps are not counted in any side.
Row 2: Ch 1, turn.
- Right side: Sc in first sc, sk 2, Shell in next st, sk 2, sc in next st. Repeat from * 41 more times. (42 shells)
- Corner shell in the ch-2 sp.
- Bottom: Sc in first st, then repeat * to * 24 times. (24 shells)
- Corner shell in the ch-2 sp.
- Left side: Sc in first st, then repeat * to * 42 times. (42 shells)
Fasten off. You will use about 30 g.
Why the math works: Each shell repeat uses 6 sts, and each side needs 1 extra sc to finish, so a side must have a multiple of 6, plus 1.
- Sides: 253 = 6 × 42 + 1.
- Bottom: 145 = 6 × 24 + 1.
Each extra 32-row wave repeat adds 16 loops per edge, which is 48 sc, which is exactly 8 more shells. So lengthening the panel never breaks the border count.
Final Blocking
- Weave in all ends securely, following the stitch direction. Cotton ends can work loose, so split the plies as you weave.
- Soak the panel in cool water for 15 minutes. Press out the water; do not wring.
- Roll it in towels to remove more water.
- Lay it flat on mats and pin the header to a straight line 29 in (73.7 cm) wide.
- Pin each tape into its wave. Use a long straightedge to check that all six crests line up across the panel.
- Pin each lattice opening open. Keep every gap at 3.4 in (8.6 cm).
- Pin the bottom edge straight and open each shell into a round scallop.
- Check the size: 30 1/2 x 62 3/4 in (77.5 x 159.4 cm). Let it dry completely before unpinning.
Final Quality-Control Checklist
- All 6 tapes have 160 rows of 10 sts, with 80 loops per edge.
- All waves curve in step, with no tape mirrored.
- Every gap has 79 bars per pass, and every crossing is tied with a sl st.
- The header has 145 sts in every row.
- The border has 42 shells on each side, 24 across the bottom, and 2 corner shells.
- The panel measures 30 1/2 x 62 3/4 in (77.5 x 159.4 cm).
- All ends are woven in, and none show on the RS.
Troubleshooting
The tape drifts sideways instead of waving. You skipped the 8-row Right Curves at the start or end of a repeat. Frog back to the last vertical point and recount.
One tape waves against the others. Its hdc fell on the wrong edge. Check that Edge A starts every odd row.
The gaps are wider at the top. Your bar tension changed. Redo the loose section, counting the chains.
The header ripples. You worked extra chains across the gaps. Check that each bridge is 17 ch.
The border flares. You worked 4 sc into some loops. Each loop gets 3 sc.
The scallops don’t come out even at a corner. Your side count is off. Recount Row 1 to 253 sts.
Care
Hand wash cool, or machine wash in a mesh bag on a gentle cycle. Lay it flat to dry and re-pin the waves, then hang it while slightly damp so it relaxes straight.
Final Notes
The measurement chain:
– Tape gauge: 10 sts = 2 in (5.1 cm), and 32 rows = 12 in (30.5 cm) vertically.
– Joined: 6 tapes plus 5 gaps of 3.4 in (8.6 cm) = 29 in (73.7 cm) wide.
– Header: 145 sts and 2 in (5.1 cm) deep, bringing the length to 62 in (157.5 cm).
– Border: adds 3/4 in (1.9 cm) to the sides and bottom.
– Finished: 30 1/2 x 62 3/4 in (77.5 x 159.4 cm).
If you check gauge at the first wave, every later count will fall into place. Hang the panel from 8 clip rings: one at each top corner and six evenly spaced between them.
Happy crocheting!