

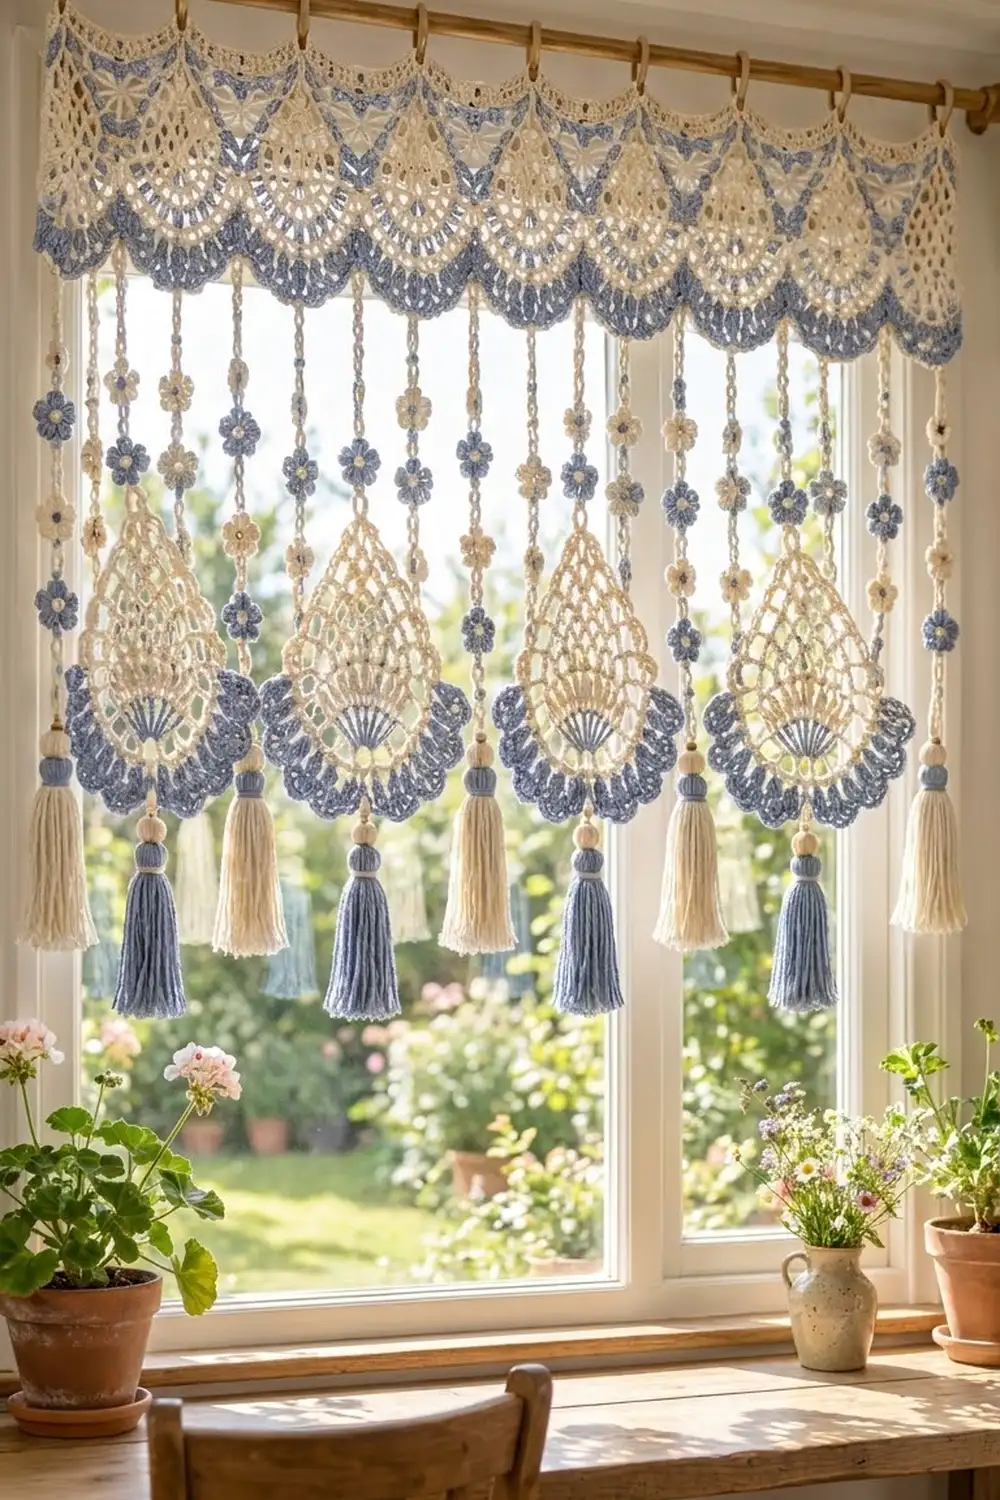
The Cornflower Lace Window Valance is a light, airy curtain topper that lets the sun through. A band of lacy half-circle arches runs along the rod. Below it hang chain strands threaded with tiny flowers, pointed teardrop motifs and soft tassels.
The palette is cream with dusty cornflower blue, plus pale gold flower centers and natural wood beads. Every arch and teardrop has a thick blue scalloped edge, so the blue frames the cream lace in a calm, cottage-style way.
This pattern uses US crochet terms. The finished band is 40 in (101.6 cm) wide and 3.25 in (8.3 cm) deep. The overall drop, including tassels, is about 25 in (63.5 cm).
You will make eight arches in rows, add a 22-stitch top edge to each one, and join them side by side. A three-row border runs across the top and includes hanging loops. Last, you make 15 strands with 85 flowers, 4 teardrops and 15 tassels and sew them on.
Finished Size and Construction
- Finished size: 40 in (101.6 cm) wide band; about 25 in (63.5 cm) total drop
- Skill level: Intermediate
- Terminology: US
- Yarn weight: DK (3) cotton
- Hook: 3.5 mm (E-4)
- Number of pieces: 8 arches, 4 teardrops, 85 flowers, 15 cords, 15 tassels
- Layout: 8 arches in one row; 15 strands below
- Arch size: 5 in (12.7 cm) wide x 2.5 in (6.4 cm) deep
- Teardrop size: 5 in (12.7 cm) wide x 6 in (15.2 cm) tall
- Band width before border: 40 in (101.6 cm)
- Border depth: 0.75 in (1.9 cm)
Materials
Choose a smooth mercerized or combed DK cotton. It shows the lace clearly, holds its shape after blocking and doesn’t stretch out of shape as it hangs. The amounts below are for a cotton of about 115 m per 50 g.
- Cream: 180 g (414 m)
- Dusty Blue: 120 g (276 m)
- Pale Gold: 10 g (23 m), for flower centers
These amounts include a margin of about 15 percent.
Tools
- 3.5 mm (E-4) crochet hook
- Tapestry needle
- 15 wooden beads, 16 mm (5/8 in, 1.6 cm), with holes at least 4 mm wide
- 3 in (7.6 cm) piece of cardboard for tassels
- 9 curtain rings, 1 in (2.5 cm) (optional)
- Rust-proof pins, blocking mat, spray bottle
- Stitch markers, tape measure, scissors
Abbreviations (US Terms)
- ch – chain
- sl st – slip stitch
- sc – single crochet
- hdc – half double crochet
- dc – double crochet
- sk – skip
- sp(s) – space(s)
- st(s) – stitch(es)
- RS – right side
Special stitches
- Picot: (sc, ch 3, sc) in the same stitch.
- Hanging loop: sc in the stitch, ch 12, sl st in the sc you just made. It counts as one sc.
- Scallop: 4 dc in next loop, dc in next sc, 4 dc in next loop, for 9 dc.
Gauge and Checkpoints
Gauge: 22 sc = 5 in (12.7 cm) on the top edge of one arch.
Make one complete arch before starting the rest. It is your gauge swatch.
Checkpoints for the arch:
- After Row 3: 2.5 in (6.4 cm) across the straight edge
- After Row 5: 3.75 in (9.5 cm) across
- Finished arch with top edge: 5 in (12.7 cm) wide x 2.5 in (6.4 cm) deep
Checkpoint for the teardrop: after Rnd 4, 4 in (10.2 cm) wide.
If your arch is larger than 5 in (12.7 cm), go down to a 3.25 mm hook. If it is smaller, go up to a 3.75 mm hook. Do not change the stitch counts. The border math depends on exactly 22 sc per arch.
Arch (Make 8)
The arch is worked in turned rows from the center of its straight top edge outward. The straight edge ends up at the top.
Row 1 (Cream): Make a magic ring, ch 3 (counts as dc), 7 dc in ring. Pull the ring closed. Turn. (8 dc)
Row 2: Ch 3 (counts as dc), dc in first st, 2 dc in each of next 6 sts, dc in top of ch-3. Turn. (15 dc)
Row 3: Ch 4 (counts as dc + ch 1), dc in next dc, ch 1, dc in next dc; repeat from * 12 more times. Turn. (15 dc, 14 ch-1 sps)*
Row 4: Ch 1, sc in first dc, ch 5, sk next dc, sc in next dc; repeat from * 6 more times, working the last sc in the 3rd ch of the ch-4. Turn. (8 sc, 7 ch-5 loops)*
Row 5: Ch 1, sc in first sc, ch 5, sc in next ch-5 loop, ch 5, sc in next sc; repeat from * 6 more times. Change to Blue in the last sc. Turn. (15 sc, 14 ch-5 loops)*
Row 6 (Blue): Ch 1, sc in first sc, scallop over the next 2 loops and the sc between them, sc in next sc; repeat from * 6 more times. Turn. (7 scallops; 7 x 9 dc + 8 sc = 71 sts)*
Each scallop sits centered on one of the sc that Row 5 placed between loops, so the 7 scallops are evenly spaced.
Row 7: Ch 1, sl st in first sc, sc in next 4 dc, picot in next dc, sc in next 4 dc, sl st in next sc; repeat from * 6 more times. Fasten off. (7 x 10 sc + 8 sl st = 78 sts, plus 7 picots)*
Top edge (Cream): With RS facing, join Cream at the right end of the straight edge. Ch 1, then work across the straight edge:
- 1 sc in the ends of Rows 7, 6, 5 and 4 (4 sc)
- 2 sc in the ends of Rows 3, 2 and 1 (6 sc)
- 2 sc over the magic ring (2 sc)
- 2 sc in the ends of Rows 1, 2 and 3 (6 sc)
- 1 sc in the ends of Rows 4, 5, 6 and 7 (4 sc)
Total: 4 + 6 + 2 + 6 + 4 = 22 sc. Fasten off. On arches A1–A7, leave a 12 in (30.5 cm) tail for joining.
Make All Pieces
| Piece | Qty | Colors |
|---|---|---|
| Arch | 8 | Cream body, Blue Rows 6–7 |
| Teardrop | 4 | Blue fan, Cream mesh, Blue edging |
| Blue flower | 44 | Cream center, Blue petals |
| Cream flower | 41 | Gold center, Cream petals |
| Cord | 15 | Cream |
| Cream tassel | 8 | Cream, Blue neck |
| Blue tassel | 7 | Blue, Cream neck |
Layout grid (A = arch, S = seam; strands hang below):
Top border with 9 hanging loops
A1 S1 A2 S2 A3 S3 A4 S4 A5 S5 A6 S6 A7 S7 A8
 c  T  c  b  c  T  c  b  c  T  c  b  c  T  c

c = arch-center strand: 16 in cord, 6 flowers, cream tassel
b = plain seam strand: 20 in cord, 7 flowers, blue tassel
T = teardrop strand: 12 in cord, 4 flowers, teardrop, blue tassel
Joining
Lay the arches in a row, RS up, with the top edges along a straight line.
Thread the 12 in (30.5 cm) tail of the left arch. Whipstitch the last top-edge sc of the left arch to the first top-edge sc of the right arch. Continue down through the row ends of Rows 7 and 6 on both arches, about 0.6 in (1.5 cm). The curves separate below that point and form the V between arches.
This is a stitch-to-stitch join, sc end to sc end. It does not add any stitches, so each arch keeps its own 22 sc.
Keep your tension snug enough to close the gap but not so tight that the top edge puckers. Join all 7 seams.
Size checkpoint: The top edge should measure 40 in (101.6 cm), within 0.5 in (1.3 cm).
Border
The border is worked across the top edge only, in turned rows.
Border gauge: 22 sts = 5 in (12.7 cm), the same as the arch top edge.
Row 1 (Cream): With RS facing, join Cream in the first top-edge sc of A1. Ch 1, sc in each sc across all arches. Change to Blue in the last st. Turn. (8 x 22 = 176 sc)
Row 2 (Blue): Ch 2 (does not count), hdc in each st across. Change to Cream in the last st. Turn. (176 hdc)
Row 3 (Cream): Ch 1, hanging loop in the first st, sc in the next 20 sts, hanging loop in the next st. Sc in the next 21 sts, hanging loop in the next st; repeat from * 6 more times. Fasten off. (22 + 7 x 22 = 176 sts, including 9 hanging loops)*
Why the math works: Each arch gives exactly 22 sc, and the joins add none. So Row 1 is 8 x 22 = 176. Rows 2 and 3 work one stitch into each stitch, so the count stays at 176. The loops land on sts 1, 22, 44, 66, 88, 110, 132, 154 and 176, which places one at each end and one at each of the 7 seams. Because 176 sts at 22 sts per 5 in (12.7 cm) measure exactly 40 in (101.6 cm), the border matches the joined band and won’t ruffle or draw in.
Slide the loops onto the rod, or attach a ring to each one.
Flowers (Make 85)
Rnd 1 (center color): Make a magic ring, ch 1, 5 sc in ring, sl st to the first sc. Fasten off. (5 sc)
Rnd 2 (petal color): Join in any sc. (Sl st, ch 2, 2 dc, ch 2, sl st) in the same sc, move to the next sc; repeat from * 4 more times. Fasten off, leaving a 6 in (15.2 cm) tail. (5 petals)*
Make 44 Blue flowers with Cream centers and 41 Cream flowers with Gold centers. Each flower is about 0.9 in (2.3 cm) across.
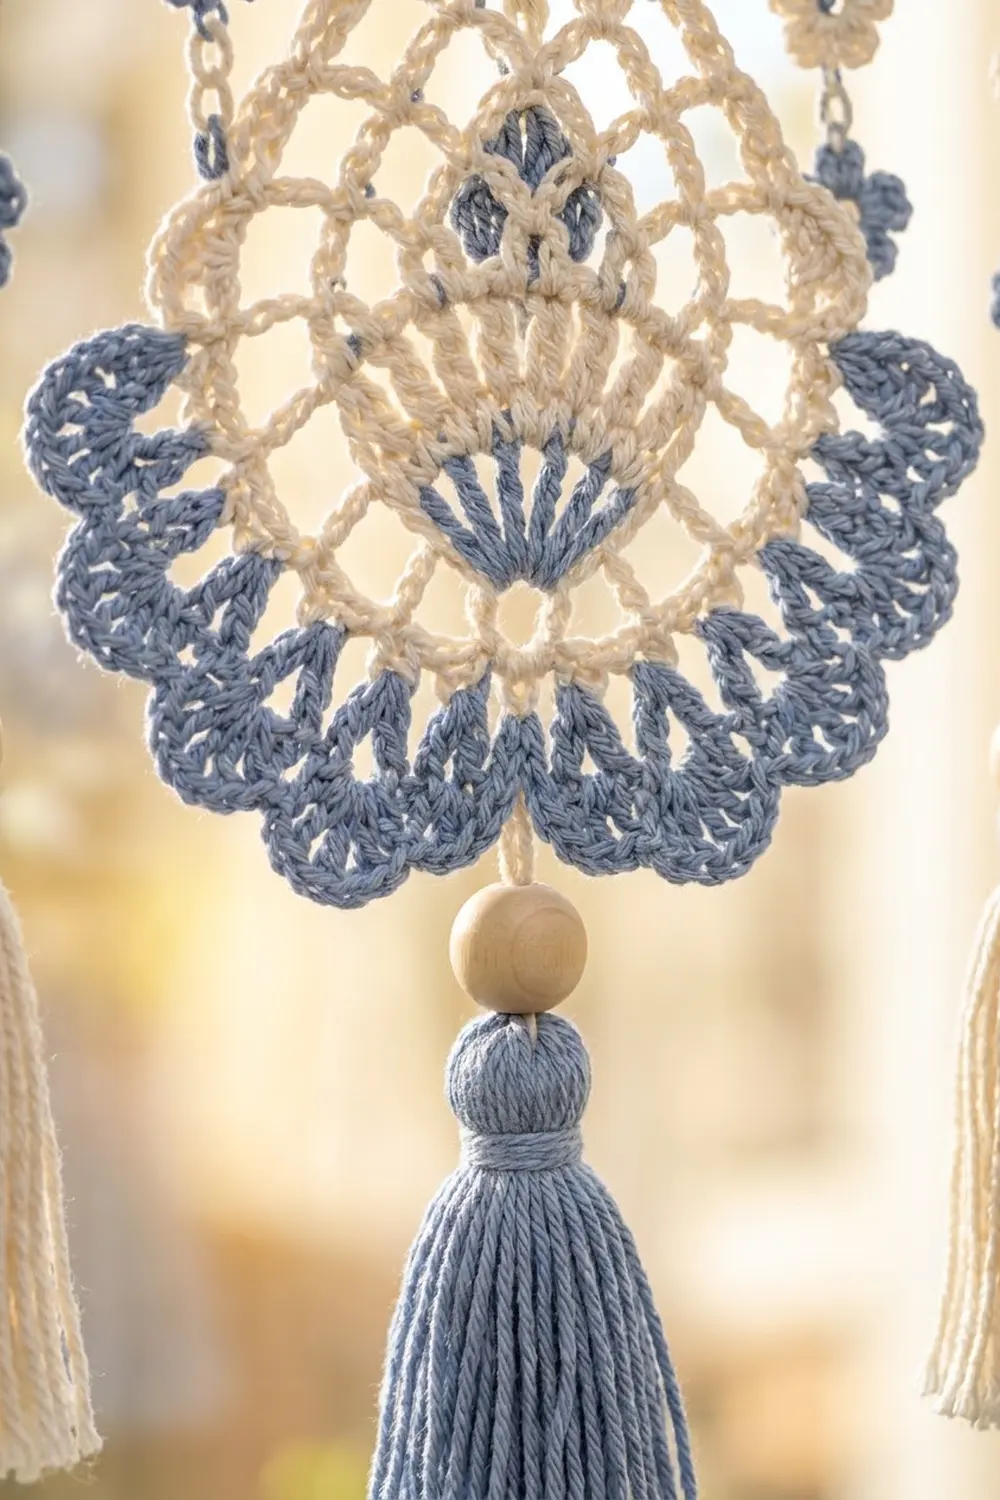
Teardrop (Make 4)
Fan Row 1 (Blue): Make a magic ring, ch 3 (counts as dc), 8 dc in ring. Turn. (9 dc)
Fan Row 2: Ch 3 (counts as dc), dc in first st, 2 dc in each of next 7 sts, dc in top of ch-3. Fasten off. (17 dc)
Hold the fan with its curve facing down.
Rnd 1 (Cream): With RS facing, join in the first dc of Row 2. Ch 1, sc in same dc, ch 2, sc in next dc; repeat from * 15 more times. Ch 5, sc over the ring at the center of the straight edge, ch 5, sl st to the first sc. (18 sc, 16 ch-2 sps, 2 ch-5 loops)*
Rnd 2: Sl st in the first ch-2 sp, ch 1, sc in same sp, ch 4, sc in next ch-2 sp; repeat from * 14 more times. Ch 4, sc in next ch-5 loop, ch 4, (sc, ch 5, sc) in the top sc, ch 4, sc in next ch-5 loop, ch 4, sl st to first sc. (20 sc, 19 ch-4 loops, 1 ch-5 point)*
Rnd 3: Sl st to the first ch-4 loop, ch 1, sc in same loop. Ch 5, sc in next loop; repeat from * around, working (sc, ch 5, sc) in the point. End with ch 5, sl st to first sc. (21 sc, 20 ch-5 loops, 1 point)*
Rnd 4: Work as Rnd 3, using ch 6 instead of ch 5. Fasten off. (22 sc, 21 ch-6 loops, 1 point)
The point gains 1 sc every round, which is what pulls the top into the teardrop shape.
Edging Row 1 (Blue): Count the 21 ordinary loops starting next to the point. Join Blue with sc in loop 4. 9 dc in next loop, sc in next loop; repeat from * 6 more times, ending in loop 18. Turn. (7 shells; 63 dc + 8 sc = 71 sts)*
This leaves 3 cream loops plus the point free on each side.
Edging Row 2: Ch 1, sl st in first sc, sc in next 4 dc, picot in next dc, sc in next 4 dc, sl st in next sc; repeat from * 6 more times. Fasten off. (78 sts, plus 7 picots)*
Cords and Tassels
Cord: Leaving a 10 in (25.4 cm) tail, ch until the chain measures the length you need, slightly stretched. Then sl st in the back bump of each ch back to the start. Leave a 10 in (25.4 cm) tail. Make 8 cords at 16 in (40.6 cm), 3 at 20 in (50.8 cm) and 4 at 12 in (30.5 cm).
Tassel: Wrap the yarn 30 times around the 3 in (7.6 cm) card. Tie the top with a 10 in (25.4 cm) strand and cut the bottom loops. Wrap the neck 8 times in the contrast color, 0.4 in (1.0 cm) below the top. Trim the tassel to 3 in (7.6 cm).
Assembly:
- Sew the “c” cords to the center picot (scallop 4) of each arch.
- Sew the “b” and “T” cords to the bottom of each joined seam, catching both arches.
- Starting 2.5 in (6.4 cm) below the attachment point, sew on the flowers every 2.5 in (6.4 cm), alternating Blue and Cream and starting with Blue.
- Thread a bead onto the lower tail of each cord, then tie on a tassel.
- On the “T” strands, sew the cord tail through the teardrop point. Attach the bead and tassel to the center picot of the teardrop’s 4th shell.
Final Blocking
- Spray each arch and teardrop until damp, but not soaked.
- Pin each arch into a true half-circle, 5 in (12.7 cm) by 2.5 in (6.4 cm), with a pin in every picot.
- Pin each teardrop to 5 in (12.7 cm) by 6 in (15.2 cm), and pin the point sharply.
- Pin the border straight at 40 in (101.6 cm).
- Let everything dry completely.
- Steam the tassels lightly and trim them even.
Final Quality-Control Checklist
- [ ] 8 arches, each with 22 top-edge sc and 7 scallops
- [ ] Border rows have 176 sts each, with 9 loops
- [ ] Band measures 40 in (101.6 cm)
- [ ] 15 strands with 85 flowers in total
- [ ] 4 teardrops on seams S1, S3, S5 and S7
- [ ] 15 beads and tassels are tied on securely
- [ ] All ends are woven in
Troubleshooting
- Arch cups: The ch-5 loops are too short for your tension. Use ch 6 in Row 5.
- Arch ruffles: Your chains are loose. Work them on a smaller hook.
- Border ruffles: Recount Row 1. It should have exactly 176 sts.
- Teardrop point is rounded: Pin it while damp, and check that the point got (sc, ch, sc) on every round.
- Strands twist: Wet-block the cords hanging, with a tassel weighting each one.
Care
Hand wash in cool water with mild soap. Roll in a towel to remove the water, then dry flat and reshape. Do not wring it.
Final Notes
Everything starts with the gauge: 22 sc = 5 in (12.7 cm). That gives a 5 in (12.7 cm) arch, eight arches give a 40 in (101.6 cm) band, and a 176-stitch border fits that band exactly. Below it, 2.5 in (6.4 cm) strand spacing and 2.5 in (6.4 cm) flower spacing keep everything evenly spaced, for a total drop of about 25 in (63.5 cm).
Happy crocheting!