

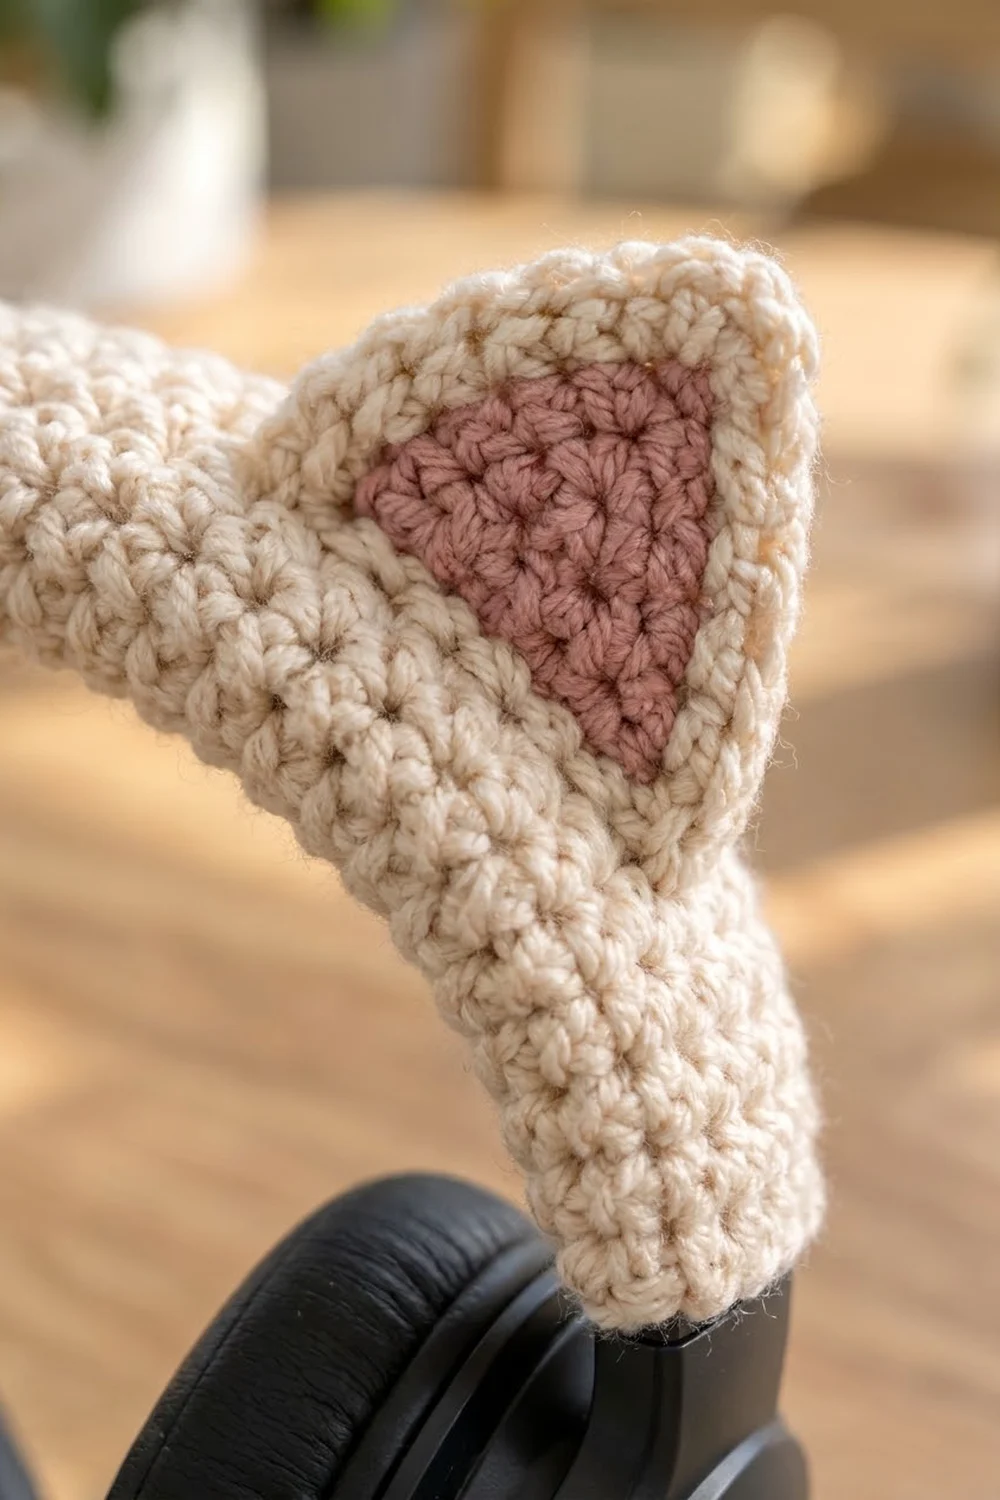
This cover turns plain over-ear headphones into a soft cat-ear headset. A cream band sleeve wraps the headband, and two pointed ears with dusty-rose centers stand up from the top. It’s a quick weekend project that looks tidy and stays comfortable to wear.
The colors are warm cream and dusty rose. Firm single crochet gives the sleeve a dense, slightly nubby texture that cushions the band without looking bulky. The ears have crisp points and a clean cream edge around the pink.
This pattern uses US crochet terms. The finished band sleeve is 3 in (7.6 cm) wide when flat and 14 in (35.6 cm) long. Each ear is about 3 in (7.6 cm) wide at the base and 2.75 in (7.0 cm) tall.
Construction is simple. You crochet a flat strip in rows, plus two ear fronts and two ear backs. Next you edge the ears and join each front to its back. Then you wrap the strip around the headband, sew it closed underneath, and stitch the ears on top. You don’t need to take the headphones apart.
Finished Size and Construction
- Finished size: band sleeve 3 in x 14 in (7.6 cm x 35.6 cm) flat; ears 3 in (7.6 cm) wide x 2.75 in (7.0 cm) tall
- Skill level: Easy
- Terminology: US
- Yarn weight: Worsted (#4)
- Hook: 4.0 mm (G-6)
- Number of pieces: 5 (1 band strip, 2 ear fronts, 2 ear backs)
- Layout: 1 strip with 2 ears sewn along its top center line
- Piece size: strip 12 sts x 56 rows; ear triangle 2 in (5.1 cm) wide x 2 in (5.1 cm) tall
- Ear size before border: 2 in (5.1 cm) base
- Border depth: 2 rounds, about 0.5 in (1.3 cm) total
Materials
Use a smooth worsted-weight cotton or cotton-acrylic blend, about 180 m per 100 g. Cotton holds the ear points well and doesn’t pill much against hair. Avoid fuzzy or very stretchy yarns because the sleeve should fit snugly.
- Color A, cream: 35 g / 63 m (band, ear backs, ear borders, seaming)
- Color B, dusty rose: 5 g / 9 m (ear centers)
These quantities include a margin of about 25% for your gauge swatch, tails, and seaming.
Tools:
- 4.0 mm (G-6) crochet hook
- Tapestry needle
- Stitch markers (4)
- Measuring tape
- Scissors
- Pins or clips
- Spray bottle for blocking
Abbreviations (US Terms)
- ch – chain
- sc – single crochet
- sc2tog – single crochet 2 together
- sl st – slip stitch
- st(s) – stitch(es)
- RS / WS – right side / wrong side
Special stitch – sc2tog: Insert the hook in the next st, yarn over, and pull up a loop. Insert the hook in the following st, yarn over, and pull up a loop (3 loops on hook). Yarn over and pull through all 3 loops. You’ve now made 1 st from 2.
Corner group: Work 3 sc in the same st. The middle sc of the 3 is the corner stitch. In the next round, you’ll work the new corner group into that middle sc.
Gauge and Checkpoints
Gauge: 16 sc and 16 rows = 4 in (10.2 cm) in sc worked in rows. That’s 4 sts and 4 rows per 1 in (2.5 cm).
Make one ear front before you start the long strip. It’s small, so it’s the quickest way to test your gauge. The pink triangle should measure 2 in (5.1 cm) across the base and 2 in (5.1 cm) from base to tip.
Checkpoints:
- Band, Row 1: 3 in (7.6 cm) wide
- Band, Row 28: 7 in (17.8 cm) long
- Band, Row 56: 14 in (35.6 cm) long
- Ear triangle: 2 in (5.1 cm) base
- After Border Round 1: 2.5 in (6.4 cm) per side
- After Border Round 2: 3 in (7.6 cm) per side
If your piece is too big, go down one hook size to 3.5 mm (E-4). If it’s too small, go up to 4.5 mm (US 7). Keep the stitches firm. If you loosen your tension instead, the sleeve may sag on the headband.
Band Sleeve
Before you start, measure your headband. Wrap the tape around the thickest part of the band. This pattern fits a band up to 3 in (7.6 cm) around. Then measure along the outside of the arc from one slider to the other. The standard length is 14 in (35.6 cm).
With Color A, ch 13.
Row 1 (RS): Sc in 2nd ch from hook and in each ch across. Turn. (12 sts)
Row 2: Ch 1 (does not count as a st), sc in each st across. Turn. (12 sts)
Rows 3–56: Repeat Row 2. (12 sts in every row)
At the end of Row 56, fasten off and leave a 30 in (76.2 cm) tail for sewing the seam.
The strip has 56 rows, so each long edge has 56 row ends. You’ll sew those row ends together one-to-one later.
Fitting adjustments:
- Length: Work 4 rows for every 1 in (2.5 cm) of your arc measurement. For a 13 in (33.0 cm) arc, work 52 rows. For a 15 in (38.1 cm) arc, work 60 rows.
- Width: If your band measures more than 3 in (7.6 cm) around, add 2 chains for every extra 0.5 in (1.3 cm). For example, ch 15 and work 14 sts per row for a 3.5 in (8.9 cm) band.
Mark the top center line for the ears now. Place a marker between st 6 and st 7 of Row 9 and another between st 6 and st 7 of Row 20. Then place one between st 6 and st 7 of Row 37 and one of Row 48.
Ear Fronts (make 2)
With Color B, ch 9.
Row 1 (RS): Sc in 2nd ch from hook and in each ch across. Turn. (8 sts)
Row 2: Ch 1, sc in each st across. Turn. (8 sts)
Row 3: Ch 1, sc2tog, sc in next 4 sts, sc2tog. Turn. (6 sts)
Row 4: Ch 1, sc in each st across. Turn. (6 sts)
Row 5: Ch 1, sc2tog, sc in next 2 sts, sc2tog. Turn. (4 sts)
Row 6: Ch 1, sc in each st across. Turn. (4 sts)
Row 7: Ch 1, [sc2tog] twice. Turn. (2 sts)
Row 8: Ch 1, sc2tog. (1 st)
Fasten off and weave in the ends. The triangle should measure 2 in (5.1 cm) across the base and 2 in (5.1 cm) tall. Decreasing on every other row gives the sides a slightly upright angle, so the finished ear looks like a cat ear rather than a flat wedge.
Ear Backs (make 2)
Work exactly as for the Ear Fronts, using Color A for all rows. (1 st at the end of Row 8)
Fasten off and weave in the ends. Each back should match its front in size.
Make All Pieces
Before you assemble anything, check that you have every piece:
- Color A: 1 band strip (12 sts x 56 rows) and 2 ear backs
- Color B: 2 ear fronts
Placement layout (top view of the band, read from left slider to right slider):
Rows:  1–8    | 9–20  | 21–36  | 37–48 | 49–56
       plain  | EAR 1 | plain  | EAR 2 | plain
       2 in   | 3 in  | 4 in   | 3 in  | 2 in
That’s 8 + 12 + 16 + 12 + 8 = 56 rows. In cm, the segments are 5.1 / 7.6 / 10.2 / 7.6 / 5.1, for 14 in (35.6 cm) in total.
Joining
Order of work: Finish both ears through the Border section below before you attach them. Then come back to this section.
1. Seam the sleeve. Lay the strip RS down and center the headband on it lengthwise, with Row 1 at one slider. Fold the long edges up so they meet along the underside of the band, which is the side that touches your head.
Thread the cream tail onto a tapestry needle. Whipstitch the edges together one row end to one row end, working from Row 56 back to Row 1. That’s 56 stitches through 56 matching pairs. Because the counts match, the seam lies flat and doesn’t twist.
Tension: Pull each stitch just until the edges touch. If you pull harder, the seam ridges. If you leave it loose, it gapes when you flex the headband. Every 10 stitches, check that the seam is still running straight down the underside.
2. Attach the ears. Put Ear 1 on the top center line between the markers on Rows 9 and 20, with the pink side facing forward. The 12 base stitches of the ear match the 12 rows, so sew one base stitch to each row. Use mattress stitch through both loops of the ear’s Round 2 base and the top center stitches of the band. Then go back along the seam a second time behind the ear for strength. Attach Ear 2 between Rows 37 and 48 in the same way.
Size checkpoint: The sleeve should measure 14 in (35.6 cm) along the top, and the ears should be 4 in (10.2 cm) apart at their bases. The sleeve should not slide when you flex the band.
Border (Ear Edging)
Border gauge: Use the same gauge as the body, 4 sc per 1 in (2.5 cm). Each border round adds 2 sts to every side, one at each corner group. That makes every side about 0.5 in (1.3 cm) longer per round.
Each pink triangle has 3 sides. In this border, a side’s count includes both of its corner stitches. Neighboring sides share a corner stitch, so the round total is (3 x per-side count) – 3.
Round 1 (each front and each back, single layer): With RS facing, join Color A in the first foundation ch at the base.
- 3 sc in that ch (corner)
- sc in the next 6 ch
- 3 sc in the last ch (corner)
- working along the row ends, sc in the ends of Rows 2–7 (6 sc)
- 3 sc in the single st of Row 8 (tip corner)
- sc in the ends of Rows 7–2 (6 sc)
Join with a sl st to the first sc. Each side has 1 corner + 1 + 6 + 1 + 1 corner = 10 sts. The total is 3 x 10 – 3 = 27 sts. Fasten off on the backs. On the fronts, keep the loop live. Each side should now measure 2.5 in (6.4 cm).
Round 2 (joining round): Hold one front and one back WS together with the edges matched. Work through both layers at once, starting with the live loop of the front. Ch 1, then sc in each st around, working 3 sc in each corner stitch. Join with a sl st.
Each side now has 1 corner + 1 + 8 + 1 + 1 corner = 12 sts. The total is 3 x 12 – 3 = 33 sts. Fasten off and leave a 12 in (30.5 cm) tail.
Why the math works: Each 3-sc corner group adds 2 sts at that corner. Every side gets 1 of those extra sts from each of its two corners, so it grows by 2 sts per round: 8 base sts, then 10, then 12. At 4 sts per inch, the sides measure 2 in, 2.5 in, and 3 in (5.1 cm, 6.4 cm, 7.6 cm). The finished base has 12 sts, which matches the 12 band rows each ear covers.
Final Blocking
- Take the sleeve off the headphones if you need to work on the ears separately. Otherwise, block the ears while they’re attached.
- Lightly mist the ears with water until they feel damp. Don’t soak them.
- Pinch each tip into a sharp point and straighten the sides with your fingers.
- Pin each ear flat on a blocking mat, checking that the base is 3 in (7.6 cm) wide.
- Leave them to dry completely, which takes about 6 hours.
- Mist the sleeve, smooth it along the headband, and leave it to air-dry in place. Keep it away from heat, and don’t steam it near the electronics.
Final Quality-Control Checklist
- The strip has 12 sts in every row and 56 rows in total.
- Each pink triangle ends with 1 st at the tip.
- Border Round 1 has 27 sts, or 10 per side.
- Border Round 2 has 33 sts, or 12 per side.
- The front and back of each ear are fully joined with no gaps.
- The underside seam runs straight and lies flat.
- The ears are centered on Rows 9–20 and 37–48, with the pink sides facing forward.
- All yarn ends are woven in securely.
Troubleshooting
- The ear tips curl backward: Your Round 2 tension is tighter on the back layer. Re-block the ears flat, or redo Round 2 with a more even pull.
- The ears flop over: Firm up the attachment by sewing a second line of stitches along the base. A cotton yarn will also help.
- The sleeve slides around: The strip is too wide. Remove 1–2 sts per row, or go down a hook size.
- The sleeve won’t close: Add 2 sts per row, as described in the fitting adjustments.
- The seam twists: You skipped or doubled a row end. Unpick the seam back to the problem spot and re-sew it one-to-one.
- The corners look rounded: Make sure you’re working the next corner group into the middle sc of the previous one.
Care
Spot clean with a damp cloth and mild soap. If you need to wash the cover more thoroughly, remove it, hand wash it cold, and lay it flat to dry.

Final Notes
Every measurement in this pattern comes from the same gauge of 4 sts and 4 rows per 1 in (2.5 cm). The 12-st strip measures 3 in (7.6 cm) across and wraps a band of the same circumference. The 56 rows give the 14 in (35.6 cm) length, and the row ends match one-to-one for the underside seam. Each ear grows from an 8-st base to 10 and then 12 sts per side, or 2 in, 2.5 in, and 3 in (5.1 cm, 6.4 cm, 7.6 cm). Its 12-st base then fits exactly over 12 band rows. If you check your gauge at each stage, the cover will fit your headphones.
Happy crocheting!