

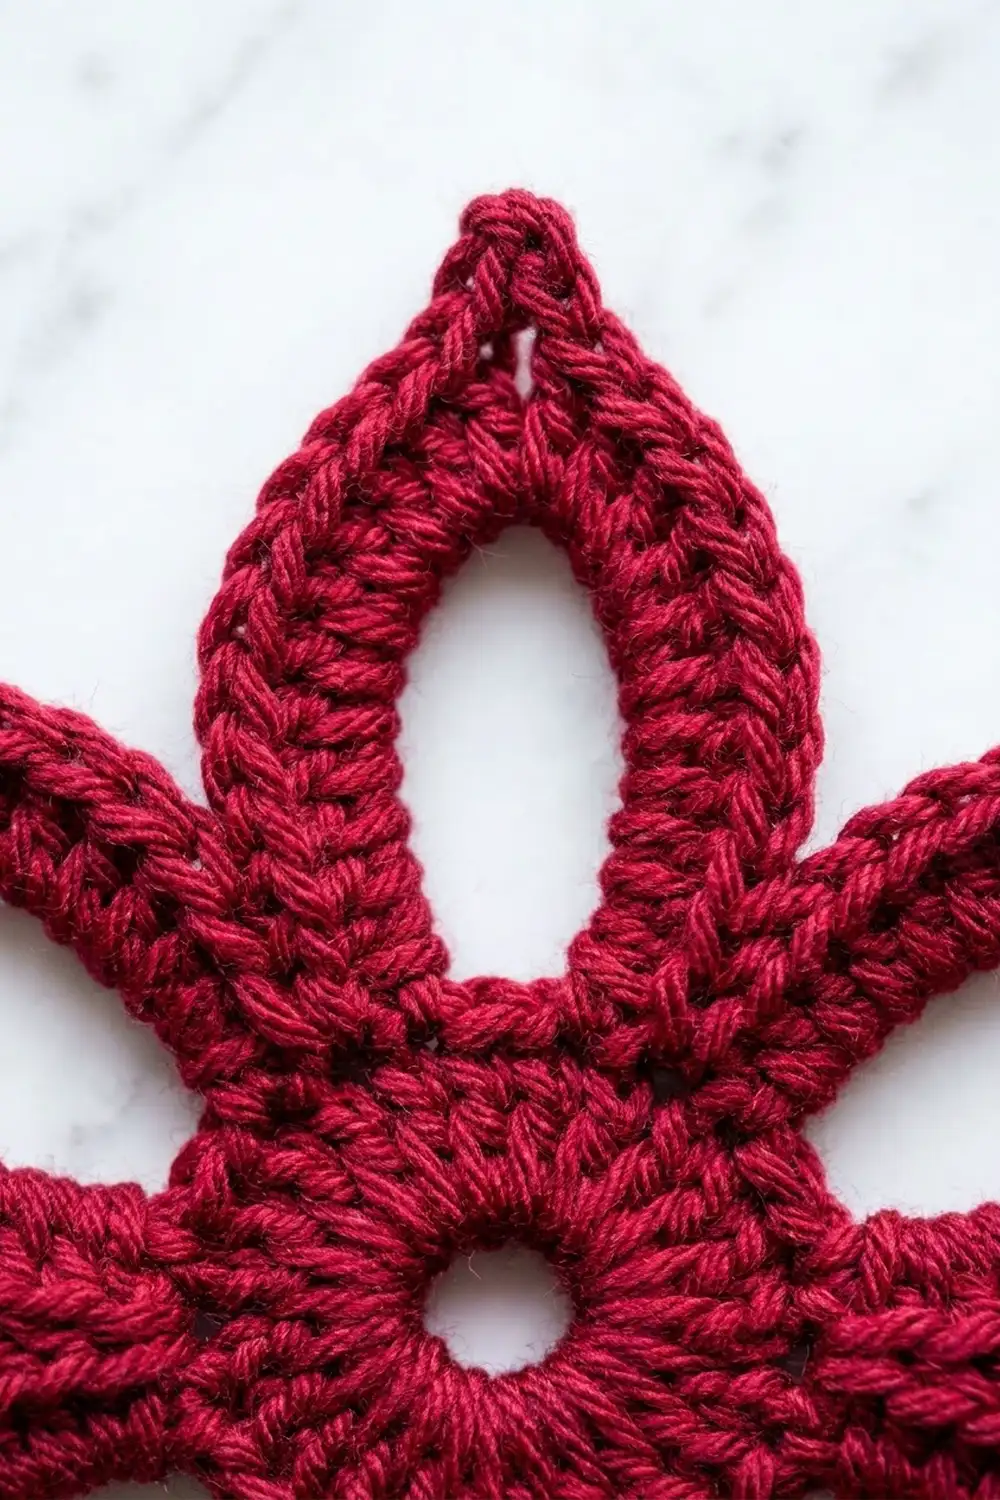
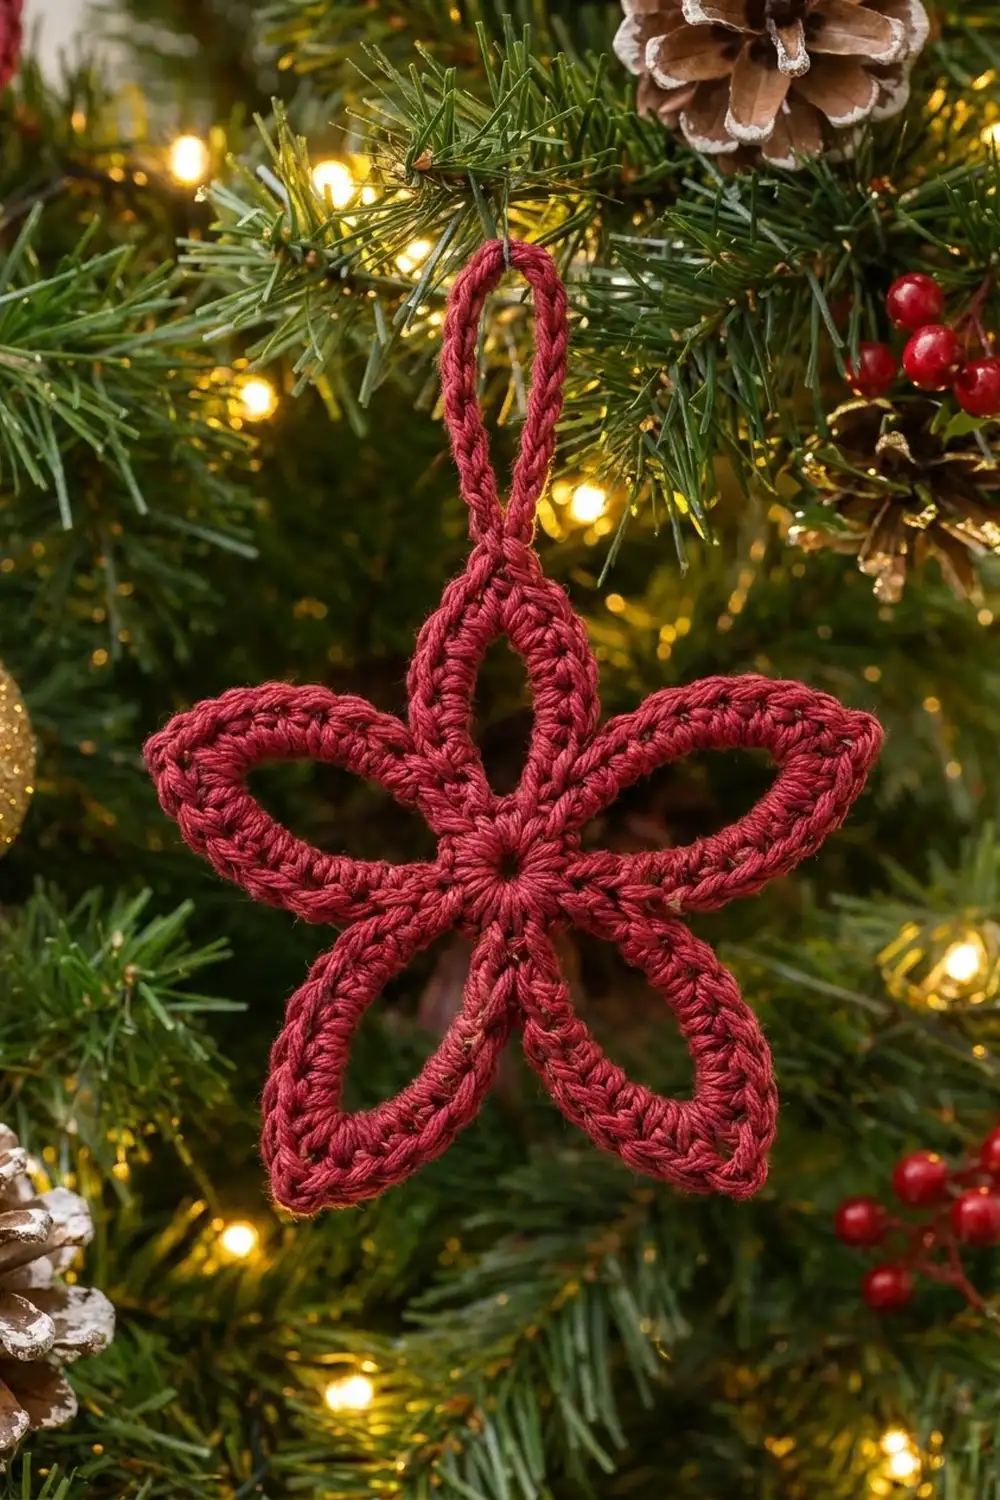
The Cranberry Petal Star is a small, open, five-petal ornament that looks like a cross between a star and a poinsettia. Each petal is an airy, pointed loop outlined with a thick, ridged rim of single crochet. All five petals come out of a tiny round center with a pin-sized hole in the middle. A short hanging loop, covered in stitches, rises from the tip of the top petal, so the piece is ready to hang as soon as you weave in your ends.
The sample is worked in one solid cranberry red, which stands out well against green branches and warm fairy lights. It is a single piece in one color, with no sewing and no separate parts. The style is clean and graphic rather than lacy, so it works well as a gift topper, a tree ornament, or part of a set of matching stars.
This pattern uses US crochet terms. The finished ornament measures about 4 in (10.2 cm) wide and 3.75 in (9.5 cm) tall without the hanging loop, which adds about 1.25 in (3.2 cm).
Construction is simple. You make a 10-stitch center ring and chain five long petal loops off it. Then you outline each loop with single crochet and a sharp chain tip, add a second outline round on the outer edge for thickness, and finish with a covered hanging loop at one petal tip.
Finished Size and Construction
- Finished size: about 4 in (10.2 cm) wide x 3.75 in (9.5 cm) tall, plus a 1.25 in (3.2 cm) hanging loop
- Skill level: Easy / advanced beginner
- Terminology: US crochet terms
- Yarn weight: Light (#3, DK) cotton or cotton blend
- Hook: 3.25 mm (US D/3)
- Number of pieces: 1
- Layout: single five-petal motif with a hanging loop at the top petal tip
- Piece size: each petal about 2 in (5.1 cm) from center to tip and about 1 in (2.5 cm) wide at its widest
- Size before border: about 3.5 in (8.9 cm) wide after Round 3
- Border depth: Round 4 adds about 0.25 in (0.6 cm) around the petals
Materials
Choose a smooth, mercerized or tightly plied cotton in a light (#3, DK) weight. Cotton keeps the pointed petal tips crisp and blocks flat. Avoid fuzzy or very soft acrylics, which blur the outline and let the petals curl.
Yarn:
- Cranberry red: about 10 g / 25 m (27 yd) per ornament
Tools:
- 3.25 mm (US D/3) crochet hook
- Tapestry needle
- Scissors
- Stitch marker
- Blocking mat or folded towel, plus rust-proof pins
- Spray bottle with water (light spray starch is optional)
The yarn amount includes a margin of about 20% for your test star, tails, and any ripping back. One ornament actually uses closer to 8 g.
Abbreviations (US Terms)
- ch – chain
- sc – single crochet
- sl st – slip stitch
- st(s) – stitch(es)
- sp – space
- rnd – round
- MR – magic ring (adjustable ring)
Special technique – working into the chain: In Round 3 you work single crochet directly into each chain of the petal loops. You can insert the hook under the top loop and back bump of each chain, or under the back bump only. Either works, but use the same method for every petal. Working into individual chains, instead of around the whole chain space, lets you place the pointed tip exactly in the middle of each petal.
Gauge and Checkpoints
Gauge: 22 sc and 24 rows = 4 in (10.2 cm) in rows of single crochet, worked firmly with a 3.25 mm hook.
For a small ornament, the most useful gauge test is to make one complete star first and measure it. It takes about 20 minutes and tells you more than a flat swatch.
Checkpoints:
- After Round 1: the center ring is about 0.5 in (1.3 cm) across, with a hole no wider than 0.125 in (0.3 cm).
- After Round 2: each ch-16 loop, held flat in a teardrop shape, is about 1.5 in (3.8 cm) long from the ring to its tip.
- After Round 3: each petal is about 1.75 in (4.4 cm) from center to tip, and the star is about 3.5 in (8.9 cm) wide.
- After Round 4: each petal is about 2 in (5.1 cm) from center to tip, and the star is about 4 in (10.2 cm) wide and 3.75 in (9.5 cm) tall.
If your star is too big: go down to a 3.0 mm hook, or tighten your chains. Loose chains in Round 2 are the most common cause of oversized, floppy petals.
If your star is too small: go up to a 3.5 mm (US E/4) hook. Don’t add extra chains to the petals unless you keep the count even, or the tip won’t sit in the center of the petal.
Pattern
Round 1 – Center Ring
Make a magic ring.
Rnd 1: Ch 1 (does not count as a st), work 10 sc into the ring. Pull the tail to close the ring tightly, leaving a tiny center hole. Sl st to the first sc to join. (10 sc)
Place a marker in the first sc. This is the starting sc of Petal 1.
Round 2 – Petal Loops
Each petal loop starts in one sc and ends in the very next sc. The two ends of the loop sit side by side, so the chain folds into a teardrop.
Rnd 2: Ch 1, *sc in next sc, ch 16, sc in next sc; repeat from * 4 more times, sl st to the first sc to join.
(10 sc and 5 ch-16 loops)
Each of the 10 sc of Round 1 now holds exactly one sc of Round 2, and each pair of side-by-side sc anchors one loop. Check that none of the five loops is twisted before moving on. When you lay the piece flat, you should see five long, open teardrops around a small solid ring.
Round 3 – Petal Outline
In this round you crochet along both sides of every chain loop and form the sharp tip.
Rnd 3: Ch 1. *Working into the chains of the next ch-16 loop: sc in each of the next 8 ch, ch 2, sc in each of the next 8 ch. Sl st in the next sc of Round 2 (the sc that closes this petal), then sl st in the next sc of Round 2 (the sc that starts the next petal). Repeat from * 4 more times. The final sl st lands in the first sc of Round 2 and joins the round.
Per petal: 16 sc + 1 ch-2 tip sp + 2 sl sts
Round total: 80 sc, 5 ch-2 tip sps, 10 sl sts
The 8 sc on each side of the ch-2 sp go into chains 1–8 and chains 9–16, so the tip falls exactly halfway along the loop. The two sl sts at the base hold the petals tight to the ring without adding bulk. Gently pinch each tip into a point.
Checkpoint: each petal is now about 1.75 in (4.4 cm) long, and the star is about 3.5 in (8.9 cm) wide.
Border
Border Gauge
The border is one round of sc worked into the Round 3 outline, at the same gauge of 22 sc = 4 in (10.2 cm). Each sc is about 0.18 in (0.5 cm) wide, and the extra round adds about 0.25 in (0.6 cm) of depth to the outer edge of every petal. The inner edge of each petal (the original chain) gets no border, which keeps the middle of each petal open.
Round 4 – Outer Outline
Treat each petal as one “side” of the border. Every side has the same count: 8 sc up one edge, a pointed tip, and 8 sc down the other edge.
Rnd 4: Ch 1. *Sc in each of the next 8 sc (up the first side of the petal), (sc, ch 2, sc) in the ch-2 tip sp, sc in each of the next 8 sc (down the second side). Skip the 2 sl sts at the base. Repeat from * 4 more times. Sl st to the first sc to join.
Per petal (per side): 8 sc + (sc, ch 2, sc) + 8 sc = 18 sc + 1 ch-2 tip sp
Round total: 90 sc and 5 ch-2 tip sps
Why the math works: Round 3 has 16 sc per petal. Round 4 works into those 16 sc one-to-one, which gives 16 sc, and adds 2 extra sc at the tip, one on each side of the new ch-2 sp. That makes 16 + 2 = 18 sc per petal, and 5 x 18 = 90 sc for the round. The 2 extra sc per petal are the only increase, and they sit right at the point, where the outer edge curves around and needs extra length. The sides stay at one stitch per stitch, so they lie flat instead of ruffling. Skipping the sl sts at the base lets the outer edges of neighboring petals meet snugly in a V, which gives the deep notches between petals you see in the finished star.
If you want to work the hanging loop without joining new yarn, don’t fasten off yet. Otherwise, fasten off and weave in the end.
Hanging Loop
Choose one petal as the top. If you are still attached at the base of Petal 1, sl st up the first 8 sc of Petal 1 to reach its tip. If you fastened off, join the yarn with a sl st in the ch-2 tip sp of the top petal.
Loop: In the ch-2 tip sp: ch 20, sl st in the same ch-2 tip sp to form a loop. Work 28 sc into the ch-20 loop (working around the chain, not into each chain), then sl st into the ch-2 tip sp. Fasten off.
(28 sc around the hanging loop)
The 28 sc are packed tightly onto 20 chains on purpose. The crowded stitches stiffen the loop so it stands upright, as it does in the sample, instead of flopping over. The loop measures about 1.25 in (3.2 cm) from the petal tip to the top of the loop.
Weave in all ends along the back of the petal outlines. Split the yarn as you go so the ends can’t work loose.
Final Blocking
- Lightly mist the ornament with water until it is damp but not dripping. For a crisper finish, use a light spray starch instead.
- Lay it face up on a blocking mat or folded towel.
- Pin the center ring flat, with one pin through the center hole.
- Pin the top petal tip so the hanging loop points straight up. Pin the hanging loop itself into a slim upright oval.
- Pin the other four petal tips, spacing them evenly. Each tip should be about 2 in (5.1 cm) from the center pin.
- Check the overall size: about 4 in (10.2 cm) wide, and 3.75 in (9.5 cm) tall from the bottom petal tips to the top petal tip.
- Pinch each tip into a sharp point, and smooth the open middle of each petal into an even teardrop with your fingertip.
- Let it dry completely, at least a few hours, before you remove the pins.
Final Quality-Control Checklist
- The center ring is closed tight, with only a tiny hole.
- Round 1 has 10 sc. Round 2 has 10 sc and 5 ch-16 loops.
- Round 3 has 16 sc per petal (80 total), each petal with a centered ch-2 tip.
- Round 4 has 18 sc per petal (90 total), each petal with a ch-2 tip.
- All five petals are the same length, about 2 in (5.1 cm).
- No petal is twisted at its base.
- The open middle of each petal is a clean teardrop.
- The hanging loop has 28 sc on a ch-20 base and stands upright at the top tip.
- The star measures about 4 in (10.2 cm) wide and 3.75 in (9.5 cm) tall.
- All ends are woven in and trimmed close.
Troubleshooting
Petals are floppy or too long. Your Round 2 chains are loose. Rework the round with tighter chains, or use a hook one size smaller for the chains only.
The tip is off-center. You miscounted chains in Round 2 or skipped a chain in Round 3. Each loop needs exactly 16 ch, worked as 8 sc, ch 2, 8 sc.
A petal is twisted. The chain was twisted before you anchored it. Undo that loop and chain it again, keeping the chain flat as you sc into the next stitch.
Petals ruffle or cup. Your tension in Round 4 is looser than in Round 3. Keep a firm, even tension, and block with starch.
The center hole is too big. Pull the magic ring tail tighter before weaving it in, and anchor it with a couple of stitches through the back of Round 1.
There are gaps between petals at the center. Make sure you work both sl sts in Round 3, one into each sc of Round 2, so the petal bases stay joined.
The hanging loop flops over. Fit in all 28 sc and push them together along the chain as you work.
Care
Hand wash in cool water with mild soap, press out the water in a towel, then reshape and pin flat to dry. Store flat or hanging, out of direct sunlight, so the cranberry red doesn’t fade.
Final Notes
The whole ornament builds on a short chain of measurements. A 10-sc center ring of about 0.5 in (1.3 cm) holds five ch-16 loops of about 1.5 in (3.8 cm) each. The 16-sc outline of Round 3 brings each petal to about 1.75 in (4.4 cm) and the star to about 3.5 in (8.9 cm) wide. The 18-sc outer outline of Round 4 finishes each petal at about 2 in (5.1 cm), for a star about 4 in (10.2 cm) wide and 3.75 in (9.5 cm) tall. A 28-sc hanging loop adds about 1.25 in (3.2 cm) on top.
If your first star hits those checkpoints, every star after it will match. Make one for the tree, a handful for gift tags, or a whole set in shades of red and white.
Happy crocheting!