
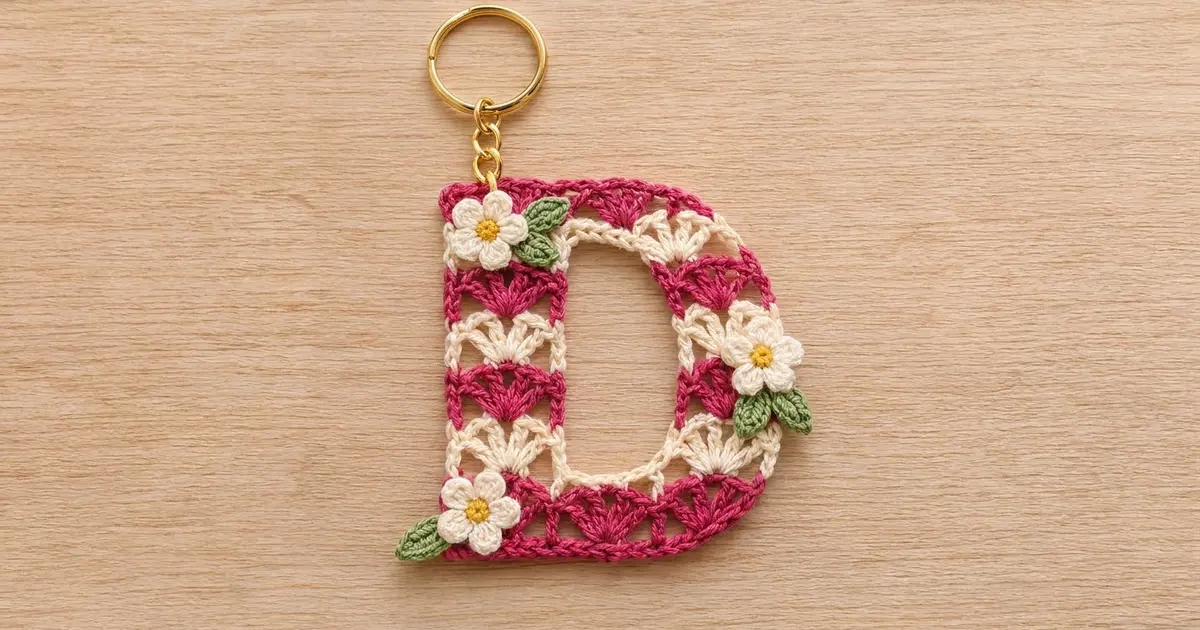
This little letter D is a bag charm with a lot of personality. Stripes of shell stitch fans in deep raspberry and soft cream stack from bottom to top. A crisp raspberry outline frames the letter, and three tiny cream daisies with sunny yellow centers and green leaves sit around its edges.
The style is sweet and a little vintage, like a sampler stitch made into a monogram. It’s ideal as a personalized gift, a backpack tag, or a quick stash-buster in fine cotton.
The pattern uses US crochet terms. The finished letter measures 4.0 in (10.2 cm) wide by 4.3 in (10.9 cm) tall, not counting the hardware.
You crochet the D as one flat piece in rows. First you make a full-width bottom bar. Then you work the stem and the curved side as two separate narrow columns, which leaves the open center. A chain bridge rejoins the two columns, and the top bar is worked straight across. A two-round border outlines the outer and inner edges. Finally, you sew on the flowers and attach the key ring.
Finished Size and Construction
- Finished size: 4.0 in wide x 4.3 in tall (10.2 x 10.9 cm)
- Skill level: Intermediate (shell stitch, color changes, working into a chain bridge)
- Terminology: US
- Yarn weight: Fine (#2) cotton
- Hook: 2.75 mm (US C-2)
- Number of pieces: 1 letter, plus 3 flower and 5 leaf appliqués
- Layout: One single letter, no joining
- Size before border: 3.5 in wide x 3.8 in tall (8.9 x 9.7 cm)
- Border depth: 0.25 in (0.6 cm) on every edge
- Center opening after border: about 1.0 x 1.3 in (2.5 x 3.3 cm)
Materials
Use a smooth mercerized cotton or cotton blend in fine (#2) weight, about 150 m per 50 g. Cotton gives the fans crisp definition and holds up well on a keychain. Avoid fuzzy yarns, because they blur the fan shapes.
- Raspberry pink (Color A): 6 g, about 18 m
- Cream (Color B): 5 g, about 15 m (includes the petals)
- Sunny yellow (Color C): 1 g, about 3 m
- Leaf green (Color D): 1 g, about 3 m
All quantities include a margin of about 20 percent for gauge swatches and tails.
Tools:
– 2.75 mm (US C-2) hook
– Tapestry needle
– Scissors
– 1 in (2.5 cm) gold split key ring with a 1 in (2.5 cm) chain
– 6 mm jump ring and two pairs of flat-nose pliers
– Rust-proof pins and a blocking mat
– Spray bottle
Abbreviations (US Terms)
- ch – chain
- sl st – slip stitch
- sc – single crochet
- hdc – half double crochet
- dc – double crochet
- sk – skip
- st(s) – stitch(es)
- MR – magic ring
- RS / WS – right side / wrong side
Special stitches:
– Shell: 5 dc in the same st.
– Half shell: 3 dc in the same st. At the start of a row, ch 3 (counts as 1 dc) and work 2 dc in the first st.
– Corner fan: (dc, dc, dc, hdc, sc) all in the same st. The stitches get shorter toward the outer edge, which rounds the top-right corner.
Row types: Each shell row is one of two types, and they alternate.
– Row A has a sc at each end and 4 full shells. It always has 25 sts.
– Row B has a half shell at each end, 3 full shells and 4 sc. It also always has 25 sts.
Gauge and Checkpoints
Gauge: 25 sts across one row = 3.5 in (8.9 cm). Each shell row is 0.4 in (1.0 cm) tall, and the foundation sc row is 0.2 in (0.5 cm) tall.
Test first: Work the bottom bar (Rows 1 to 3) and measure it before going further. It should be 3.5 in (8.9 cm) wide and 1.0 in (2.5 cm) tall.
Checkpoints:
– After Row 3: 3.5 x 1.0 in (8.9 x 2.5 cm)
– After Row 7: the stem and curved-side columns are 1.6 in (4.1 cm) tall above the bar, for a total height of 2.6 in (6.6 cm)
– After Row 10: 3.5 x 3.8 in (8.9 x 9.7 cm)
– After the border: 4.0 x 4.3 in (10.2 x 10.9 cm)
If your piece is too big, go down to a 2.5 mm hook. If it is too small, go up to a 3.0 mm hook. Check the width first, because shell rows usually even out in height once you block them.

Letter D Pattern
Work all color changes on the last yarn over of the final stitch of the row. Cut the old color, leaving a 4 in (10.2 cm) tail. Crochet over the tails as you go, or hide them under the border later.
Bottom Bar
Row 1 (RS, Color A): Ch 26. Sc in the 2nd ch from the hook and in each ch across. Turn. (25 sc)
Row 2 (WS, Color A, Row A): Ch 1 (does not count as a st). Sc in the first st, then work sk 2, shell in the next st, sk 2, sc in the next st 4 times. On the last stitch, change to Color B. Turn. (4 shells + 5 sc = 25 sts)
Row 3 (RS, Color B, Row B): Ch 3 (counts as dc), then 2 dc in the first sc to make a half shell. Work sk 2 dc, sc in the center dc, sk 2 dc, shell in the next sc 3 times. Then sk 2 dc, sc in the center dc, sk 2 dc, and work 3 dc in the last sc. Do not turn yet. (3 + 1 + 5 + 1 + 5 + 1 + 5 + 1 + 3 = 25 sts)
The last st you made is now st 1. Number the sts of Row 3 from 1 to 25, starting at the stem (left) edge. Here’s the layout:
– sts 1–3: half shell
– st 4: sc
– sts 5–9: shell (center st 7)
– st 10: sc
– sts 11–15: shell (center st 13)
– st 16: sc
– sts 17–21: shell (center st 19)
– st 22: sc
– sts 23–25: half shell
The stem uses sts 1–7. The curved side uses sts 19–25. Sts 8–18 (11 sts) stay unworked and become the bottom of the center opening.
Stem Column (Rows 4–7, on sts 1–7)
Row 4 (WS, Color A, Row A): Change to Color A, then turn. Ch 1. Sc in st 1, sk 2, shell in st 4, sk 2, sc in st 7. Leave the rest of the row unworked. Turn. (7 sts)
Row 5 (RS, Color B, Row B): Ch 3, 2 dc in the first sc, sk 2, sc in the center dc, sk 2, 3 dc in the last sc. Turn. (7 sts)
Row 6 (WS, Color A): Work as Row 4 across the 7 sts. (7 sts)
Row 7 (RS, Color B): Work as Row 5. Fasten off. (7 sts)
Curved Side Column (Rows 4–7, on sts 19–25)
Row 4 (WS, Color A): With the WS facing, join Color A in st 19 of Row 3. Ch 1. Sc in st 19, sk 2, shell in st 22, sk 2, sc in st 25. Turn. (7 sts)
Rows 5–7: Work as Rows 5–7 of the stem. Row 7 ends at the inner edge, next to the opening. Fasten off. (7 sts each row)
The opening between the two columns is now 1.5 in (3.8 cm) wide.
Top Bar
Row 8 (WS, Color A, bridge row): With the WS facing, join Color A in the first st at the outer edge of the stem.
1. Ch 1, sc in the same st, sk 2, shell in the sc, sk 2, sc in the last stem st.
2. Ch 11 for the bridge. Keep the chain relaxed so it doesn’t pull.
3. Sc in the first st of the curved-side column, sk 2, shell in the sc, sk 2, sc in the last st.
Change to Color B and turn. (7 + 11 ch + 7 = 25 sts)
Row 9 (RS, Color B, Row B): Number the Row 8 sts from the stem end: the bridge chains are sts 8–18.
1. Ch 3, 2 dc in st 25, then sc in the center dc (st 22).
2. Shell in st 19, sc in st 16 (the 9th bridge ch), shell in st 13 (the 6th ch), and sc in st 10 (the 3rd ch).
3. Shell in st 7, sc in the center dc (st 4), and 3 dc in st 1.
Change to Color A and turn. (25 sts)
Row 10 (WS, Color A, Row A): Ch 1. Work these in order:
– Sc in st 1, shell in st 4, sc in st 7
– Shell in st 10, sc in st 13
– Shell in st 16, sc in st 19
– Corner fan in st 22, sc in st 25
Skip 2 sts between every two of these. Do not fasten off. (4 fans + 5 sc = 25 sts)
Checkpoint: 3.5 x 3.8 in (8.9 x 9.7 cm).
Border
The border gauge is 7 sc per 1 in (2.5 cm), which matches the body. Work 1 sc into each top or bottom st. Along the side edges, work 3 sc into the end of each shell row and 1 sc into the end of Row 1. The left corners get 3 sc each. The right corners get only 1 sc each, so they ease into a curve.
Outer Edge
Round 1 (RS, Color A): Ch 1 and turn so the RS faces you.
– Top: Sc in st 25 (top-right corner, 1 sc only), sc in each of the next 23 sts, then 3 sc in st 1 (top-left corner). (27 sc)
– Left side: 3 sc in the end of each of Rows 10–2, then 1 sc in the end of Row 1. (27 + 1 = 28 sc)
– Bottom: Work into the free loops of the foundation chain. Make 3 sc in the first ch (bottom-left corner), sc in each of the next 23 ch, then 1 sc in the last ch (bottom-right corner). (27 sc)
– Right side: 1 sc in the end of Row 1, then 3 sc in the end of each of Rows 2–10. (28 sc)
Sl st to the first sc. (27 + 28 + 27 + 28 = 110 sc)
Round 2: Loosely sl st in each sc around. Fasten off. (110 sl sts)
Inner Opening
Round 1 (RS, Color A): Join Color A in st 8 of Row 3.
– Bottom of opening: Sc in sts 8–18. (11 sc)
– Curved-side inner edge: 3 sc in the end of each of Rows 4–7, then 1 sc in the end of the Row 8 sc. (13 sc)
– Under the bridge: Sc in the free loop of each of the 11 bridge chains. (11 sc)
– Stem inner edge: 1 sc in the end of the Row 8 sc, then 3 sc in the end of each of Rows 7–4. (13 sc)
Don’t add stitches at the inner corners. Sl st to the first sc. (48 sc)
Round 2: Loosely sl st in each sc around. Fasten off. (48 sl sts)
Why the Math Works
- The top and bottom have 25 sts over 3.5 in (8.9 cm), about 7 per inch.
- Each side has 28 sc over 3.8 in (9.7 cm), about 7.4 per inch. That’s close enough to lie flat without ruffling.
- The 11 sts along the bottom and top of the opening exactly match the 11 skipped sts and the 11 bridge chains.
- The border adds 0.25 in (0.6 cm) on each edge: 3.5 + 0.5 = 4.0 in wide and 3.8 + 0.5 = 4.3 in tall.
Flowers and Leaves
Flower (make 3):
- Rnd 1 (Color C): In a MR, work 5 sc. Sl st to the first sc and fasten off. (5 sc)
- Rnd 2 (Color B): Join in any sc. Work (sl st, ch 2, 2 dc, ch 2, sl st) in each sc around to make 5 petals. Fasten off and leave a 6 in (15.2 cm) tail. (5 petals)
Each flower is about 0.9 in (2.3 cm) across.
Leaf (make 5, Color D):
1. Ch 6. Work into the back bumps: sl st in the 2nd ch from the hook, sc in the next ch, hdc in each of the next 2 ch, and sc in the last ch.
2. Rotate and work along the other side of the chain: sc in the same ch, hdc in each of the next 2 ch, sc in the next ch, and sl st in the tip ch.
Fasten off and leave a tail. (10 sts, about 0.6 in / 1.5 cm long)
Placement:
– Flower 1: Over the top-left corner, with 2 leaves pointing right.
– Flower 2: Over the outer curve at Rows 5–6, with 2 leaves tucked below it.
– Flower 3: Over the bottom-left corner, with 1 leaf pointing left.
Let each flower overlap the border slightly. Sew around the center ring and the base of each petal with small stitches that don’t show on the back.
Hardware: Open the jump ring and pass it through Round 1 of the border, 0.5 in (1.3 cm) in from the top-left corner. Add the end of the chain and close the ring tightly. The chain should already be attached to the split key ring.
Final Blocking
- Weave in all ends except the flower tails before blocking.
- Spray the letter until it is evenly damp.
- Pin it face up to 4.0 x 4.3 in (10.2 x 10.9 cm), keeping the left side and the bottom straight.
- Ease the right side into a smooth curve, rounding both right corners.
- Pin the center opening square to 1.0 x 1.3 in (2.5 x 3.3 cm).
- Gently open each fan with your fingertips.
- Let it dry completely, then sew on the flowers and attach the hardware.
Final Quality-Control Checklist
- Every Row A has 25 sts and every Row B has 25 sts.
- The stem and curved-side columns have 7 sts in every row.
- The bridge has exactly 11 chains, and the edge beneath it isn’t puckered.
- The outer border has 110 sc and the inner border has 48 sc.
- The left side is straight and the right side curves smoothly.
- The flowers are stitched securely and the jump ring is fully closed.
- The letter measures 4.0 x 4.3 in (10.2 x 10.9 cm).
Troubleshooting
- The bridge pulls the top bar in: Redo Row 8 and make the chains looser, or use a hook one size larger just for the chain.
- The fans lean or twist: Check that every shell is worked into a sc and every sc into a center dc.
- The sides ruffle: Work 2 sc per shell row end instead of 3, then recount.
- The sides cup: Your border is too tight. Use a larger hook for Round 2.
- The right corners look square: Re-block and pin the curve more firmly. Check that each right corner got only 1 sc.
- Too many ends: Crochet over the tails while working Border Round 1.
Care
Spot clean with mild soap and cool water, and lay flat to dry. Remove the key ring before any deeper washing to protect the metal finish.

Final Notes
Here is the full measurement chain:
– 25 sts make 3.5 in (8.9 cm) of width.
– The bottom bar is 1.0 in (2.5 cm) tall.
– The stem and curved-side columns add 1.6 in (4.1 cm).
– The top bar brings the body to 3.8 in (9.7 cm).
– The 0.25 in (0.6 cm) border finishes the letter at 4.0 x 4.3 in (10.2 x 10.9 cm).
If you check each stage against these numbers, your D will come out flat and even, ready for its daisies.
Happy crocheting!