

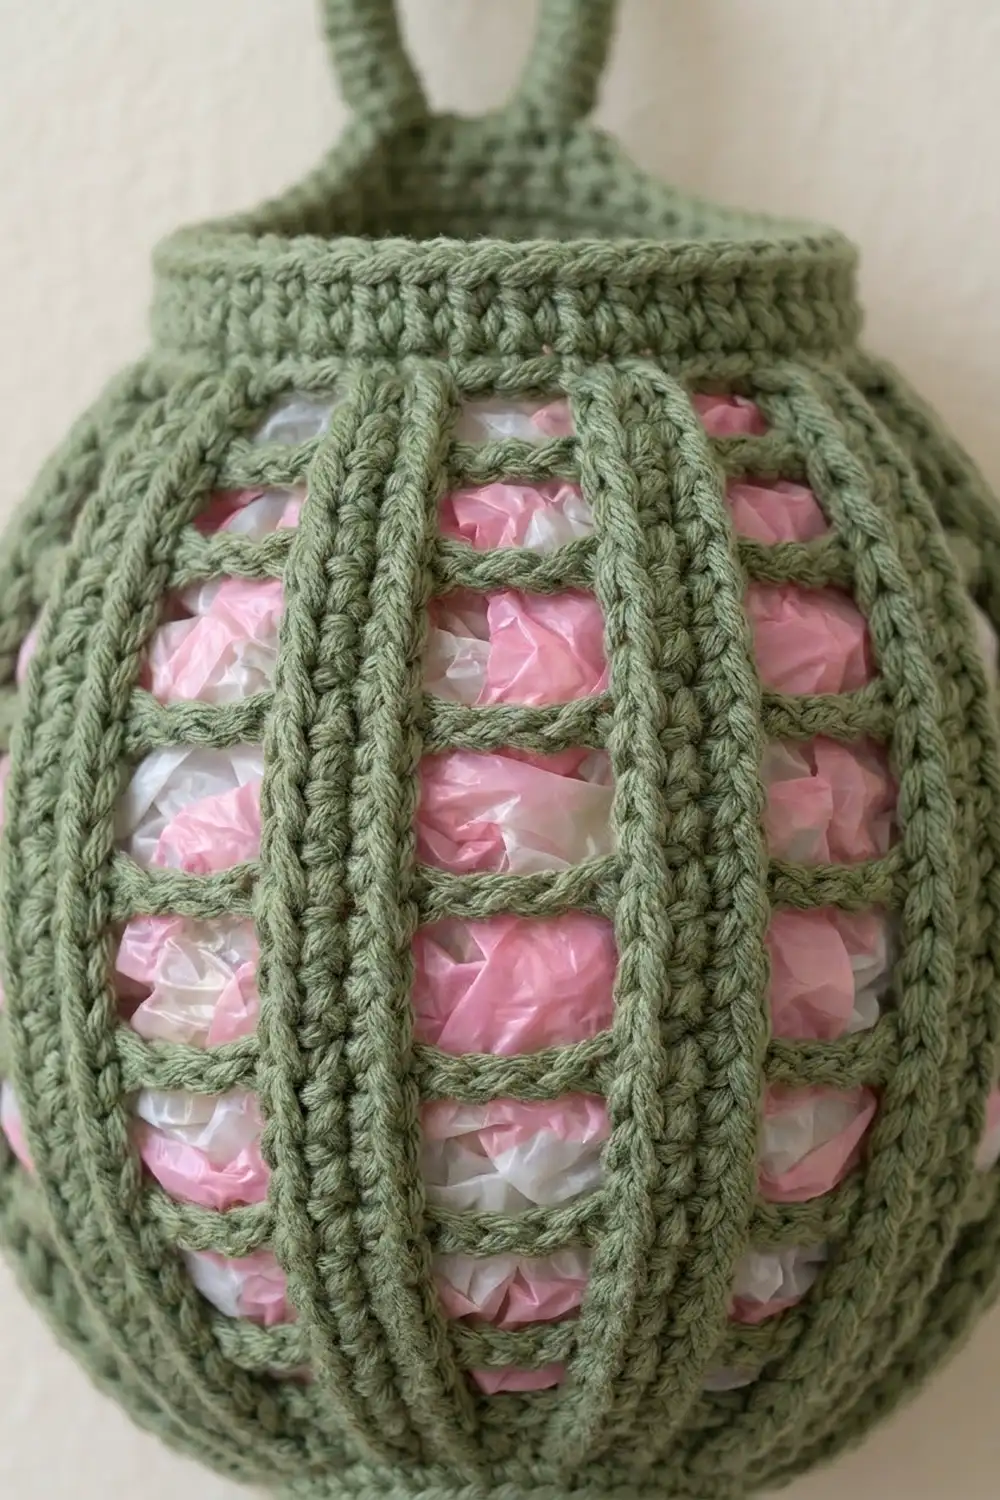
The Terracotta Lantern is a round, hanging grocery bag holder shaped like a small paper lantern. Solid vertical ribs curve from top to bottom, and slim chain bars cross between them. The open windows show the bags inside, and the holder still looks tidy on the wall.
The sample is worked in a warm terracotta. It looks just as good in sage green, mustard or cream. This is a single, seamless piece: no motifs, no seams and no joining. All instructions use US crochet terms.
The finished holder measures about 8 in (20.3 cm) tall and 7.5 in (19.1 cm) across when filled with bags. The hanging loop adds 3.5 in (8.9 cm), for a total hanging length of about 11.5 in (29.2 cm).
The holder is worked from the bottom up, in joined rounds. You start with a small single crochet rim for the bottom opening. The ribbed body then grows by lengthening the chain bars, holds steady at the widest point, and narrows again. A solid collar and a covered hanging loop finish the top.
Finished Size and Construction
- Finished size: 8 in (20.3 cm) tall x 7.5 in (19.1 cm) wide when filled; 12 in (30.5 cm) wide when laid flat and empty
- Skill level: Easy to Intermediate
- Terminology: US crochet terms
- Yarn weight: Worsted (#4)
- Hook: 5.0 mm (H-8)
- Number of pieces: 1
- Layout: One seamless globe worked bottom-up in the round, with 12 vertical ribs
- Piece size: 24 in (61.0 cm) around at the widest round
- Size before border: 6.75 in (17.1 cm) tall (bottom rim plus ribbed body)
- Border depth: Top collar 1.25 in (3.2 cm); hanging loop 3.5 in (8.9 cm) including the stem
Materials
Yarn: Use a worsted-weight cotton or a cotton blend. Cotton holds the round shape and does not stretch under the weight of the bags. Acrylic also works, but the windows will sag a little more over time.
- Terracotta (main color): 100 g, about 180 m (197 yd)
- Optional alternate colorway (sage green): 100 g, about 180 m (197 yd) for a second holder
These quantities include a margin of about 20% for your gauge swatch and small tension differences.
Tools:
- 5.0 mm (H-8) crochet hook
- Stitch marker
- Tapestry needle
- Scissors
- Measuring tape
- Blocking pins and a small inflated balloon or ball, about 7.5 in (19.1 cm) across, for shaping
Abbreviations (US Terms)
- ch – chain
- sl st – slip stitch
- sc – single crochet
- dc – double crochet
- sc2tog – single crochet 2 together
- sp – space
- st(s) – stitch(es)
- beg – beginning
- rnd(s) – round(s)
Special stitch: sc2tog. Insert your hook in the next stitch, yarn over and pull up a loop. Insert your hook in the following stitch, yarn over and pull up a loop. Yarn over and draw through all 3 loops on the hook.
Rib and bar: In every mesh round, each rib is 2 dc worked into the 2 dc of the rib below. Each bar is a chain that skips over the chain space below it.
Gauge and Checkpoints
Gauge:
- 14 dc and 8 rnds = 4 in (10.2 cm)
- 14 sc and 16 rnds = 4 in (10.2 cm)
Each dc round adds 0.5 in (1.3 cm) of height, and each sc round adds 0.25 in (0.6 cm). A single chain is about the same width as one stitch.
Test first. Before starting the holder, work Rnds 1–5 and measure them. This test is also the beginning of the real piece. If your gauge is correct, keep going; if not, rip it out and change your hook.
Checkpoints:
| After | Circumference | Height from start |
|---|---|---|
| Rnd 3 | 6.9 in (17.5 cm) | 0.75 in (1.9 cm) |
| Rnd 8 | 24 in (61.0 cm) | 3.25 in (8.3 cm) |
| Rnd 12 | 24 in (61.0 cm) | 5.25 in (13.3 cm) |
| Rnd 15 | 13.7 in (34.8 cm) | 6.75 in (17.1 cm) |
| Rnd 20 | 10.3 in (26.2 cm) | 8 in (20.3 cm) |
If the piece is too big: Go down 0.5 mm in hook size. If only the windows look too wide, work each chain bar more tightly.
If the piece is too small: Go up 0.5 mm in hook size. Do not add extra chains to the bars, because that changes the shape of the globe.
Bottom Rim
The bottom rim is the small solid band around the opening where you pull bags out.
Foundation: Ch 24, then sl st into the first ch to form a ring. Take care not to twist the chain.
Rnd 1: Ch 1, sc in each ch around, sl st to the first sc. (24 sc)
Rnds 2–3: Ch 1, sc in each st around, sl st to the first sc. (24 sc)
Checkpoint: The rim measures 6.9 in (17.5 cm) around and 0.75 in (1.9 cm) tall. The opening is about 2.2 in (5.6 cm) across.
Ribbed Body
The body has 12 ribs and 12 chain bars. The ribs keep the same width for the whole body; only the chain bars get longer and shorter.
Rnd 4 (growth round): Ch 3 (counts as the first dc), dc in the next sc, ch 1. Then repeat dc in the next 2 sc, ch 1 11 times. Sl st to the top of the beg ch-3.
(24 dc + 12 ch = 36 sts total; 12 ribs, 12 bars)
No stitches are skipped in this round. The ch-1 bars are inserted between the pairs, and that is what starts to widen the globe.
Rnd 5 (growth round): Ch 3 (counts as dc), dc in the next dc, ch 2, skip the ch-1 sp. Then repeat dc in the next 2 dc, ch 2, skip the ch-sp 11 times. Sl st to the top of the beg ch-3.
(24 dc + 24 ch = 48 sts total)
Rnd 6 (growth round): Work as Rnd 5, but ch 3 for each bar.
(24 dc + 36 ch = 60 sts total)
Rnd 7 (growth round): Work as Rnd 5, but ch 4 for each bar.
(24 dc + 48 ch = 72 sts total)
Rnd 8 (growth round): Work as Rnd 5, but ch 5 for each bar.
(24 dc + 60 ch = 84 sts total)
Checkpoint: The piece measures 24 in (61.0 cm) around and 3.25 in (8.3 cm) from the start. Each window is about 1.4 in (3.6 cm) wide, and each rib is about 0.6 in (1.5 cm) wide.
Rnds 9–12 (even rounds): Work as Rnd 5, but ch 5 for each bar.
(84 sts total in each round)
This is the widest part of the lantern. Keep the bars at an even tension so the windows line up as neat rectangles.
Checkpoint: The piece measures 5.25 in (13.3 cm) from the start.
Rnd 13 (decrease round): Work as Rnd 5, but ch 4 for each bar.
(24 dc + 48 ch = 72 sts total)
Rnd 14 (decrease round): Work as Rnd 5, but ch 3 for each bar.
(24 dc + 36 ch = 60 sts total)
Rnd 15 (decrease round): Work as Rnd 5, keeping ch 2 for each bar.
(24 dc + 24 ch = 48 sts total)
Checkpoint: The piece measures 13.7 in (34.8 cm) around and 6.75 in (17.1 cm) tall.
At this stage the shape already looks round: narrow at the bottom, full in the middle, and gathering in at the top. The top section is one round shorter than the bottom (Rnds 13–15 versus Rnds 4–8). Together with the wider collar, this makes the top opening larger than the bottom, which makes loading bags easy.
Border: Top Collar, Bottom Edge and Hanging Loop
Border gauge: 14 sc and 16 rnds = 4 in (10.2 cm). Each sc round adds 0.25 in (0.6 cm).
Top Collar
Rnd 16 (conversion round): Ch 1, sc in each of the next 2 dc, 2 sc in the next ch-2 sp. Then repeat sc in the next 2 dc, 2 sc in the next ch-2 sp 11 times. Sl st to the first sc.
(24 sc worked 1 per dc + 24 sc worked into the ch-2 spaces, 1 per chain, + 0 extra = 48 sc)
Each repeat of 2 dc plus 2 chains becomes exactly 4 sc. That makes 12 repeats x 4 sc = 48.
Rnd 17 (decrease round): Ch 1. Repeat sc in the next 2 sts, sc2tog 12 times. Sl st to the first sc.
(12 repeats x 3 sts = 36 sc)
Rnds 18–20: Ch 1, sc in each st around, sl st to the first sc.
(36 sc in each round)
Why the math works: There is one decrease per rib repeat. That leaves exactly 3 sc above each rib-and-window section, so the collar sits evenly and does not twist. At 3.5 sc per inch, 36 sc gives a collar 10.3 in (26.2 cm) around, which is about 3.3 in (8.4 cm) across. That is wide enough for a hand and a bundle of bags. The collar’s 5 rounds add 1.25 in (3.2 cm), for a total height of 8 in (20.3 cm).
Do not fasten off.
Hanging Loop
Rotate the holder so the round’s join, at the back of the collar, faces you. You will now work in rows.
Rows 1–4 (stem): Ch 1, sc in the next 4 sts, turn. On Rows 2–4, ch 1 and sc in each of the 4 sc of the row before, then turn.
(4 sc in each row)
The stem measures 1 in (2.5 cm).
Row 5 (ring): Ch 24, then sl st into the first sc of Row 4. This forms a chain ring above the stem.
Rnd 6 (covering round): Work sc into the ring, around the chain rather than into individual chain stitches, until you have 36 sc. Slide the stitches together as you go so they pack tightly. Sl st into the last sc of Row 4.
(24 sc to match the 24 chains + 12 extra sc = 36 sc)
The 12 extra stitches let the covering sit firm and fully hide the chain. The finished loop measures about 2.5 in (6.4 cm) high.
Fasten off.
Bottom Edge Finish
Join yarn at any stitch of the foundation chain on the bottom rim. Sl st loosely in each foundation ch around.
(24 sl sts)
Fasten off. This round firms up the bottom opening so it doesn’t stretch out when you pull bags through it.
Final Blocking
- Weave in all ends along the ribs, where they won’t show through the windows.
- Wet the holder with cool water, then gently squeeze out the water. Don’t wring it.
- Roll the holder in a towel to remove extra moisture.
- Inflate a balloon to about 7.5 in (19.1 cm) across and put it inside the holder. The collar should sit at the top and the bottom rim should be centered underneath.
- Straighten each rib so it runs in a clean vertical line from the top opening to the bottom opening.
- Even out the chain bars so each window is a level rectangle.
- Pin the hanging loop upright and smooth the covering stitches.
- Let the holder dry completely, then deflate and remove the balloon.
Final Quality-Control Checklist
- 12 ribs, each 2 dc wide, running unbroken from Rnd 4 to Rnd 15
- 12 windows per round, with bars of 1, 2, 3, 4, 5, 5, 5, 5, 5, 4, 3, 2 chains from Rnd 4 to Rnd 15
- Bottom rim: 24 sc, 6.9 in (17.5 cm) around
- Widest round: 84 sts, 24 in (61.0 cm) around
- Collar: 36 sc, 10.3 in (26.2 cm) around
- Total height: 8 in (20.3 cm), not counting the loop
- Loop centered over the round’s join, firm and fully covered
- All ends hidden inside the ribs
Troubleshooting
Ribs spiral around the globe: You probably worked into a chain space instead of the dc pair. Make sure each pair of dc goes exactly on top of the pair below.
Windows sag: Your chains are too loose. Chain more firmly, or go down a hook size for the bars only.
Globe looks flat or squat: Check your round height. Each dc round should add 0.5 in (1.3 cm). Taller stitches help keep the round shape.
Collar flares: Check that you worked the Rnd 17 decreases. Without them, the collar has 48 sc instead of 36.
Bags fall out of the bottom: Work a second sl st round on the bottom edge, or chain the foundation more tightly.
Loop twists: Make sure you sl st Row 5 into the first sc of Row 4, not into a stitch further along the row.
Care
Hand wash in cool water and lay flat, or dry over a balloon, to keep the round shape. Don’t tumble dry, because heat can loosen the chain bars.

Final Notes
Each stage builds on the one before. A 24 sc rim measuring 6.9 in (17.5 cm) grows to an 84-stitch widest round of 24 in (61.0 cm). The body narrows back to 48 sts, converts to 48 sc, and finishes with a 36 sc collar of 10.3 in (26.2 cm). The holder measures 8 in (20.3 cm) tall, with a 3.5 in (8.9 cm) loop on top.
If you check the measurement at each checkpoint, the finished holder will match. Hang it near the pantry, load bags in through the top, and pull them out through the bottom.
Happy crocheting!