

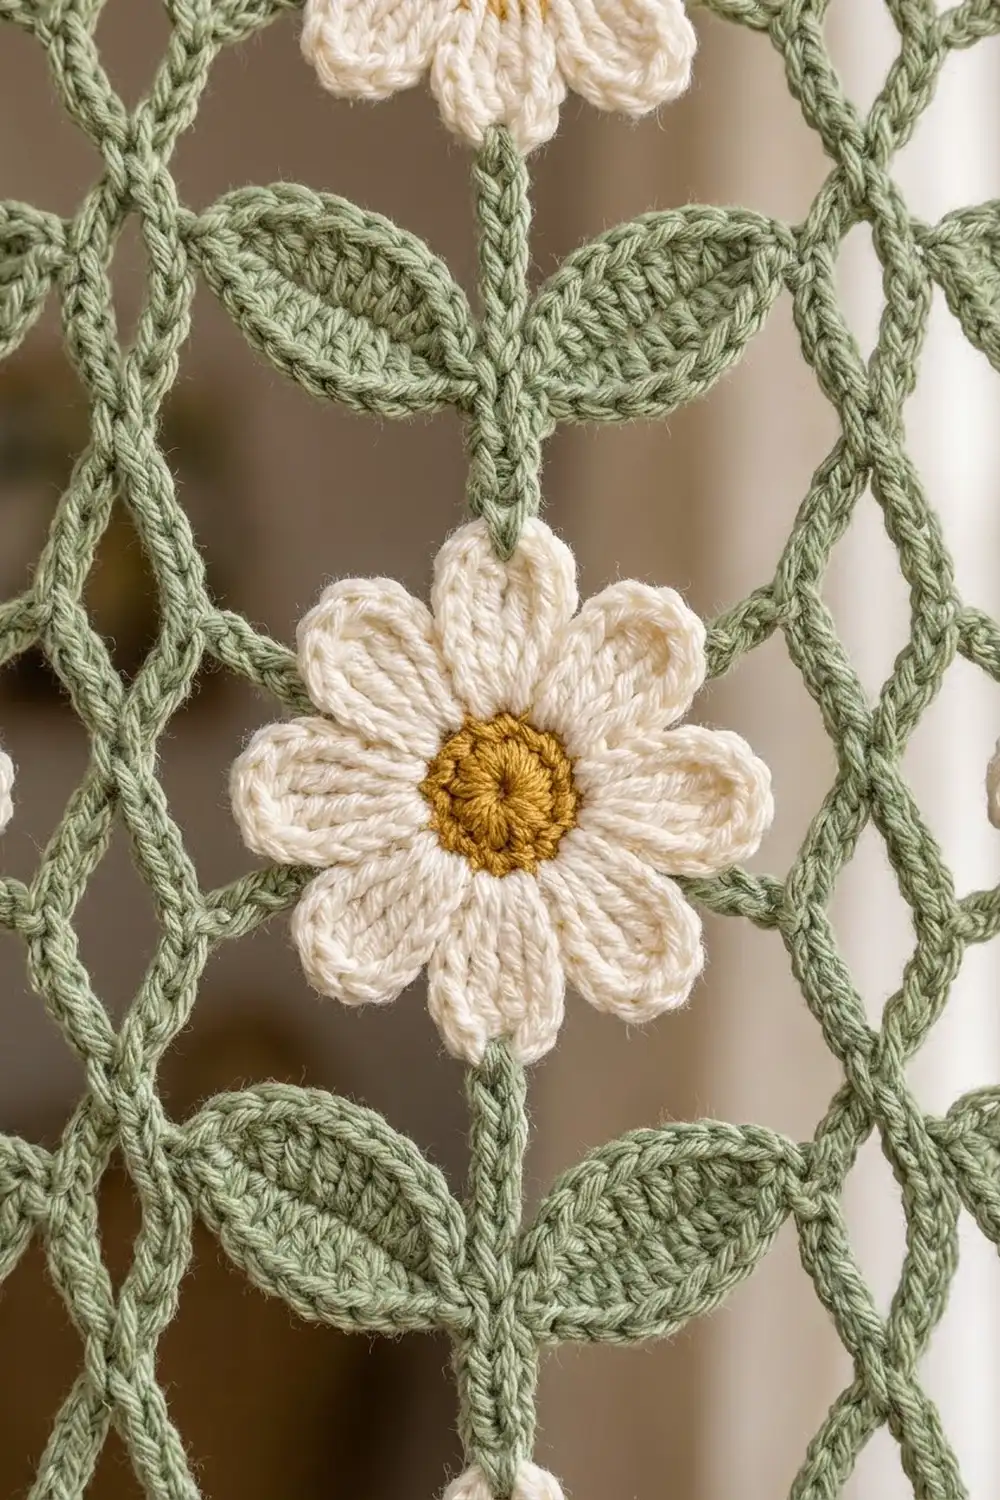
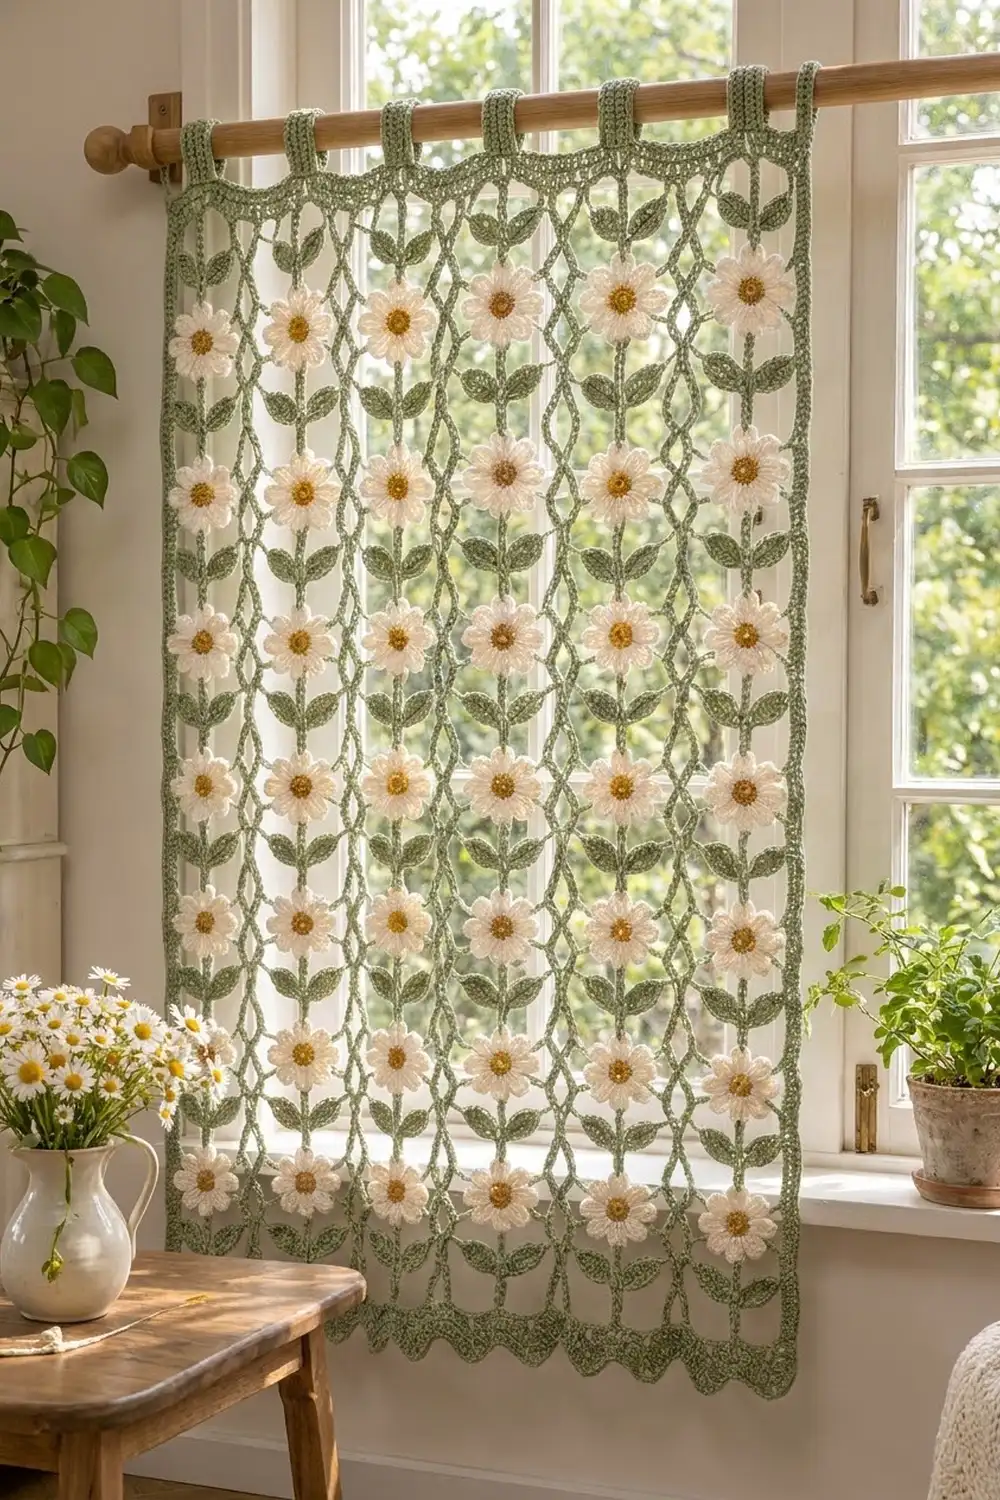
This curtain looks like a summer meadow seen through a window. Cream daisies with warm gold centers hang in neat vertical columns. A sage green stem with a pair of leaves links each daisy to the next, and a diamond lattice of braided-looking cords ties the columns together. A solid green header band with tab loops holds everything on a wooden rod.
The palette has three colors: sage green, cream, and mustard gold. The style is light and cottage-inspired, and daylight shows through the open lattice around each daisy.
This pattern uses US crochet terms. The finished curtain measures 39.25 in (99.7 cm) wide and 74.5 in (189.2 cm) long from the top of the header to the bottom edge. The tabs stand about 2 in (5.1 cm) above the header.
The curtain is built from small pieces. You crochet the header and tabs first. Then you make 130 flower units, each a daisy with its own stem and leaf pair, and join each unit to the one above as you go. This forms 10 hanging strands. Cords worked in foundation single crochet make the lattice, and edge cords finish the sides and bottom.
Finished Size and Construction
- Finished size: 39.25 in x 74.5 in (99.7 cm x 189.2 cm), plus 2 in (5.1 cm) tabs
- Skill level: Intermediate
- Terminology: US
- Yarn weight: Worsted (#4) cotton
- Hook: 4.5 mm (US 7)
- Number of pieces: 130 flower units, plus 1 header band with 11 tabs
- Layout: 10 strands across x 13 daisies down
- Piece size: each daisy is 3 in (7.6 cm) across from petal tip to petal tip; each unit repeats every 5.5 in (14.0 cm)
- Size before border: 39 in x 74.5 in (99.1 cm x 189.2 cm), measured across the outer petal tips
- Border depth: 0.25 in (0.6 cm) edge cords, adding 0.125 in (0.3 cm) per side
Materials
Use a smooth worsted-weight cotton, about 85 m per 50 g. Cotton holds the petal points well and blocks crisply. Fuzzy yarns blur the lattice, so avoid them.
- Sage green: 1,000 g (1,700 m), about 20 skeins
- Cream: 450 g (765 m), about 9 skeins
- Mustard gold: 160 g (272 m), about 4 skeins
These amounts include about 20 percent extra for swatches, tails, and joins.
Tools:
– 4.5 mm (US 7) crochet hook
– Removable stitch markers (at least 40)
– Tapestry needle
– Scissors and tape measure
– Blocking mats or a clean floor area, rust-proof pins, spray bottle
Abbreviations (US Terms)
- ch chain
- sl st slip stitch
- sc single crochet
- hdc half double crochet
- dc double crochet
- tr treble crochet
- st(s) stitch(es)
- yo yarn over
- fsc foundation single crochet
- fhdc foundation half double crochet
Foundation single crochet (fsc): Ch 2. Insert your hook in the 2nd ch from the hook, yo and pull up a loop, yo and pull through 1 loop (this makes the “chain”), then yo and pull through 2 loops. For each following fsc, insert your hook into the “chain” of the previous fsc and repeat. Here the fsc is used as a free-standing cord that looks like a two-strand braid.
Foundation half double crochet (fhdc): Ch 3. Yo, insert your hook in the 3rd ch from the hook, pull up a loop, yo and pull through 1 loop (the “chain”), then yo and pull through 3 loops. For each following fhdc, yo, insert your hook into the “chain” of the previous stitch and repeat.
Gauge and Checkpoints
- hdc: 16 sts and 12 rows = 4 in (10.2 cm)
- fsc cord: 16 fsc = 4 in (10.2 cm), measured without stretching
Make one complete flower unit before starting the full project. Check it at each stage:
- After Round 2, the gold center measures 1.25 in (3.2 cm) across.
- After Round 3, the daisy measures 3 in (7.6 cm) from tip to opposite tip.
- Each leaf measures 1.75 in (4.4 cm) long and 0.75 in (1.9 cm) wide.
- The 10-fsc stem measures 2.5 in (6.4 cm).
If your pieces come out too big, go down one hook size. If they’re too small, go up one. Small errors add up: 0.25 in (0.6 cm) extra per unit becomes 3.25 in (8.3 cm) over a strand of 13 units.
Part 1: Header Band
Use green.
Row 1: Fhdc 157. Turn. [157 sts]
Rows 2–9: Ch 1 (does not count as a stitch), hdc in each st across. Turn. [157 sts]
Fasten off. The header measures 39.25 in x 3 in (99.7 cm x 7.6 cm).
Along the bottom edge (the free foundation loops of Row 1), mark sts 7, 23, 39, 55, 71, 87, 103, 119, 135, and 151. The markers are exactly 16 sts (4 in / 10.2 cm) apart. Each strand will hang from one of these stitches.
Part 2: Tabs
Work 11 tabs of 7 sts each across Row 9, leaving 8 sts unworked between tabs. Start the tabs at sts 1, 16, 31, 46, 61, 76, 91, 106, 121, 136, and 151. Tab 11 uses sts 151–157, so there’s a tab at each edge.
Each tab, Rows 1–15: Join green in the first st of the tab (Row 1 only). Ch 1, hdc in each of the 7 sts. Turn. [7 sts]
Each tab strip measures 1.75 in x 5 in (4.4 cm x 12.7 cm). Fold the strip to the back and whipstitch its last row to the back of header Row 6. This leaves a loop about 2 in (5.1 cm) tall above the header.
Check: 11 tabs x 7 sts = 77, plus 10 gaps x 8 sts = 80, for a total of 157.
Part 3: Flower Units
Each unit is one daisy plus the stem and leaf pair above it.
Daisy Center (Gold)
Round 1: Make a magic ring, ch 1, 8 sc in the ring. Sl st to the first sc. [8 sts]
Round 2: Ch 1, 2 sc in each st around. Sl st to the first sc. Fasten off. [16 sts]
Petals (Cream)
Round 3: Join cream in any st. *Sc in next st, (hdc, dc, tr, dc, hdc) in next st; repeat from * 7 more times. Sl st to the first sc. Fasten off. [48 sts: 8 sc + 40 petal sts; 8 petals]
The tr makes the pointed tip of each petal. Number the petals 1–8 clockwise: petal 1 is the top, petal 3 is the right side, petal 5 is the bottom, and petal 7 is the left side. Mark petals 3, 5, and 7.
Stem and Leaves (Green)
Lower stem: Join green with a sl st in the tr at the tip of petal 1. Ch 2 and work 5 fsc (the ch 2 is the base of the first fsc). The top of the 5th fsc is the node. Mark it.
Left leaf: Ch 8.
– Side 1: Sl st in the 2nd ch from the hook, then sc, hdc, dc, hdc, and sc in the next 5 ch, and sl st in the last ch. [7 sts]
– Side 2: Working in the opposite loops of the same chains back toward the tip: sl st, sc, hdc, dc, hdc, sc, sl st. [7 sts]
– Tip: (Sl st, ch 2, sl st) in the skipped ch at the tip.
– Vein: Make 7 sl sts down the center of the leaf, between the two sides, back to the base. Sl st in the node.
Right leaf: Work it exactly like the left leaf, from the same node, on the other side of the stem.
Upper stem: Insert your hook into the “chain” of the 5th fsc and work 5 more fsc. [10 fsc total]
Join: For the first unit of a strand, sl st into a marked header stitch. For every other unit, sl st into the tr at the tip of petal 5 (the bottom petal) of the daisy above. Fasten off.
Check: from one daisy center to the next is 1.5 + 2.5 + 1.5 = 5.5 in (14.0 cm). The node sits halfway, 2.75 in (7.0 cm) from each daisy center.
Make All Pieces
Make 130 flower units in total:
- Gold: 130 centers (Rounds 1–2)
- Cream: 130 petal rounds (Round 3)
- Green: 130 stems with 260 leaves
Build each strand from the top down: unit 1 joins to the header, unit 2 joins to unit 1, and so on through unit 13. If you prefer, make all the daisies first and add the stems afterward.
Layout (T = tab, H = header, D = daisy):
T   T   T   T   T   T   T   T   T   T   T
HHHHHHHHHHHHHHHHHHHHHHHHHHHHHHHHHHHHHHHHH
  D   D   D   D   D   D   D   D   D   D     row 1
  D   D   D   D   D   D   D   D   D   D     row 2
  ...                                       rows 3-12
  D   D   D   D   D   D   D   D   D   D     row 13
Joining
The vertical joins are already done, because each stem’s last sl st attaches it to the unit above. Now join the strands side to side with the lattice.
Pin the header straight and lay the strands flat, with their centers 4 in (10.2 cm) apart. The 10 strands leave 9 gaps, and each gap gets 2 crossing cords.
Segment math: From a node to the side petal tip of the next strand is 2.5 in (6.4 cm) across and 2.75 in (7.0 cm) down. That diagonal is about 3.7 in (9.4 cm). Each segment uses 15 fsc (3.75 in / 9.5 cm), which leaves a slight drape.
Cord AB (A = left strand, B = right strand): Join green with a sl st in node 0 of strand A (the node of unit 1). Ch 2, work 15 fsc, sl st in the tip of petal 7 on the next daisy of strand B. Ch 2, work 15 fsc, sl st in the next node down on strand A. Repeat from * 11 more times. Then ch 2, work 15 fsc, and sl st in petal 7 of daisy 13 of strand B. Fasten off. [25 segments, 375 fsc]
Cord BA: Work the mirror image. Start at node 0 of strand B and zigzag between the petal 3 tips of strand A and the nodes of strand B. Lay this cord over Cord AB wherever they cross, and leave the crossings unjoined. [25 segments, 375 fsc]
Work both cords in all 9 gaps, for 18 cords in total. Every inner side petal gets one cord, and every interior node gets two.
Tension: Keep each sl st join firm but not tight. A short segment tilts the daisy toward it. Rework that segment instead of stretching it.
Size checkpoint: Across the outer petal tips, the width is 9 x 4 in + 2 x 1.5 in = 39 in (99.1 cm). From the top of the header to the bottom petal tips, the length is 3 + 4 + (12 x 5.5) + 1.5 = 74.5 in (189.2 cm).
Border
Border gauge: 16 fsc = 4 in (10.2 cm), the same as the lattice.
Side edge cords (make 2): Join green in the left corner st of header Row 1. Ch 2, work 16 fsc, then sl st in the petal 7 tip of daisy 1 on strand 1. Ch 2, work 22 fsc, sl st in the petal 7 tip of the next daisy down. Repeat from * 11 more times. Fasten off. [16 + (12 x 22) = 280 fsc]
Work the right edge the same way, joining into the petal 3 tips of strand 10.
Why the side math works: The bottom of the header to the center of daisy 1 is 2.5 + 1.5 = 4 in (10.2 cm), which is 16 fsc. Daisy center to daisy center is 5.5 in (14.0 cm), which is 22 fsc. The header corner sits only 0.125 in (0.3 cm) outside the petal tips, so the cord hangs straight.
Bottom edge cord: Join green with a sl st in the petal 5 tip of daisy 13 on strand 1. Ch 2, work 16 fsc, sl st in the petal 5 tip of daisy 13 on the next strand. Repeat from * 8 more times. Fasten off. [9 x 16 = 144 fsc]
Why the bottom math works: The bottom tips are 4 in (10.2 cm) apart, and 16 fsc = 4 in. The cord spans 36 in (91.4 cm), which matches the 144 header stitches between the first and last markers. Add 6.5 sts on each side and you get the header’s 157 sts, or 39.25 in (99.7 cm).
Final Blocking
- Weave in all tails along the back of the cords.
- Lay the curtain face down on mats or a clean floor.
- Pin the header straight at 39.25 in x 3 in (99.7 cm x 7.6 cm).
- Pin each strand vertical, 4 in (10.2 cm) apart, with daisy centers every 5.5 in (14.0 cm).
- Pin each daisy at petals 1, 3, 5, and 7 so it lies round and flat.
- Angle each leaf up and outward at about 45 degrees.
- Mist until damp and let it dry completely, at least 24 hours.
Final Quality-Control Checklist
- 130 daisies, each with 8 pointed petals and a flat gold center
- Every stem has 10 fsc, with a leaf pair at the node
- Daisies line up in 13 straight rows across the curtain
- 18 lattice cords of 375 fsc each, crossing cleanly
- Side cords have 280 fsc each; the bottom cord has 144 fsc
- Header is 157 sts by 9 rows, with 11 evenly spaced tabs
- Finished size is 39.25 in x 74.5 in (99.7 cm x 189.2 cm)
Troubleshooting
Daisies cup or ruffle: Check the 1.25 in (3.2 cm) center. Adjust your tension on Round 2.
One strand hangs longer than the others: Count the stem stitches. One extra fsc per unit adds 3.25 in (8.3 cm) per strand.
Lattice pulls daisies sideways: One segment is short. Recount it; it should have 15 fsc.
Leaves curl: Hover steam over them without touching, then pin them flat.
Header waves: Recount to 157 sts. If your hdc rows are looser than Row 1, go down one hook size for Rows 2–9.
Tabs stretch: Whipstitch through both layers across all 7 sts.
Care
Hand wash in cool water with mild soap, then lay flat and reshape the daisies and lattice. Never hang the curtain while it’s wet, because the weight will stretch the cords.
Final Notes
Here is how the measurements build on each other. Each daisy is 3 in (7.6 cm) across, and each stem is 2.5 in (6.4 cm), so the units repeat every 5.5 in (14.0 cm). The strands hang 4 in (10.2 cm) apart and are linked by 15-fsc lattice segments. The 157-st header sets the 39.25 in (99.7 cm) width, and 13 units plus the header give 74.5 in (189.2 cm) of length. Check each step, and the curtain will hang straight.
Happy crocheting!