

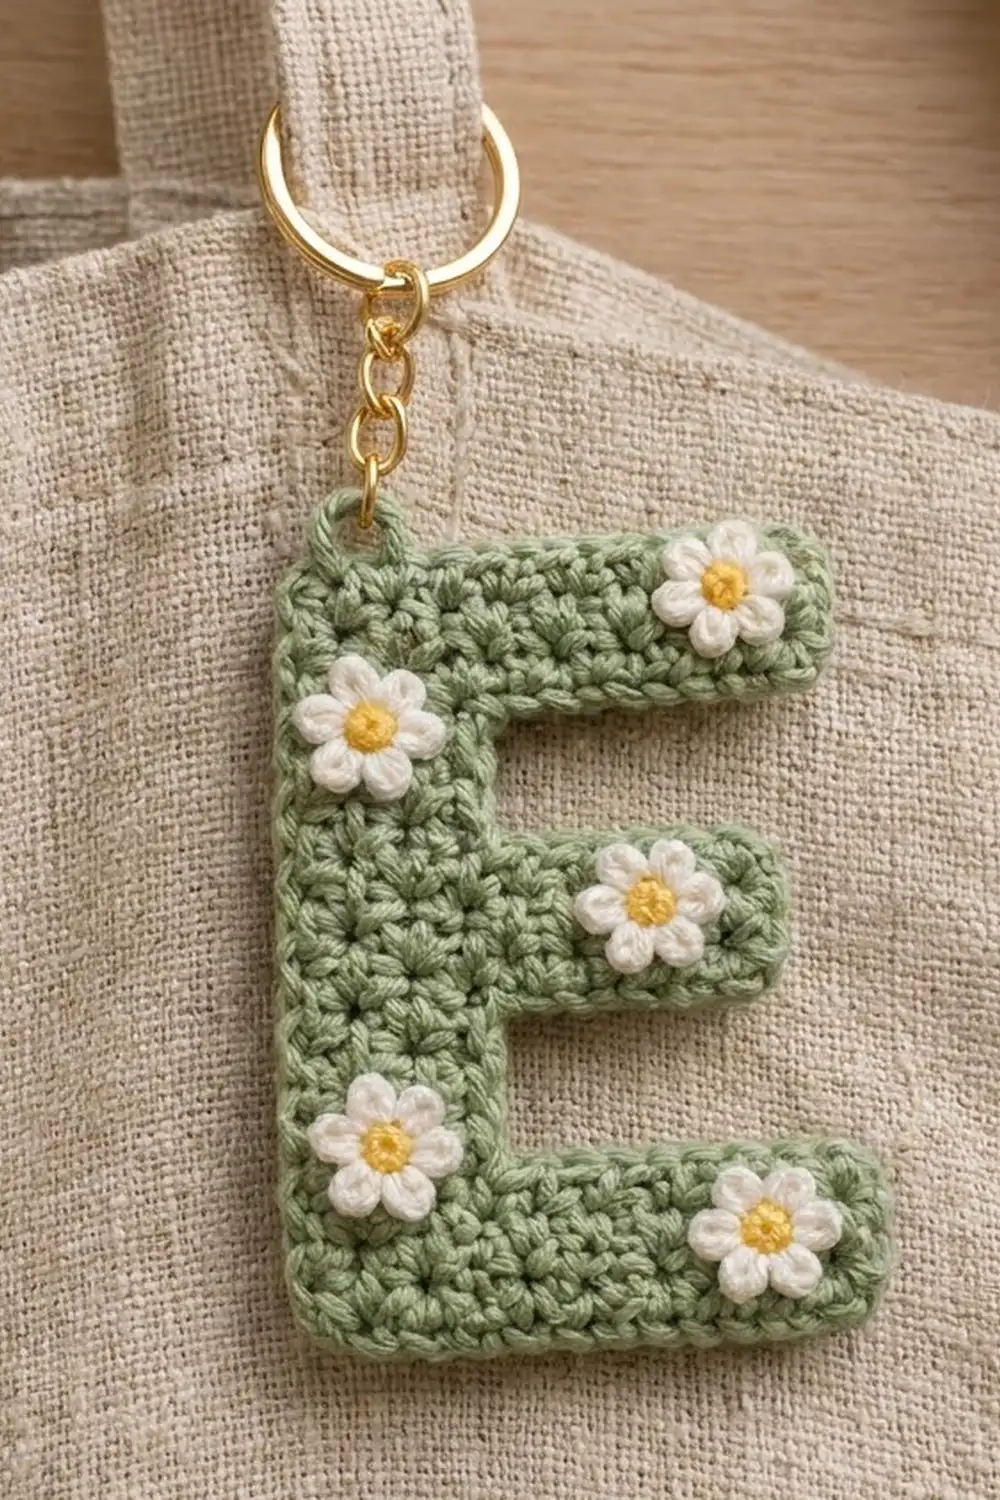
This little letter E is a soft sage green keychain with a spring garden look. Five tiny white daisies with sunny yellow centers sit on the letter: one at the tip of each arm and two along the spine. A gold keyring on a short chain finishes it, ready to clip to a tote bag, backpack, or set of keys.
The style is clean and graphic. The letter has crisp, squared corners and a dense, even fabric that keeps its shape. The daisies add texture and a hand-made touch without making the piece bulky. The whole pattern is written in US crochet terms.
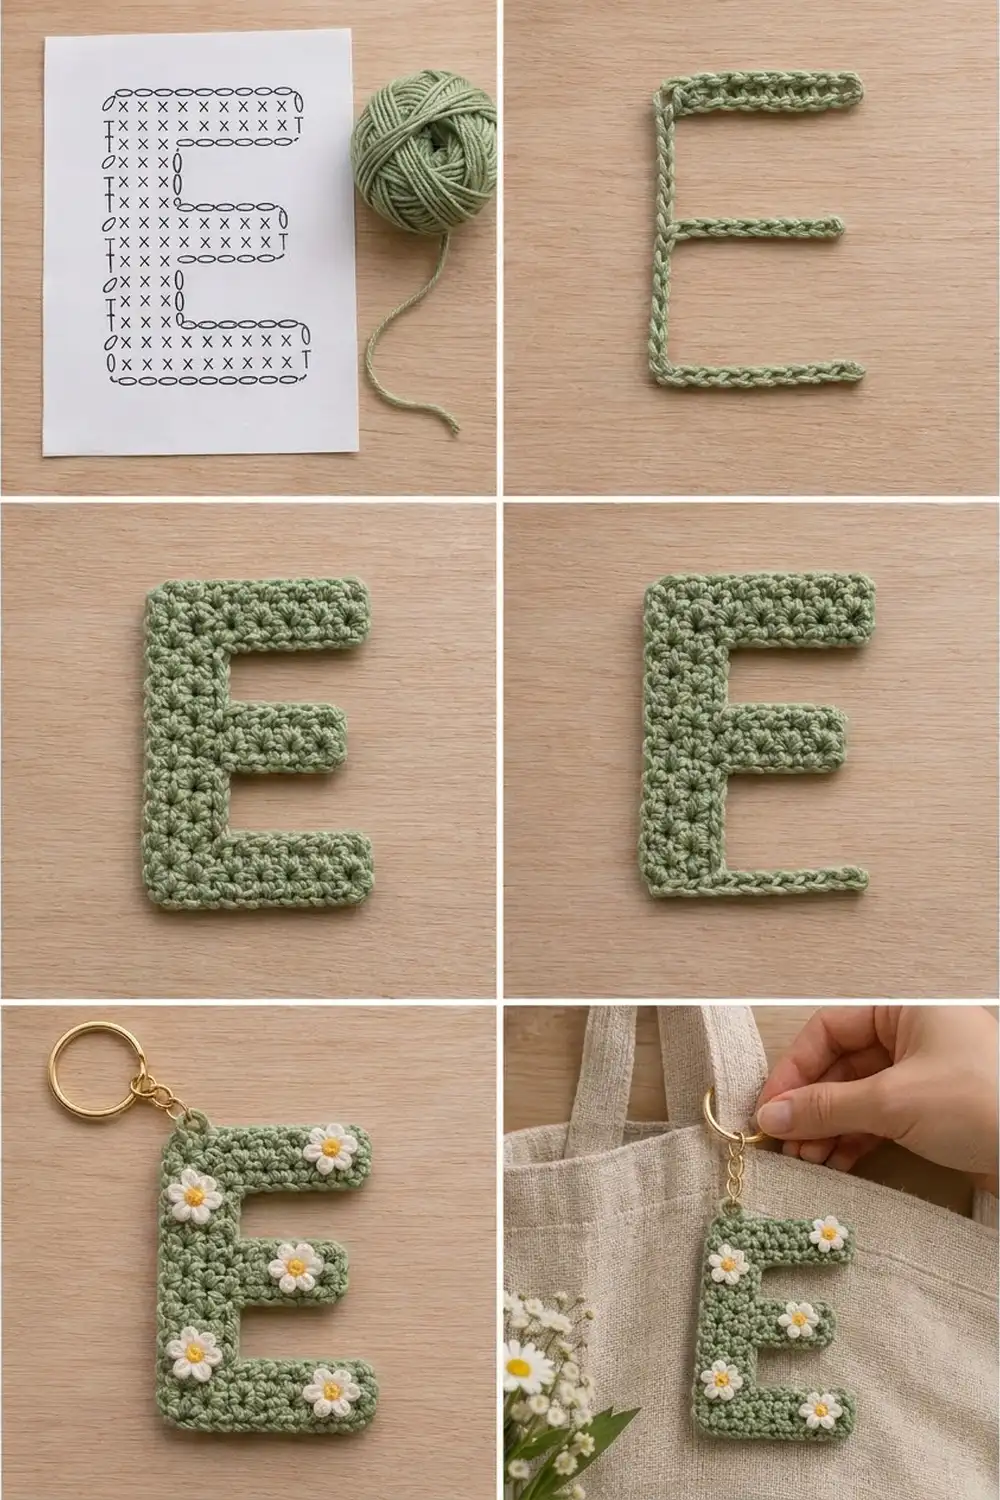
The finished keychain is about 3.2 in (8.1 cm) wide and 4.2 in (10.7 cm) tall. The letter is worked flat in rows of single crochet from the bottom arm up. The middle and top arms are added with short chain extensions as you go. One round of single crochet border then outlines the whole letter. The daisies are made separately and sewn on, and the hardware goes on last.
Every stage has a measurement checkpoint, so you can catch size problems early.
Finished Size and Construction
- Finished size: 3.2 in (8.1 cm) wide x 4.2 in (10.7 cm) tall
- Skill level: Easy / advanced beginner
- Terminology: US crochet terms
- Yarn weight: DK / light (#3) cotton for the letter; fingering (#1) cotton for the daisies
- Hook: 3.5 mm (US E-4) for the letter; 2.5 mm for the daisies
- Number of pieces: 1 letter piece, plus 5 small daisy appliqués
- Layout: Single letter E, spine on the left, arms opening to the right
- Piece size (body before border): 2.8 in (7.1 cm) wide x 3.8 in (9.7 cm) tall
- Border depth: 0.2 in (0.5 cm) on every edge, adding 0.4 in (1.0 cm) to each overall dimension
- Daisy size: about 0.7 in (1.8 cm) across
Materials
Yarn advice: Use a smooth mercerized or combed cotton. Cotton gives crisp stitch definition, holds the letter shape, and wears well on a bag. Avoid fuzzy or very stretchy yarns, because the letter will lose its sharp corners.
- Sage green (DK cotton): 12 g / 25 m
- White (fingering cotton): 4 g / 15 m
- Yellow (fingering cotton): 2 g / 5 m
These quantities include a margin for your gauge swatch and weaving in ends.
Tools:
- 3.5 mm (US E-4) crochet hook
- 2.5 mm crochet hook
- Tapestry needle, plus a fine sewing needle (optional) for the daisies
- Scissors
- 2 stitch markers
- 1 in (2.5 cm) gold split keyring with a short chain, about 0.75 in (1.9 cm) long
- One 8 mm gold jump ring
- 2 pairs of flat-nose pliers
- Rust-proof pins and a blocking mat
- Spray starch (optional)
Abbreviations (US Terms)
- ch – chain
- sc – single crochet
- dc – double crochet
- sl st – slip stitch
- st(s) – stitch(es)
- MR – magic ring
- RS – right side
- rep – repeat
- sc2tog – single crochet 2 together: insert hook in first st (or row end) and pull up a loop, insert hook in next st (or row end) and pull up a loop, yarn over and pull through all 3 loops on hook.
Special stitch – Daisy petal: (ch 2, dc, ch 2, sl st) all in the same stitch.
Gauge and Checkpoints
Gauge: 5 sc and 5.5 rows = 1 in (2.5 cm) with the 3.5 mm hook. A swatch of 10 sc x 11 rows should measure 2 in (5.1 cm) square.
Test piece first: Rows 1–4 of the letter work as a test piece. Make them first and measure before you go on.
Checkpoints:
- After Row 4: 2.8 in (7.1 cm) wide x about 0.7 in (1.8 cm) tall
- After Row 12: about 2.2 in (5.6 cm) tall. The middle arm should measure 2.4 in (6.1 cm) from the spine edge.
- After Row 21: 2.8 in (7.1 cm) wide x about 3.8 in (9.7 cm) tall
- After the border: 3.2 in (8.1 cm) x 4.2 in (10.7 cm)
If the piece is too big: Go down 0.25–0.5 mm in hook size and restart. Don’t skip stitches to fix it, because the border counts depend on the exact stitch counts.
If the piece is too small: Go up 0.25–0.5 mm in hook size.
If only the height is off: Your row gauge differs from the pattern. Small differences are fine, and you can even them out during blocking.
Letter Body
Use the 3.5 mm hook and sage green.
To keep directions clear, this pattern uses two names for the edges:
- Spine edge: the long straight edge of the E
- Open edge: the side where the arms end
Columns are numbered 1–14 from the spine edge, so the spine is columns 1–5.
Row 1: Ch 15. Sc in the 2nd ch from the hook and in each ch across. (14 sc) You finish at the open edge.
Rows 2–4: Ch 1, turn, sc in each st across. (14 sc)
Row 4 ends at the spine edge. This finishes the bottom arm. Checkpoint: 2.8 in (7.1 cm) wide.
Row 5: Ch 1, turn, sc in the first 5 sts. Leave the remaining 9 sts unworked. (5 sc)
Rows 6–9: Ch 1, turn, sc in each st across. (5 sc)
Row 9 ends at the inner edge of the spine. That is the side facing the arms, where the middle arm will begin.
Row 10 (middle arm): Ch 8, turn. Sc in the 2nd ch from the hook and in the next 6 ch (7 sc). Then sc in each of the 5 spine sts. (12 sc)
Row 10 ends at the spine edge.
Rows 11–12: Ch 1, turn, sc in each st across. (12 sc)
Row 12 ends at the spine edge. Checkpoint: about 2.2 in (5.6 cm) tall.
Row 13: Ch 1, turn, sc in the first 5 sts. Leave the remaining 7 sts unworked. (5 sc)
Rows 14–17: Ch 1, turn, sc in each st across. (5 sc)
Row 17 ends at the inner edge of the spine.
Row 18 (top arm): Ch 10, turn. Sc in the 2nd ch from the hook and in the next 8 ch (9 sc). Then sc in each of the 5 spine sts. (14 sc)
Rows 19–21: Ch 1, turn, sc in each st across. (14 sc)
Fasten off. Weave in the ends along the spine edge.
Checkpoint: 2.8 in (7.1 cm) x about 3.8 in (9.7 cm). The spine gaps are 5 rows tall, the outer arms 4 rows, and the middle arm 3 rows. The gap rows are odd-numbered so each chain extension starts on the correct side without cutting the yarn.
Choose your RS: Lay the piece so the E reads correctly, with the spine on the left. This face is the RS for the border and the daisies.
Daisy Appliqués (Make 5)
Use the 2.5 mm hook.
Rnd 1 (yellow): MR, 6 sc in the ring. Pull the ring tight and sl st to the first sc. (6 sc)
Fasten off and weave in the yellow ends on the back. The center measures about 0.25 in (0.6 cm).
Rnd 2 (white): Join white with a sl st in any sc. Work a petal in the same st, then sl st in the next st. Rep 5 more times. On the last rep, the final sl st lands in the joining st. (6 petals)
Fasten off, leaving an 8 in (20.3 cm) tail for sewing.
Each daisy measures about 0.7 in (1.8 cm) across. Set them aside. You will sew them on after blocking.
Border
Border gauge: The border keeps the body gauge of 5 sc per 1 in (2.5 cm) along stitch edges. Work 1 sc into each row end, because one sideways sc is about the same height as one sc row.
Corner rules:
- Outer corners (8 total): Work 3 sc in the corner stitch. That is 1 sc for the stitch itself plus 2 extra sc.
- Inner corners (4 total): Sc2tog over the last stitch or row end of one edge and the first of the next.
Rnd 1: With the RS facing and the 3.5 mm hook, join sage green in the bottom-left foundation ch (column 1). Ch 1 (does not count as a stitch), then work around the letter in this order:
- Bottom edge (foundation): 3 sc in column 1, 1 sc in each of columns 2–13 (12 sc), 3 sc in column 14. (18 sc)
- Open edge of bottom arm: 1 sc in each row end of Rows 1–4. (4 sc)
- Top of bottom arm (unworked sts of Row 4): 3 sc in column 14, 1 sc in each of columns 13–7. (10 sc)
- Inner corner A: sc2tog over column 6 of Row 4 and the row end of Row 5. (1 st)
- Inner spine, Rows 6–8: 1 sc in each row end. (3 sc)
- Inner corner B: sc2tog over the row end of Row 9 and the free loop of the column-6 ch. (1 st)
- Underside of middle arm: 1 sc in the free loop of each of columns 7–11 (5 sc), 3 sc in column 12. (8 sc)
- Open edge of middle arm: 1 sc in each row end of Rows 10–12. (3 sc)
- Top of middle arm (unworked sts of Row 12): 3 sc in column 12, 1 sc in each of columns 11–7. (8 sc)
- Inner corner C: sc2tog over column 6 of Row 12 and the row end of Row 13. (1 st)
- Inner spine, Rows 14–16: 1 sc in each row end. (3 sc)
- Inner corner D: sc2tog over the row end of Row 17 and the free loop of the column-6 ch. (1 st)
- Underside of top arm: 1 sc in each free loop of columns 7–13 (7 sc), 3 sc in column 14. (10 sc)
- Open edge of top arm: 1 sc in each row end of Rows 18–21. (4 sc)
- Top edge (Row 21): 3 sc in column 14, 1 sc in each of columns 13–2 (12 sc), 3 sc in column 1. (18 sc)
- Spine edge: 1 sc in each row end of Rows 21–1. (21 sc)
Sl st to the first sc. Fasten off and weave in the ends.
Round total: 114 sts. That is 102 (1 per existing edge stitch, chain, or row end) + 16 (2 extra sc at each of the 8 outer corners) − 4 (one stitch saved at each of the 4 inner-corner sc2togs).
Why the math works: The 12 edges of the letter add up to 102 working spots:
14 + 4 + 9 + 5 + 7 + 3 + 7 + 5 + 9 + 4 + 14 + 21 = 102
Each corner stitch is counted once, inside its own edge. The 3-sc groups add exactly enough fullness to turn 90 degrees, and the sc2togs remove fullness where the edge turns inward, so nothing ruffles or cups. The border adds 0.2 in (0.5 cm) on each side:
- Width: 2.8 in + 0.4 in = 3.2 in (8.1 cm)
- Height: 3.8 in + 0.4 in = 4.2 in (10.7 cm)
Final Blocking
- Wet the letter (without the daisies) in cool water and gently press out the excess. Don’t wring it.
- Lay it RS up on a blocking mat.
- Pin the 8 outer corners first, shaping the piece to 3.2 in (8.1 cm) x 4.2 in (10.7 cm).
- Pin each inner corner so the gaps between the arms are straight and even.
- Check that the spine measures about 1.4 in (3.6 cm) wide along its whole length.
- Mist lightly with spray starch if you want a stiffer keychain (optional).
- Let it dry completely, then unpin.
- Place the daisies. Center each daisy on these RS positions:
- Top arm: column 12, between Rows 19 and 20
- Upper spine: column 3, Row 15
- Middle arm: column 10, Row 11
- Lower spine: column 3, Row 7
- Bottom arm: column 11, between Rows 2 and 3
- Sew the daisies on. With the white tail, sew a small circle around the yellow center, then tack down each petal tip. Keep the stitches small and work through the sage fabric only, so nothing shows on the back.
- Attach the hardware. Open the jump ring with two pliers, twisting sideways. Thread it through the center sc of the top-left 3-sc corner group and the stitch just below it. Add the end link of the keyring chain, then close the ring fully.
Final Quality-Control Checklist
- Body measured 2.8 in (7.1 cm) x 3.8 in (9.7 cm) before the border.
- Border Rnd 1 has exactly 114 sts.
- All 8 outer corners are square and sharp, and all 4 inner corners lie flat.
- The finished piece measures 3.2 in (8.1 cm) x 4.2 in (10.7 cm).
- The E reads correctly, with the spine on the left.
- All 5 daisies are flat, with every petal tip tacked down.
- The jump ring is fully closed with no gap.
- All ends are woven in and trimmed.
Troubleshooting
- Chain extension ends up on the wrong side: Check that Rows 5–9 and 13–17 are exactly 5 rows each. Odd gap rows put you at the inner edge, ready to chain.
- Inner corners pucker: You skipped the sc2tog or worked extra sc there. Rework that corner.
- Outer corners look rounded: Make sure all 3 corner sc go into the single corner stitch.
- Border ruffles along the spine edge: Your row gauge is tighter than 5.5 rows per inch. Sc2tog once near the middle of the spine edge, or block firmly.
- Arms slant: Check your stitch counts. Rows 1–4 and 19–21 have 14 sc, and Rows 10–12 have 12 sc.
- Daisies cup: Pull the MR less tightly, or block the daisies flat before sewing.
- Keyring pulls through: Thread the jump ring through two stitches, not one.
Care
Hand wash in cool water with mild soap, press out the water, and dry flat. Re-shape the corners while damp.
Final Notes
Here is the measurement chain from start to finish:
- Work to a gauge of 5 sc and 5.5 rows per 1 in (2.5 cm).
- Rows 1–4 measure 2.8 in (7.1 cm) wide.
- The finished body measures 2.8 in (7.1 cm) x 3.8 in (9.7 cm).
- Border Rnd 1 has 114 stitches and adds 0.2 in (0.5 cm) on every side.
- The blocked keychain measures 3.2 in (8.1 cm) x 4.2 in (10.7 cm).
If each checkpoint matches, the daisies and hardware will fit right where they should. Happy crocheting!