
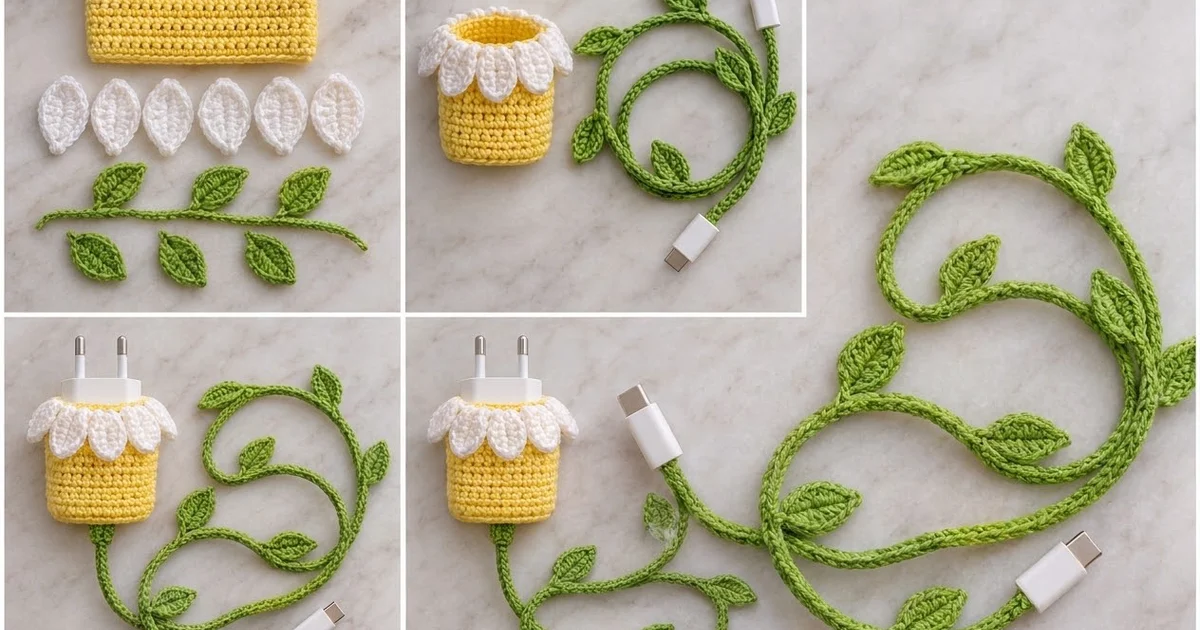
Turn a plain white wall charger into a small flower. The Daisy Vine set is a soft yellow sleeve that slips over the charger body, with a ring of ten white petals around the rim and a green leafy vine wrapped along the cable.
The palette is simple: buttery yellow for the flower center, clean white for the petals and grass green for the vine. It looks fresh and a little playful, and it makes your charger easy to spot in a shared outlet or a busy bag.
This pattern uses US crochet terms. The finished sleeve is a tube 6 in (15.2 cm) around and 2.5 in (6.4 cm) tall. Laid flat, it measures 3 in (7.6 cm) wide. It fits compact USB-C chargers with a body about 1.75 in × 1.1 in (4.4 cm × 2.8 cm) in cross-section and about 2.25 in (5.7 cm) tall.
Construction is straightforward. You work a flat rectangle in single crochet, seam it into a tube and add edging rounds at the top and bottom. Then you sew on ten separate petals. The vine is single crochet worked directly over the cable, with ten small leaves sewn along it.
Finished Size and Construction
- Finished sleeve: 6 in (15.2 cm) around × 2.5 in (6.4 cm) tall
- Skill level: Advanced beginner
- Terminology: US terms
- Yarn weight: DK / light worsted (#3), cotton
- Hook: 3.25 mm (US D-3)
- Number of pieces: 1 yellow panel, 10 white petals, 1 green cable cover, 10 green leaves
- Layout: Panel seamed into a tube; petals around the rim; leaves along the cable on alternating sides
- Panel size before edging: 6 in × 2 in (15.2 cm × 5.1 cm)
- Edging depth: 2 rounds at the top, 0.33 in (0.8 cm); 1 round at the bottom, 0.17 in (0.4 cm)
- Petal size: 1.25 in (3.2 cm) long × 0.8 in (2.0 cm) wide
- Leaf size: 1.25 in (3.2 cm) long × 0.6 in (1.5 cm) wide, plus a 0.5 in (1.3 cm) stem
- Cable covered: 37 in (94.0 cm) of a 39 in (99.1 cm) cable
Materials
Use a smooth mercerized cotton or cotton blend in DK weight. Cotton holds its shape, shows stitch definition clearly and handles warmth from the charger better than acrylic. These amounts assume a yarn of about 115 m per 50 g.
- Yellow: 10 g / 23 m (sleeve)
- White: 5 g / 12 m (petals)
- Green: 15 g / 35 m (cable cover and leaves)
All quantities include a margin for swatching and sewing tails.
Tools:
– 3.25 mm (US D-3) crochet hook
– Tapestry needle
– Stitch markers (2–3)
– Scissors
– Measuring tape or ruler
– Pins and a small spray bottle for blocking
– A compact USB-C wall charger and a 39 in (99.1 cm) cable
Abbreviations (US Terms)
- ch – chain
- sl st – slip stitch
- sc – single crochet
- hdc – half double crochet
- dc – double crochet
- BLO – back loop only
- st(s) – stitch(es)
- sp – space
- Rnd – round
Special stitch – sc over cable: Hold the cable on top of the working loop. Insert the hook under the cable, yarn over and pull up a loop so it wraps the cable. Yarn over and pull through both loops on the hook. Each stitch encloses the cable.
Gauge and Checkpoints
Gauge: 20 sc and 24 rows = 4 in (10.2 cm) square, which is 5 sc and 6 rows per 1 in (2.5 cm).
Don’t make a separate swatch: test with the yellow panel itself. After Row 6, measure before you go on.
Checkpoints:
– Row 1: 30 sc should measure 6 in (15.2 cm) across.
– After Row 6: the panel should be 1 in (2.5 cm) tall.
– After Row 12: the panel should be 6 in × 2 in (15.2 cm × 5.1 cm).
– After seaming: the tube should be 6 in (15.2 cm) around, or 3 in (7.6 cm) wide laid flat.
– After edging: the tube should be 2.5 in (6.4 cm) tall.
– Petal: 1.25 in × 0.8 in (3.2 cm × 2.0 cm).
– Cable cover: about 7 sc per 1 in (2.5 cm) of cable.
If your panel is too big, go down to a 3.0 mm hook. If it’s too small, go up to a 3.5 mm hook. Keep the stitch count at 30. A 0.25 in (0.6 cm) change in width noticeably changes the fit on a small charger.

Yellow Sleeve Panel
With yellow, ch 31.
Row 1: Sc in 2nd ch from hook and in each ch across. (30 sc)
Rows 2–12: Ch 1, turn. Sc in each st across. (30 sc)
Fasten off, leaving a 12 in (30.5 cm) tail for seaming.
The panel now measures 6 in × 2 in (15.2 cm × 5.1 cm) and has 12 rows of solid, even single crochet.
White Petals
With white, make 10.
Ch 6.
Rnd 1: Sc in 2nd ch from hook, hdc in next ch, dc in next ch, hdc in next ch, 3 sc in last ch. Rotate the piece and work along the opposite side of the foundation chain: hdc in next ch, dc in next ch, hdc in next ch, sc in the same ch as the first sc. Sl st to first sc. (11 sts)
Rnd 2: Ch 1. (Sc, ch 2, sc) in first st, sc in next 3 sts, 2 sc in each of next 3 sts, sc in next 3 sts, sc in last st. Sl st to first sc. (15 sc + one ch-2 sp)
Fasten off, leaving an 8 in (20.3 cm) tail.
The ch-2 space forms the pointed tip. The three increased stitches form the rounded end, which is the end you sew to the rim.
Green Leaves
With green, make 10.
Ch 8.
Side 1: Sl st in 2nd ch from hook, sc in next ch, hdc in next ch, dc in next 2 ch, hdc in next ch, sc in last ch. (7 sts)
Tip: Ch 2.
Side 2: Rotate and work into the free loops of the foundation chain. Sc in the same ch as the last sc, hdc in next ch, dc in next 2 ch, hdc in next ch, sc in next ch, sl st in the same ch as the first sl st. (7 sts)
The leaf has 14 sts plus a ch-2 tip.
Stem: Ch 4. Sl st in 2nd ch from hook and in next 2 ch. (3 sl sts)
Fasten off, leaving an 8 in (20.3 cm) tail at the stem end.
Green Cable Cover
Leave 1 in (2.5 cm) of bare cable next to each plug so the plugs still fit into ports. The covered section is 37 in (94.0 cm).
With green, make a slipknot on your hook. Starting 1 in (2.5 cm) from one plug, work sc over the cable (see Special Stitch). Push each stitch snugly against the last one so no white shows through.
Keep working sc over the cable until you are 1 in (2.5 cm) from the other plug. That is about 259 sc (37 in × 7 sc per in). The exact count depends on your cable’s thickness, so measure rather than count.
The stitch tops naturally spiral around the cable, giving the twisted, vine-like texture. Don’t fight the twist.
Fasten off. Weave the tail back through 1 in (2.5 cm) of stitches in both directions, then do the same with the starting tail.
Checkpoint: Every 1 in (2.5 cm) should hold about 7 sc. If you see gaps, push the stitches together. If the cable stiffens or kinks, your stitches are too tight.
Make All Pieces
- Yellow: 1 panel (30 sc × 12 rows)
- White: 10 petals
- Green: 1 cable cover and 10 leaves
Rim layout (seen from above, 30 sts, counted from the seam):
Petal:  P1    P2    P3    P4    P5    P6    P7     P8     P9     P10
Sts:    1-3   4-6   7-9   10-12 13-15 16-18 19-21  22-24  25-27  28-30
Cable layout (one end to the other):
[Plug A] 1 in bare | 2.75 in | L1 (L) | 3.5 in | L2 (R) | 3.5 in | L3 (L) | ...
... | L9 (L) | 3.5 in | L10 (R) | 2.75 in | 1 in bare [Plug B]
The 9 gaps of 3.5 in (8.9 cm) add up to 31.5 in (80.0 cm). With 2.75 in (7.0 cm) at each end, the total is exactly 37 in (94.0 cm).
Joining
Seam the tube. Fold the panel so the two 12-row short edges meet, right side out. Use the long yellow tail to whipstitch the edges together through the row ends: one stitch per row end, 12 on each side, matched 1 to 1. Keep the seam firm but flat. If you pull too hard, the seam puckers and the tube turns lopsided.
Size checkpoint: Laid flat, the tube should measure 3 in (7.6 cm) across and 2 in (5.1 cm) tall. Each flat face has 15 sts.
Next, work the edging (below) before you attach the petals.
Attach the petals. Hold each petal with the right side facing out and the rounded end up. Pin it across its 3 rim sts from the layout. Sew it along the front-loop ridge left by Top Rnd 2, catching the 3 increased stitches at the rounded end. Let the rounded edge sit about 0.2 in (0.5 cm) above the rim.
Tack down only the top 0.25 in (0.6 cm) of each petal so the tip can flare outward and hang down over the yellow side. Each neighbouring petal overlaps by about 0.2 in (0.5 cm), because the petals are 0.8 in (2.0 cm) wide on a 0.6 in (1.5 cm) spacing.
Attach the leaves. Pin each stem end to the cable cover at its marked spot, alternating left and right. Sew the stem through 2–3 cover stitches. Add one small tack at the leaf base so the leaf lies along the vine at a slight angle.
Border (Sleeve Edging)
Border gauge: 5 sc per 1 in (2.5 cm), the same as the panel. A 30-st round = 6 in (15.2 cm), which matches the tube exactly.
Top Rnd 1: With the top edge (Row 12) facing, join yellow at the seam. Ch 1, sc in each st around. Don’t add a stitch at the seam. Sl st to first sc. (30 sc: 15 per flat face)
Top Rnd 2: Ch 1, sc in BLO of each st around. Sl st to first sc. (30 sc: 15 per flat face)
This leaves a ring of unused front loops from Rnd 1, which is the ridge you sew the petals to. Fasten off and weave in the end.
Bottom Rnd 1: With the foundation edge facing, join yellow at the seam. Ch 1, sc in the free loop of each foundation ch around. Sl st to first sc. (30 sc: 15 per flat face)
Fasten off and weave in the end.
Why the math works: Each round is exactly 30 sts, one per panel st, so 30 sts = 6 in (15.2 cm). The edging neither flares nor pulls in. The seam row ends are never counted, so nothing extra builds up there. Height: 12 panel rows plus 3 edging rounds = 15 rows ÷ 6 rows per in = 2.5 in (6.4 cm). For the petals, 30 sts ÷ 10 petals = 3 sts each, so the ring spaces evenly.
Final Blocking
- Lightly spritz the petals and leaves with water.
- Pin each petal flat to 1.25 in × 0.8 in (3.2 cm × 2.0 cm), with the tip pointed.
- Pin each leaf to 1.25 in × 0.6 in (3.2 cm × 1.5 cm), keeping the stem straight.
- Let them dry completely before sewing.
- After assembly, slide the sleeve over a small box or folded card about 1.75 in × 1.1 in (4.4 cm × 2.8 cm). Never block it on the charger.
- Spritz the sleeve, then gently shape the petals outward and downward with your fingers.
- Let it dry overnight. Smooth the cable cover by hand; no blocking needed.
Final Quality-Control Checklist
- Panel is 30 sc × 12 rows.
- Tube is 6 in (15.2 cm) around and 2.5 in (6.4 cm) tall.
- All three edging rounds have exactly 30 sc.
- Seam is flat, with 12 row ends matched 1 to 1.
- 10 petals sit 3 sts apart, tips flared outward and down.
- Charger prongs and the USB-C port are fully clear.
- 1 in (2.5 cm) of bare cable at each plug.
- 10 leaves, 3.5 in (8.9 cm) apart, alternating sides.
- All ends woven in securely.
Troubleshooting
Sleeve is too loose on the charger: Go down a hook size, or remake the panel with 28 sts (5.6 in / 14.2 cm). With 28 sts, use 7 petals over 4 sts each.
Sleeve is too tight: Go up a hook size, or use 32 sts (6.4 in / 16.3 cm). With 32 sts, use 8 petals over 4 sts each.
Petals curl: Re-block them flat, and check that Rnd 2 has exactly 15 sc.
Petals stand straight up: Tack only the top 0.25 in (0.6 cm) so the tips can drop outward.
Cable shows through: Pack the stitches tighter, aiming for at least 7 per 1 in (2.5 cm).
Cable kinks: Your stitches are too tight. Loosen your tension and let the spiral twist form naturally.
Edging flares: Check that you haven’t worked into the seam row ends.
Care
Hand wash the sleeve in cool water and lay it flat to dry. Spot clean the cable cover with a damp cloth. Unplug the charger before removing or fitting the sleeve, and take the sleeve off if the charger feels warm in use.

Final Notes
The measurement chain is simple. Gauge is 5 sc and 6 rows per inch. The panel is 30 sc × 12 rows = 6 in × 2 in (15.2 cm × 5.1 cm). That becomes a tube 6 in (15.2 cm) around. Three 30-st edging rounds bring it to 2.5 in (6.4 cm) tall. Ten petals at 3 sts each complete the daisy. Along the cable, 37 in (94.0 cm) of packed single crochet carries ten leaves spaced 3.5 in (8.9 cm) apart. Check each stage, and the set will fit neatly.
Happy crocheting!