

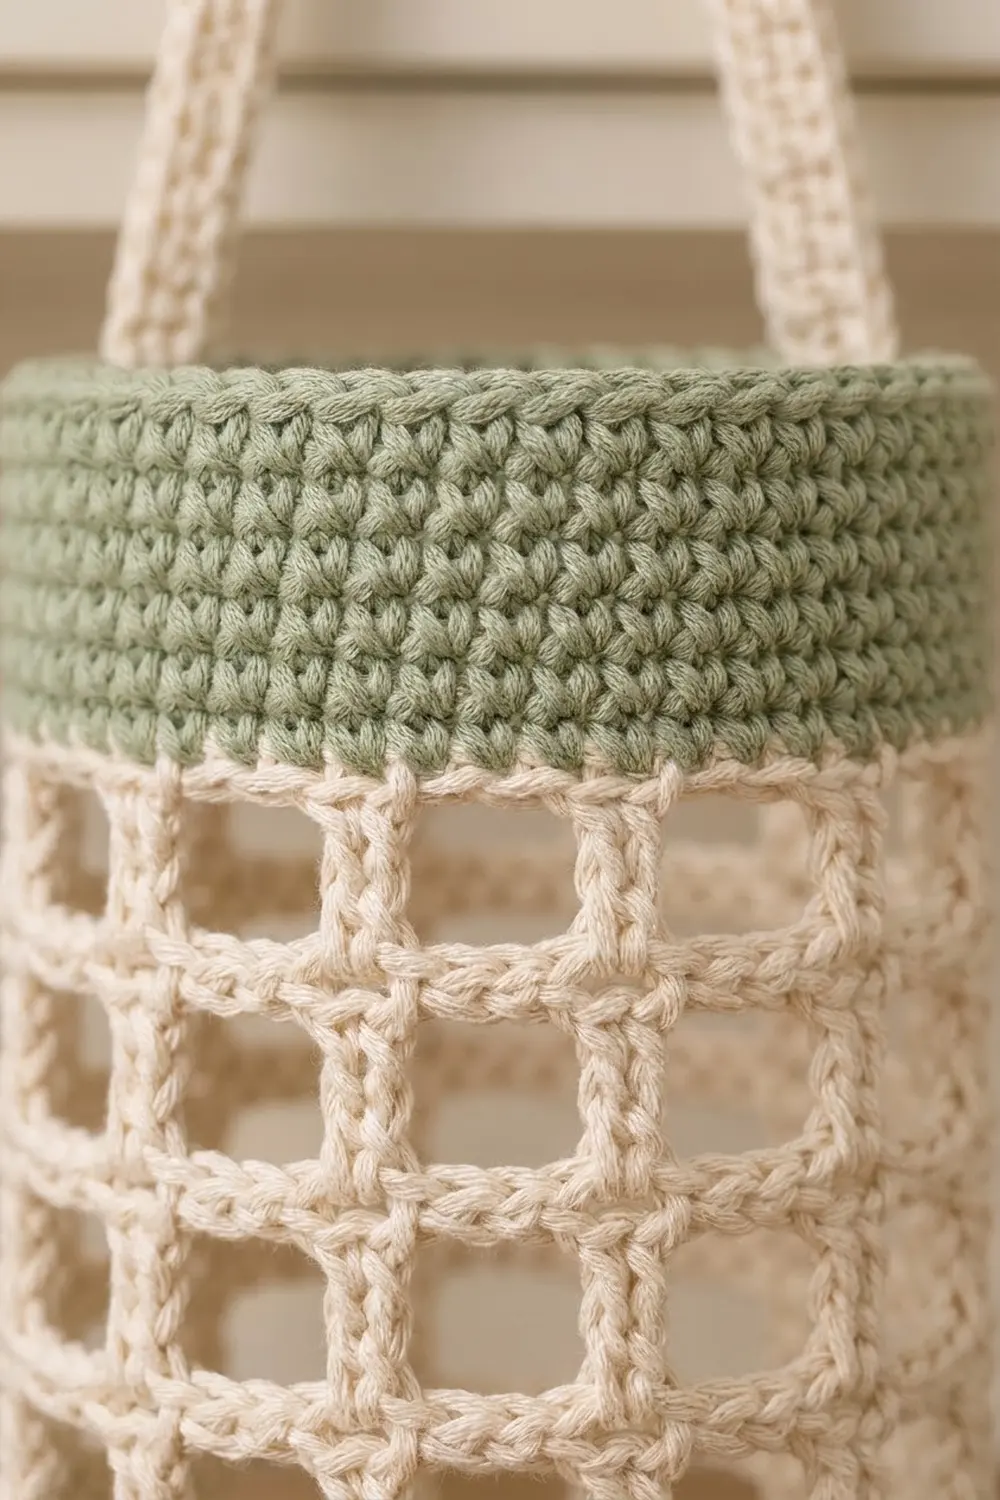
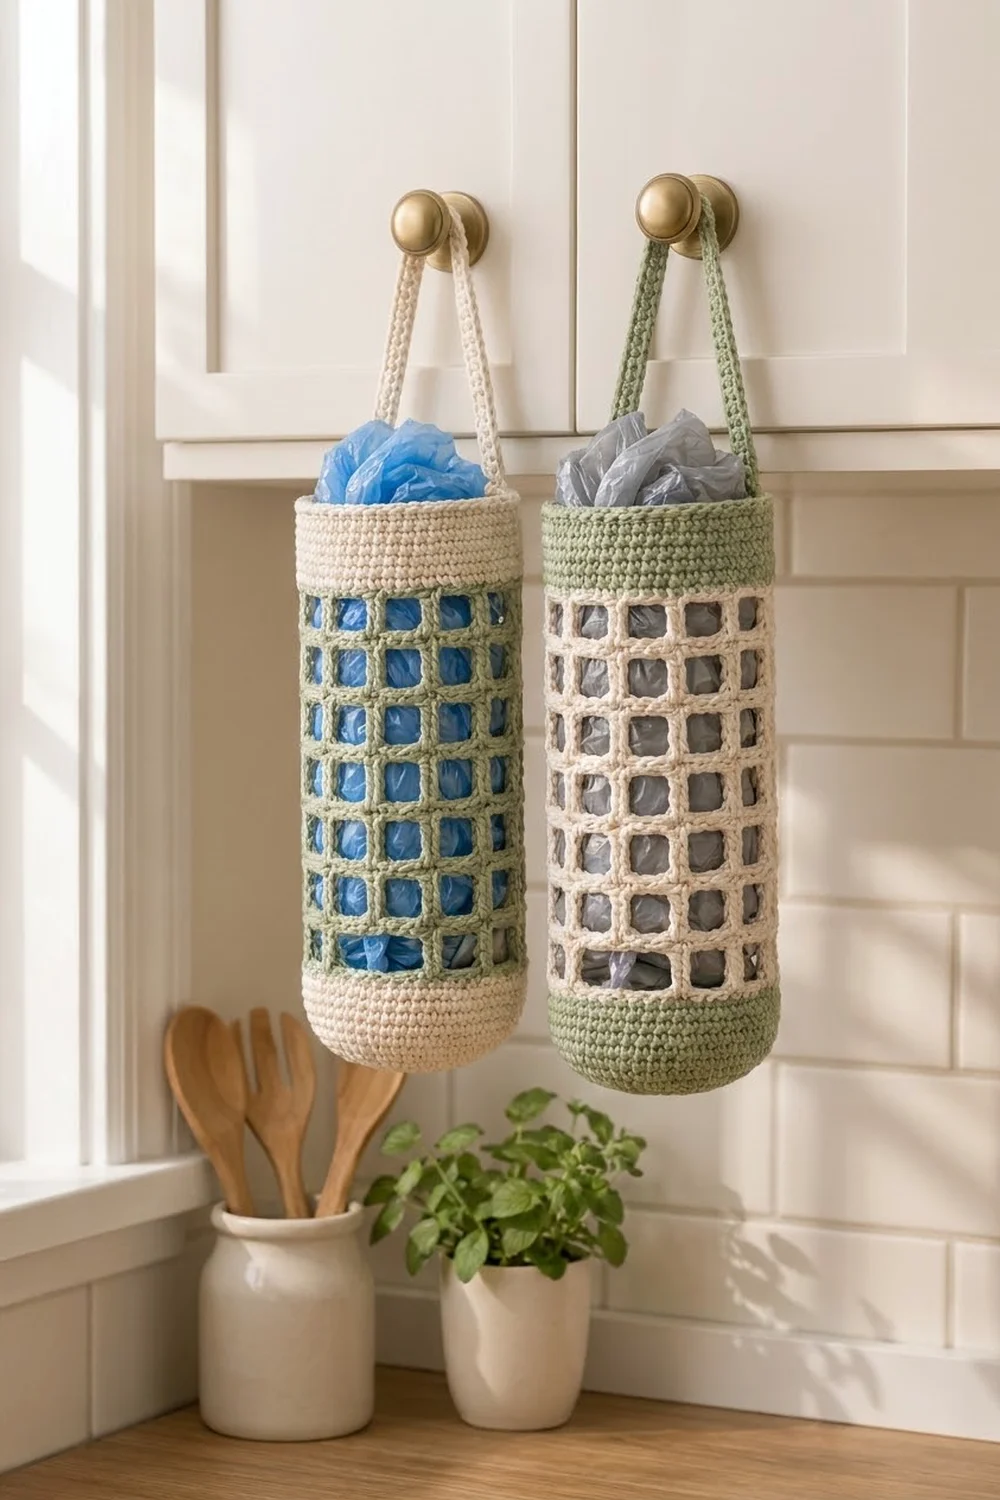
This hanging bag holder brings some order to the drawer of crumpled grocery bags. It has a solid cream base, a tall body with a sage-green grid of square windows, a cream band at the top and a cream strap that hangs from a cabinet knob or hook. You push bags in at the top and pull them back out the same way. The grid lets you see how many are left.
The look is simple and suits a farmhouse kitchen: soft sage with natural cream, in matte cotton. If you prefer, swap the colors to make a sage base and band with a cream grid. Make one of each and hang them as a pair.
This pattern uses US crochet terms. The finished holder is about 3.8 in (9.7 cm) in diameter, 6 in (15.2 cm) wide when pressed flat and about 12.1 in (30.7 cm) tall without the strap. The strap is 12 in (30.5 cm) long and makes a loop that rises about 5 in (12.7 cm) above the rim.
You work the whole holder in one piece. Start with a flat single crochet circle, turn it upward through the back loops to form the base wall, then work the grid as alternating rounds of double crochet and single crochet. Finish with a solid band, work the strap in rows straight off the rim, attach its end to the opposite side and edge everything once.
Finished Size and Construction
- Finished size: 3.8 in (9.7 cm) diameter × 12.1 in (30.7 cm) tall; strap 12 in (30.5 cm) long
- Skill level: Easy
- Terminology: US crochet terms
- Yarn weight: Worsted / Aran (#4) cotton
- Hook: 4.5 mm (US 7)
- Number of pieces: 1 (the strap is worked off the rim)
- Layout: Single cylinder: base, grid body, top band, strap
- Piece size: 48 stitches around = 12 in (30.5 cm) circumference
- Size before border: Same as finished; the edging doesn’t change the height or diameter
- Border depth: About 1/8 in (0.3 cm) along the rim and strap edges
Materials
Yarn: Use a smooth, firm worsted-weight cotton or cotton blend. Cotton holds its shape when the holder is full and doesn’t stretch out under the weight. Avoid stretchy acrylics, which let the bottom sag. The amounts below assume a yarn of about 50 g = 85 m.
- Color A, cream (base, top band, strap, edging): 50 g / 85 m
- Color B, sage green (grid body): 40 g / 68 m
These quantities include a margin of about 25–30% for your gauge swatch, color changes and weaving in ends.
Tools:
- 4.5 mm (US 7) crochet hook
- 2 stitch markers
- Tapestry needle
- Scissors
- Tape measure
- Spray bottle and a rolled towel or cardboard tube for blocking
Abbreviations (US Terms)
- ch: chain
- sl st: slip stitch
- sc: single crochet
- dc: double crochet
- inc: 2 sc in the same stitch
- BLO: back loop only
- sp: space
- sk: skip
- st(s): stitch(es)
- rnd(s): round(s)
Special stitch: grid repeat. The grid uses two rounds that alternate. The Post Round is (dc, ch 2, sk 2) worked all the way around. The Bar Round is (sc in dc, 2 sc in ch-2 sp) worked all the way around. Both rounds keep 48 stitches around, so the grid’s circumference matches the base and the band.
Gauge and Checkpoints
Solid sc gauge: 16 sts × 18 rnds = 4 in (10.2 cm).
Grid gauge: 1 grid repeat (Post Round + Bar Round) = 0.75 in (1.9 cm) tall; 4 repeats = 3 in (7.6 cm).
The base is your test piece, so make it first and measure before you go on.
Checkpoints:
- After Rnd 8 (flat circle): 3.8 in (9.7 cm) across.
- After Rnd 14 (base wall): The wall stands about 1.3 in (3.3 cm) tall, and the tube measures 6 in (15.2 cm) across when pressed flat.
- After 4 grid repeats: 3 in (7.6 cm) of grid.
- After 12 grid repeats: 9 in (22.9 cm) of grid.
- After the band: Total height is about 12.1 in (30.7 cm).
If your circle is too big (over 4 in / 10.2 cm), go down to a 4 mm hook. If it’s too small (under 3.6 in / 9.1 cm), go up to a 5 mm hook. If your grid rounds are too short, add repeats until you reach 9 in (22.9 cm). If they’re too tall, work fewer. Always end the grid on a Bar Round.
Pattern
Join every round with a sl st to the first stitch. The ch 1 at the start of a sc round doesn’t count as a stitch. Put a marker in the first stitch of each round.
Base (Color A, cream)
Rnd 1: Make a magic ring and work 6 sc into it. Join. (6 sts)
Rnd 2: Ch 1, inc in each st around. (12 sts)
Rnd 3: Ch 1, sc in next st, inc; rep from * around. (18 sts)
Rnd 4: Ch 1, sc in next 2 sts, inc; rep from * around. (24 sts)
Rnd 5: Ch 1, sc in next 3 sts, inc; rep from * around. (30 sts)
Rnd 6: Ch 1, sc in next 4 sts, inc; rep from * around. (36 sts)
Rnd 7: Ch 1, sc in next 5 sts, inc; rep from * around. (42 sts)
Rnd 8: Ch 1, sc in next 6 sts, inc; rep from * around. (48 sts)
Checkpoint: The circle lies flat and measures 3.8 in (9.7 cm) across.
Rnd 9 (turning round): Ch 1, sc in BLO of each st around. (48 sts) The unworked front loops make a crisp ridge where the base turns upward, so the bottom has a neat rounded edge.
Rnds 10–14: Ch 1, sc in each st around. (48 sts)
On the final sl st of Rnd 14, drop Color A and pull through Color B. Cut Color A, leaving a 6 in (15.2 cm) tail.
Checkpoint: The wall is about 1.3 in (3.3 cm) tall, and the cup measures 6 in (15.2 cm) across when pressed flat.
Grid Body (Color B, sage)
Rnd 15 (Post Round): Ch 5 (counts as dc + ch 2), sk next 2 sts, dc in next st, ch 2, sk 2 sts; rep from * 14 more times. Join with a sl st to the 3rd ch of the beginning ch-5. (16 dc + 16 ch-2 sps = 48 sts)
Rnd 16 (Bar Round): Ch 1, sc in same st as join, 2 sc in next ch-2 sp, sc in next dc, 2 sc in next ch-2 sp; rep from * 14 more times. Join. (16 sc over posts + 32 sc in spaces = 48 sts)
In the Bar Round, every third sc sits directly above a dc. In each later Post Round, the “sk 2, dc in next” spacing lands the new dc exactly on top of the post below, so the posts stack into straight vertical columns and the windows form a clean square grid.
Rnds 17–38: Repeat Rnds 15 and 16 eleven more times, for 12 grid repeats in total (24 rounds). Every round has 48 sts. The final round, Rnd 38, is a Bar Round.
Checkpoints: After Rnd 22 (4 repeats), the grid measures 3 in (7.6 cm). After Rnd 38, it measures 9 in (22.9 cm). The windows are 16 around and 12 tall.
On the final sl st of Rnd 38, change to Color A. Cut Color B.
Top Band (Color A, cream)
Rnds 39–46: Ch 1, sc in each st around. Join. (48 sts)
Checkpoint: The band is about 1.8 in (4.6 cm) tall, and the total height is about 12.1 in (30.7 cm). Don’t fasten off.
Strap (Color A, cream)
The strap is worked in rows straight off stitches 1–5 of Rnd 46. Count the joining stitch of Rnd 46 as stitch 1.
Row 1: Ch 1, sc in sts 1–5 of Rnd 46. Turn. (5 sts)
Rows 2–54: Ch 1, sc in each st across. Turn. (5 sts)
Checkpoint: The strap is 12 in (30.5 cm) long and 1.25 in (3.2 cm) wide.
Attach: Count to sts 25–29 of Rnd 46, which sit directly opposite sts 1–5. Bring the end of the strap across without twisting it. Hold Row 54 against sts 25–29 with the wrong sides together, and work 5 sl sts through both layers. Fasten off and weave in the end.
Border: Rim and Strap Edging
Border gauge: Along the strap’s row ends, work 8 sc per 9 rows. The strap’s 54 rows are 12 in (30.5 cm) long, and 48 sc at the solid gauge of 4 sts per inch also measure exactly 12 in (30.5 cm). If you worked 1 sc per row end, you’d get 54 sc over 12 in. That’s 4.5 sts per inch, which would make the strap edge wavy.
The strap divides the rim into two open sections. Each section and one long edge of the strap form a closed loop. Edge each loop separately.
Loop 1: Join Color A in st 6 of Rnd 46. Ch 1, sc in sts 6–24 (19 sc). Continue up the long edge of the strap that runs from st 24 back to st 5: sc in each of the next 8 row ends, sk 1 row end; rep from * 5 more times (6 groups × 8 = 48 sc). Join with a sl st to the first sc. (Total: 19 + 48 = 67 sts)
Loop 2: Join Color A in st 30. Ch 1, sc in sts 30–48 (19 sc). Work the other long strap edge as for Loop 1 (48 sc). Join. (Total: 19 + 48 = 67 sts)
Why the math works:
- Rim: 48 rim sts = 5 (strap start) + 19 + 5 (strap end) + 19. The edging covers every rim stitch that the strap doesn’t, with no stitches added.
- Strap edges: 8 sc per 9 rows matches the solid sc gauge, so both strap edges stay flat and the same length.
Fasten off and weave in all ends.
Final Blocking
- Weave in all remaining tails through the solid sc sections, where they won’t show through the grid.
- Mist the whole holder with water until it’s damp but not dripping.
- Slide a rolled towel or a cardboard tube about 3.75–4 in (9.5–10.2 cm) across into the holder so it stands as a straight cylinder.
- Gently line up the posts in each column so they’re vertical and square up each window with your fingers.
- Lay the strap flat and pat it to 1.25 in (3.2 cm) wide and 12 in (30.5 cm) long.
- Leave the holder until it’s completely dry, then take out the form.
Final Quality-Control Checklist
- [ ] The base is flat and 3.8 in (9.7 cm) across, with a clear ridge at Rnd 9.
- [ ] All rounds have 48 sts, from Rnd 8 through Rnd 46.
- [ ] There are 16 straight post columns and 12 rows of windows.
- [ ] The grid measures 9 in (22.9 cm), and the total height is about 12.1 in (30.7 cm).
- [ ] The band is all cream and about 1.8 in (4.6 cm) tall.
- [ ] The strap is 5 sts wide, 54 rows long and not twisted.
- [ ] The strap is attached at sts 25–29, directly opposite sts 1–5.
- [ ] Each edging loop has 67 sts, and the strap edges are flat.
- [ ] All ends are woven into solid areas.
Troubleshooting
The base cups before Rnd 9. Your tension is tight. Go up half a hook size for Rnds 1–8, or make sure the increases are spread evenly around the round.
The base ruffles. Your tension is loose. Go down half a hook size for the base only.
The posts spiral or lean. Check that you sk 2 sc and work the dc into the third sc, the one directly above the previous dc. Count to 48 after each Bar Round.
The windows are taller than they are wide. Your dc are tall. Make the ch-2 slightly firmer, or wrap the dc tighter. Measure the grid against the 0.75 in (1.9 cm) per repeat gauge.
The holder leans when it hangs. The strap isn’t directly opposite the start. Re-attach it at sts 25–29.
The strap edges wave. You worked 1 sc per row end. Rework them with 8 sc per 9 rows.
The color change shows as a jog. Make each change on the final sl st of the round, and weave the tails in opposite directions.
Care
Hand wash in cool water with mild soap, press out the water in a towel, and reshape the holder over a tube to dry flat. Don’t tumble dry; it can shrink the cotton and make the grid uneven.
Final Notes
Every measurement in this holder comes from one stitch count: 48 stitches around. At a gauge of 16 sc per 4 in (10.2 cm), that gives a 12 in (30.5 cm) circumference and a 3.8 in (9.7 cm) base. The base wall adds 1.3 in (3.3 cm), the 12 grid repeats add 9 in (22.9 cm) and the band adds 1.8 in (4.6 cm). The strap is 54 rows long, or 12 in (30.5 cm), and is attached exactly opposite where it starts. The edging uses 8 sc per 9 rows so the strap edges stay flat.
Check each stage against these numbers as you go, and the holder will hang straight and hold plenty of bags.
Happy crocheting!