

This curtain is six long filet mesh strips hung side by side from a rod. Each strip carries nine raised, tone-on-tone dragonflies. The open grid lets light and air through, and the dragonflies give the plain mesh some texture and a bit of play.
The strips alternate soft teal and pale lilac, starting with teal on the left. Each dragonfly matches its strip: teal on teal, lilac on lilac. Every strip has a solid single crochet edge and two small hanging loops, so you can push the strips apart and walk through like a beaded curtain.
This pattern uses US crochet terms. Each finished strip measures 6.5 in (16.5 cm) wide by 76 in (193.0 cm) long, or 77.5 in (196.9 cm) including the loops. With the six strips touching, the curtain is 39 in (99.1 cm) wide.
Construction is simple and repetitive. For each strip, you crochet one long mesh panel, sew on nine dragonflies (each made from four wings and a beaded body), then add a two-round border and two loops. The strips are never joined to each other.
Finished Size and Construction
- Finished strip size: 6.5 in x 76 in (16.5 cm x 193.0 cm), plus 1.5 in (3.8 cm) loops
- Curtain width: 39 in (99.1 cm) with strips touching
- Skill level: Intermediate
- Terminology: US
- Yarn weight: DK (#3), cotton
- Hook: 3.5 mm (E-4)
- Number of pieces: 6 strips + 54 dragonfly appliqués
- Layout: 6 strips in a row, unjoined, alternating teal and lilac
- Mesh size before border: 5.5 in x 75 in (14.0 cm x 190.5 cm), 11 squares x 150 rows
- Border depth: 0.5 in (1.3 cm), 2 rounds of sc
Materials
Use a smooth, mercerized DK cotton or cotton blend. It shows the mesh clearly, holds the bobbles firmly and hangs straight without stretching too much. Avoid fuzzy yarns, because they fill in the open squares.
- Color A, Teal: 450 g (approx. 1,020 m)
- Color B, Lilac: 450 g (approx. 1,020 m)
Each strip with its dragonflies uses about 135 g. The amounts above include a margin for gauge swatches and differences between dye lots.
Tools:
– 3.5 mm (E-4) crochet hook
– Tapestry needle
– Locking stitch markers
– Rust-proof pins and a blocking surface
– Measuring tape
– Curtain rod, up to 1.25 in (3.2 cm) in diameter
Abbreviations (US Terms)
- ch – chain
- sl st – slip stitch
- sc – single crochet
- hdc – half double crochet
- dc – double crochet
- sk – skip
- sp – space
- st(s) – stitch(es)
- RS – right side
Bobble: (Yarn over, insert hook in st, pull up a loop, yarn over, pull through 2 loops) 3 times in the same st, then yarn over and pull through all 4 loops on hook.
Popcorn: Work 5 dc in the same st. Remove your hook, insert it front to back in the first dc of the group, pick up the dropped loop and pull it through.
Mesh square: 1 dc + ch 2, closed by the next dc.
Gauge and Checkpoints
Mesh gauge: 8 squares and 8 rows = 4 in (10.2 cm). Each square measures 0.5 in (1.3 cm) wide and tall.
Border gauge: 4 sc and 4 rounds = 1 in (2.5 cm).
Make one test piece before starting: work Rows 1–8 of a strip and one complete dragonfly. Measure the mesh without stretching it.
- After Row 1: 5.5 in (14.0 cm) wide
- After Row 8: 4 in (10.2 cm) tall
- Upper wing: 2 in (5.1 cm) long, 0.75 in (1.9 cm) wide
- Lower wing: 1.75 in (4.4 cm) long
- Body: 3 in (7.6 cm) long
If your piece is too big, go down to a 3.25 mm hook. If it’s too small, go up to a 3.75 mm hook. If only the row height is off, adjust how tall you pull up your dc loops instead of changing hooks. Over 150 rows, even a tiny difference per row adds up to a big one.
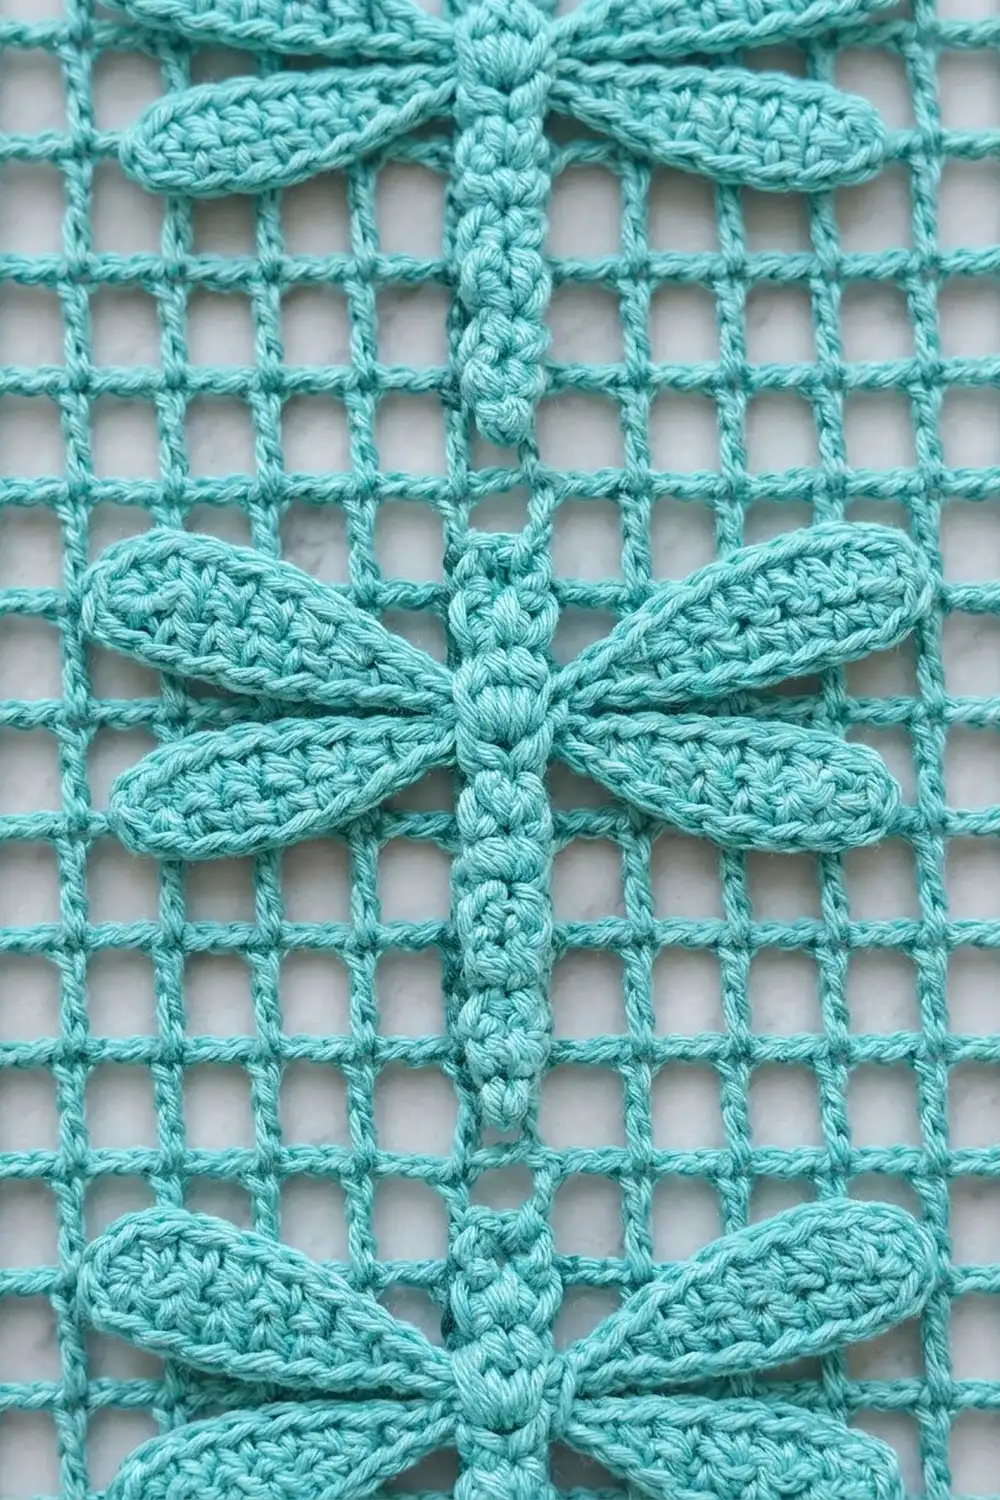
Strip Mesh (Make 6: 3 in A, 3 in B)
Foundation: Ch 38.
Row 1: Dc in 8th ch from hook. The 7 skipped chs count as the first dc and the first ch-2 sp. Ch 2, sk 2 ch, dc in next ch; repeat from * 9 more times. Turn. (11 squares; 12 dc counting the turning chain)*
Row 2: Ch 5 (counts as dc + ch 2). Dc in next dc. Ch 2, dc in next dc; repeat from * 9 more times, working the last dc in the 5th of the 7 skipped chs. Turn. (11 squares; 12 dc)*
Rows 3–150: Ch 5 (counts as dc + ch 2). Dc in next dc. Ch 2, dc in next dc; repeat from * 9 more times, working the last dc in the 3rd ch of the turning ch-5. Turn. (11 squares; 12 dc in every row)*
Do not fasten off after Row 150. Place a marker in the live loop and set the strip aside.
Checkpoints: Row 50 = 25 in (63.5 cm). Row 100 = 50 in (127.0 cm). Row 150 = 75 in (190.5 cm). The width should stay at 5.5 in (14.0 cm) the whole way.
Dragonfly Appliqué (Make 9 per Strip)
Make each dragonfly in the same color as its strip. Leave a 12 in (30.5 cm) tail on every piece for sewing.
Upper Wing (Make 2)
Ch 9.
Round 1: Sc in 2nd ch from hook, hdc in next ch, dc in next 4 chs, hdc in next ch, 3 sc in last ch. Now work along the other side of the chain: hdc in next ch, dc in next 4 chs, hdc in next ch, 2 sc in the same ch as the first sc. Sl st to the first sc. (18 sts)
Round 2: Ch 1, sc in each st around, working 2 sc in the center sc at each tip. Sl st to the first sc. (20 sc)
Fasten off. The result is a pointed oval with a firm, slightly raised edge.
Lower Wing (Make 2)
Ch 8.
Round 1: Sc in 2nd ch from hook, hdc in next ch, dc in next 3 chs, hdc in next ch, 3 sc in last ch. Along the other side: hdc in next ch, dc in next 3 chs, hdc in next ch, 2 sc in the same ch as the first sc. Sl st to the first sc. (16 sts)
Round 2: Ch 1, sc in each st around, working 2 sc in the center sc at each tip. Sl st to the first sc. (18 sc)
Fasten off.
Body (Make 1)
The bobbles pop out on the side facing away from you, so that side is the RS.
Ch 14.
Row 1: Sc in 2nd ch from hook (tail tip). Sc in next ch, bobble in next ch; repeat from * 3 more times. Sc in next ch, popcorn in next ch (thorax), sc in next ch. In the last ch, work (sl st, ch 3, bobble, ch 3, sl st) for the head. (13 chs used: 4 tail bobbles, 1 popcorn, 1 head bobble)*
Fasten off. You now have a segmented tail, a fat thorax and a round head.
Assemble One Dragonfly
- Lay the body RS up with the head at the top.
- Place the upper wings so their inner tips tuck under the thorax, angled slightly upward.
- Place the lower wings just below them, angled slightly downward, with their inner tips also under the thorax.
- Whipstitch the inner 0.5 in (1.3 cm) of each wing to the back of the body.
Check the size: the wingspan should be 4.5 in (11.4 cm) and the dragonfly should be 3 in (7.6 cm) long.
Make All Pieces
| Color | Strips | Dragonflies | Upper wings | Lower wings | Bodies |
|---|---|---|---|---|---|
| A, Teal | 3 | 27 | 54 | 54 | 27 |
| B, Lilac | 3 | 27 | 54 | 54 | 27 |
Layout, left to right, as hung:
[ A ][ B ][ A ][ B ][ A ][ B ]
  1    2    3    4    5    6
Joining: Sewing the Dragonflies to the Strips
The strips are not joined to each other. Each one hangs on its own. The only joining is attaching the dragonflies to their strips. Do this before the border so the strip is easy to handle.
Placement: Turn the strip so Row 150 is at the top. Put the thorax of the first dragonfly 5.5 in (14.0 cm) below the top mesh edge, centered on the middle (6th) square. Place the other eight every 8 in (20.3 cm) further down. This means each dragonfly sits in its own 16-row block, and there are 3 empty rows at the top and the bottom.
Stitch-to-stitch logic: The body runs straight down the center of the 6th square column. The wingspan is 4.5 in (11.4 cm) and the mesh is 5.5 in (14.0 cm) wide, so exactly one open square, 0.5 in (1.3 cm), is left on each side of the wing tips.
Method: Pin everything first. Using the tail, whipstitch the body and the wing edges to the dc posts and chain bars underneath them, going only through the back loops of the appliqué so the stitches don’t show. Weave the ends in along a dc post.
Tension: Keep the stitches snug but not tight. If you pull too hard, the mesh puckers. Lay the strip flat after each dragonfly to check.
Size checkpoint: The strip should still measure 5.5 in x 75 in (14.0 cm x 190.5 cm), with no puckering around the appliqués.
Border
Work the border with the same color as the strip. Border gauge: 4 sc = 1 in (2.5 cm). Corner stitches are the center sc of each 3-sc corner group. The counts for each side below include both corner sts.
Round 1: Put the live loop back on your hook. Ch 1, 3 sc in the last dc of Row 150 (corner). Work down the long side: 2 sc around each row-end post, 300 sc in total. Work 3 sc in the base of the bottom corner st. Along the bottom: sc in each ch-2 sp and each base dc between, 21 sc. Work 3 sc in the next bottom corner. Up the second long side: 300 sc. Then 3 sc in the top corner dc. Along the top: sc in each ch-2 sp and each dc between, 21 sc. Sl st to the first sc.
(Short sides: 25 sts each. Long sides: 302 sts each. Total: 650 sts)
Round 2: Ch 1. Sc in each sc around, with 3 sc in each corner center. Sl st to the first sc.
(Short sides: 27 sts each. Long sides: 304 sts each. Total: 658 sts)
Why the math works: Each mesh square is 0.5 in (1.3 cm) and gets exactly 2 border sts in both directions. That’s 4 sts per inch, which matches the border gauge, so the edge lies flat and doesn’t ruffle or pull in. Check: 2 x 27 + 2 x 304 − 4 shared corners = 658. Each corner group adds 2 sts per side in each round.
Hanging loops (top edge only): Hold the strip RS up with the top short edge facing you. Count the 27 sts from the right corner center as st 1.
- Loop 1: Join with sl st in st 2, ch 16, sl st in st 4. Turn, work 24 sc into the ch-16 loop, then sl st in st 2. Fasten off.
- Loop 2: Repeat in sts 24 and 26.
Each loop stands 1.5 in (3.8 cm) tall.
Final Blocking
- Weave in all remaining ends.
- Soak each strip in cool water for 15 minutes, then press out the water gently. Do not wring.
- Roll the strip in a towel to remove the extra moisture.
- Pin it flat to 6.5 in x 76 in (16.5 cm x 193.0 cm), pinning every 4 in (10.2 cm) along both long edges.
- Straighten the mesh columns with a ruler so the squares stay square.
- Shape the wings into soft ovals with your fingers and leave the bobbles raised. Don’t press them flat.
- Let it dry completely, then thread the loops onto the rod in the order A, B, A, B, A, B.
Final Quality-Control Checklist
- Every strip has 11 squares across and 150 rows.
- Each mesh measures 5.5 in x 75 in (14.0 cm x 190.5 cm) before the border.
- The border has 658 sts, with 27 on each short side and 304 on each long side.
- Each strip has nine dragonflies, spaced 8 in (20.3 cm) apart and centered.
- The wings are firmly attached, with no tips flipping up.
- Both loops are the same height and spaced evenly.
- All six strips hang at the same length, to within 0.25 in (0.6 cm).
Troubleshooting
- Strip slants or twists: You probably missed the last dc in the turning ch. Every 10 rows, check that each row still has 12 dc.
- Squares are taller than they are wide: Shorten your dc loops, or work the ch-2 spaces a bit looser.
- Border ruffles: Work 2 sc per row-end consistently, not 3, and check your border gauge.
- Border pulls in: Go up 0.25 mm in hook size for the border only.
- Bobbles sink in: Make sure the bumpy side is facing up before you sew the body on.
- Strips hang at different lengths: Re-block the longer strips, or remove rows before the border to match the shortest strip.
Care
Hand wash in cool water with a mild detergent and dry flat by re-pinning to the blocked size. Don’t hang the strips wet, because the weight of the water will stretch them.

Final Notes
Everything in this pattern follows one measurement chain. Each 0.5 in (1.3 cm) square makes an 11-square mesh that is 5.5 in (14.0 cm) wide. 150 rows give you 75 in (190.5 cm). Two rounds of border bring each strip to 6.5 in x 76 in (16.5 cm x 193.0 cm). The loops add 1.5 in (3.8 cm), and six strips together make a 39 in (99.1 cm) curtain. Check your gauge at the start, measure again at each checkpoint, and the dragonflies will line up neatly in every strip.
Happy crocheting!