
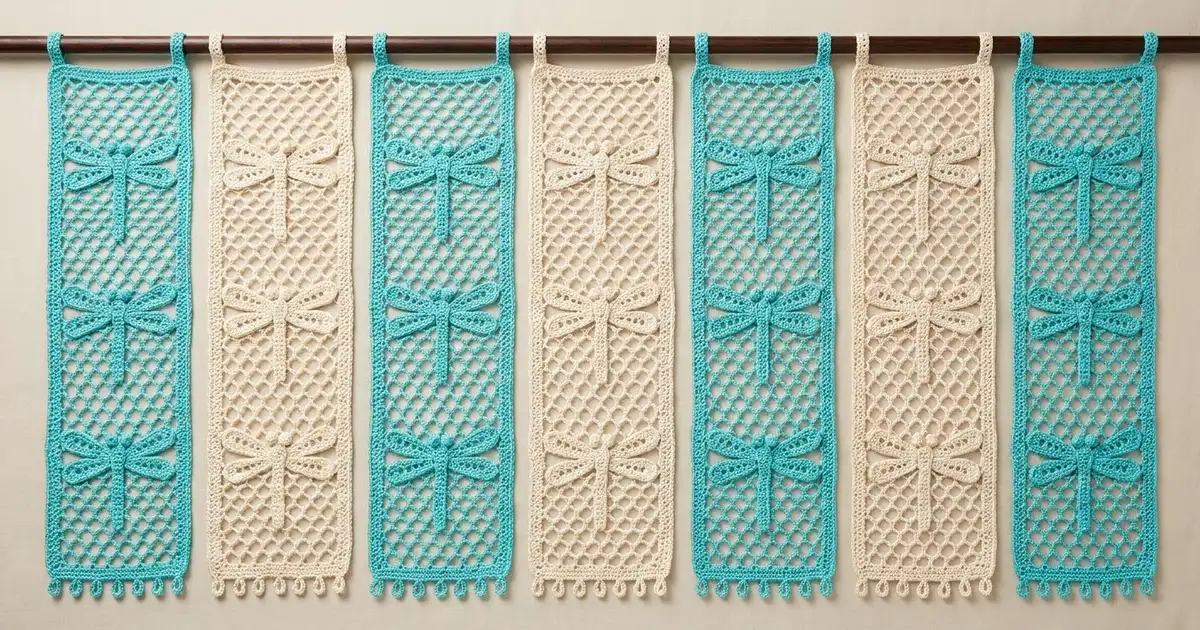
This door curtain is made of seven airy strips of honeycomb mesh. A line of open-winged dragonflies flutters down the center of each strip. Turquoise and cream strips alternate across the doorway, so the curtain looks fresh and summery and lets the light through.
Each strip hangs on its own from two loop tabs, so you can push a strip aside to walk through. The dragonflies match the color of their strip, which keeps the look calm. All instructions use US crochet terms.
One finished strip measures 5.5 in (14.0 cm) wide by 73 in (185.4 cm) long, not counting the bottom loops and the top tabs. The seven strips spread across about 41.5 in (105.4 cm) of rod.
Here is how it’s built. You crochet each mesh strip in rows from the bottom up. Then you make nine small dragonflies (a body plus four wings each), sew them down the center of the strip, and work a two-round border that adds the bottom loops. Finally you add two hanging tabs at the top.
Finished Size and Construction
- Strip size: 5.5 in x 73 in (14.0 cm x 185.4 cm)
- Total drop: about 75.5 in (191.8 cm), from the top of the tab loops to the tips of the bottom loops
- Skill level: Intermediate
- Terminology: US
- Yarn weight: DK (#3) cotton
- Hook: 4.0 mm (G-6)
- Number of pieces: 7 strips (4 turquoise, 3 cream), plus 63 dragonflies sewn on
- Layout: 7 strips side by side, not joined to each other, with gaps of 0.5 in (1.3 cm)
- Mesh size before border: 5 in x 72.5 in (12.7 cm x 184.2 cm)
- Border depth: 0.25 in (0.6 cm) on each side, plus bottom loops 0.5 in (1.3 cm) long
- Dragonfly size: 5 in (12.7 cm) wingspan x 3.5 in (8.9 cm) tall
Materials
Use a smooth mercerized DK cotton, about 115 m per 50 g. Cotton keeps the mesh crisp, and the hexagons and wing veins stay well defined after blocking.
- Turquoise: 450 g (1035 m), 9 balls, for 4 strips
- Cream: 350 g (805 m), 7 balls, for 3 strips
- 4.0 mm (G-6) crochet hook
- Tapestry needle
- Stitch markers
- Rustproof pins and blocking mats
- Spray bottle
- Measuring tape
- Scissors
- Wooden curtain rod, up to 1 in (2.5 cm) thick and at least 44 in (111.8 cm) long
One strip uses about 100 g (230 m). The quantities above include a margin of about 12%–17% for gauge swatches and sewing tails.
Abbreviations (US Terms)
- ch: chain
- sl st: slip stitch
- sc: single crochet
- hdc: half double crochet
- dc: double crochet
- tr: treble crochet
- sk: skip
- sp: space
- st(s): stitch(es)
- rep: repeat
- RS / WS: right side / wrong side
Bobble: Yarn over, insert the hook in the stitch, yarn over and pull up a loop, yarn over and draw through 2 loops. Do this 4 times in the same stitch, then yarn over and draw through all 5 loops on the hook.
Picot loop: Ch 4, then sl st in the top of the sc you just made.
Gauge and Checkpoints
Finish one whole strip before you start the others.
- Mesh gauge: 6 loops across = 5 in (12.7 cm), and 8 rows = 4 in (10.2 cm), after light blocking.
- Chain gauge: 6 ch = 1 in (2.5 cm).
- Border gauge: 5 sc = 1 in (2.5 cm) along the edges.
Checkpoints:
- After Row 9: 5 in x 4.5 in (12.7 cm x 11.4 cm)
- After Row 73: 36.5 in (92.7 cm) long
- After Row 145: 72.5 in (184.2 cm) long
- Each upper wing: 2.25 in x 0.75 in (5.7 cm x 1.9 cm)
- Each body: 3.5 in (8.9 cm) long
If it’s too big or too small: If your mesh is wider than 5 in (12.7 cm), go down 0.5 mm in hook size. If it’s narrower, go up 0.5 mm. If only the length is off, keep the width and adjust your row count by an even number. Then move every dragonfly position by the same amount so the spacing stays even.
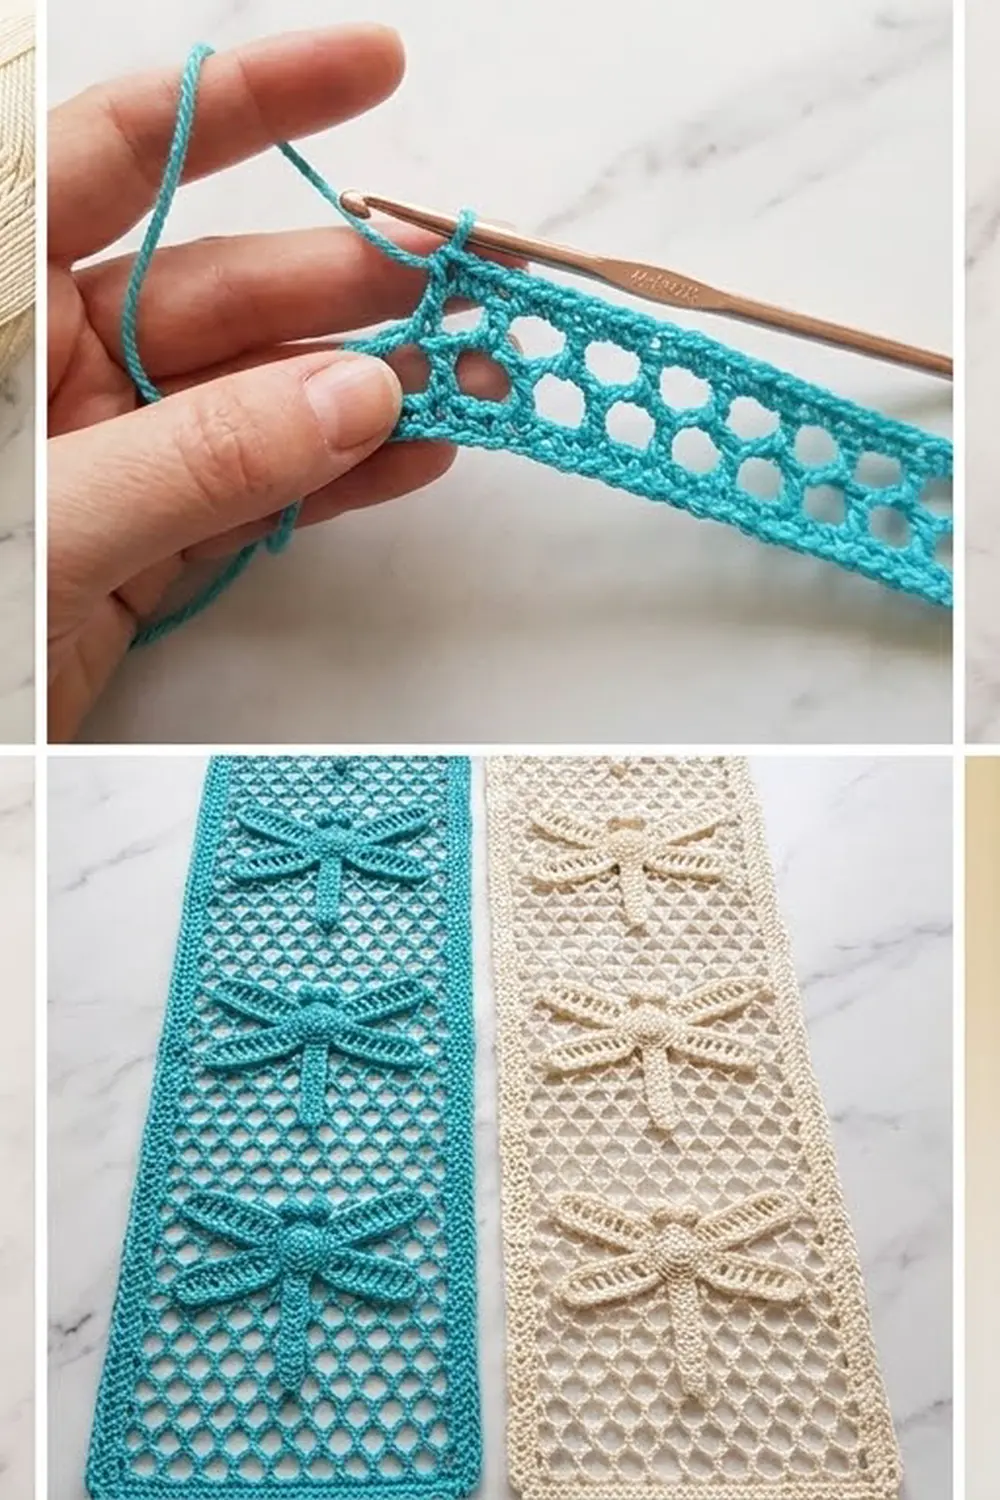
Mesh Strip (Make 7)
Foundation: Ch 32.
Row 1 (RS): Sc in the 2nd ch from hook. Ch 5, sk the next 4 ch, sc in the next ch. Rep from * 5 more times. Turn. (7 sc, 6 ch-5 loops)*
Row 2: Ch 5 (counts as dc + ch 2). Sc in the first ch-5 loop. Ch 5, sc in the next loop. Rep from * 4 more times. Ch 2, dc in the last sc. Turn. (6 sc, 5 ch-5 loops, 2 ch-2 sps, 2 dc including the turning ch)*
Row 3: Ch 1. Sc in the first dc. Ch 5, sc in the next ch-5 loop. Rep from * 4 more times. Ch 5, sc in the 3rd ch of the turning ch. Turn. (7 sc, 6 ch-5 loops)*
Rows 4–145: Rep Rows 2 and 3 another 71 times. Row 145 is a Row 3 type, so the top edge comes out flat. Fasten off.
Shifting the loops back and forth by half a loop on each row makes the honeycomb pattern. When you block the mesh lengthwise, the loops open into hexagons.
Dragonfly (Make 9 per Strip)
Body
Foundation: Ch 19.
Rnd 1: Sc in the 2nd ch from hook and in each of the next 16 ch (17 sc). In the last ch, work (sc, bobble, sc, bobble, sc). Now work along the other side of the foundation chain: sc in each of the next 16 ch, then 2 sc in the last ch. Sl st to the first sc. Fasten off. (40 sts: 38 sc + 2 bobbles)
The bobbles push out on the side facing away from you, so make that side the RS. The two bobbles are the eyes. The foundation chain shows as a raised ridge down the center of the body.
Upper Wing (Make 2)
Foundation: Ch 14.
Row 1: Starting in the 2nd ch from hook, work into the chain as follows:
– sc in the next ch, hdc in the next ch
– ch 1, sk 1 ch, dc in the next ch
– ch 1, sk 1 ch, tr in the next ch
– ch 1, sk 1 ch, tr in the next ch
– ch 1, sk 1 ch, dc in the next ch
– ch 1, sk 1 ch, hdc in the next ch
– sc in the last ch
(8 sts, 5 ch-1 sps)
Rnd 2 (outline): Ch 1, turn. Sc in each stitch and each ch-1 sp across the top (13 sc). Rotate the wing and sc in each of the 13 foundation ch. Sl st to the first sc. Fasten off. (26 sc)
The six posts (hdc, dc, tr, tr, dc, hdc) form the veins. Because the posts are short at the ends and tall in the middle, the outline arches into an oval.
Lower Wing (Make 2)
Foundation: Ch 12.
Row 1: Starting in the 2nd ch from hook, work into the chain as follows:
– sc in the next ch, hdc in the next ch
– ch 1, sk 1 ch, dc in the next ch
– ch 1, sk 1 ch, tr in the next ch
– ch 1, sk 1 ch, dc in the next ch
– ch 1, sk 1 ch, hdc in the next ch
– sc in the last ch
(7 sts, 4 ch-1 sps)
Rnd 2 (outline): Ch 1, turn. Sc in each stitch and each ch-1 sp across the top (11 sc). Then sc in each of the 11 foundation ch. Sl st to the first sc. (22 sc)
The lower wing measures 2 in x 0.75 in (5.1 cm x 1.9 cm).
Assemble the Dragonfly
Pin each piece flat, mist it with water, and let it dry.
- Place the upper wings with the arched edge facing up. Butt the straight base end of each wing against the side of the body, 0.75 in (1.9 cm) below the tips of the eyes. Whipstitch each wing in place through the outline sc.
- Place the lower wings with the arched edge facing down. Sew them on just below the upper wings, 1.5 in (3.8 cm) below the eye tips. Angle them about 15 degrees downward.
Wingspan: 0.5 in (1.3 cm) of body + 2 x 2.25 in (5.7 cm) of upper wing = 5 in (12.7 cm). This matches the width of the mesh.
Make All Pieces
Turquoise: 4 strips and 36 dragonflies (36 bodies, 72 upper wings, 72 lower wings).
Cream: 3 strips and 27 dragonflies (27 bodies, 54 upper wings, 54 lower wings).
Strip:  1    2    3    4    5    6    7
Color:  T    C    T    C    T    C    T
Flies:  9    9    9    9    9    9    9
Joining
The strips are never joined to each other. The only joining is sewing the dragonflies onto their strip, which you do before the border.
Placement: Center the dragonflies, where the wings meet the body, on Rows 9, 25, 41, 57, 73, 89, 105, 121, and 137. They are 16 rows apart, which is 8 in (20.3 cm). The first and last ones sit 4.25 in (10.8 cm) from each end of the mesh. Row 73 is the exact middle of the strip. Each gap between dragonflies leaves 4.5 in (11.4 cm) of open mesh.
Stitch-to-stitch logic: Line each body up over the center column of sc, which is the 4th sc of every odd row. With matching yarn, whipstitch the body down its full length, catching each center sc and each ch-5 loop that it crosses. Tack each wing in 3 places to the mesh chains underneath it. Then tack each upper wingtip to the row-end of the mesh at that spot.
Tension: Make your stitches snug but not tight. If you pull too hard, the mesh puckers and the strip gets shorter. After sewing, the strip should still measure 72.5 in (184.2 cm) when laid flat.
Hanging: Hang the strips on the rod in the order shown in the grid, with 0.5 in (1.3 cm) between them. The total spread is 7 x 5.5 in + 6 x 0.5 in = 41.5 in (105.4 cm).
Border
Work the border on each strip separately. The border gauge is 5 sc = 1 in (2.5 cm). The ch-1 corners are not counted in the side counts below.
Rnd 1 (RS): Join yarn in the first sc of Row 145. Ch 1.
- Top: Sc in each sc and 3 sc in each ch-5 loop across. (25 sc)
- First corner: Ch 1.
- Long side: Work 2 sc in the end of each odd row and 3 sc in the end of each even row. (73 x 2 + 72 x 3 = 362 sc)
- Second corner: Ch 1.
- Bottom: Working along the foundation chain, sc in the base of each Row 1 sc and 3 sc around each group of 4 skipped ch. (7 + 18 = 25 sc)
- Third corner: Ch 1.
- Second long side: Work it the same way as the first side. (362 sc)
- Fourth corner: Ch 1, then sl st to the first sc.
(774 sc, 4 corner ch-1 sps)
Why the math works: 25 sc divided by 5 is 5 in (12.7 cm), which matches the mesh width. 362 sc divided by 5 is 72.4 in (183.9 cm). That is within 1/8 in (0.3 cm) of the 72.5 in (184.2 cm) mesh, and light blocking evens out the difference. Alternating 2 sc and 3 sc gives an average of 2.5 sc per row, which equals 0.5 in (1.3 cm), exactly the height of one row.
Rnd 2: Ch 1.
- Top: Sl st in each of the 25 sc.
- Corners: Sl st in each corner sp as you come to it.
- Long sides: Sl st in each of the 362 sc. This makes a firm, chain-textured edge.
- Bottom: Sc in the first sc and make a picot loop. Sc in each of the next 3 sc, then sc in the next sc and make a picot loop. Rep from * 5 more times. (25 sc, 7 picot loops, spaced 4 sts apart: 1 + 6 x 4 = 25)*
Sl st to the first sl st. Fasten off.
Tabs (Make 2): With the RS facing, join yarn in the 1st sl st of the top edge.
- Row 1: Ch 1, sc in the same st and in each of the next 5 sts. (6 sc)
- Rows 2–20: Ch 1, turn, sc in each sc. (6 sc)
Fasten off, leaving a long tail. Work the second tab the same way over sts 20–25. Each tab is 4 in (10.2 cm) long and 1.2 in (3.0 cm) wide.
Fold each tab to the WS and sew its last row to the Rnd 1 stitches. This makes a loop that stands 2 in (5.1 cm) tall and fits a rod up to 1 in (2.5 cm) thick.
Final Blocking
- Soak the strip in cool water for 10 minutes. Press the water out gently.
- Pin the strip out to 5.5 in x 73 in (14.0 cm x 185.4 cm). If your mats are too short, block it in sections.
- Pull the mesh lengthwise until the loops open into hexagons.
- Pin out each wing oval and smooth the veins straight.
- Pin each bottom loop into a round shape.
- Let it dry completely, then unpin.
Final Quality-Control Checklist
- Each strip has 145 rows and 9 dragonflies, centered on the correct rows.
- The top and bottom have 25 sts each, and each long side has 362 sts.
- There are 7 bottom loops on each strip.
- The wingtips reach the side edges.
- Both eyes are on the RS of every dragonfly.
- The tabs are sewn securely.
- The colors go in the order T, C, T, C, T, C, T.
Troubleshooting
- Strip is narrowing: You probably missed the ch 2 and dc at the end of an even row. Count 7 sc on each odd row.
- Mesh puckers behind a dragonfly: Your sewing is too tight. Snip and redo it with looser stitches.
- Wing cups instead of lying flat: Your Rnd 2 is too tight. Rework it with your hook one size larger.
- Eyes are on the wrong side: Flip the body over before you sew it on.
- Side edge ripples: Use 2 sc in every row-end on the next strip, or work the edge sl sts more loosely.
Care
Hand wash in cool water with a mild soap. Roll the strip in a towel to remove water, then dry it flat, pinned to size if needed.

Final Notes
Here is how the measurements build on each other:
- 6 ch = 1 in (2.5 cm)
- 6 loops = 5 in (12.7 cm) wide
- 8 rows = 4 in (10.2 cm), so 145 rows = 72.5 in (184.2 cm)
- 25 and 362 border sc give a 5.5 in x 73 in (14.0 cm x 185.4 cm) strip
- 7 strips with gaps = 41.5 in (105.4 cm) across the rod
Check your first strip against these numbers before you start the rest. If it matches, the remaining six will line up without any trouble.
Happy crocheting!