

The Emerald Plume panel is made of nine peacock-feather motifs joined into one lace rectangle. Each motif is a teardrop with a pointed tip. It has a deep teal eye, a gold band with short gold rays around it, and an open teal fan made of graded ribs and chain loops.
The colors are deep teal and warm mustard gold, and the overall look is somewhere between art nouveau and vintage doily lace. Because the motifs touch only at a few points, the panel has open oval windows between the feathers. A two-round chain-arch border follows the scalloped outline instead of forcing it into a straight edge.
This pattern uses US crochet terms. The finished panel measures 13 x 16 in (33.0 x 40.6 cm) after blocking.
You make the first motif in full. You then make the other eight with join-as-you-go in their last round, so the grid is finished when the last motif is done. The border goes on last, followed by blocking.
Finished Size and Construction
- Finished size: 13 x 16 in (33.0 x 40.6 cm)
- Skill level: Intermediate
- Terminology: US crochet terms
- Yarn weight: Sport (#2), mercerized cotton
- Hook: 3.0 mm (US C/D)
- Number of pieces: 9 motifs, joined as you go
- Layout: 3 motifs across x 3 motifs down
- Motif size: 4 in wide x 5 in tall (10.2 x 12.7 cm)
- Size before border: 12 x 15 in (30.5 x 38.1 cm)
- Border depth: 0.5 in (1.3 cm) per side
Materials
Use a smooth mercerized cotton in sport weight. Cotton gives crisp ribs and holds its blocked shape. Acrylic will work, but the lace will look softer and the tips will be less defined.
- Color A, deep teal: 100 g (about 300 m)
- Color B, mustard gold: 25 g (about 75 m)
Tools:
– 3.0 mm (US C/D) crochet hook
– Tapestry needle
– 4 locking stitch markers
– Blocking mat and rust-proof pins
– Spray bottle
– Measuring tape
All quantities include a margin of about 25% for your gauge swatch and for differences in tension.
Abbreviations (US Terms)
- ch – chain
- sl st – slip stitch
- sc – single crochet
- hdc – half double crochet
- dc – double crochet
- tr – treble crochet
- sp(s) – space(s)
- st(s) – stitch(es)
- RS – right side
- MR – magic ring
Special terms:
– Rib: one tall stitch (hdc, dc, or tr) followed by ch 2. Every rib in Round 5 is worked this way.
– Loop center: the point between the 2nd and 3rd sc of a 4-sc group in Round 7.
Gauge and Checkpoints
Make one complete motif before starting the panel and block it lightly. It should measure 4 x 5 in (10.2 x 12.7 cm). Each motif is a gauge swatch, so check the first one at every stage:
- After Round 1: 1 in (2.5 cm) across
- After Round 3: 2 in (5.1 cm) across
- After Round 4: 2.25 in (5.7 cm) across, lying flat
- After Round 5: 3.25 in wide x 4 in tall (8.3 x 10.2 cm)
- After Round 6: 3.75 x 4.75 in (9.5 x 12.1 cm)
- After Round 7: 4 x 5 in (10.2 x 12.7 cm)
If your motif is more than 0.25 in (0.6 cm) too big, go down to a 2.75 mm hook. If it is that much too small, go up to a 3.25 mm hook. If Round 4 ruffles, the problem is tension, not stitch count, so change the hook before you continue.
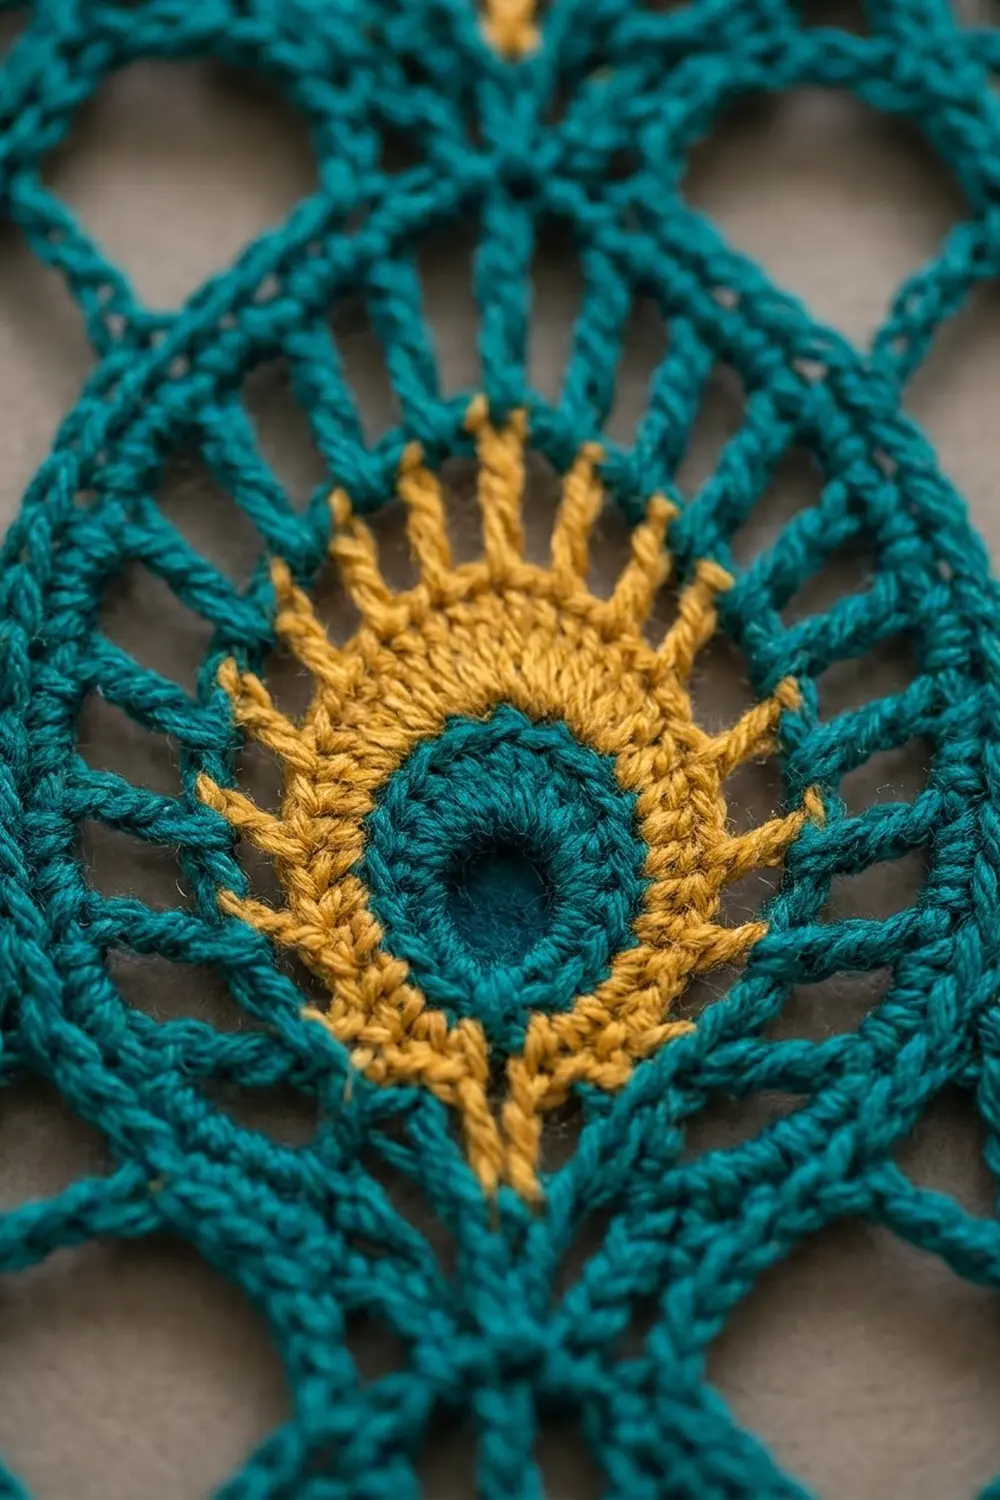
Motif (Make 9)
The first motif is worked in full. Motifs 2–9 follow the same rounds, but their Round 7 includes the joins described in the Joining section.
Round 1 (Color A): MR, ch 3 (counts as dc), 11 dc in ring. Join with sl st to the top of ch-3. (12 dc)
Fasten off A.
Round 2 (Color B): Join B in any st. Ch 3 (counts as dc), dc in the same st, 2 dc in each st around. Join. (24 dc)
This is the solid gold band around the eye.
Round 3 (Color B): Ch 4 (counts as dc + ch 1), dc in the next st, ch 1; repeat from * 22 more times. Join to the 3rd ch of the beginning ch-4. (24 dc, 24 ch-1 sps)
These separated dc make the short gold rays. Fasten off B.
Round 4 (Color A): Join A in any ch-1 sp. Ch 1, sc in the same sp, sc in the next dc, sc in the next ch-1 sp, sc in the next dc; repeat around. Join. (48 sc)
Place a marker in any sc. This sc is st 1 and becomes the top center of the feather.
Round 5 (Color A) – the graded ribs: You will work 24 ribs, one in every other sc (sts 1, 3, 5 … 47), and skip the sc between them. Number the ribs 1–24 in working order. Rib 1 sits on st 1 at the top.
Use these heights:
– tr ribs: ribs 23, 24, 1, 2, 3 (5 ribs, forming the tip)
– dc ribs: ribs 4–7 and 19–22 (8 ribs, the shoulders)
– hdc ribs: ribs 8–18 (11 ribs, the rounded bottom, centered on rib 13)
Join A in st 1. Ch 4 (counts as tr), ch 2. Then skip 1 sc, work the next rib in the next sc, ch 2; repeat until all 24 ribs are made. Join to the top of the beginning ch-4. (24 ribs, 24 ch-2 sps)
Rib heights total 5 + 8 + 11 = 24. The tall stitches pull the top into a point, and the short ones keep the bottom round.
Round 6 (Color A) – lace loops: Sl st into the next ch-2 sp. Ch 1, sc in the same sp, ch 4, sc in the next ch-2 sp; repeat until you have a sc in all 24 sps. Ch 6 and join to the first sc. (24 sc, 23 ch-4 loops, 1 ch-6 loop)
The ch-6 loop crosses over rib 1 and is the top loop. Call it L1. Number the other loops in working order: the loop after your first sc is L2, and the last ch-4 loop is L24. The bottom center loop is L13.
Round 7 (Color A) – edge: Sl st into L2. Ch 1, 4 sc in L2, then 4 sc in each loop from L3 to L24. In L1 work (3 sc, ch 3, 3 sc) for the tip. Join to the first sc. (98 sc: 23 x 4 = 92, plus 6 at the tip; 1 ch-3 tip sp)
Fasten off and weave in ends.
Motif sides (needed for joining and the border):
– Top: L22–L4 (7 loops)
– Side 1: L5–L9 (5 loops)
– Bottom: L10–L16 (7 loops)
– Side 2: L17–L21 (5 loops)
That adds up to 7 + 5 + 7 + 5 = 24 loops.
Make All Pieces
- Total: 9 motifs
- Color A per motif: about 6 g
- Color B per motif: about 1.5 g
Lay the motifs out RS up with the tips pointing up. Make them in this order:
[1] [2] [3]
[4] [5] [6]
[7] [8] [9]
Joining
Motif 1 is made in full. Join all the others during Round 7, using sl sts into the loop centers of motifs that are already finished.
Side join (3 points): Side 1 of one motif joins Side 2 of its neighbor, loop to mirrored loop: L6↔L20, L7↔L19, L8↔L18.
In each joining loop of the new motif, work: 2 sc, sl st into the loop center of the matching loop on the neighbor, 2 sc. The sl st is not counted, so each group stays at 4 sc.
Tip join (1 point): When a motif has a motif above it, work L1 as: 3 sc, ch 1, sl st into the loop center of L13 on the motif above, ch 1, 3 sc. This replaces the ch-3 tip, and the count stays at 98 sc.
Which joins each motif gets:
– Motifs 2 and 3: side join only
– Motif 4 and motif 7: tip join only
– Motifs 5, 6, 8, and 9: tip join and side join
Tension: Work each sl st snugly but not tight. A tight joining sl st pulls the loops out of shape and narrows the oval windows. Neither motif should pucker at the join.
Size checkpoint: After motif 3, the top row should measure 12 x 5 in (30.5 x 12.7 cm). After motif 6, it should measure 12 x 10 in (30.5 x 25.4 cm). After motif 9, it should measure 12 x 15 in (30.5 x 38.1 cm). The width is 3 x 4 in with nothing added at the seams, because each join is a single sl st into an existing stitch.
Border
Border gauge: about 5 sc per 1 in (2.5 cm), measured along the curved edge. The border follows the scallops instead of straightening them.
On the panel’s outer edge, every free loop sits on one of four sides:
– Top edge: the Top loops (L22–L4) of motifs 1, 2, 3
– Right edge: the Side 1 loops (L5–L9) of motifs 3, 6, 9
– Bottom edge: the Bottom loops (L10–L16) of motifs 9, 8, 7
– Left edge: the Side 2 loops (L17–L21) of motifs 7, 4, 1
If your Side 1 lies on the left because of how you hold your work, just mirror these directions. The motif is symmetrical, so the counts don’t change.
Starting counts per side:
– Top and bottom: 3 motifs x 7 loops = 21 sc each
– Left and right: 3 motifs x 5 loops = 15 sc each
Round 1 (Color A) – chain arches: Join A at the loop center of L22 on motif 1 and ch 1. Then:
- Sc at the loop center, ch 4; repeat across the Top loops of motif 1. On the top row, the L1 sc goes into the ch-3 tip sp.
- After the last loop of a motif, ch 8 instead of ch 4. This is the bridge across the gap to the next motif.
- At each corner, replace the last ch-4 with ch 6.
- Work around all four edges the same way. Join to the first sc.
Per-side counts for Round 1:
– Top/bottom: 21 sc and 21 sps. The spaces are 18 ch-4 (6 per motif x 3), 2 ch-8 bridges, and 1 ch-6 corner.
– Left/right: 15 sc and 15 sps. The spaces are 12 ch-4 (4 per motif x 3), 2 ch-8 bridges, and 1 ch-6 corner.
– Total: 72 sc and 72 sps
Round 2 (Color A) – edge: This round goes into the spaces only. The Round 1 sc are skipped.
- 3 sc in each ch-4 sp
- 7 sc in each ch-8 bridge
- (2 sc, ch 2, 2 sc) in each ch-6 corner
Join and fasten off.
Per-side counts for Round 2:
– Top/bottom: 18 x 3 + 2 x 7 + 4 = 72 sc
– Left/right: 12 x 3 + 2 x 7 + 4 = 54 sc
– Total: 252 sc, plus 4 ch-2 corners
Why the math works: Every Round 1 sc sits on a loop that already exists, so no stitches are invented at the seams. Each loop on a perimeter side gives exactly one sc, which is why the side counts are 3 x 7 and 3 x 5. In Round 2, each ch-4 sp is about 0.6 in (1.5 cm) long, and 3 sc fill it at the border gauge. That keeps the scallops flat instead of ruffled. Together the two rounds add 0.5 in (1.3 cm) per side, so the finished size is 13 x 16 in (33.0 x 40.6 cm).
Final Blocking
- Weave in any remaining ends along the sc edges.
- Lay the panel RS up on the blocking mat.
- Mist it evenly until it is damp, not soaking.
- Pin the four corners to 13 x 16 in (33.0 x 40.6 cm).
- Pin each motif tip upward so it forms a clean point.
- Pin each tr rib out straight so the fan radiates evenly.
- Open each oval window and pin its loops into a smooth curve.
- Pin the border arches so they all sit at the same height.
- Let it dry completely, at least 12 hours, before unpinning.
Final Quality-Control Checklist
- Each motif has 98 sc in Round 7 and a pointed tip.
- The gold band has 24 even rays.
- Side joins sit at L6, L7, and L8 on one side and L20, L19, and L18 on the other.
- Tip joins land at the L13 center of the motif above.
- Border Round 1 has 21 / 15 / 21 / 15 sc.
- Border Round 2 has 72 / 54 / 72 / 54 sc.
- The panel measures 13 x 16 in (33.0 x 40.6 cm).
- All ends are secure and invisible.
Troubleshooting
- The tip is rounded, not pointed: Check that ribs 23–3 are tr and that the top loop is ch 6. Pin the tip firmly while blocking.
- Round 4 ruffles: Your tension is loose. Go down a hook size and keep 48 sc.
- The motif is lopsided: The st 1 marker probably moved. Count the ribs from the top.
- The oval windows are pinched: The joining sl sts are too tight. Redo them more loosely.
- The border waves: Recheck that each ch-4 sp has 3 sc, not 4.
- The border cups: Your bridges are too short. Use ch 9 instead of ch 8 and work 8 sc in each bridge on Round 2. Record the change and use it on all eight bridges.
Care
Hand wash in cool water with mild detergent, then press out the water in a towel. Lay the panel flat and pin it back to 13 x 16 in (33.0 x 40.6 cm) to dry.

Final Notes
Here is the full measurement chain:
- Eye: 1 in (2.5 cm)
- Gold band: 2 in (5.1 cm)
- Finished motif: 4 x 5 in (10.2 x 12.7 cm)
- Nine motifs joined: 12 x 15 in (30.5 x 38.1 cm)
- With the border: 13 x 16 in (33.0 x 40.6 cm)
If the first motif matches its checkpoints, every later number will follow. Happy crocheting!