

This hanging holder stores three rolls of toilet paper in a narrow strip of wall. Three oval baskets with scalloped rims are sewn onto a long diamond-mesh back panel. The top of the panel narrows to a point and hangs from a natural wooden ring.
The sample uses one deep emerald green cotton, which looks fresh against white tile and pale marble. Cream works just as well for a softer look. The style is airy and slightly vintage. Each basket has a solid single crochet base, an eyelet band, a round of fan shells and a top round of open arches, all set against open trellis mesh.
All terms are US crochet terms. The panel measures 7.2 in (18.3 cm) wide and 25.5 in (64.8 cm) long including the border. With the strap and ring, the holder hangs about 28.5 in (72.4 cm) long. Each basket is 6 in (15.2 cm) long, 3.4 in (8.6 cm) deep at the base and 2.75 in (7.0 cm) tall.
You crochet three identical oval baskets in joined rounds. Then you make the mesh panel in turned rows, with a tapered top and a short strap. A single crochet and slip stitch border firms the panel edges. Finally, you sew each basket to the panel along two lines and fold the strap around the ring.
Finished Size and Construction
- Finished size: 7.2 in x 25.5 in (18.3 cm x 64.8 cm) panel; about 28.5 in (72.4 cm) hanging length
- Skill level: Intermediate
- Terminology: US
- Yarn weight: #4 worsted, 100% cotton
- Hook: 4.0 mm (US G-6)
- Number of pieces: 4 crocheted pieces (3 baskets, 1 mesh panel) plus 1 wooden ring
- Layout: 3 baskets stacked vertically on the panel, with base lines 7.2 in (18.3 cm) apart
- Basket size: 6 in x 3.4 in (15.2 cm x 8.6 cm) base, 2.75 in (7.0 cm) tall
- Panel size before border: 6.6 in x 25.2 in (16.8 cm x 64.0 cm)
- Border depth: 2 rounds, about 0.3 in (0.8 cm)
Materials
Choose a smooth, firm cotton or cotton blend. It holds the basket shape, copes with a humid bathroom and washes well. Avoid very soft or splitty yarns, because the arches will droop.
- Emerald green worsted cotton: 200 g, about 340 m (372 yd)
- 4.0 mm (US G-6) crochet hook
- 1 wooden ring, 2 in (5.1 cm) outer diameter
- Tapestry needle
- Stitch markers
- Measuring tape and scissors
- Rust-proof pins and a blocking mat
The sample used about 140 g. The quantity above includes a margin for your test piece and any reworking.
Abbreviations (US Terms)
- ch: chain
- sl st: slip stitch
- sc: single crochet
- dc: double crochet
- inc: 2 sc in the same stitch
- BLO: back loop only
- sp: space
- st(s): stitch(es)
Shell: 7 dc in the same stitch.
Arch: a ch-9 loop that you later cover with 13 sc.
Gauge and Checkpoints
- Basket gauge: 18 sc x 20 rounds = 4 in (10.2 cm)
- Mesh gauge: 8 ch-5 loops = 6.6 in (16.8 cm) wide; 5 rows = 3 in (7.6 cm), so each row is 0.6 in (1.5 cm) tall
- Border gauge: 5 sc = 1 in (2.5 cm) along any edge
Make one basket first. It serves as your gauge test and shows whether a roll will sit well before you start the panel.
Basket checkpoints:
– After Rnd 1: about 3.25 in (8.3 cm) long
– After Rnd 4: about 4.4 in x 1.7 in (11.2 cm x 4.3 cm)
– After Rnd 8: 6 in x 3.4 in (15.2 cm x 8.6 cm)
– After Rnd 12: wall 1.1 in (2.8 cm) tall
– Finished: 2.75 in (7.0 cm) tall at the arch tops
Panel checkpoints:
– After Row 1: 6.6 in (16.8 cm) wide
– After Row 35: 21 in (53.3 cm) long
– After Row 42: 25.2 in (64.0 cm) long
If your base is too big, go down one hook size. If it is too small, go up one. If the mesh comes out too long but the right width, stop the body at Row 33, which is also a full-loop row.
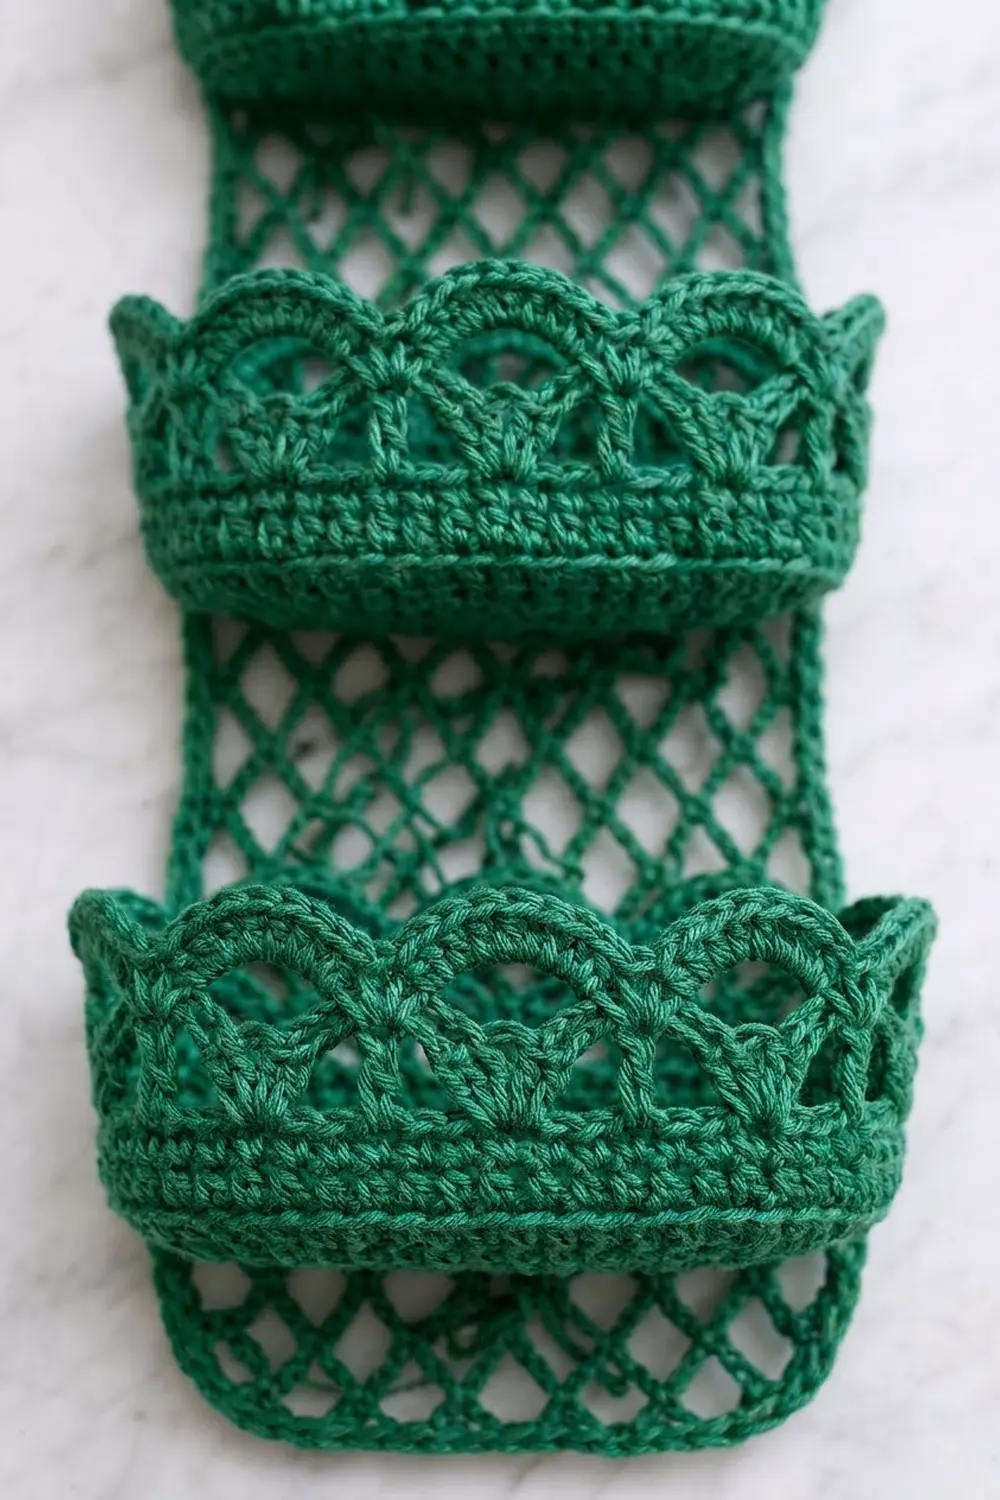
Basket (Make 3)
The base is a flat sc oval. Each straight side keeps 12 stitches throughout, and all increases happen at the two curved ends. Join each round with a sl st to the first sc, then ch 1. The ch 1 does not count as a stitch.
Ch 15.
Rnd 1: Sc in 2nd ch from hook, sc in next 12 ch, 3 sc in last ch. Rotate and work along the other side of the chain: sc in next 12 ch, 2 sc in last ch (the same ch as the first sc). Join. (30 sts)
Rnd 2: Inc in first st, sc in next 12, inc in each of next 3, sc in next 12, inc in each of last 2. Join. (36 sts)
Rnd 3: (Sc in next st, inc) once, sc in next 12, (sc in next st, inc) 3 times, sc in next 12, (sc in next st, inc) 2 times. Join. (42 sts)
Rnd 4: (Sc in next 2, inc) once, sc in next 12, (sc in next 2, inc) 3 times, sc in next 12, (sc in next 2, inc) 2 times. Join. (48 sts)
Rnd 5: (Sc in next 3, inc) once, sc in next 12, (sc in next 3, inc) 3 times, sc in next 12, (sc in next 3, inc) 2 times. Join. (54 sts)
Rnd 6: (Sc in next 4, inc) once, sc in next 12, (sc in next 4, inc) 3 times, sc in next 12, (sc in next 4, inc) 2 times. Join. (60 sts)
Rnd 7: (Sc in next 5, inc) once, sc in next 12, (sc in next 5, inc) 3 times, sc in next 12, (sc in next 5, inc) 2 times. Join. (66 sts)
Rnd 8: (Sc in next 6, inc) once, sc in next 12, (sc in next 6, inc) 3 times, sc in next 12, (sc in next 6, inc) 2 times. Join. (72 sts: 12 on each straight side, 24 at each end)
Mark the first and last stitch of one straight side. This side will be the back of the basket.
Rnd 9 (turning ridge): Sc in BLO of each st around. Join. (72 sts) The wall now rises from the base.
Rnd 10 (eyelets): Ch 4 (counts as dc + ch 1), skip next st, *dc in next st, ch 1, skip next st; repeat from * around. Join to 3rd ch of beginning ch-4. (36 dc + 36 ch-1 sps)
Rnd 11 (conversion round): Ch 1, sc in each dc and in each ch-1 sp around. Join. (36 + 36 = 72 sts)
Rnd 12: Sc in each st around. Join. (72 sts)
Rnd 13 (shells): Ch 1, sc in first st, *skip 3 sts, shell in next st, skip 3 sts, sc in next st; repeat from * 7 more times, skip 3 sts, shell in next st, skip last 3 sts. Join to first sc. (9 shells: 9 sc + 63 dc = 72 sts)
Rnd 14 (arch base): Sl st in next 4 dc (to the center dc of the first shell), ch 1, sc in same st, *ch 9, sc in center dc of next shell; repeat from * 7 more times, ch 9. Join to first sc. (9 sc + 9 ch-9 arches)
Rnd 15 (arches): *13 sc in next ch-9 arch, sl st in next sc; repeat from * around. (9 x 13 sc = 117 sc, plus 9 sl sts = 126 sts) Fasten off, leaving a 36 in (91.4 cm) tail for sewing.
Pinch each arch upward so it stands above its shell. The shells make the lower scalloped band and the arches make the open top edge.
Mesh Back Panel
The panel is a classic diamond net. Odd rows have 8 full loops. Even rows have 7 full loops plus a half loop at each edge.
Ch 34.
Row 1: Sc in 2nd ch from hook, *ch 5, skip 3 ch, sc in next ch; repeat from * across. (9 sc, 8 ch-5 loops)
Row 2: Turn, ch 5 (counts as dc + ch 2), sc in first ch-5 loop, (ch 5, sc in next loop) 7 times, ch 2, dc in last sc. (7 full loops + 2 half loops)
Row 3: Ch 1, turn, sc in dc, (ch 5, sc in next ch-5 loop) 7 times, ch 5, sc in 3rd ch of turning ch. (8 loops)
Rows 4–35: Repeat Rows 2 and 3 sixteen more times, ending on Row 35, a full 8-loop row. The body now measures 21 in (53.3 cm).
Tapered top: Each row places one sc in every loop of the row below. That loses one loop per row and narrows the panel by half a loop at each edge.
Row 36: Ch 1, turn, sc in first ch-5 loop, (ch 5, sc in next loop) across. (7 loops)
Rows 37–42: Repeat Row 36. (6, 5, 4, 3, 2, 1 loops) The taper is 4.2 in (10.7 cm) tall.
Strap, Row 43: Ch 1, turn, 5 sc in the single ch-5 loop. (5 sts)
Rows 44–52: Ch 1, turn, sc in each st across. (5 sts) Fasten off, leaving a 12 in (30.5 cm) tail. The strap is about 2 in (5.1 cm) long.
Make All Pieces
You need 3 baskets and 1 panel, all in emerald green. Allow about 30 g per basket (90 g total) and 50 g for the panel, border and strap.
Layout, measured from the bottom edge of the panel body:
          ( ring )
             |     strap
           [^^^]   Rows 36-42 taper
           |   |   Rows 29-35 open mesh
           [B3]    base ridge at top of Row 26 (15.6 in / 39.6 cm)
           |   |
           [B2]    base ridge at top of Row 14 (8.4 in / 21.3 cm)
           |   |
           [B1]    base ridge at top of Row 2 (1.2 in / 3.0 cm)
           -----   bottom edge (foundation chain)
Each basket base sits 12 rows, or 7.2 in (18.3 cm), above the one below it.
Border
Work the border before attaching the baskets, so the edges are stable while you sew.
Border gauge: 5 sc = 1 in (2.5 cm).
Rnd 1: Hold the panel with the foundation chain at the top and the right side facing you, then join yarn in the first ch at the right corner. Working along the free loops of the foundation chain, work 3 sc in first ch, sc in next 31 ch, 3 sc in last ch. (37 sts on the bottom edge, including both 3-sc corner groups)
Rotate. Work 3 sc around each row-end of Rows 1–35. (105 sts)
Work up the slope along Rows 36–42, alternating 4 sc and 3 sc per row-end in the order 4, 3, 4, 3, 4, 3, 4. (25 sts) Stop at the base of the strap. Do not edge the strap.
Work down the other slope the same way. (25 sts) Then work 3 sc around each row-end from Row 35 down to Row 1. (105 sts) Join to first sc. (37 + 105 + 25 + 25 + 105 = 297 sts)
Rnd 2: Sl st loosely in each sc around. (297 sl sts) Fasten off and weave in the ends.
Why the math works: Each body row is 0.6 in (1.5 cm) tall, and 3 sc at 5 sc per inch also cover 0.6 in. Each side’s 105 sc therefore span 21 in (53.3 cm), exactly the body length. The bottom edge’s 33 working chains span 6.6 in (16.8 cm), and the 4 extra corner stitches turn the corners square. On the slopes, each row-end runs diagonally about 0.73 in (1.9 cm). Alternating 4 and 3 sc averages about 3.6 sc per row-end, which keeps the slope flat.
Joining
Use whipstitch and the basket’s tail.
Find the 24 back stitches of the basket: the 12 marked straight stitches plus 6 stitches on each side of them around the curve. These 24 sts span 5.3 in (13.5 cm). Center them on the 6.6 in (16.8 cm) panel body, which leaves about 0.65 in (1.7 cm) of mesh free on each side.
- Pin the basket so its Rnd 9 ridge lies on the mesh row shown in the layout.
- Lower line: Sew each of the 24 ridge stitches to the mesh strand directly behind it, one stitch at a time.
- Upper line: Sew the same 24 stitches on Rnd 12 to the mesh 2 rows higher, about 1.2 in (3.0 cm) up. The wall is 1.1 in (2.8 cm) tall at this point, so it lies flat with only slight ease.
- Leave the eyelet, shell and arch rounds free so the rim stands away from the wall.
Keep the tension firm but not tight. If the diamonds pucker or close up, loosen your stitches. Attach the baskets from bottom to top.
Size checkpoint: The panel should still be 7.2 in (18.3 cm) wide. Measured from the bottom edge of the body, the Rnd 9 ridges sit at 1.2 in, 8.4 in and 15.6 in (3.0 cm, 21.3 cm and 39.6 cm).
Ring: Pass the top 1 in (2.5 cm) of the strap through the wooden ring and fold it to the back. Sew the end down with the strap tail.
Final Blocking
- Spray the whole piece lightly until it is damp, not wet.
- Lay it face up on a blocking mat.
- Pin the panel to 7.2 in x 25.5 in (18.3 cm x 64.8 cm), opening each diamond evenly.
- Pin the slopes straight up to the point.
- Fill each basket with a plastic bag so the walls stand up.
- Shape each arch upward with your fingers.
- Let it dry completely, which takes 12–24 hours.
Final Quality-Control Checklist
- Each basket has 72 sts in each of Rnds 8–13, with 9 shells and 9 arches.
- Each base measures 6 in x 3.4 in (15.2 cm x 8.6 cm).
- The panel body has 35 rows and ends on an 8-loop row.
- The taper steps evenly from 7 loops down to 1.
- Border Rnd 1 has 297 sts: 37 on the bottom, 105 on each side and 25 on each slope.
- The baskets are 7.2 in (18.3 cm) apart and centered.
- The ring is sewn on securely and the holder hangs straight.
Troubleshooting
- Base cups or ruffles: Recount Rnds 2–8. Cupping usually means missed increases; ruffling means extra ones.
- Shells don’t fit evenly: Rnd 12 must have exactly 72 sts, because each shell repeat uses 8 sts.
- Arches flop: Pack the 13 sc tightly or use a firmer cotton.
- Panel edges are wavy: Your border is too loose. Work it more firmly, or use 2 sc on every third row-end.
- Baskets tilt forward: Check that the upper sewing line on Rnd 12 catches every back stitch.
Care
Hand wash in cool water with mild soap and lay flat to dry. Reshape the baskets while they are damp.

Final Notes
At 18 sc per 4 in (10.2 cm), each basket has a 6 in x 3.4 in (15.2 cm x 8.6 cm) base and 72 wall stitches, enough for 9 shell repeats. At 0.6 in (1.5 cm) per row, the panel has a 21 in (53.3 cm) body and a 4.2 in (10.7 cm) taper. The border adds 0.3 in (0.8 cm) to each edge, so the finished panel is 7.2 in x 25.5 in (18.3 cm x 64.8 cm). Spaced 12 rows apart, the three baskets hold three rolls in a neat column.
Happy crocheting!