
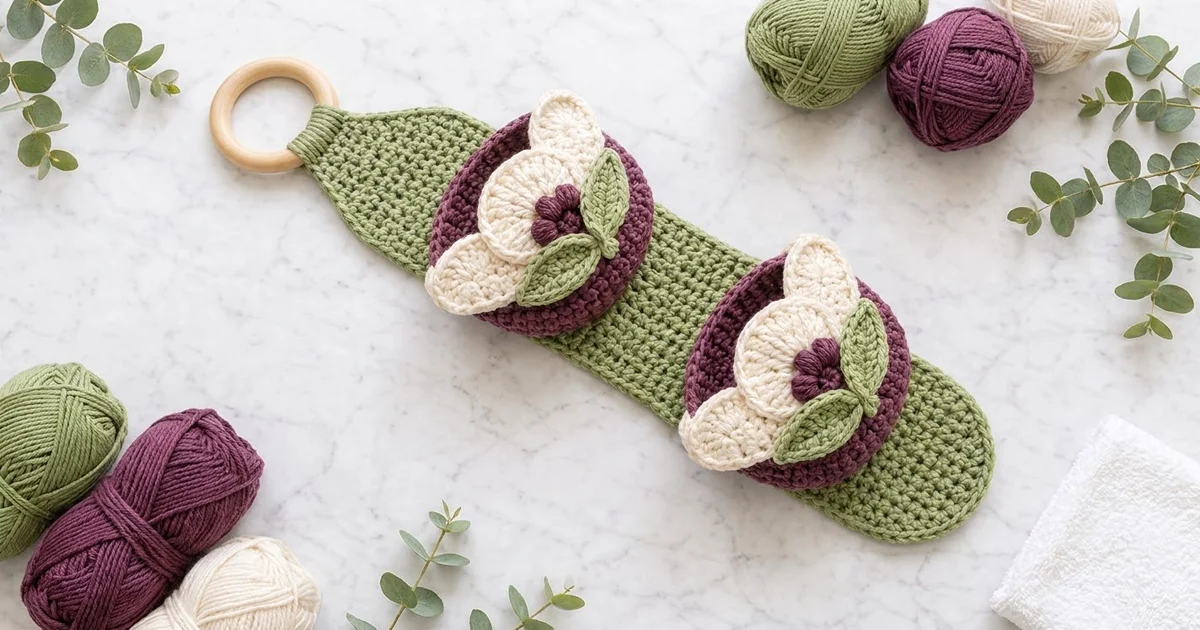
This hanging holder stores two spare toilet rolls on a long sage green strip. A plum basket sits near the bottom of the strip and another higher up. Each basket has a cream petal fan on the front with a plum bobble center and two green leaves, so every roll sits inside a small flower.
The colors are plum, cream and sage green. The look is soft and cottage-style, with firm baskets and a dense, flat backing that holds its shape. All instructions use US crochet terms.
The finished holder is about 4.6 in (11.7 cm) wide and about 26.3 in (66.8 cm) long from the folded tab to the bottom edge, not counting the ring. Each basket is about 5.5 in (14.0 cm) across, with walls about 3.4 in (8.6 cm) tall.
The strip is worked in single crochet rows from the rounded bottom up to a narrow tab. The baskets are worked in the round. The petals, centers and leaves are small appliqués that you layer and sew on. After that, you attach the baskets, work a two-round border on the strip, fold the tab over the ring and block.
Finished Size and Construction
- Finished size: about 4.6 in (11.7 cm) wide x 26.3 in (66.8 cm) long, hung
- Skill level: Easy intermediate
- Terminology: US
- Yarn weight: Worsted (#4) cotton
- Hook: 5.0 mm (H-8)
- Number of pieces: 19 (1 strip, 2 baskets, 10 petals, 2 bobble centers, 4 leaves)
- Layout: one vertical strip with 2 baskets stacked down the center
- Strip before border: 4.0 in (10.2 cm) wide x 28.0 in (71.1 cm) long, including the tab
- Basket size: 5.5 in (14.0 cm) across, with 3.4 in (8.6 cm) walls
- Border depth: about 0.3 in (0.8 cm) on each edge
Materials
Use a smooth worsted-weight cotton, either mercerized or combed. Cotton keeps the baskets upright. The amounts below assume about 93 yd (85 m) per 1.75 oz (50 g) ball.
- Sage green (strip, leaves): 100 g, about 170 m
- Plum (baskets, bobble centers): 120 g, about 204 m
- Cream (petals): 50 g, about 85 m
Tools:
- 5.0 mm (H-8) crochet hook
- 1 wooden ring, 3 in (7.6 cm) outer diameter
- Tapestry needle
- Stitch markers
- Rustproof pins
- Measuring tape
- Spray bottle and blocking mat
All quantities include a margin of about 15 percent for swatching and differences in tension.
Abbreviations (US Terms)
- ch – chain
- sl st – slip stitch
- sc – single crochet
- hdc – half double crochet
- dc – double crochet
- inc – 2 sc in the same stitch
- sc2tog – single crochet 2 together
- BLO – back loop only
- MR – magic ring
- st(s) – stitch(es)
- RS / WS – right side / wrong side
Bobble: Yarn over, insert the hook in the ring, yarn over and pull up a loop, then yarn over and pull through 2 loops. Repeat these steps 5 times in the same place. Yarn over and pull through all 6 loops on the hook.
Gauge and Checkpoints
Gauge: 14 sc and 14 rows = 4 in (10.2 cm) in sc rows. The sc rounds in the baskets match this gauge. Firm cotton sc on this hook is nearly square, and the border math depends on that.
Make one basket first as your test piece. It will show whether your tension gives a firm enough fabric.
Checkpoints:
- Basket after Rnd 10: a flat circle 5.5 in (14.0 cm) across
- Basket after Rnd 22: walls 3.4 in (8.6 cm) tall
- Strip after Row 4: 4.0 in (10.2 cm) wide
- Strip after Row 77: 22.0 in (55.9 cm) long
- Strip after Row 98: 28.0 in (71.1 cm) long
If your piece is too big, go down to a 4.5 mm (7) hook. If it is too small, go up to a 5.5 mm (I-9) hook. Never change the stitch counts, because the joining depends on them.

Basket (make 2, plum)
Work in a continuous spiral. Mark the first stitch of each round and move the marker up as you go.
Rnd 1: MR, 6 sc in ring. (6 sts)
Rnd 2: Inc in each st around. (12 sts)
Rnd 3: *Sc in next st, inc; rep from * 6 times. (18 sts)
Rnd 4: *Sc in next 2 sts, inc; rep from * 6 times. (24 sts)
Rnd 5: *Sc in next 3 sts, inc; rep from * 6 times. (30 sts)
Rnd 6: *Sc in next 4 sts, inc; rep from * 6 times. (36 sts)
Rnd 7: *Sc in next 5 sts, inc; rep from * 6 times. (42 sts)
Rnd 8: *Sc in next 6 sts, inc; rep from * 6 times. (48 sts)
Rnd 9: *Sc in next 7 sts, inc; rep from * 6 times. (54 sts)
Rnd 10: *Sc in next 8 sts, inc; rep from * 6 times. (60 sts)
Checkpoint: the base lies flat and measures 5.5 in (14.0 cm) across.
Rnd 11: Sc BLO in each st around. (60 sts) This makes a sharp ridge where the wall turns up from the base.
Rnds 12–22: Sc in each st around. (60 sts each round)
Rnd 23: Sl st loosely in each st around. (60 sl sts) This gives the rim a neat rolled edge.
Fasten off, leaving a 24 in (61.0 cm) tail for sewing. Checkpoint: the walls measure 3.4 in (8.6 cm) from the ridge to the rim.
Strip (make 1, sage green)
Work in rows from the bottom up and turn at the end of every row. The ch 1 at the start of a row does not count as a stitch.
Row 1: Ch 9, sc in 2nd ch from hook and in each ch across. (8 sts)
Row 2: Ch 1, inc in first st, sc in next 6 sts, inc in last st. (10 sts)
Row 3: Ch 1, inc in first st, sc in next 8 sts, inc in last st. (12 sts)
Row 4: Ch 1, inc in first st, sc in next 10 sts, inc in last st. (14 sts)
Checkpoint: the strip is 4.0 in (10.2 cm) wide, with a gently rounded bottom.
Rows 5–77: Ch 1, sc in each st across. (14 sts each row)
Checkpoint: the strip is 22.0 in (55.9 cm) long.
Taper:
Row 78: Ch 1, sc2tog, sc in next 10 sts, sc2tog. (12 sts)
Row 79: Ch 1, sc in each st across. (12 sts)
Row 80: Ch 1, sc2tog, sc in next 8 sts, sc2tog. (10 sts)
Row 81: Ch 1, sc in each st across. (10 sts)
Row 82: Ch 1, sc2tog, sc in next 6 sts, sc2tog. (8 sts)
Rows 83–84: Ch 1, sc in each st across. (8 sts each row)
Checkpoint: the body is 24.0 in (61.0 cm) long.
Tab:
Rows 85–98: Ch 1, sc in each st across. (8 sts each row)
The tab is 2.3 in (5.8 cm) wide and 4.0 in (10.2 cm) long. Fasten off and weave in the end.
Petals (cream)
Each petal is a half circle worked in rows from a magic ring. The straight edge is the bottom and the curved edge is the top. Each basket needs 2 small, 2 medium and 1 large petal, so make 4 small, 4 medium and 2 large in total. The ch 3 counts as a dc.
Row 1: MR, ch 3, 6 dc in ring. Pull the ring closed and turn. (7 sts)
Row 2: Ch 3, dc in first st, 2 dc in each of next 6 sts. Turn. (14 sts)
Small petal edging: Ch 1, sc in each st across. (14 sc) Fasten off. The petal is about 2.25 in (5.7 cm) wide.
Row 3 (medium and large only): Ch 3, dc in first st, dc in next st, *2 dc in next st, dc in next st; rep from * 6 times. Turn. (21 sts)
Medium petal edging: Ch 1, sc in each st across. (21 sc) Fasten off. The petal is about 3.0 in (7.6 cm) wide.
Row 4 (large only): Ch 3, dc in first st, dc in next 2 sts, *2 dc in next st, dc in next 2 sts; rep from * 6 times. Turn. (28 sts)
Large petal edging: Ch 1, sc in each st across. (28 sc) Fasten off. The petal is about 3.75 in (9.5 cm) wide.
Bobble Center (make 2, plum)
Rnd 1: MR, ch 2 (does not count), *bobble in ring, ch 1; rep from * 5 times. Sl st in top of first bobble. (5 bobbles, 5 ch-1 sps)
Pull the ring tight so the bobbles bunch into a domed cluster about 1.25 in (3.2 cm) across. Fasten off, leaving a 10 in (25.4 cm) tail.
Leaves (make 4, sage green)
Rnd 1: Ch 9. Starting in the 2nd ch from the hook, work sc, hdc, 3 dc, hdc, sc. (7 sts on the first side) Work (sc, ch 2, sc) in the last ch for the tip. Rotate and work along the other side of the foundation chain: sc, hdc, 3 dc, hdc, sc. (7 sts) Sl st in first sc. (16 sts plus a ch-2 tip)
Each leaf is about 2.5 in (6.4 cm) long and 1.0 in (2.5 cm) wide. The foundation chain forms a center vein. Fasten off, leaving a 10 in (25.4 cm) tail.
Make All Pieces
Before you assemble, check that you have:
- Plum: 2 baskets, 2 bobble centers
- Cream: 4 small, 4 medium and 2 large petals
- Sage green: 1 strip, 4 leaves
Strip layout (top to bottom):
        (  wooden ring  )
        [ tab, rows 85-98 ]
        [ taper, rows 78-84 ]
        [ plain strip ]
        [ BASKET A + flower ]  base on row 46
        [ plain strip ]
        [ BASKET B + flower ]  base on row 6
        [ rounded bottom, rows 1-4 ]
Petal fan (back to front):
   S       S        <- back layer
     M   M          <- middle layer
       L            <- front, centered
Joining
Build the flower fronts. Place the 2 small petals side by side with their straight edges in a gentle downward curve. Lay a medium petal over the inner half of each small petal. Center the large petal on top of the two medium petals. The fan should be about 6.0 in (15.2 cm) wide. Whipstitch the layers together along the straight bottom edges. Then tack each layer to the one behind it in 2 or 3 places.
Sew a bobble center onto the large petal, just above its straight edge. Sew 2 leaves in a V below the center so the tips point outward and up and the leaf bases hide the bottom edges of the petals.
Attach the fans. Pin a fan to the front of each basket so the straight edge sits at about Rnd 14 and the petal tops rise about 1.0 in (2.5 cm) above the rim. With cream yarn, sew along the petal edges that touch the basket.
Attach the baskets. Flatten the back of each basket against the RS of the strip. Both pieces use the same gauge, so the back 14 sts of the basket match the strip’s 14 sts one for one.
- Basket B (lower): Sew the back 14 sts of the Rnd 11 ridge to the 14 sts of Row 6, stitch to stitch. Then sew the back 14 rim sts to Row 17.
- Basket A (upper): Sew the back 14 ridge sts to Row 46 and the back 14 rim sts to Row 57.
Whipstitch with the plum tail, going through both loops of each basket stitch and one full sc of the strip. Pull snug enough to hide the yarn, but not so tight that the strip puckers.
Size checkpoint: The strip is still 4.0 in (10.2 cm) wide. The basket bases are 40 rows apart, which is 11.4 in (29.0 cm). The base of Basket B is about 1.4 in (3.6 cm) above the bottom edge.
Border
Border gauge: Work 1 sc in each stitch and 1 sc in each row end. The strip’s gauge is square (14 sts and 14 rows to 4 in / 10.2 cm), so 1 sc per row end lies flat.
Rnd 1 (sage green): With RS facing, join in the first st of Row 98.
- Top of tab: 3 sc in first st, sc in next 6 sts, 3 sc in last st. That gives (8 sts worked 1 per st) + (4 extra corner sts) = 12 sc.
- First long side: 1 sc in each row end down to Row 1. (98 sc)
- Bottom: In the free loops of the foundation chain, work 2 sc in first loop, sc in next 6 loops, 2 sc in last loop. That gives (8 worked 1 per loop) + (2 extra) = 10 sc.
- Second long side: 1 sc in each row end up to Row 98. (98 sc)
Sl st in first sc. Total: 12 + 98 + 10 + 98 = 218 sc.
Rnd 2: Sl st loosely in each st around. (218 sl sts: 12 top, 98 per side, 10 bottom)
Fasten off and weave in the end.
Why the math works: Each long side has 98 rows, so it gets 98 sc. The top and bottom edges get 1 sc per stitch, plus only the extra stitches needed for the corners or the curve, and those extras are already counted in each side’s total. The tapered edges are slightly diagonal, and blocking evens out the small extra length. The border adds about 0.3 in (0.8 cm) to each edge, which brings the width to 4.6 in (11.7 cm).
Attach the ring: Fold the tab over the wooden ring to the WS. Sew the end of the tab to the WS across Rows 84–85.
Final Blocking
- Mist the strip until it is evenly damp. Don’t soak it.
- Lay it RS up on a blocking mat.
- Pin the long edges straight at 4.6 in (11.7 cm) wide.
- Check that it measures 26.3 in (66.8 cm) from the tab fold to the bottom edge.
- Fill each basket with a toilet roll so it dries round.
- Mist the petals and leaves, then open out the petal tips with your fingers.
- Let it dry for at least 24 hours before you remove the pins.
Final Quality-Control Checklist
- The strip is 4.6 in (11.7 cm) wide along its whole length.
- The border has 218 sts and doesn’t ruffle.
- Both baskets have 60 sts per round and walls 3.4 in (8.6 cm) tall.
- The baskets are centered on Rows 6 and 46 and sit level.
- The petals are in S, M, L, M, S order, and the centers and leaves are secure.
- The tab is sewn firmly around the ring.
- All ends are woven in on the WS.
Troubleshooting
- Basket base cups: Your increase rounds are too tight. Loosen your tension or go up a hook size.
- Basket walls flare: Work Rnd 11 strictly in the BLO, and keep the wall rounds firm.
- Strip is too wide: Skip the turning ch and recount for 14 sts per row.
- Border ruffles: Recount for exactly 98 sc per side.
- Petals curl: Block them flat and keep the edging row snug.
- Strip sags: Sew both the ridge line and the rim line of each basket.
Care
Hand wash in cool water, or machine wash on a gentle cycle inside a laundry bag. Reshape the holder and lay it flat to dry.

Final Notes
The measurements build on each other:
- A square gauge of 14 sts and 14 rows to 4 in (10.2 cm) gives a strip 4.0 in (10.2 cm) wide and 28.0 in (71.1 cm) long.
- Baskets of 60 sts measure 5.5 in (14.0 cm) across, and the back 14 sts of each basket sew stitch for stitch onto the strip’s 14 sts.
- The 218-stitch border brings the width to 4.6 in (11.7 cm).
- With the tab folded over the ring, the holder hangs about 26.3 in (66.8 cm) long.
Happy crocheting!