

This tulip strand is a column of bright orange crochet tulips linked by short, sturdy chain stems. Each tulip has a round, cup-shaped base and three pointed petals, with a neat single crochet outline all the way around. Hang a strand in a window and the light shows through the gaps between the flowers.
The design uses one color, a warm tangerine orange, in smooth worsted-weight cotton. Cotton gives crisp petal points and holds its shape when it hangs. The look is simple and graphic. It suits a cottage window, a nursery, or a spring display.
All instructions use US crochet terms. Each finished tulip measures 3.5 in (8.9 cm) wide by 3.5 in (8.9 cm) tall. A strand of 6 tulips, with stems, a hanging loop and a bottom tail, is about 40 in (101.6 cm) long.
Each tulip is worked flat in rows from the bottom up: one row of single crochet, four rows of double crochet that widen the cup, and a petal row with three points. Then you work one edging round. During that round you make the stem cord below the tulip and join the tulip to the cord of the one above it, so there is no sewing.
Finished Size and Construction
- Finished tulip: 3.5 in x 3.5 in (8.9 cm x 8.9 cm)
- Finished strand: about 40 in (101.6 cm), loop to tail
- Skill level: Easy
- Terminology: US crochet terms
- Yarn weight: Worsted (#4) cotton or cotton blend
- Hook: 4.0 mm (US G-6)
- Number of pieces: 6 tulips, joined as you go
- Layout: 1 column x 6 tulips, hanging vertically
- Piece size before edging: 3 in x 3 in (7.6 cm x 7.6 cm)
- Edging depth: 0.25 in (0.6 cm) on every side
- Stem cord between tulips: 2.5 in (6.4 cm)
Materials
Yarn: Choose a smooth combed or mercerized worsted cotton. Fuzzy or splitty yarn blurs the petal points. Acrylic also works, but it hangs less crisply.
- Tangerine orange: 50 g, about 85 m (93 yd)
This amount includes a margin of about 20 percent for your test tulip, differences in tension, and weaving in ends. One strand uses about 40 g.
Tools:
- 4.0 mm (US G-6) crochet hook
- Tapestry needle
- Scissors
- 2–3 stitch markers
- Ruler or tape measure
- Rust-proof pins and a blocking mat or folded towel
- Spray bottle with water
Abbreviations (US Terms)
- ch: chain
- sl st: slip stitch
- sc: single crochet
- dc: double crochet
- tr: treble crochet
- st(s): stitch(es)
- sp: space
- RS / WS: right side / wrong side
Special stitch: Petal. Worked over 4 stitches: sc in the first st, (dc, tr) in the next st, ch 2, (tr, dc) in the next st, sc in the next st. One Petal = 6 sts plus 1 ch-2 point.
Special stitch: Cord. Ch 13. Sl st in the 2nd ch from hook and in each of the next 11 ch. That makes 12 sl sts and a firm cord about 2.5 in (6.4 cm) long. The skipped chain at the far end is the cord tip.
Gauge and Checkpoints
Gauge: 16 dc and 9 dc rows = 4 in (10.2 cm), before blocking.
Skip the square swatch. Instead, make one complete tulip (Rows 1–6 plus edging, without the cord) and measure it. This tests every stitch in the design.
Checkpoints:
- After Row 3: 3 in (7.6 cm) wide across 12 dc.
- After Row 5: 2 in (5.1 cm) tall from the foundation edge.
- After Row 6: 3 in (7.6 cm) tall to the petal tips, still 3 in (7.6 cm) wide.
- After edging: 3.5 in x 3.5 in (8.9 cm x 8.9 cm).
Too big? If Row 3 is more than 3.25 in (8.3 cm) wide, change to a 3.75 mm hook. Too small? If it is under 2.75 in (7.0 cm), change to a 4.5 mm hook. Being 0.25 in (0.6 cm) off on each tulip adds up to 1.5 in (3.8 cm) over six tulips.
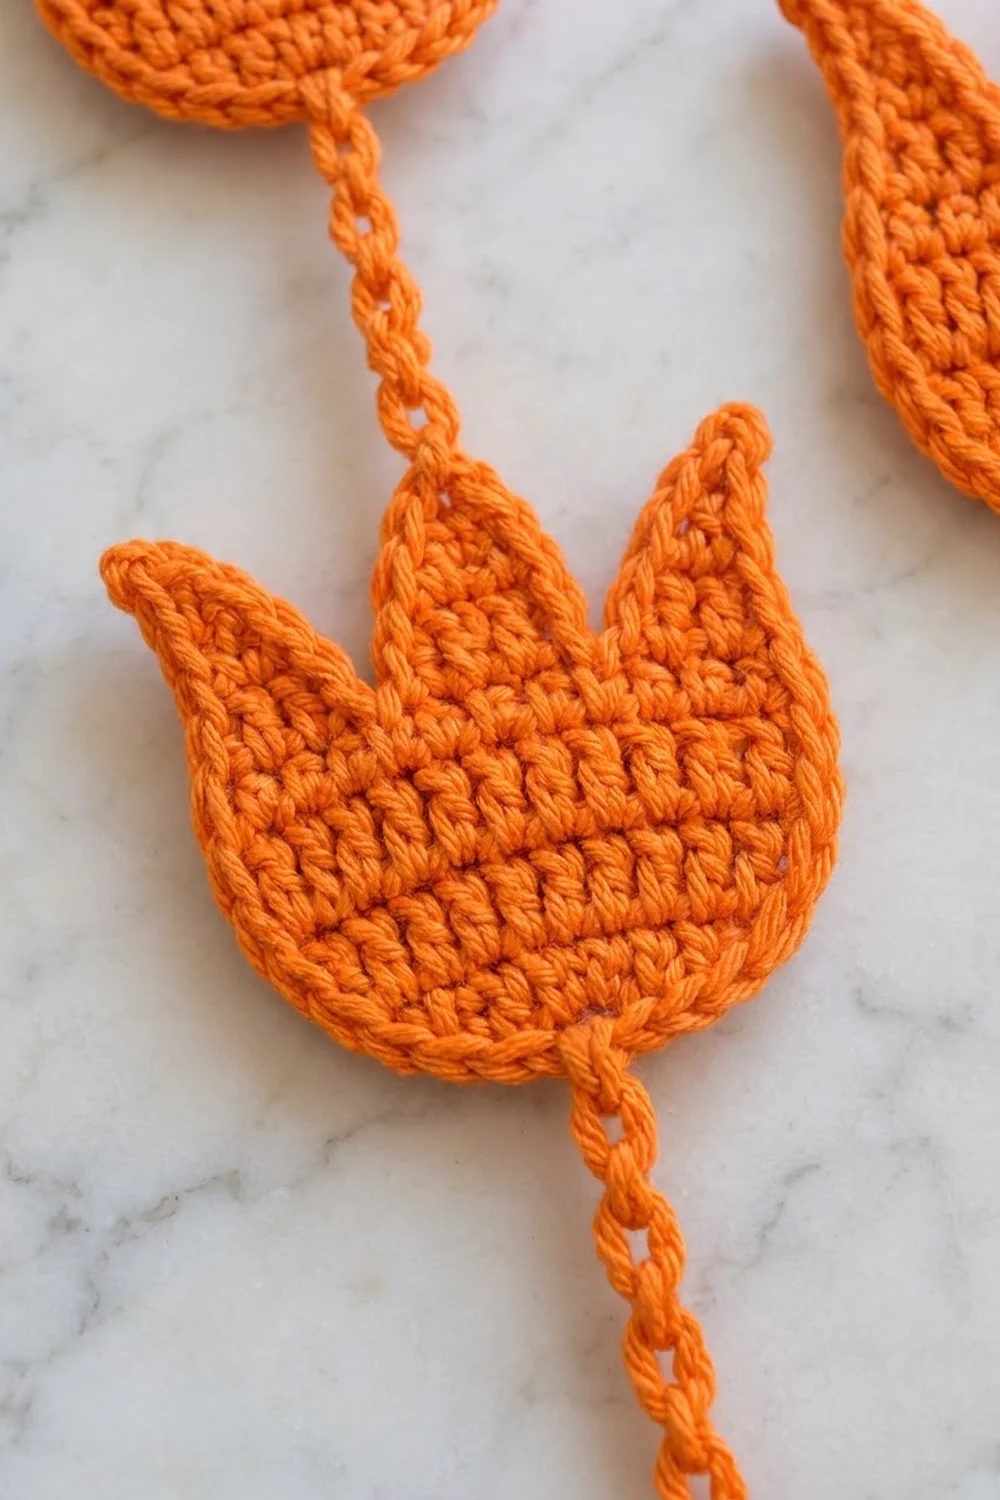
Tulip (make 6)
Work flat in turned rows. Leave a 4 in (10.2 cm) starting tail.
Row 1 (RS): Ch 5. Sc in the 2nd ch from hook and in each of the next 3 ch. Turn. (4 sc)
This is the narrow base of the cup, about 1 in (2.5 cm) wide.
Row 2 (WS): Ch 3 (counts as dc throughout). Dc in the same st, 2 dc in each of the next 2 sts, 2 dc in the last st. Turn. (8 dc)
Each stitch is doubled, so the cup flares to 2 in (5.1 cm).
Row 3 (RS): Ch 3, dc in the same st. Dc in the next st, 2 dc in the next st. Repeat from * to * 2 more times. Dc in the last st. Turn. (12 dc)
Count check: 2 + (3 x 3) + 1 = 12, worked over 1 + 6 + 1 = 8 stitches. The width is now 3 in (7.6 cm).
Row 4 (WS): Ch 3, dc in each st across. Turn. (12 dc)
Row 5 (RS): Ch 3, dc in each st across. Turn. (12 dc)
Rows 4 and 5 make the straight upper sides of the cup. The height is now about 2 in (5.1 cm).
Row 6 (WS), petal row: Ch 1. Work one Petal over sts 1–4, one over sts 5–8 and one over sts 9–12. Do not fasten off. (18 sts and 3 ch-2 points)
Count check: 3 Petals x 6 sts = 18 sts, worked over 3 x 4 = 12 base sts. Where two Petals meet, two short sc sit side by side between tall stitches, which makes a sharp V-shaped valley. The outer Petals start and end with sc, so the top corners curve in before rising to the outer points.
The tulip now measures 3 in x 3 in (7.6 cm x 7.6 cm).
Make All Pieces
Work Rows 1–6 on all 6 tulips in tangerine orange, each about 6 g. The edging uses about 1 g more per tulip. Because the tulips are joined during the edging, you edge them in order from the top down: Tulip 1, then Tulip 2, and so on.
Layout grid (1 column x 6 rows):
  [ Hanging loop ]
        |
      [ T1 ]
        |
      [ T2 ]
        |
      [ T3 ]
        |
      [ T4 ]
        |
      [ T5 ]
        |
      [ T6 ]
        |
     ( tail )
Each “|” is a 2.5 in (6.4 cm) cord. Every tulip hangs petals up, from the point of its middle Petal.
Joining
The tulips are joined as you go during the edging round. Each tulip makes the cord below it. The next tulip attaches to that cord’s tip at the point of its middle Petal.
Stitch-to-stitch logic: Each join connects 1 point to 1 cord tip. Nothing is added or skipped anywhere else on the edge, so every tulip has the same edging count.
Tension advice: Work the cord sl sts loosely enough that your hook enters each chain easily, but firmly enough that the cord stays straight. If they feel tight, use a hook one size larger for the cords only. Keep the joining sl st snug, because a loose join lets the tulip tip forward.
Size checkpoint: After joining Tulip 2, measure from the bottom of Tulip 1 to the middle point of Tulip 2. It should be 2.5 in (6.4 cm). The finished strand adds up like this: 1.25 in (3.2 cm) loop + 2.5 in (6.4 cm) top cord + 6 tulips at 3.5 in (8.9 cm) + 5 stems at 2.5 in (6.4 cm) + a 2.5 in (6.4 cm) tail. That is 39.75 in (101.0 cm), or about 40 in (101.6 cm).
Border (Edging Round)
Edging gauge:
– 4 sc = 1 in (2.5 cm) along the tops of stitches
– 2 sc in each dc row end
– 1 sc in each sc row end
The edging adds 0.25 in (0.6 cm) on every side and continues straight on from the last stitch of Row 6.
Edging Round: Ch 1. Do not turn. Rotate the tulip and work down the side.
- Side 1: 2 sc in the side of each of Rows 5, 4, 3 and 2, then 1 sc in the side of Row 1. (9 sc)
- Bottom (free loops of the foundation ch): 2 sc in the 1st loop and 1 sc in the 2nd loop (3 sc). Work the Cord. Then 1 sc in the 3rd loop and 2 sc in the 4th loop (3 sc). (6 sc, with the Cord centered)
- Side 2: 1 sc in the side of Row 1, then 2 sc in the side of each of Rows 2, 3, 4 and 5. (9 sc)
- Top (across Row 6):
- Sc in the first sc. (1 sc)
- Left Petal: sc in the dc, 2 sc in the tr, (sc, ch 2, sc) in the ch-2 point, 2 sc in the tr, sc in the dc. (8 sc)
- Valley: sl st in each of the next 2 sc. (2 sl st)
- Middle Petal: sc in the dc, 2 sc in the tr, point join (see below), 2 sc in the tr, sc in the dc. (8 sc)
- Valley: sl st in each of the next 2 sc. (2 sl st)
- Right Petal: work as for the Left Petal. (8 sc)
- Sc in the last sc. (1 sc)
- Sl st in the first sc of the round. Fasten off and weave in ends.
Point join:
- Tulip 1: In the ch-2 point, work sc, then ch 24. Sl st in the 13th ch from hook to form a 12-ch hanging loop, then sl st in each of the remaining 11 ch. Finish with sc in the same ch-2 point.
- Tulips 2–6: In the ch-2 point, work sc, ch 1, sl st in the cord tip of the tulip above, ch 1, sc.
- Tulip 6: Its bottom Cord becomes the tail.
Edging totals per tulip: 9 + 6 + 9 + 26 (1 + 8 + 8 + 8 + 1) = 50 sc, plus 4 sl sts, 3 points and 1 Cord.
Why the math works:
– Sides: A dc row is about 0.44 in (1.1 cm) tall, the same height as 2 sc. Two sc per row end keep the sides flat.
– Bottom: The 4 free loops span only 1 in (2.5 cm). The extra sc at each corner (4 + 2 = 6) let the edging go around the curve without pulling.
– Top: Each tr gets 2 sc to match its height. The sl st valleys pull the Vs in sharply, and the (sc, ch 2, sc) points keep the tips crisp.
Final Blocking
- Lay the strand flat on a mat or folded towel, petals up.
- Spray each tulip until it is damp but not soaked.
- Pin each tulip to 3.5 in x 3.5 in (8.9 cm x 8.9 cm), starting with the bottom curve and then the sides.
- Pin each petal point up and slightly outward, and pin both valleys down.
- Straighten each cord to 2.5 in (6.4 cm) and pin it at both ends.
- Let it dry completely, about 6–8 hours.
- Hang the strand by its loop. Respray and repin any tulip that leans.
Final Quality-Control Checklist
- Rows 3–5 have 12 dc. Row 6 has 3 Petals.
- Each edging round has 50 sc, 4 sl sts and 3 points.
- Each tulip measures 3.5 in x 3.5 in (8.9 cm x 8.9 cm).
- All cords measure 2.5 in (6.4 cm).
- Each tulip joins only at its middle Petal point.
- The hanging loop is firm and centered.
- Tails are woven into the edging and don’t show on either side.
- The strand is about 40 in (101.6 cm) long.
Troubleshooting
The sides ruffle: You have too many sc on the sides. Use exactly 2 sc per dc row end.
The sides pucker: Your edging is too tight, or you missed a row end. Count 9 sc per side.
The points are rounded: Check that each point has (sc, ch 2, sc), and pin the points firmly when blocking.
The valleys are shallow: Use sl sts, not sc, in the 2 valley stitches, and pull them snug.
A tulip tilts forward: The joining sl st is loose. Redo it snugly.
The cords twist: Work every sl st into the back bumps of the chain, then pin the cords straight to block.
The strand is the wrong length: Check your gauge at Row 3 first. For small adjustments, start the Cord with ch 11 or ch 15 (10 or 14 sl sts).
Care
Hand wash in cool water with mild soap. Press the water out in a towel and dry flat with the tulips pinned to shape.
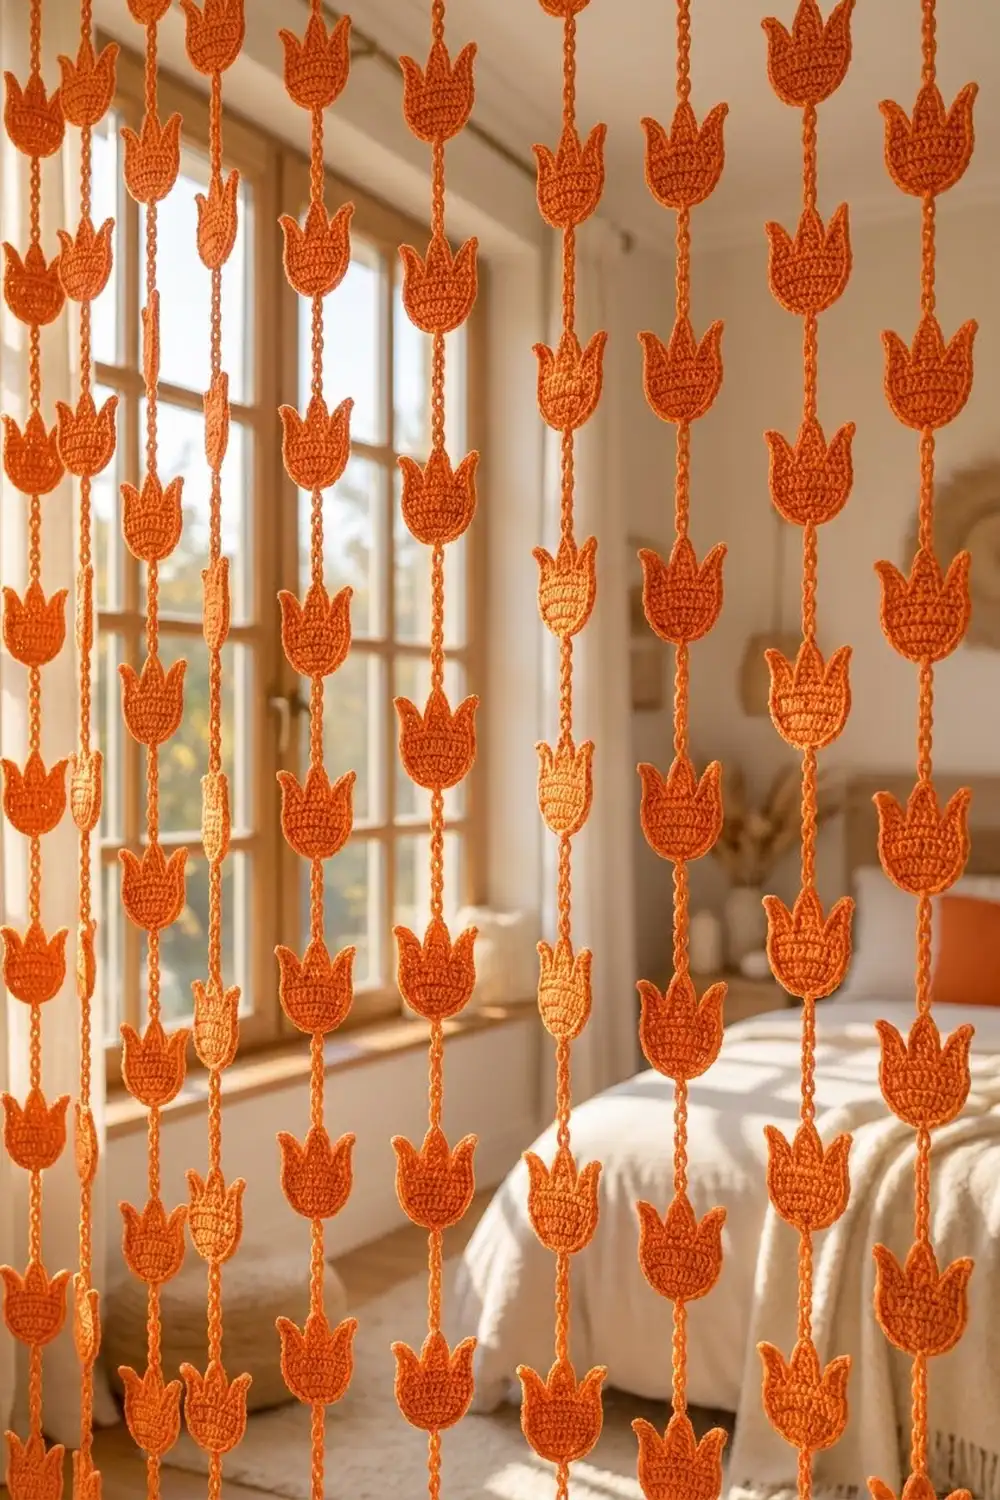
Final Notes
Each measurement builds on the one before. At 16 dc to 4 in (10.2 cm), Row 3’s 12 dc make a 3 in (7.6 cm) cup. The petal row brings the tulip to 3 in x 3 in (7.6 cm x 7.6 cm). The 50-stitch edging adds 0.25 in (0.6 cm) per side, for 3.5 in x 3.5 in (8.9 cm x 8.9 cm). Six tulips, five 2.5 in (6.4 cm) stems, a top cord, a loop and a tail make a strand of about 40 in (101.6 cm).
If your first tulip matches the checkpoints, the rest of the strand will match too.
Happy crocheting!