

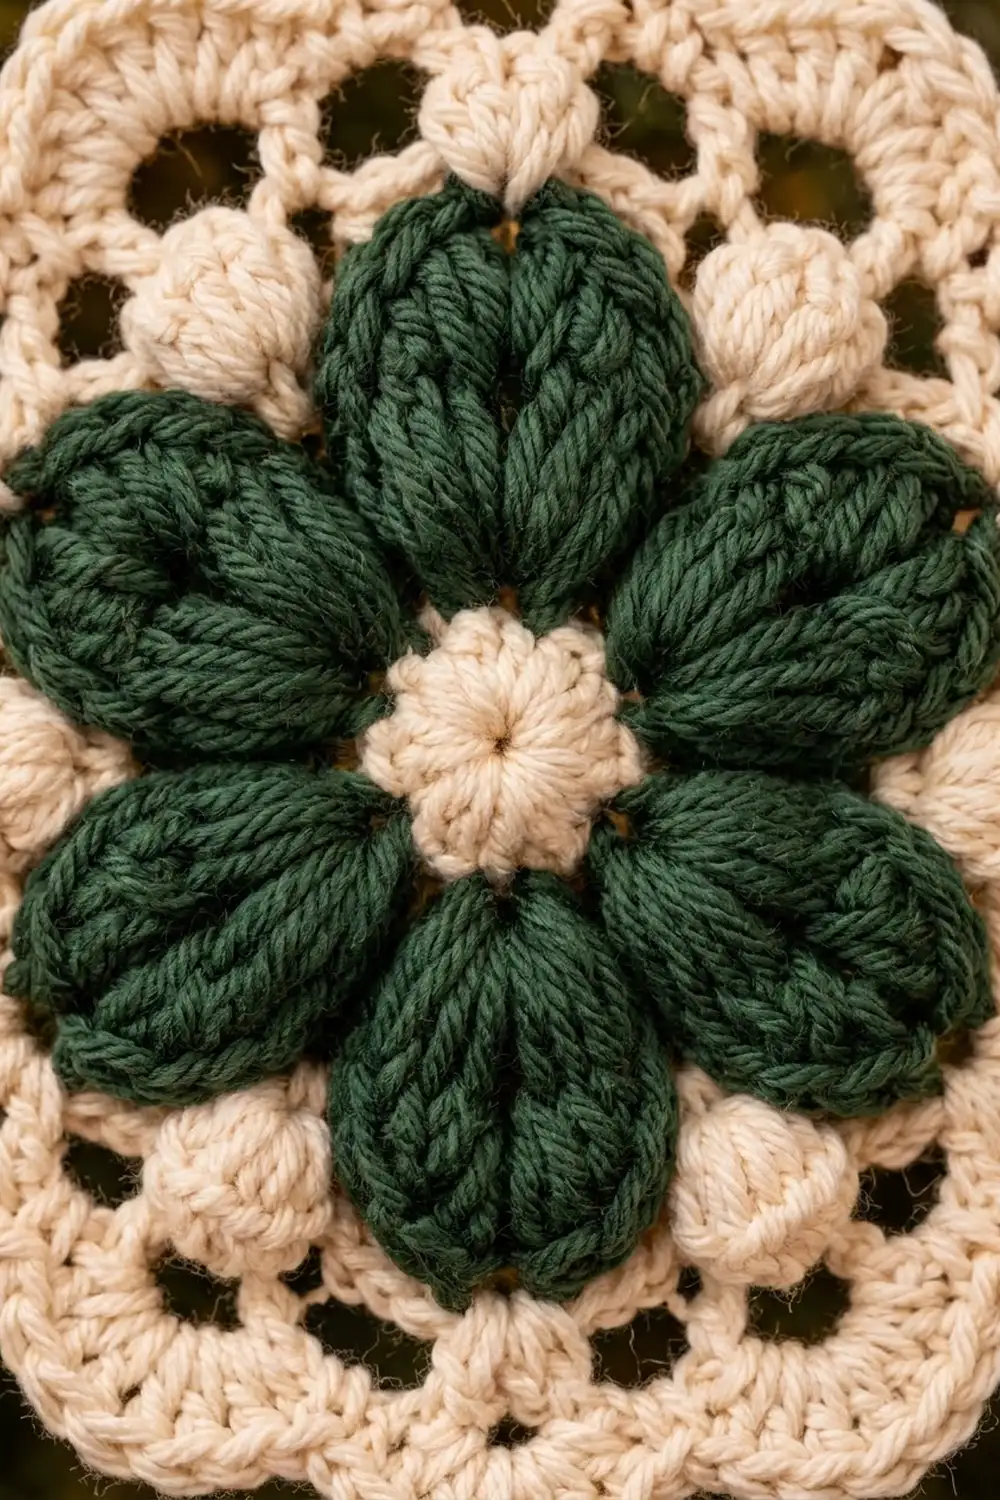
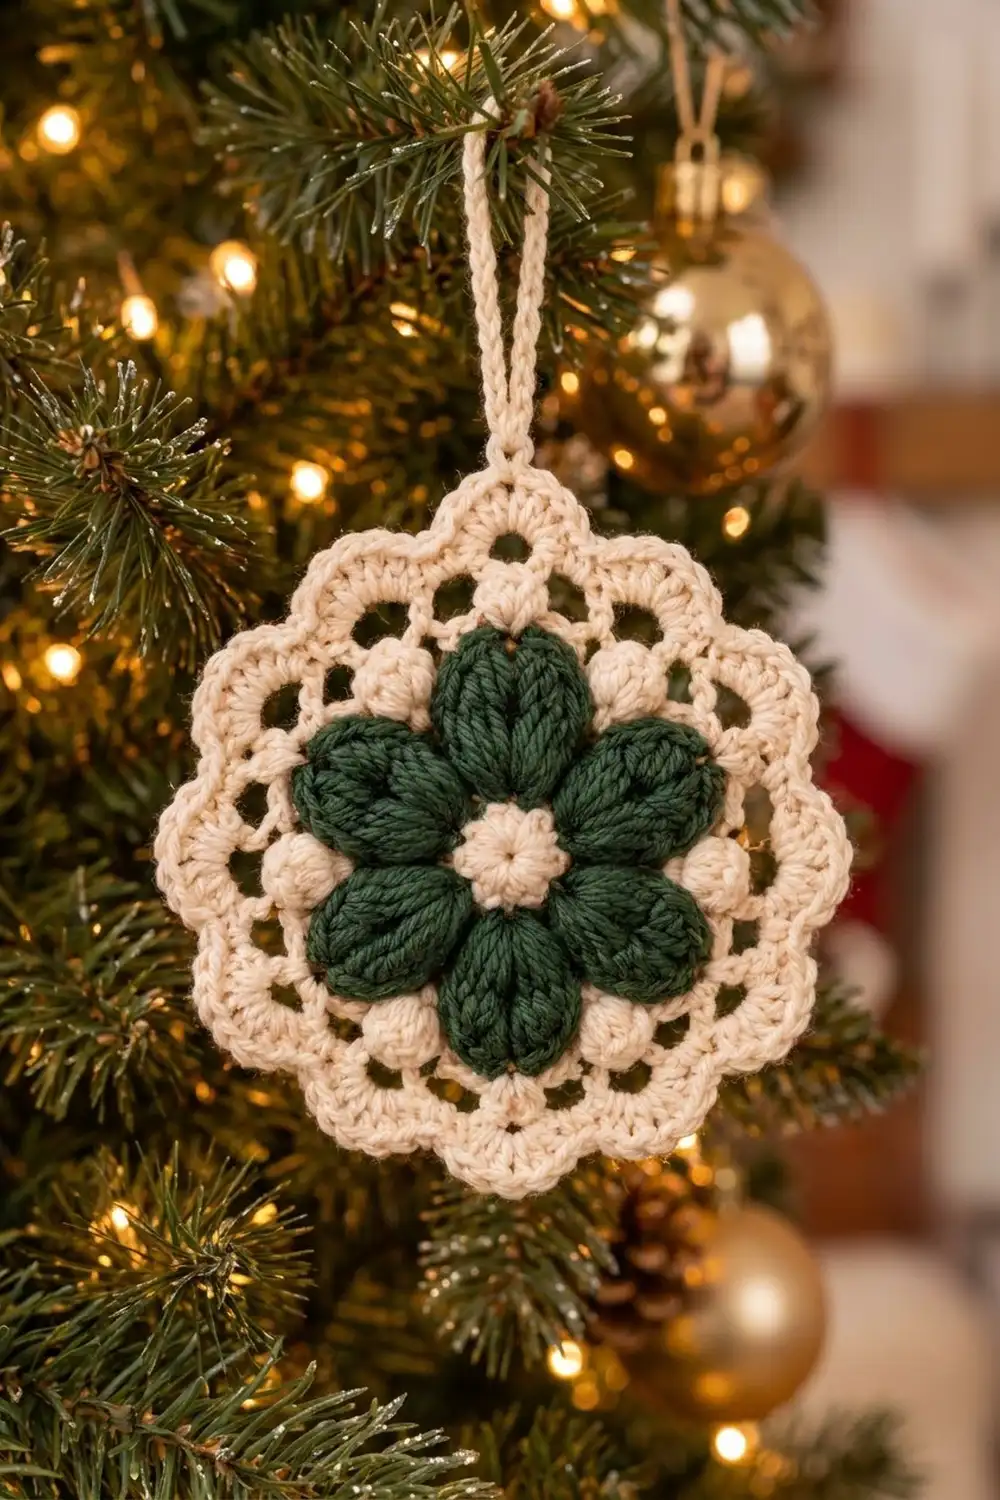
The Evergreen Bloom ornament is a small, round motif made to hang on the tree. A six-petal flower in deep forest green sits inside a lacy cream frame, with plump cream bobbles nestled between the petals and a soft scalloped edge around the outside.
The two-color palette of evergreen and cream gives it a classic, slightly vintage holiday look. It goes well with gold baubles and warm string lights, and it also works as a gift tag, a package topper, or a mug-rug-sized decoration.
This pattern uses US crochet terms. The finished ornament measures 4 in (10.2 cm) across, not counting the hanging loop.
The ornament is worked in the round from the center out. You start with a cream ring, make six green two-part leaf petals, then go back to cream for the bobbles and the lacy border. A chain hanging loop finishes it. It is one piece, so there is no joining.
Finished Size and Construction
- Finished size: 4 in (10.2 cm) diameter, without the hanging loop
- Hanging loop: about 2 in (5.1 cm) tall when folded
- Skill level: Advanced beginner (bobbles and clusters)
- Terminology: US crochet terms
- Yarn weight: DK / light worsted (#3) cotton or cotton blend
- Hook: 3.5 mm (US E-4)
- Number of pieces: 1
- Layout: Single round motif, no assembly
- Piece size: 4 in (10.2 cm) diameter
- Size before border: 2.75 in (7.0 cm) diameter (flower plus bobble round)
- Border depth: 0.625 in (1.6 cm) on each side, Rounds 5–7
Materials
Yarn: Use a smooth, mercerized or matte DK cotton. Cotton shows the bobble and petal texture clearly and holds its shape on the tree. The amounts below assume about 105 m per 50 g.
- Color A – Cream: 10 g (about 21 m)
- Color B – Forest Green: 5 g (about 11 m)
These amounts include a margin for a gauge swatch and the hanging loop. One ornament actually uses about 8 g of cream and 4 g of green.
Tools:
– 3.5 mm (US E-4) crochet hook
– Tapestry needle
– Scissors
– 12 rust-proof pins
– Foam blocking mat or folded towel
– Spray bottle with water
– Optional: fabric stiffener or diluted craft glue
Abbreviations (US Terms)
- ch – chain
- sl st – slip stitch
- sc – single crochet
- hdc – half double crochet
- dc – double crochet
- tr – treble crochet
- sp(s) – space(s)
- sk – skip
- st(s) – stitch(es)
- MR – magic ring
Special stitches:
- tr5-bob (treble 5-bobble): Yarn over twice, insert hook in the stated space, yarn over and pull up a loop, [yarn over, pull through 2 loops] twice; repeat from * to * 4 more times in the same space (6 loops on hook), yarn over and pull through all 6 loops.
- Beginning tr5-bob: Ch 3 (counts as the first leg), then work the * to * sequence 4 times in the same space (5 loops on hook), yarn over and pull through all 5 loops.
- Petal: In the same ch-3 sp work [tr5-bob, ch 1, tr5-bob]. The two bobbles fan apart into a leaf shape, and the ch-1 between them forms the leaf tip and center vein.
- dc4-bob (double 4-bobble): Yarn over, insert hook in the stated stitch, yarn over and pull up a loop, yarn over and pull through 2 loops; repeat from * to * 3 more times in the same stitch (5 loops on hook), yarn over and pull through all 5.
- Beginning dc4-bob: Ch 2, then work the * to * sequence 3 times in the same stitch (4 loops on hook), yarn over and pull through all 4.
Gauge and Checkpoints
Gauge isn’t critical for an ornament, but it controls the finished size and how flat the piece lies. Make a test ornament first, or at least work through Round 4 before committing to a batch.
Measurement checkpoints (lay flat, measure across the center):
- After Round 1: 0.75 in (1.9 cm)
- After Round 3 (petals): 2.25 in (5.7 cm), tip to opposite tip
- After Round 4 (bobbles): 2.75 in (7.0 cm)
- After Round 6 (mesh): 3.5 in (8.9 cm)
- After Round 7 (scallops): 4 in (10.2 cm)
If your piece is too big (more than 0.25 in / 0.6 cm over at Round 4), change to a 3.25 mm hook, or work the bobbles a little tighter.
If your piece is too small, or the petals cup upward, change to a 3.75 mm hook. Pull the bobble loops up to full height before closing them.
If the mesh ruffles after Round 5 or 6, your chains are too loose. Use ch 4 in place of ch 5 in both rounds and keep everything else the same.
Pattern
Round 1 – Center (Color A, Cream)
Make a MR with cream. Ch 1 (does not count as a stitch), work 12 sc into the ring. Pull the ring tight. Sl st to the first sc to join.
Count: 12 sc. Fasten off cream.
Checkpoint: 0.75 in (1.9 cm) across.
Round 2 – Petal Base (Color B, Green)
Join green with a sl st in any sc. Ch 1, sc in the same st, ch 3, sk next sc, sc in next sc, ch 3, sk next sc; repeat from * to * 4 more times. Sl st to the first sc to join.
Count: 6 sc and 6 ch-3 sps.
These six chain arches hold the petals. Each sc sits between two petals.
Round 3 – Leaf Petals (Color B, Green)
Sl st into the first ch-3 sp. Work a Beginning tr5-bob, ch 1, tr5-bob all in the same ch-3 sp (first Petal made). Sc in the next sc.
Work a Petal in the next ch-3 sp, sc in the next sc; repeat from * to * 4 more times. The last sc goes into the sc at the start of Round 2. Sl st to the top of the beginning bobble to join.
Count: 6 Petals (12 bobbles and 6 ch-1 tips) and 6 sc.
Fasten off green. Push each petal gently from the back so both bobble halves sit plump and face forward.
Checkpoint: 2.25 in (5.7 cm) tip to opposite tip.
Round 4 – Cream Bobbles (Color A, Cream)
Join cream with a sl st in any sc between two petals. Work a Beginning dc4-bob in the same sc. Ch 3, sc in the ch-1 sp at the tip of the next petal, ch 3.
Work a dc4-bob in the next sc between petals, ch 3, sc in the ch-1 tip of the next petal, ch 3; repeat from * to * 4 more times. Sl st to the top of the beginning bobble to join.
Count: 6 dc4-bobs, 6 sc and 12 ch-3 sps.
This round places one cream bobble in each gap between petals, which is the look in the photo. The ch-3 arches frame each petal without squeezing it.
Checkpoint: 2.75 in (7.0 cm) across. This is your size before border.
Border
The border is Rounds 5–7 and is all cream. It adds 0.625 in (1.6 cm) on each side, so the 2.75 in (7.0 cm) flower grows to 4 in (10.2 cm).
Border gauge: At the finished diameter each scallop measures about 1 in (2.5 cm) along the outer edge. That is 12 scallops around a circumference of about 12.6 in (32.0 cm).
Round 5 – First Mesh Ring
You are at the top of the first bobble. Ch 1, sc in the top of the same bobble.
Ch 5, sc in the next sc (petal tip), ch 5, sc in the top of the next bobble; repeat from * to * 5 more times. On the last repeat, skip the final sc and sl st to the first sc instead.
Count: 12 sc and 12 ch-5 loops (6 per bobble-to-bobble section, 2 per petal).
Round 4 has 12 anchor points: 6 bobbles plus 6 petal tips. Round 5 places exactly one loop between each pair of neighboring anchors, so the round stays balanced.
Round 6 – Second Mesh Ring (Offset)
Sl st into each of the first 3 ch of the next ch-5 loop to reach the loop’s center. Ch 1, sc in the same loop.
Ch 5, sc in the next ch-5 loop; repeat from * to * 10 more times. Ch 5, sl st to the first sc to join.
Count: 12 sc and 12 ch-5 loops.
The sc’s now sit at the centers of the Round 5 loops. This offsets the mesh and makes the open “window” ring you see in the photo.
Checkpoint: 3.5 in (8.9 cm) across.
Round 7 – Scallop Edge
Sl st into the next ch-5 loop. Ch 1. In the same loop work (sc, hdc, 5 dc, hdc, sc).
In the next ch-5 loop work (sc, hdc, 5 dc, hdc, sc); repeat from * to * 10 more times. Sl st to the first sc to join.
Count: 12 scallops × 9 sts = 108 sts.
Fasten off and weave in the end.
Why the math works: Each round of the border keeps a base of 12. Round 4 gives 12 anchors (6 + 6), Rounds 5 and 6 each make 12 loops, and Round 7 makes 12 scallops. One scallop per loop means each scallop covers one-twelfth of the circle, about 1 in (2.5 cm), and the edge stays flat. The 9 stitches per scallop (5 dc in the middle) give enough height for a rounded curve without frilling.
Checkpoint: 4 in (10.2 cm) across.
Hanging Loop
Choose the scallop that sits directly above a petal tip, so the flower hangs upright. Join cream with a sl st in the center (3rd) dc of that scallop.
Ch 24, which is about 4 in (10.2 cm) of chain. Sl st in the same dc. For a sturdier cord, turn and work 1 sl st into each ch back along the loop, then sl st into the same dc again.
Fasten off and weave in the end. The folded loop stands about 2 in (5.1 cm) tall.
Final Blocking
- Weave in every remaining tail on the back. Run green tails behind green petals and cream tails behind cream stitches.
- Lightly spray the ornament until it is damp but not soaked.
- Lay it face up on the blocking mat.
- Pin the 12 scallop centers evenly around a 4 in (10.2 cm) circle. Pin opposite pairs first, at 12 and 6 o’clock, then 3 and 9, then fill in the rest.
- Use your fingertips to open the Round 5 and Round 6 mesh windows so each one is a clean, even oval.
- Press each green petal and cream bobble gently from behind so it puffs forward. Don’t flatten them.
- Optional: brush a thin coat of fabric stiffener on the border only, Rounds 5–7, so the scallops stay crisp.
- Let it dry completely, at least 4 hours or overnight, before you unpin it.
Final Quality-Control Checklist
- Diameter is 4 in (10.2 cm), give or take 0.125 in (0.3 cm)
- The center ring is closed, with no hole showing
- All 6 petals are the same size, and each has a visible center vein
- 6 cream bobbles, one sitting in each gap between petals
- Round 5 and Round 6 each have 12 even mesh openings
- Exactly 12 scallops of 9 sts each (108 sts)
- The hanging loop is centered above a petal and the flower hangs straight
- All tails are hidden on the back with nothing poking through to the front
- The ornament lies flat with no cupping or ruffling
Troubleshooting
Petals look skinny or flat: Pull every loop of the tr5-bob up to full height before you close it, and keep the ch-3 arches in Round 2 relaxed.
Center hole won’t close: Tighten the magic ring before you join Round 1. If it has already loosened, run the tail around the ring once more on the back.
Cream bobbles lean sideways: Make sure the bobble goes into the sc between petals and not into a petal’s side bobble.
Ornament cups like a bowl: Your chains are too tight. Go up a hook size for Rounds 5–7 only.
Edge ruffles: Your chains are too loose. Use ch 4 loops in Rounds 5 and 6, or go down a hook size.
Ornament hangs crooked: Move the hanging loop to the scallop directly above a petal tip, then reblock.
Care
Hand wash in cool water with mild soap, press out the water in a towel, and reshape it flat to dry. If you used fabric stiffener, spot clean only.
Final Notes
The size of the Evergreen Bloom ornament builds step by step from the center: a 0.75 in (1.9 cm) cream ring, green petals reaching 2.25 in (5.7 cm), cream bobbles bringing it to 2.75 in (7.0 cm), mesh rings to 3.5 in (8.9 cm), and a 108-stitch scalloped edge finishing at 4 in (10.2 cm). Every round from Round 4 outward keeps the same base of 12, so the motif stays round and flat. Check each measurement as you go and the finished ornament should come out at the size above.
Happy crocheting!