

The Evergreen Cord Keeper is a crocheted wall organizer shaped like a Christmas tree. Cream tulip clusters sit inside a deep green lattice, and the border steps out into three tiers. A solid strap with four cream bands runs down the center so you can tuck coiled charging cables in neatly.
The colors are traditional: forest green, warm cream and a little berry red. The style is open and lacy, but the strap and border make the piece firm enough to hang and use every day.
This pattern uses US crochet terms. The finished organizer measures about 9.2 in wide × 10.7 in tall (23.4 × 27.2 cm), plus a 1.5 in (3.8 cm) hanging loop.
Construction overview: You work the tree body bottom-up in rows. Each tulip row is one tulip shorter than the row below, which shapes the triangle. Then you add the trunk to the foundation chain, make the strap and bands, and sew the strap on. Three border rounds lock the strap in place and build the stepped tiers. The star, holly leaves, berries and loop are sewn on last.
Finished Size and Construction
- Finished size: about 9.2 × 10.7 in (23.4 × 27.2 cm), plus a 1.5 in (3.8 cm) loop
- Skill level: Intermediate
- Terminology: US
- Yarn weight: DK (#3) cotton
- Hook: 3.5 mm (E-4)
- Number of pieces: 13 (1 tree panel, 1 strap, 4 bands, 1 hanging loop, 1 star, 2 leaves, 3 berries)
- Layout: the strap runs vertically down the center of the panel, and the appliqués are stacked at the tip
- Panel size before border: 7.4 in wide × 9.5 in tall (18.8 × 24.1 cm), including the trunk
- Border depth: 0.6 in (1.5 cm) on straight edges, up to 0.9 in (2.3 cm) at the tier points
Materials
Smooth mercerized or matte cotton gives crisp tulips and keeps the edges stiff enough to hang. Avoid acrylic blends that stretch, because the strap carries weight.
- Green: 50 g / 120 m (body lattice, trunk, border Rnds 1–2, strap, loop, leaves)
- Cream: 25 g / 60 m (tulips, border Rnd 3, bands, star)
- Red: 5 g / 12 m (berries)
All quantities include a margin of about 20%.
Tools:
– 3.5 mm (E-4) crochet hook
– Tapestry needle
– 6 locking stitch markers
– Scissors
– Rustproof pins and a blocking mat
– A pinch of fiberfill or matching yarn scraps for the berries
Abbreviations (US Terms)
- ch – chain
- sl st – slip stitch
- sc – single crochet
- hdc – half double crochet
- dc – double crochet
- tr – treble crochet
- sc2tog – single crochet 2 together
- sp – space
- st(s) – stitch(es)
- rep – repeat
- RS / WS – right side / wrong side
Special stitches
- 2-tr cluster (2-tr cl): [yo twice, insert hook in st, yo and pull up a loop, (yo, pull through 2) twice] twice in the same st, then yo and pull through all 3 loops.
- Tulip: in the same st work [2-tr cl, ch 1] twice, then 2-tr cl. Each Tulip has 3 petals, and the middle petal is its “center cluster.”
- Picot (p): ch 3, sl st in the 3rd ch from the hook.
Gauge and Checkpoints
Gauge: 20 sc and 22 sc rows = 4 in (10.2 cm). Each tulip band (3 rows) measures about 1.4 in (3.6 cm) tall.
Work Rows 1–4 first as your test piece.
- After Row 1: 37 sc should measure 7.4 in (18.8 cm). If it is wider than 7.6 in (19.3 cm), go down to a 3.25 mm hook. If it is narrower than 7.2 in (18.3 cm), go up to a 3.75 mm hook.
- After Row 4: the piece should be about 1.6 in (4.1 cm) tall.
- After Row 10: about 4.4 in (11.2 cm) tall.
- After Row 16: about 7.2 in (18.3 cm) tall.
- Finished body: about 8.25 in (21.0 cm) tall at the center.
If your tulips are too tall but the width is correct, crochet the clusters more firmly rather than changing the hook.
Tree Body
The body is worked bottom-up. Each cream Tulip row is joined at the right edge and fastened off at the left edge. The green yarn waits at the right edge between rows: place a marker in its loop. Work over the cream tails when you can.
Row 1 (WS, green): Ch 38. Sc in the 2nd ch from the hook and in each ch across. (37 sc) Do not cut the yarn. Place a marker in the working loop.
Row 2 (RS, cream): Join cream with sc in the last sc of Row 1, at the right edge as seen from the RS. Skip 2 sts, Tulip in the next st, skip 2 sts, sc in the next st; rep from * 5 more times. (6 Tulips, 7 sc)* Fasten off.
Row 3 (RS, green): Pick up the green loop. Ch 6, then sc in the center cluster of the first Tulip. Ch 2, tr in the next sc, ch 2, sc in the center cluster of the next Tulip; rep from * 4 more times. Ch 6, sl st in the edge sc of Row 2. (6 sc, 5 tr, 10 ch-2 sps, 2 ch-6 edges)*
The two ch-6 edges form the sloped sides of the triangle.
Row 4 (WS, green): Turn. Sl st in each of the 6 ch, then ch 1. Sc in the next sc. 2 sc in the ch-2 sp, sc in the tr, 2 sc in the ch-2 sp, sc in the sc; rep from * 4 more times. (31 sc)*
The green yarn now rests at the right edge, ready for the next band. In general, a row with k Tulips uses 6k + 1 sts, and the sc row above it has 6(k − 1) + 1 sts. That moves the edge in by 3 sts on each side per band.
Rows 5–16: Repeat Rows 2–4 four more times, with one fewer Tulip each band:
- Rows 5–7: 5 Tulips → lattice row has 5 sc, 4 tr, 8 ch-2 sps → 25 sc
- Rows 8–10: 4 Tulips → 4 sc, 3 tr, 6 ch-2 sps → 19 sc
- Rows 11–13: 3 Tulips → 3 sc, 2 tr, 4 ch-2 sps → 13 sc
- Rows 14–16: 2 Tulips → 2 sc, 1 tr, 2 ch-2 sps → 7 sc
Row 17 (RS, cream): Sc in the first st, skip 2, Tulip in the next st, skip 2, sc in the last st. (1 Tulip, 2 sc) Fasten off.
Row 18 (RS, green): Pick up the green loop. Ch 6, sc in the center cluster of the Tulip, ch 6, sl st in the edge sc of Row 17. Fasten off. The single sc in this row is the tip st.
That gives 21 Tulips in total (6 + 5 + 4 + 3 + 2 + 1).
Trunk
With the RS facing, turn the body upside down. Join green in the free loop of foundation ch 15, counting from the right.
Row 1: Ch 1, sc in the same loop and in the next 8 loops. (9 sc) These are loops 15–23, so the trunk is centered.
Rows 2–7: Ch 1, turn, sc in each st across. (9 sc) Fasten off.
Checkpoint: The trunk measures 1.8 × 1.25 in (4.6 × 3.2 cm). The body extends 14 sts, or 2.8 in (7.1 cm), past the trunk on each side.
Strap, Bands and Small Pieces
Strap (green): Ch 8. Sc in the 2nd ch from the hook and across. (7 sc) Ch 1, turn, and work 7 sc each row until you have 44 rows. It should measure 1.4 × 8 in (3.6 × 20.3 cm).
Bands (cream, make 4): Ch 19. Sc in the 2nd ch from the hook and across. (18 sc) Work 2 more rows of 18 sc. Each band measures 3.6 × 0.55 in (9.1 × 1.4 cm).
Hanging loop (green): Ch 21. Sc in the 2nd ch from the hook and across. (20 sc, 4 in / 10.2 cm)
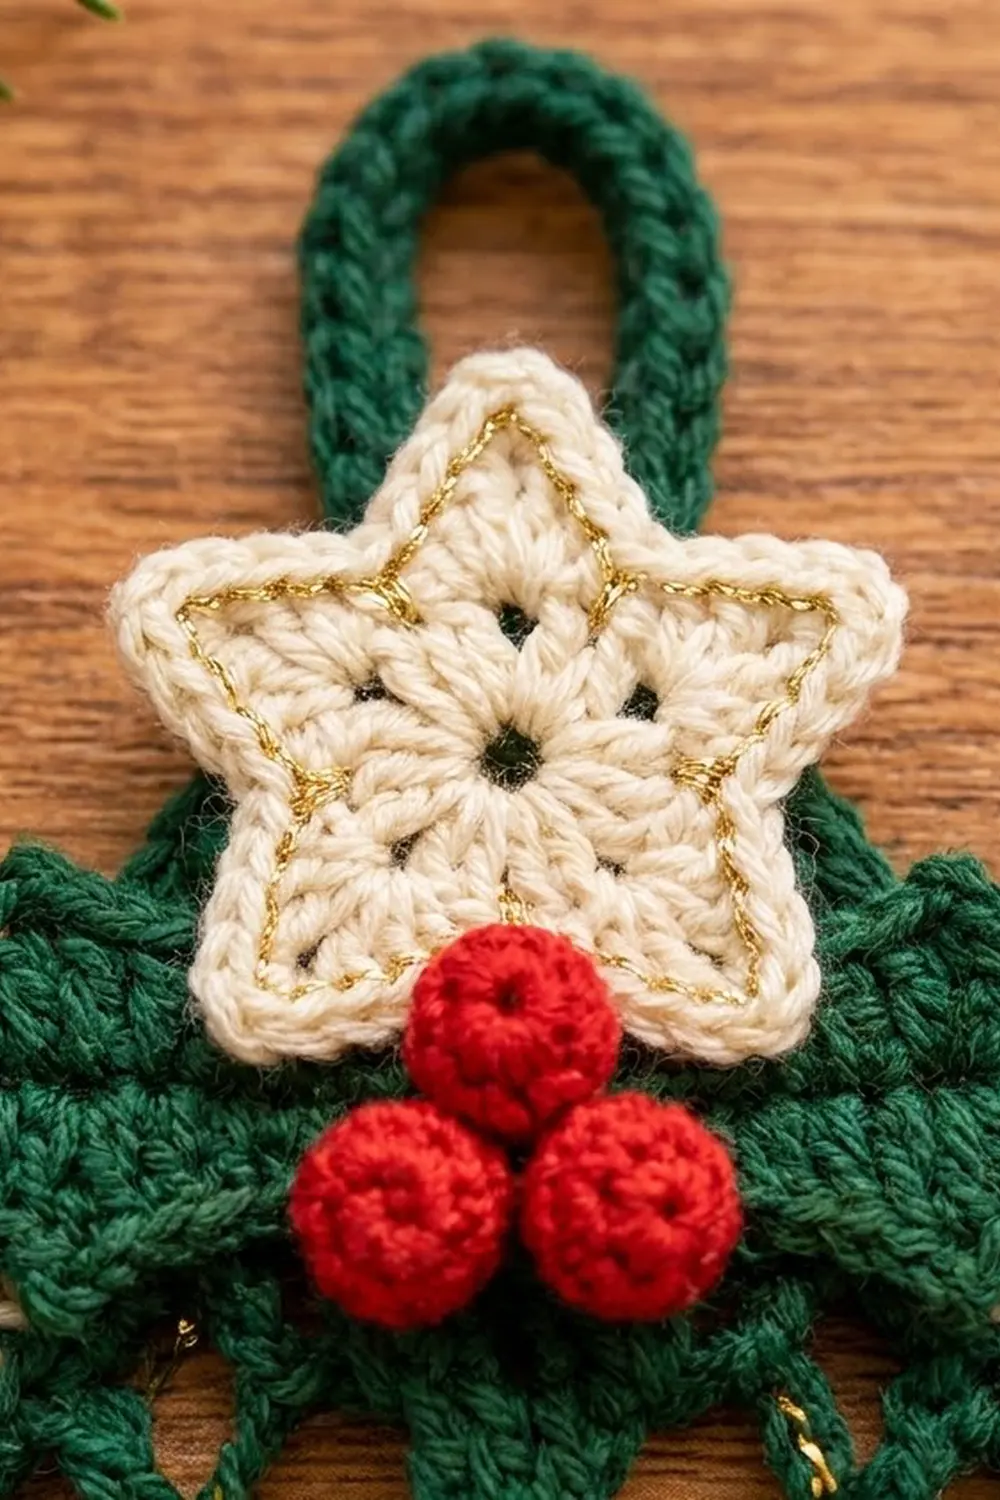
Star (cream): Make a magic ring.
– Rnd 1: Ch 1, 10 sc in the ring. Pull the ring nearly closed, leaving a small center hole, and sl st to the first sc. (10 sc)
– Rnd 2: Ch 4, sl st in the 2nd ch from the hook, sc in the next ch, hdc in the next ch, skip 1 st, sl st in the next st; rep from * 4 more times. (5 points)*
The star measures about 1.75 in (4.4 cm) across.
Holly leaf (green, make 2): Ch 10. Number the chains from the hook: ch 1 is skipped.
– First side: sl st in ch 2, sc in ch 3, hdc in ch 4, dc in ch 5, p, hdc in ch 6, dc in ch 7, p, hdc in ch 8, sc in ch 9, then (sc, ch 2, sc) in ch 10 for the leaf tip.
– Second side, working in the opposite loops: sc in ch 9, hdc in ch 8, p, dc in ch 7, hdc in ch 6, p, dc in ch 5, hdc in ch 4, sc in ch 3, sl st in ch 2.
Sl st to the first sl st. Each leaf is about 2 in (5.1 cm) long.
Berry (red, make 3):
– Rnd 1: Magic ring, 6 sc.
– Rnd 2: [Sc2tog] 3 times. Stuff with a little fiberfill and cinch closed.
Each berry is about 0.4 in (1.0 cm) across.
Make All Pieces
- Green: 1 tree panel (body and trunk), 1 strap, 1 hanging loop, 2 holly leaves
- Cream: Tulip rows (inside the panel), 4 bands, 1 star
- Red: 3 berries
Layout (front view):
            [ loop ]
            [ STAR ]
     [leaf]  (o o o)  [leaf]
       /     | strap |     \
      /      |=BAND=|       \
     /       |=BAND=|        \
    /        |=BAND=|         \
   /         |=BAND=|          \
  /__________|strap |___________\
             |trunk |
Joining: Bands and Strap
1. Wrap the bands. Wrap each band around the strap and whipstitch its short ends together at the back. Measure from the strap’s top edge to the top of each band: 1 in (2.5 cm), 2.75 in (7.0 cm), 4.5 in (11.4 cm) and 6.25 in (15.9 cm). Tack each back seam to the strap with 2 small stitches so the band can’t slide.
The band’s 18 sts measure 3.6 in (9.1 cm). The strap’s perimeter is 2.8 in (7.1 cm), which leaves about 0.8 in (2.0 cm) of slack for cables.
2. Pin the strap. Lay the strap on the RS of the panel, centered. Its last row should sit exactly on trunk Row 7, over trunk sts 2–8. Its top edge sits about 1.5 in (3.8 cm) below the tip st.
3. Sew the edges. Whipstitch both long edges with green, working 1 stitch per strap row end into the nearest panel stitch (a lattice sc, a tr, an sc-row st or a Tulip cluster). Skip the 3 rows under each band by passing the needle along the back instead. That leaves 32 sewn rows per edge. Tack the strap’s top row across. Leave the bottom row unsewn, because border Rnd 1 will join it.
Tension: Sew loosely enough that the panel still lies flat. Row 1 should still measure 7.4 in (18.8 cm). If it now measures less, unpick and re-sew more loosely.
Border
Border gauge: 5 sc per inch along every edge.
Rnd 1 (green): Join green in the tip st, ch 1, 3 sc in the tip st. Then work around:
– Right diagonal: 47 sc. Work 7 sc in each ch-6 edge and 1 sc in each sc-row end (Rows 16, 13, 10, 7 and 4).
– Body corner: 3 sc in the end of Row 1.
– Ledge: sc in foundation loops 2–14. (13 sc)
– Trunk side: 6 sc in the ends of Rows 1–6.
– Trunk corner: 3 sc in the end st of Row 7.
– Trunk bottom: 7 sc in sts 2–8, inserting the hook through both the trunk and the strap’s last row.
– Second trunk corner: 3 sc.
– Left trunk side: 6 sc.
– Left ledge: 13 sc in loops 24–36.
– Left body corner: 3 sc in loop 37 / the end of Row 1.
– Left diagonal: 47 sc.
Sl st to the first sc, then sl st in the next sc (the tip center).
Count: 3 + 47 + 3 + 13 + 6 + 3 + 7 + 3 + 6 + 13 + 3 + 47 = 154 sc.
Why 47: Each diagonal measures about 9 in (22.9 cm). 47 sc at 5 per inch gives 9.4 in (23.9 cm). That small amount of ease stops the tiers from pulling inward.
Rnd 2 (green): Each segment below is counted between the center sts of the corner groups.
- Tip: Ch 1, (sc, ch 2, sc) in the tip center.
- Right diagonal (49 sts worked):
- Top tier: sc in the next 6, hdc in the next 3, dc in the next 3, tr in the next 2, 3 tr in the next st.
- Middle tier: sc 6, hdc 3, dc 3, tr 3, 3 tr in the next st.
- Bottom tier: sc 6, hdc 4, dc 4, tr 4.
- (53 sts made)
- Body corner: (tr, ch 2, tr) in the corner center.
- Ledge and trunk side (21 sts worked): sc in the next 13, sc2tog, sc in the next 6. (20 sts made)
- Trunk corner: 3 sc in the center st.
- Trunk bottom: sc in the next 9.
- Trunk corner: 3 sc in the center st.
- Trunk side and ledge: sc 6, sc2tog, sc 13. (20)
- Body corner: (tr, ch 2, tr).
- Left diagonal: tr 4, dc 4, hdc 4, sc 6; 3 tr in the next st, tr 3, dc 3, hdc 3, sc 6; 3 tr in the next st, tr 2, dc 3, hdc 3, sc 6. (53)
Sl st to the first sc and fasten off.
Count: 154 sts worked 1 per st, plus 8 from the four tooth groups (+2 each), plus 3 from the tip and body corners (+1 each), plus 4 from the trunk corners (+2 each), minus 2 from the sc2togs = 167 sts and 3 ch-2 sps.
Each tier’s stitches grow taller from sc to tr and then drop straight back to sc. That sawtooth shape creates the stepped tree outline.
Rnd 3 (cream): Join cream in the tip ch-2 sp, ch 1, 3 sc in the sp.
- Right side (57): sc in the next 15. On the top tooth: sc in the first tr, 3 sc in the center tr, then sc2tog over the 3rd tr and the next sc (this is the notch). Sc in the next 14. On the middle tooth: sc, 3 sc in the center tr, sc2tog. Sc in the next 18.
- Body corner: 3 sc in the ch-2 sp.
- Lower edge (22): sc in the next 22.
- Trunk corner: 3 sc in the center st.
- Trunk bottom: sc in the next 11.
- Trunk corner: 3 sc in the center st.
- Lower edge: sc in the next 22.
- Body corner: 3 sc in the ch-2 sp.
- Left side (57): sc 18, sc2tog, 3 sc in the center tr, sc in the next tr, sc 14, sc2tog, 3 sc in the center tr, sc in the next tr, sc 15.
Sl st to the first sc and fasten off.
Count: 3 + 57 + 3 + 22 + 3 + 11 + 3 + 22 + 3 + 57 = 184 sc. As a check against Rnd 2: 167 + 9 (in the ch-2 sps) + 8 (tooth centers) + 4 (trunk corners) − 4 (notches) = 184.
Top trim:
1. Fold the hanging loop in half and sew both ends to the back of the tip, overlapping by 0.5 in (1.3 cm). The loop rises 1.5 in (3.8 cm) above the tip.
2. Sew the star centered on the tip, with its top point touching Rnd 3.
3. Sew the leaves below the star, angled slightly upward and covering the top of the strap.
4. Sew the 3 berries in a cluster where the leaves meet.
Final Blocking
- Spritz the organizer with water until it is damp, not soaked.
- Pin the trunk square at 1.8 in (4.6 cm) wide.
- Pin the three tooth points on each side symmetrically. The widest points should be 9.2 in (23.4 cm) apart.
- Pin the tip so the total height is 10.7 in (27.2 cm), not counting the loop.
- Open each Tulip with a fingertip and straighten the lattice lines.
- Keep the bands open over the strap, and don’t flatten the berries.
- Let it dry completely before you unpin it.
Final Quality-Control Checklist
- 21 Tulips, arranged 6-5-4-3-2-1
- Row 1 measures 7.4 in (18.8 cm)
- Strap is centered and its bottom row is caught in Rnd 1
- Bands are evenly spaced and tacked
- Each side has 3 tiers and 2 crisp notches
- Rnd 3 count is 184 sc
- All tails are woven in on the back
- The loop holds when you tug it firmly
Troubleshooting
- The triangle edges curl: the ch-6 edges are too tight. Chain more loosely or use ch 7.
- The tiers are hard to see: check that each tooth has 3 tr and that each notch is worked as sc2tog.
- The border ruffles: work 6 sc instead of 7 in each ch-6 edge.
- The strap bows outward: you sewed too loosely. Add tacking stitches between the bands.
- The bands are too tight for cables: add 2 sts to the starting chain.
Care
Hand wash in cool water and lay flat to dry, reshaping the tiers while damp. Remove the cables before washing.
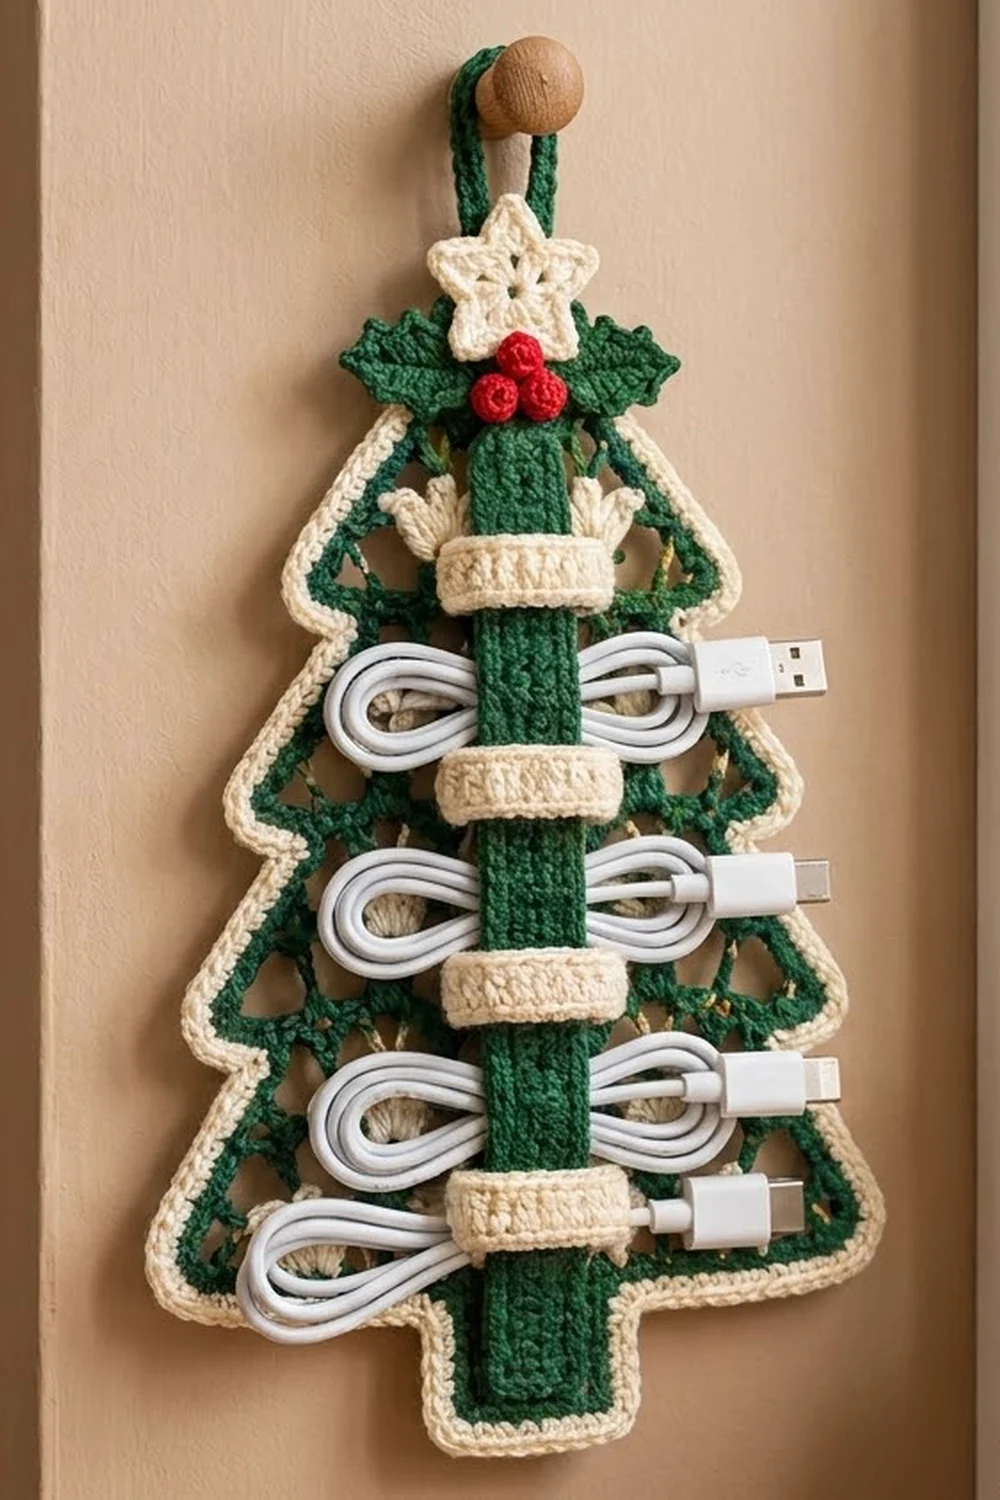
Final Notes
The measurements build on each other:
– Row 1 is 37 sc, or 7.4 in (18.8 cm).
– Each band is 1.4 in (3.6 cm) tall, giving an 8.25 in (21.0 cm) body.
– The trunk adds 1.25 in (3.2 cm).
– The 154-167-184 border rounds bring the organizer to 9.2 × 10.7 in (23.4 × 27.2 cm).
If each checkpoint matches, the finished organizer will hang straight and hold your cables neatly. Happy crocheting!