
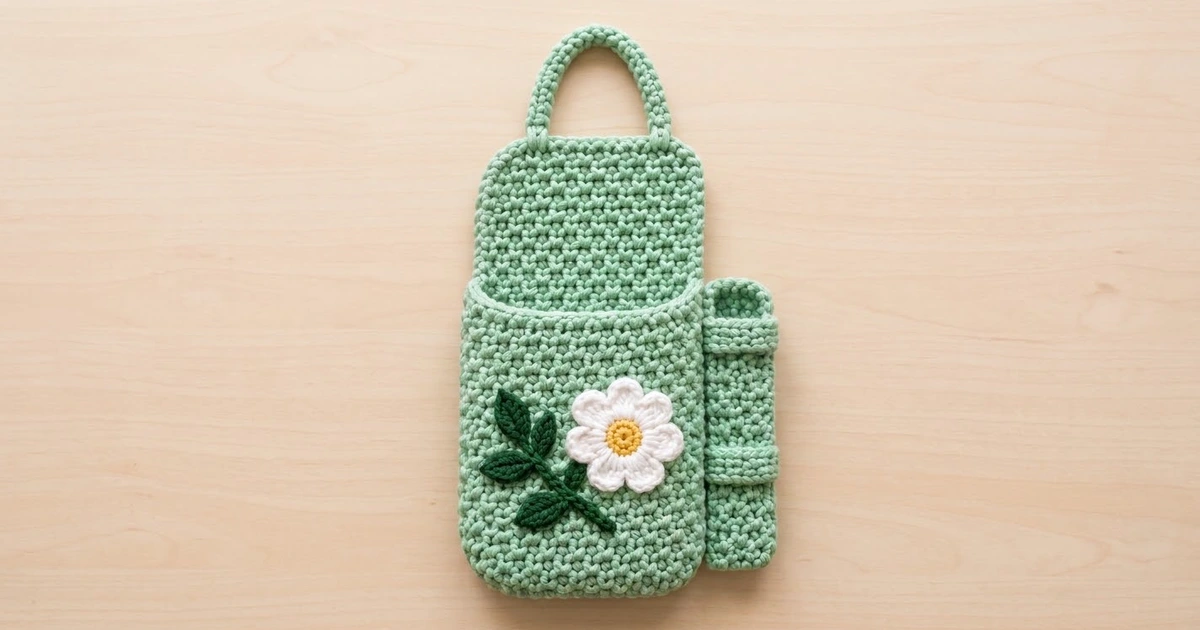
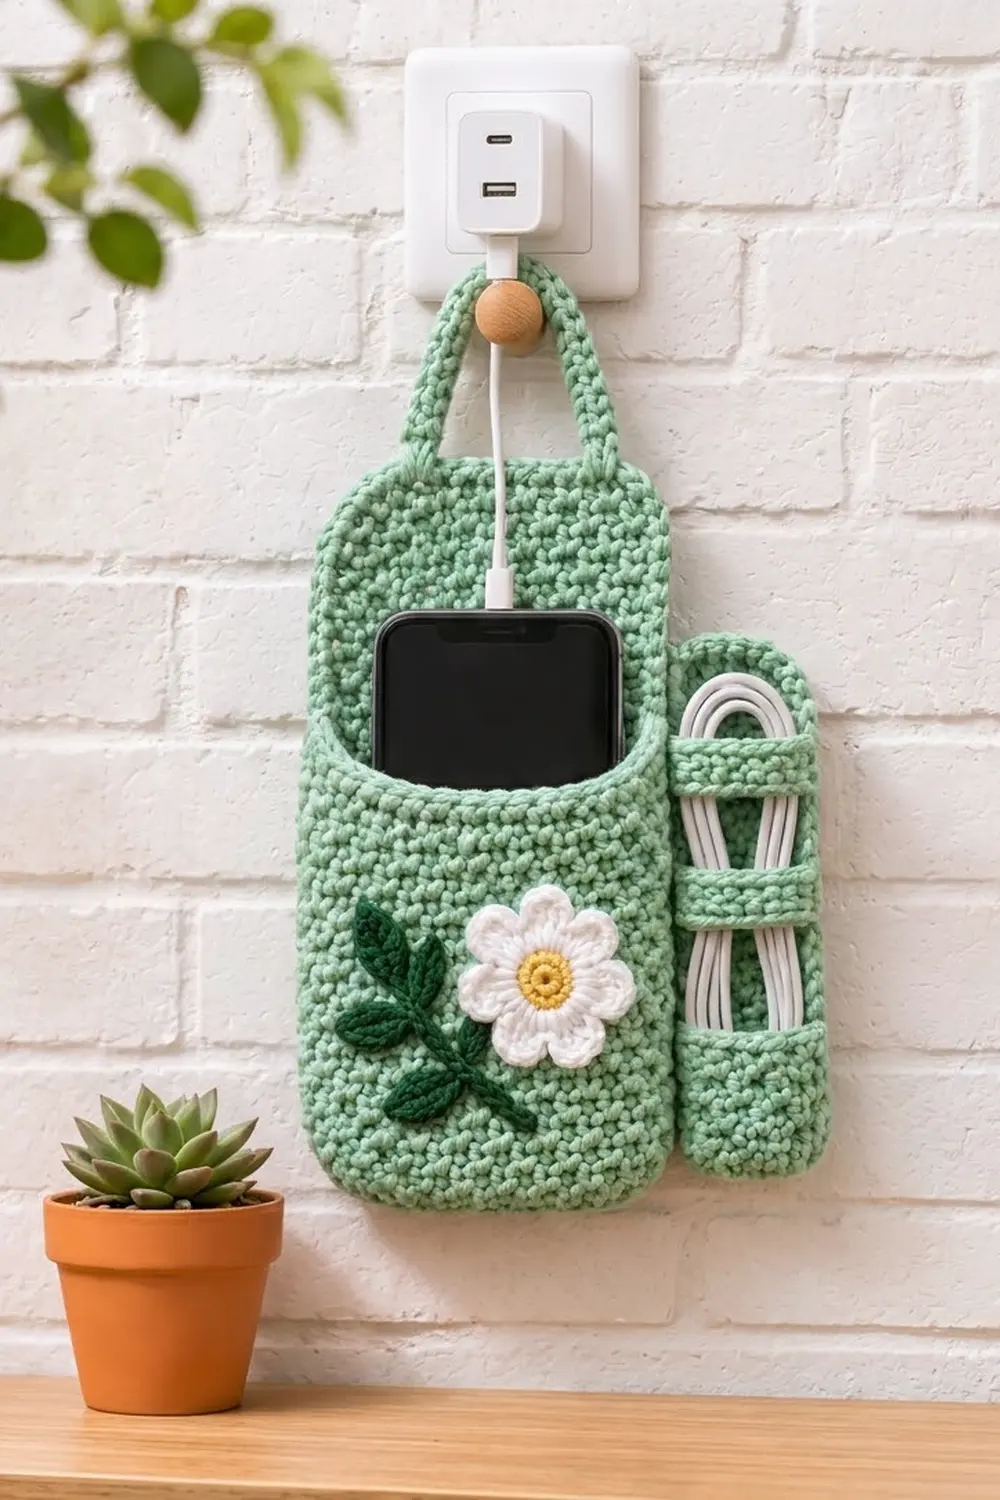
This sage green phone holder hangs on a wall peg next to your outlet, so your phone charges at eye level instead of lying on the floor. A deep front pocket holds the phone, and a narrow side sleeve keeps the spare cable coiled and tidy.
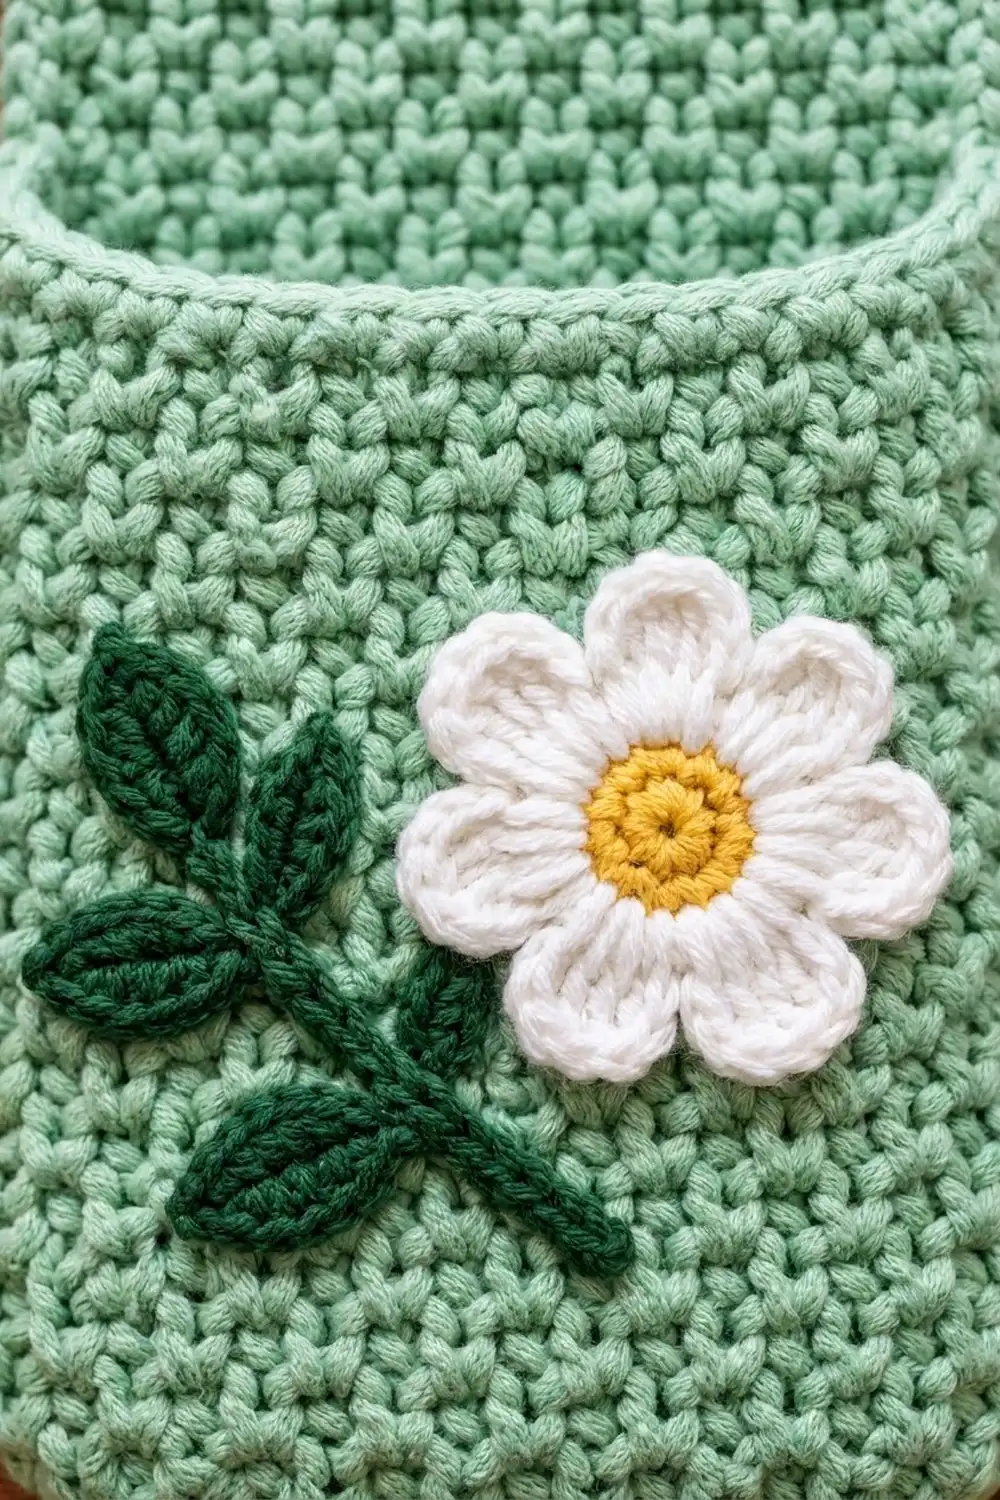
The holder is worked in sage green single crochet, which gives a firm, pebbly fabric that keeps its shape. A white daisy with a yellow center and a dark green leaf sprig are sewn onto the pocket for a soft cottage look. Each edge has a corded reverse single crochet rim, so the openings stay neat and don’t stretch.
The pattern uses US crochet terms. The finished holder measures 6 x 8.5 in (15.2 x 21.6 cm), or 8 in (20.3 cm) wide with the cord sleeve, not counting the handle.
You will crochet seven flat pieces: back panel, front pocket, cord sleeve, sleeve strap, handle, and two appliqués. The pocket gets laid on the back panel and joined by the border round, which works through both layers. Then you sew the sleeve, handle, and appliqués in place.
Finished Size and Construction
- Finished size: 6 x 8.5 in (15.2 x 21.6 cm) main body; 8 in (20.3 cm) wide with sleeve
- Skill level: Easy / Advanced Beginner
- Terminology: US crochet terms
- Yarn weight: Worsted (#4)
- Hook: 5.0 mm (H-8) for the holder; 4.0 mm (G-6) for the appliqués
- Number of pieces: 7 (back, pocket, sleeve, strap, handle, daisy, leaf sprig)
- Layout: pocket on the lower back panel, sleeve on the right, handle on top
- Back panel size: 5.5 x 8 in (14.0 x 20.3 cm) before border
- Pocket size: 5.5 x 6 in (14.0 x 15.2 cm) before rim
- Size before border: 5.5 x 8 in (14.0 x 20.3 cm)
- Border depth: 1 round, about 0.25 in (0.6 cm) per side
Materials
Use a smooth worsted weight cotton or cotton blend. Cotton holds its shape under the weight of a phone and shows the stitch texture clearly. Acrylic works too, but it stretches a little more.
- Sage green: 75 g, about 150 m (164 yd)
- White: 5 g, about 10 m (11 yd)
- Yellow: 2 g, about 4 m (4.4 yd)
- Dark green: 5 g, about 10 m (11 yd)
Tools:
– 5.0 mm (H-8) and 4.0 mm (G-6) crochet hooks
– Tapestry needle
– 4 locking stitch markers
– Rust-proof pins
– Measuring tape
– Blocking mat and spray bottle
These quantities include a margin of roughly 15 percent for your gauge swatch and seaming.
Abbreviations (US Terms)
- ch – chain
- sl st – slip stitch
- sc – single crochet
- hdc – half double crochet
- dc – double crochet
- rev sc – reverse single crochet
- st(s) – stitch(es)
- RS – right side
Reverse single crochet (rev sc): Work from left to right (right-handed). Insert the hook into the next stitch to the right, yarn over, pull up a loop, yarn over, and draw through both loops. This makes the raised, twisted cord along the rims.
Gauge and Checkpoints
Gauge: 16 sc and 18 rows = 4 in (10.2 cm) with the 5.0 mm hook.
Make the back panel first and treat it as your gauge test. Check it at these points:
- After Row 1: 22 sts measure 5.5 in (14.0 cm).
- After Row 18: the panel is 4 in (10.2 cm) tall.
- After Row 36: the panel is 5.5 x 8 in (14.0 x 20.3 cm).
If your panel is too big, go down half a hook size. If it’s too small, go up half a size. Stitch width matters most here, since the pocket and border depend on the 22-stitch width. If your row height is a bit off, add or remove a row to hit the target height.
Back Panel
With sage green and the 5.0 mm hook, ch 23.
Row 1 (RS): Sc in 2nd ch from hook and in each ch across, turn. (22 sts)
Rows 2–36: Ch 1 (does not count as a stitch), sc in each st across, turn. (22 sts)
Fasten off. The panel measures 5.5 x 8 in (14.0 x 20.3 cm).
Front Pocket
With sage green and the 5.0 mm hook, ch 23.
Row 1: Sc in 2nd ch from hook and in each ch across, turn. (22 sts)
Rows 2–27: Ch 1, sc in each st across, turn. (22 sts)
Check: the pocket is 5.5 x 6 in (14.0 x 15.2 cm).
Row 28 (rim): Do not turn. Ch 1, rev sc in each st across. (22 rev sc)
Fasten off. This row forms the raised, corded rim along the top of the pocket. Because the pocket is the same width as the back panel, the extra fabric eases out around the phone. It fits phones up to 3.5 in (8.9 cm) wide.
Cord Sleeve
With sage green and the 5.0 mm hook, ch 9.
Row 1: Sc in 2nd ch from hook and in each ch across, turn. (8 sts)
Rows 2–54: Ch 1, sc in each st across, turn. (8 sts)
Fasten off. The strip measures 2 x 12 in (5.1 x 30.5 cm).
Fold the strip in half crosswise so the two short ends meet. You now have a 2 x 6 in (5.1 x 15.2 cm) sleeve with the fold at the bottom. Sl st the side edges together through both layers, matching 27 row-ends on each side.
Sleeve rim: Join sage green at one side seam of the top opening. Ch 1, rev sc in each st around: 8 sts on the front, 8 sts on the back. Join with sl st to the first rev sc. (16 rev sc) Fasten off.
Sleeve Strap
With sage green and the 5.0 mm hook, ch 10.
Row 1: Sc in 2nd ch from hook and in each ch across, turn. (9 sts)
Rows 2–3: Ch 1, sc in each st across, turn. (9 sts)
Fasten off and leave a 10 in (25.4 cm) tail. The strap measures 2.25 x 0.7 in (5.7 x 1.8 cm).
Handle
With sage green and the 5.0 mm hook, ch 31.
Row 1: Sc in 2nd ch from hook and in each ch across, turn. (30 sts)
Row 2: Ch 1, sc in each st across. (30 sts)
Fold the strip in half lengthwise and sl st the long edges together, working through Row 2 stitches and the foundation chain at the same time. (30 sl sts) Fasten off and leave a 12 in (30.5 cm) tail. You now have a rounded cord about 7.5 in (19.1 cm) long and 0.25 in (0.6 cm) thick.
Daisy Appliqué
With yellow and the 4.0 mm hook, make a magic ring.
Rnd 1: Ch 1, 8 sc in ring, join with sl st to first sc. (8 sts)
Rnd 2: Ch 1, 2 sc in each st around, join. (16 sts) Fasten off yellow.
Rnd 3: Join white in any st. *Sl st in next st, (hdc, 3 dc, hdc) in next st; repeat from * 7 more times, join to first sl st. (8 petals; 8 sl sts + 40 petal sts)
Fasten off and leave a 12 in (30.5 cm) tail. The daisy is about 2.25 in (5.7 cm) across, with a center about 1 in (2.5 cm) wide.
Leaf Sprig Appliqué
With dark green and the 4.0 mm hook, ch 12 for the stem.
Tip leaf: Ch 7. Working back along these 7 ch, sl st in 2nd ch from hook, sc in next ch, hdc in next ch, dc in next ch, hdc in next ch, sc in last ch. (6 sts)
Down the stem: Sl st in next 3 stem ch. Ch 7, work leaf as above, sl st in same stem ch. Repeat once more from * to * for the second leaf of the pair. (2 leaves)
Sl st in next 3 stem ch. Work a second pair of leaves the same way. (2 leaves)
Sl st in remaining 6 stem ch. (12 stem ch used: 3 + 3 + 6)
Fasten off and leave a 12 in (30.5 cm) tail. You have 5 pointed leaves: one at the tip and two pairs. The sprig is about 4.25 in (10.8 cm) long.
Make All Pieces
Before you assemble, check that you have:
- Sage green: 1 back panel, 1 front pocket, 1 cord sleeve, 1 sleeve strap, 1 handle (5 pieces)
- White and yellow: 1 daisy
- Dark green: 1 leaf sprig
Layout (front view):
        ___handle___
       /            \
  +----------------+
  |   back panel   |
  |   (top 2 in)   |  +-----+
  |================|  | rim |
  |                |  |     |
  |  leaf  daisy   |  |strap|
  |  pocket 6 in   |  |     |
  +----------------+  +-----+
     6 in wide         2 in
Joining
Pocket to back panel: Place the back panel RS up. Lay the pocket RS up on top so the bottom edges and sides line up. Row 1 of the pocket sits on Row 1 of the back panel, and pocket Row 27 sits on back panel Row 27. Pin the two layers at each corner and at the center of each side.
The border round below joins the pocket to the back along the bottom and both sides. Every border stitch in these areas goes through both layers. Since both pieces have 22 stitches and matching rows, you join stitch-to-stitch and row-to-row with no easing.
Tension: Keep your border stitches the same size as your body stitches. Tight joining pulls the pocket in and makes the corners cup.
Size checkpoint: Before you start the border, the joined layers should still measure 5.5 x 8 in (14.0 x 20.3 cm).
Border
Border gauge: 4 sc per 1 in (2.5 cm) along every edge, which matches the body stitch gauge.
With sage green and the 5.0 mm hook, join with sl st in the first st of Row 36 of the back panel, at the top right corner with RS facing.
Rnd 1:
- Top edge: Ch 1, 2 sc in first st, sc in next 20 sts, 2 sc in last st. (24 sts)
- Left side: Working into row-ends going down, *sc in next 8 row-ends, skip 1 row-end; repeat from * 3 more times. (32 sts) From Row 27 down, go through both the pocket and the back panel.
- Bottom edge: Working into the foundation chains of both layers, 2 sc in first ch, sc in next 20 ch, 2 sc in last ch. (24 sts)
- Right side: Repeat the left side going up, through both layers from Row 1 to Row 27, then through the back panel only. (32 sts)
- Join with sl st to the first sc. (112 sts)
Fasten off and weave in the ends.
Why the math works: The top and bottom edges each have 22 stitches across, plus 1 extra at each end. That makes 24 per side, and the extras round off the corners. Each side has 36 rows. Working 8 sc for every 9 row-ends gives 32 stitches over 8 in (20.3 cm), which is 4 sc per inch, the same as the stitch gauge. Total: 24 + 32 + 24 + 32 = 112. The border adds 0.25 in (0.6 cm) on each side, so the main body finishes at 6 x 8.5 in (15.2 x 21.6 cm).
Attach the sleeve: Place the sleeve on the right side of the holder with its folded bottom level with the holder’s bottom border. Whipstitch the sleeve’s left side seam to the right border for its full 6 in (15.2 cm) height.
Attach the strap: Center the strap across the front of the sleeve, 1.5 in (3.8 cm) above the fold. Sew only the short ends to the sleeve’s side seams so the strap stands slightly proud.
Attach the handle: Place each handle end 1 in (2.5 cm) in from a top corner. Overlap the ends 0.75 in (1.9 cm) onto the front of the back panel and sew them down firmly. The handle forms an arch about 2 in (5.1 cm) tall.
Attach the appliqués: Place the daisy just right of the pocket’s center, about 2 in (5.1 cm) below the rim. Lay the leaf sprig diagonally from lower center up toward the left, so the leaves sit beside and below the daisy. Sew both down through the pocket layer only, keeping the back panel free so the pocket stays open.
Final Blocking
- Spray the whole holder evenly until it is damp, not soaked.
- Lay it flat RS up on the blocking mat.
- Pin the main body to 6 x 8.5 in (15.2 x 21.6 cm), with gently rounded corners.
- Pin the sleeve straight at 2 x 6 in (5.1 x 15.2 cm).
- Smooth the daisy petals outward and open each leaf to a point.
- Shape the handle into an even arch.
- Let it dry completely before you unpin it, usually 12–24 hours.
Final Quality-Control Checklist
- The main body measures 6 x 8.5 in (15.2 x 21.6 cm).
- The border has 112 sts: 24 on the top and bottom, and 32 on each side.
- The pocket is caught on the bottom and both sides, and the top rim stays open.
- The sleeve is open only at the top and sits level with the bottom border.
- The strap is centered 1.5 in (3.8 cm) above the sleeve fold.
- The handle ends are evenly placed and firmly secured.
- The appliqués are stitched through the pocket only.
- All ends are woven in.
Troubleshooting
- Pocket corners flare: You probably added stitches at the edge. Recount for 22 sts per row.
- Sides ripple: Too many border stitches. Keep to the skip-1-every-9 rhythm.
- Sides pull in: Too few border stitches, or your tension is too tight. Go up half a hook size for the border only.
- Rev sc rim looks flat: Twist the hook a little as you pull the loop through, and don’t pull the loop tight.
- Daisy cups: Block it flat, or use a looser sl st between petals.
- Holder sags under the phone: Use cotton yarn and reinforce the handle ends with a second line of stitching.
Care
Hand wash in cool water with mild soap and lay flat to dry, reshaping to 6 x 8.5 in (15.2 x 21.6 cm). Don’t wring or tumble dry.
Final Notes
The measurement chain is simple. 22 sts at 4 sts per inch give a 5.5 in (14.0 cm) width, and 36 rows at 4.5 rows per inch give an 8 in (20.3 cm) height. A 112-stitch border brings the body to 6 x 8.5 in (15.2 x 21.6 cm), and the 2 in (5.1 cm) sleeve brings the total width to 8 in (20.3 cm). If your back panel hits its checkpoints, everything else lines up.
Happy crocheting!