

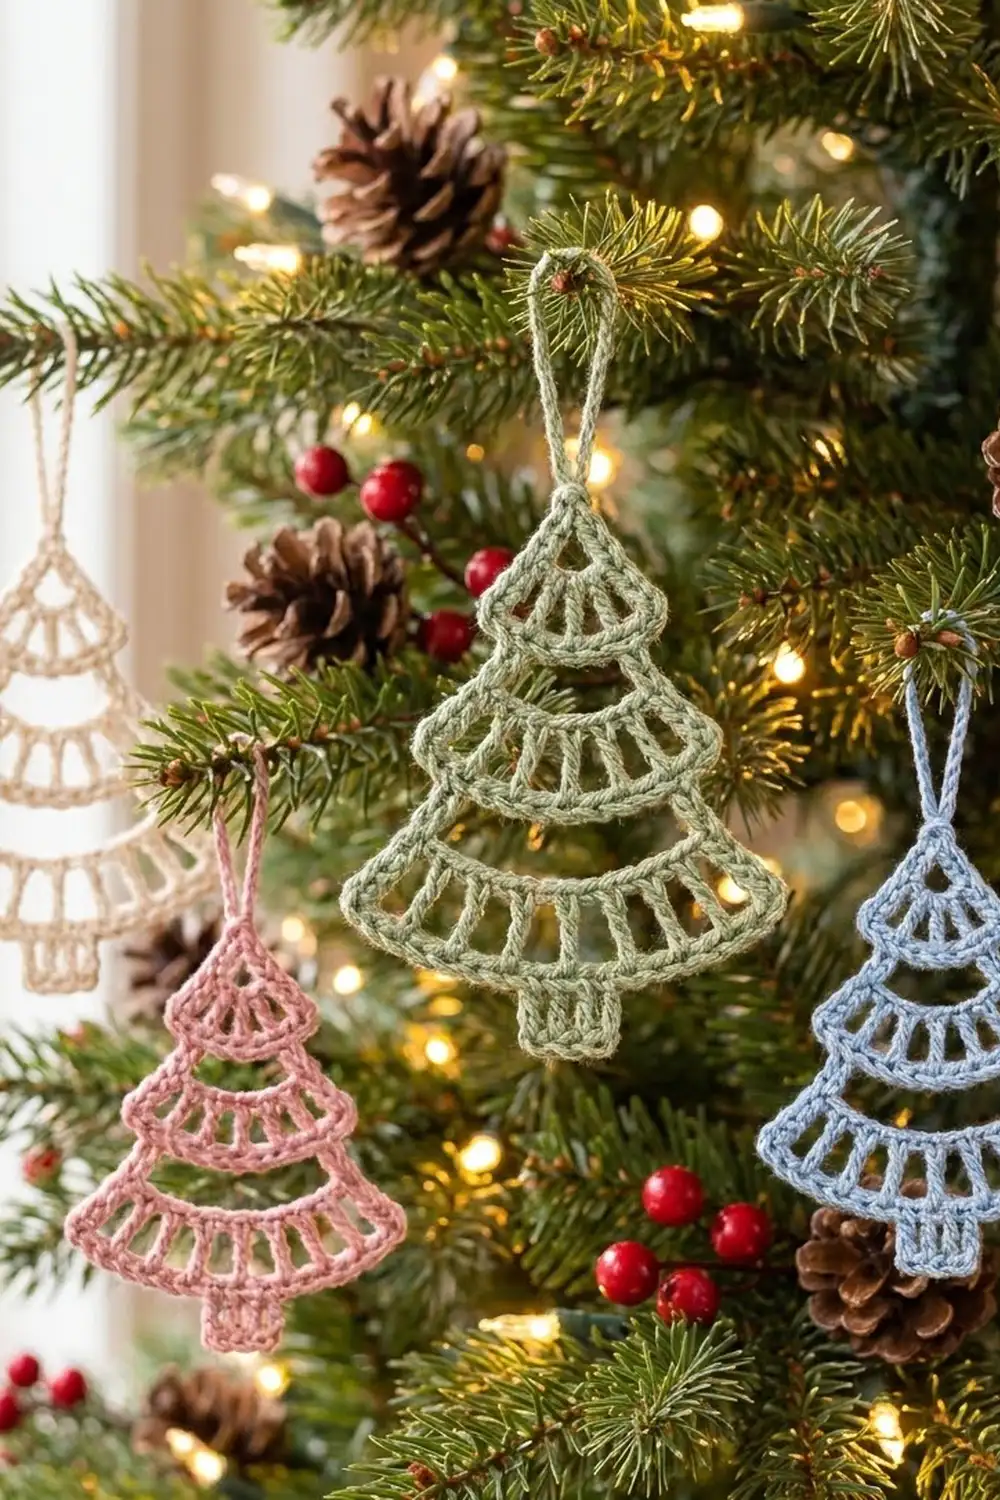
This lacy tree ornament is light, airy and quick to make. It has three fan-shaped tiers of open spokes, a small square trunk, a pointed tip and a chain hanging loop. A corded single-crochet outline frames the whole shape, so it reads clearly against green branches.
The sample is a soft sage green. The design also suits cream, dusty pink and powder blue, so you can make a few in different colors for a soft, Scandinavian-style tree. Each ornament takes one small amount of yarn, so leftovers work well.
The pattern uses US crochet terms. The finished ornament measures about 4.5 in (11.4 cm) wide and 5.25 in (13.3 cm) tall, plus a hanging loop of about 1.75 in (4.4 cm).
You work the tree flat in turned rows from the top tier down. Each tier is a single-crochet arc, a row of treble-crochet spokes and a wider single-crochet arc. Short treble “bridge” rows make the open gaps between tiers. Then you add the trunk, and one border round outlines everything and finishes with the tip triangle and hanging loop.
Finished Size and Construction
- Finished size: 4.5 in (11.4 cm) wide × 5.25 in (13.3 cm) tall, not counting the loop
- Skill level: Easy–Intermediate
- Terminology: US crochet terms
- Yarn weight: Sport (2), cotton or cotton blend
- Hook: 3.0 mm
- Number of pieces: 1 (single ornament)
- Layout: One flat tree shape, three tiers plus trunk
- Piece size before border: 4.25 in (10.8 cm) wide × 4.25 in (10.8 cm) tall, Row 1 to trunk bottom
- Border depth: about 1/8 in (0.3 cm) on each edge, plus the tip triangle of about 0.75 in (1.9 cm)
Materials
Yarn: Use a smooth, mercerized sport-weight cotton, about 125 m per 50 g. Cotton shows the spokes clearly and holds its shape after blocking. Fuzzy yarns blur the openwork, so avoid them.
- Sage Green (sample): 5 g / 12 m
- Optional colorways (one ornament each): Cream 5 g / 12 m, Dusty Pink 5 g / 12 m, Powder Blue 5 g / 12 m
All quantities include about a 20% margin for your gauge swatch and weaving in ends.
Tools:
– 3.0 mm crochet hook
– Tapestry needle
– Scissors
– Rust-proof pins
– Foam blocking mat
– Spray bottle with clean water
– Optional: fabric stiffener or starch spray
Abbreviations (US Terms)
- ch – chain
- sl st – slip stitch
- sc – single crochet
- dc – double crochet
- tr – treble crochet
- sk – skip
- sp – space
- st(s) – stitch(es)
- RS / WS – right side / wrong side
Special technique – working into a chain space: Insert your hook under the whole chain, not into the individual chains, and work the stated number of sc. Push the stitches along so they spread evenly from end to end.
Turning chains: Ch 4 counts as a tr, and ch 3 counts as a dc. Ch 1 never counts as a stitch.
Gauge and Checkpoints
Gauge: 24 sc and 24 rows = 4 in (10.2 cm) in sc. One tr is about 0.5 in (1.3 cm) tall.
The ornament is small, so make one full tree before you buy yarn for several. That first tree is your real gauge swatch. Check it against these points:
- After Row 3 (Tier 1): 16 sc, about 2.5 in (6.4 cm) straight across the bottom arc.
- After Row 7 (Tier 2): 22 sc, about 3.5 in (8.9 cm) straight across.
- After Row 11 (Tier 3): 31 sc, about 4.25 in (10.8 cm) straight across. Height from Row 1 to Row 11 is about 3.5 in (8.9 cm).
- After the trunk: The trunk is 7 sts, about 1.25 in (3.2 cm) wide and 0.75 in (1.9 cm) tall.
Too big? Go down to a 2.75 mm hook, or tighten your chains in the bridge rows.
Too small? Go up to a 3.25 mm hook. If only the tiers look cramped, pull up a slightly taller loop on your tr spokes.
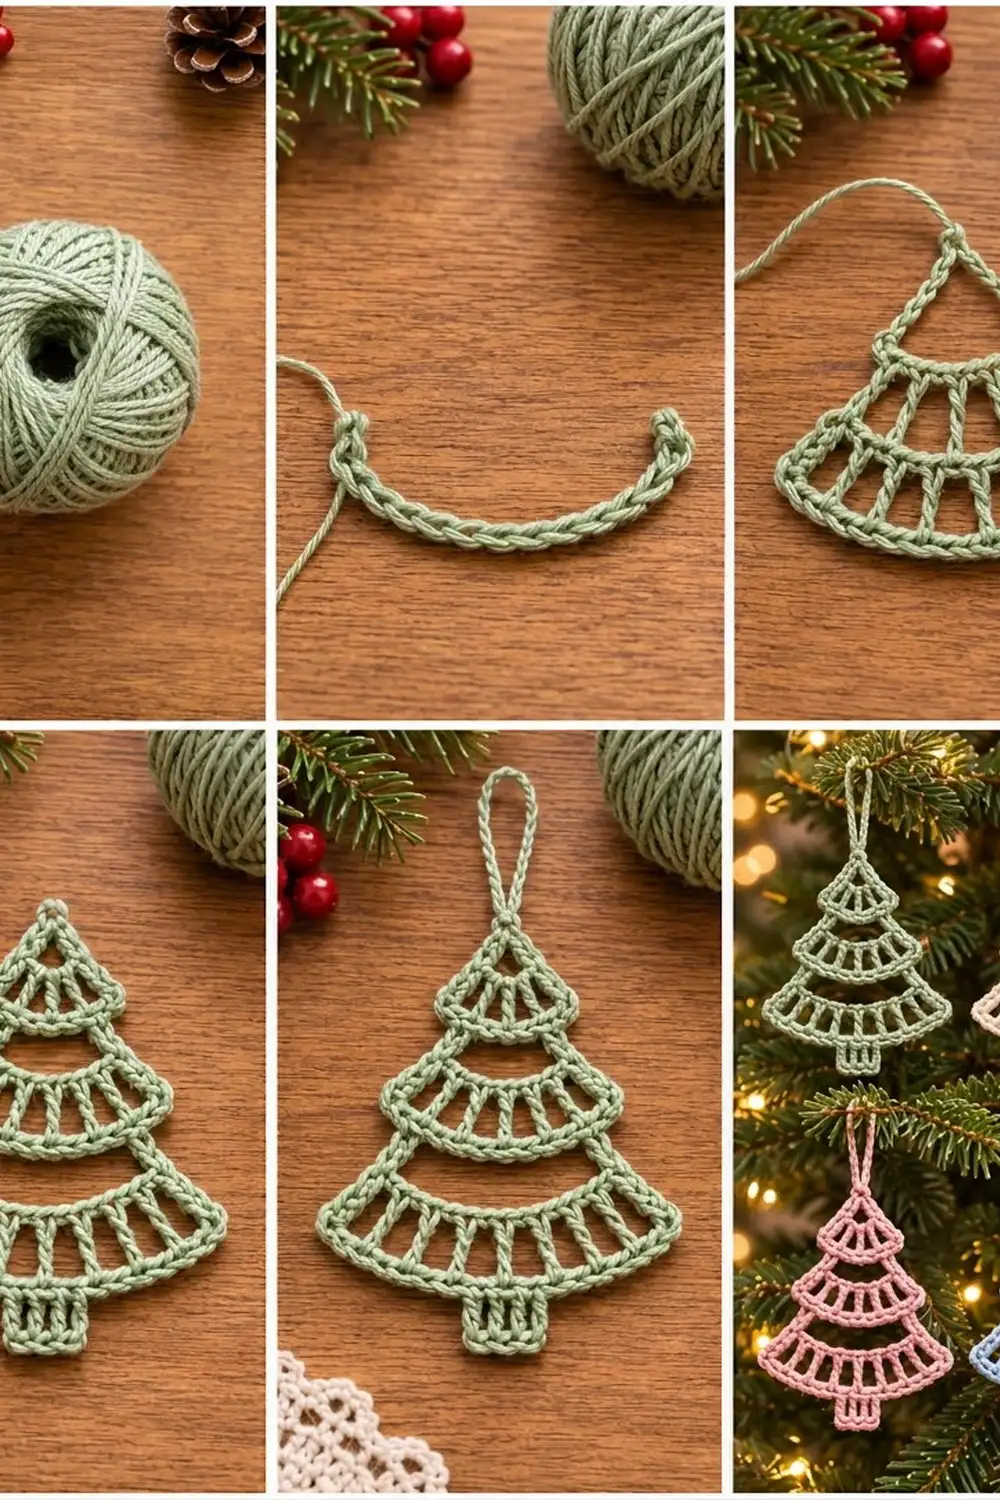
Pattern
Odd-numbered rows are RS rows.
Tier 1 (Top)
Row 1 (RS): Ch 12, sc in 2nd ch from hook and in each ch across. Turn. (11 sc)
Row 2: Ch 4 (counts as tr), [ch 2, sk 1 sc, tr in next sc] 5 times. Turn. (6 tr, 5 ch-2 sps)
This is the first spoke row. The spokes land on sc 1, 3, 5, 7, 9 and 11.
Row 3: Ch 1, sc in first tr, [2 sc in next ch-2 sp, sc in next tr] 5 times, working the last sc into the 4th ch of the turning ch. Turn. (16 sc)
Each gap now has 3 sts at the bottom and 2 at the top. That difference makes the spokes splay into a fan, and the arc curves on its own.
Bridge 1 (Open Gap)
Row 4: Ch 4 (counts as tr), ch 14, sk next 14 sc, tr in last sc. Turn. (2 tr, 1 ch-14 sp)
The two tr make the short sides of the gap. The ch-14 becomes the base of Tier 2’s top arc.
Tier 2 (Middle)
Row 5: Ch 1, sc in first tr, 13 sc in ch-14 sp, sc in 4th ch of turning ch. Turn. (15 sc)
Working 13 sc over 14 chains gathers the arc slightly. That pulls the gap sides inward a little, so the corners of Tier 1 stand out as shoulders.
Row 6: Ch 4 (counts as tr), [ch 2, sk 1 sc, tr in next sc] 7 times. Turn. (8 tr, 7 ch-2 sps)
Row 7: Ch 1, sc in first tr, [2 sc in next ch-2 sp, sc in next tr] 7 times, last sc in 4th ch of turning ch. Turn. (22 sc)
Check: 1 + (7 × 3) = 22.
Bridge 2 (Open Gap)
Row 8: Ch 4 (counts as tr), ch 20, sk next 20 sc, tr in last sc. Turn. (2 tr, 1 ch-20 sp)
Check: 1 + 20 skipped + 1 = 22, which matches Row 7.
Tier 3 (Bottom)
Row 9: Ch 1, sc in first tr, 19 sc in ch-20 sp, sc in 4th ch of turning ch. Turn. (21 sc)
Row 10: Ch 4 (counts as tr), [ch 2, sk 1 sc, tr in next sc] 10 times. Turn. (11 tr, 10 ch-2 sps)
Row 11: Ch 1, sc in first tr, [2 sc in next ch-2 sp, sc in next tr] 10 times, last sc in 4th ch of turning ch. (31 sc)
Check: 1 + (10 × 3) = 31. Fasten off and weave in the starting tail.
Trunk
Row 11’s stitch tops face down, along the bottom edge of the tree. The trunk is centered on them: 12 sc + 7 trunk sts + 12 sc = 31.
Row T1 (WS): With WS facing, sk the first 12 sc of Row 11 and join yarn in the 13th sc. Ch 1, sc in same st and in next 6 sc. Turn. (7 sc)
Row T2 (RS): Ch 3 (counts as dc), [ch 1, sk 1 sc, dc in next sc] 3 times. Turn. (4 dc, 3 ch-1 sps)
The 4 posts land on sts 1, 3, 5 and 7.
Row T3 (WS): Ch 1, sc in first dc, [sc in next ch-1 sp, sc in next dc] 3 times, last sc in 3rd ch of turning ch. (7 sc)
Fasten off and weave in the ends.
Checkpoint: The tree now measures about 4.25 in (10.8 cm) wide at Tier 3 and 4.25 in (10.8 cm) from Row 1 to the trunk bottom.
Border
Border gauge: Same as the body, 6 sc per 1 in (2.5 cm). Use these placement rules:
- 1 sc for each sc row end
- 2 sc for each dc row end
- 3 sc for each tr row end
- 1 sc in each stitch along stitch edges
- 3 sc in each outer corner stitch
Round 1 (RS)
With RS facing, join yarn in the foundation-chain loop at one top corner of Row 1. Work these counts in order:
- Top arc: Ch 1, sc in the same loop and in each remaining foundation loop across. (11 sc)
- First side, down the row ends of Rows 1–10: Rows 1, 3, 5, 7 and 9 give 1 sc each (5 sc). Rows 2, 4, 6, 8 and 10 give 3 sc each (15 sc). (20 sc)
- Bottom of Tier 3, outer section: 3 sc in the corner st of Row 11, sc in each of next 11 sts. (14 sc)
- Trunk side, down: Row T1 gives 1 sc, Row T2 gives 2 sc, Row T3 gives 1 sc. (4 sc)
- Trunk bottom: 3 sc in first st, sc in next 5 sts, 3 sc in last st. (11 sc)
- Trunk side, up: Rows T3, T2 and T1 give 1, 2 and 1 sc. (4 sc)
- Bottom of Tier 3, other outer section: Sc in each of next 11 sts, 3 sc in corner st. (14 sc)
- Second side, up the row ends of Rows 10–1: Same as step 2. (20 sc)
Sl st in the first sc of the round. Round total: 98 sc
Check: 11 + 20 + 14 + 4 + 11 + 4 + 14 + 20 = 98.
Why the math works:
– A tr is about three sc rows tall, so 3 sc per tr row end keeps the sides flat without ruffling.
– Each tier side is 1 + 3 + 1 = 5 sc for 5 rows’ worth of height.
– Row 11’s 31 stitches are fully used: 12 + 7 + 12, and the 7 trunk stitches carry the trunk.
– No corner is counted twice. The 3-sc corners are worked into Row 11’s own end stitches, and Row 11’s row end gets no separate sc.
Tip and Hanging Loop
You are now at the first sc of the round, at the top corner where you started.
- Ch 8 to make the first side of the tip triangle.
- Ch 24, then sl st in the 24th ch from hook to close the hanging loop.
- Ch 8 to make the second side of the tip triangle.
- Sl st in the 11th sc of the round, which is the opposite top corner.
Fasten off.
The two ch-8 sides and the top arc form a small open triangle about 0.75 in (1.9 cm) tall. The loop hangs about 1.75 in (4.4 cm) above the tip.
Final size check: 4.5 in (11.4 cm) wide × 5.25 in (13.3 cm) tall, not counting the loop.
Final Blocking
- Weave in all ends along the border sc so they don’t show through the open spaces.
- Mist the ornament until it is evenly damp, or soak it briefly and press out the water in a towel.
- Lay it RS up on the blocking mat.
- Pin the trunk straight first: 1.25 in (3.2 cm) wide, square corners.
- Pin the three tier corners on each side so the tree is symmetrical. The bottom tier should be 4.5 in (11.4 cm) across.
- Pin each bottom arc into a gentle curve, then nudge every spoke straight and evenly spaced.
- Pin the tip point so the triangle sides are taut and the total height is 5.25 in (13.3 cm).
- Open up both gaps between tiers with a pin in the middle of each.
- If you like, apply stiffener or starch now for crisper spokes.
- Let it dry completely before you unpin it.
Final Quality-Control Checklist
- Spoke counts are 6, 8 and 11 from top to bottom.
- Arc counts are 16, 22 and 31 sc. The tier tops are 11, 15 and 21 sc.
- Both gaps between tiers are open, with a tr post on each side.
- The trunk is centered, with 12 sc of Row 11 free on each side.
- The border totals 98 sc, with 20 sc on each side.
- The tip triangle is symmetrical, and the hanging loop is closed securely.
- No ends show in the open spaces.
- The ornament measures 4.5 in × 5.25 in (11.4 cm × 13.3 cm).
Troubleshooting
- Spokes lean to one side: You may have missed a sk 1 or put the last tr in the wrong place. Count your sps (5, 7 or 10) before you turn.
- Tier won’t curve: Check that you put 2 sc in every ch-2 sp on Rows 3, 7 and 11.
- Gap collapses or puckers: Your bridge chains are too tight. Loosen them, or chain with a hook 0.5 mm larger, then switch back.
- Gap sags too much: Spread the sc firmly over the chain on Rows 5 and 9 so the chain gathers to fit.
- Sides ruffle: Work 2 sc per tr row end instead of 3, and block firmly.
- Sides pull in: Check that every tr row end got its full 3 sc.
- Trunk is off-center: Before joining, count 12 free sc on each side.
- Floppy tip: Pull the ch-8 sides snug and pin them during blocking. Stiffener helps too.
Care
Hand wash in cool water, press dry in a towel and re-block flat. Store the ornament flat between tissue paper so the spokes stay straight.
Final Notes
Every measurement comes from the gauge, 6 sc per 1 in (2.5 cm):
- Tier 1 is 16 sc, about 2.5 in (6.4 cm).
- Tier 2 is 22 sc, about 3.5 in (8.9 cm).
- Tier 3 is 31 sc, about 4.25 in (10.8 cm).
- The trunk takes the center 7 of Tier 3’s 31 stitches.
- The 98-sc border brings the tree to 4.5 in × 5.25 in (11.4 cm × 13.3 cm).
- The ch-8 triangle and ch-24 hanging loop finish the tip.
If your first tree hits these checkpoints, every tree after it will match.
Happy crocheting!