

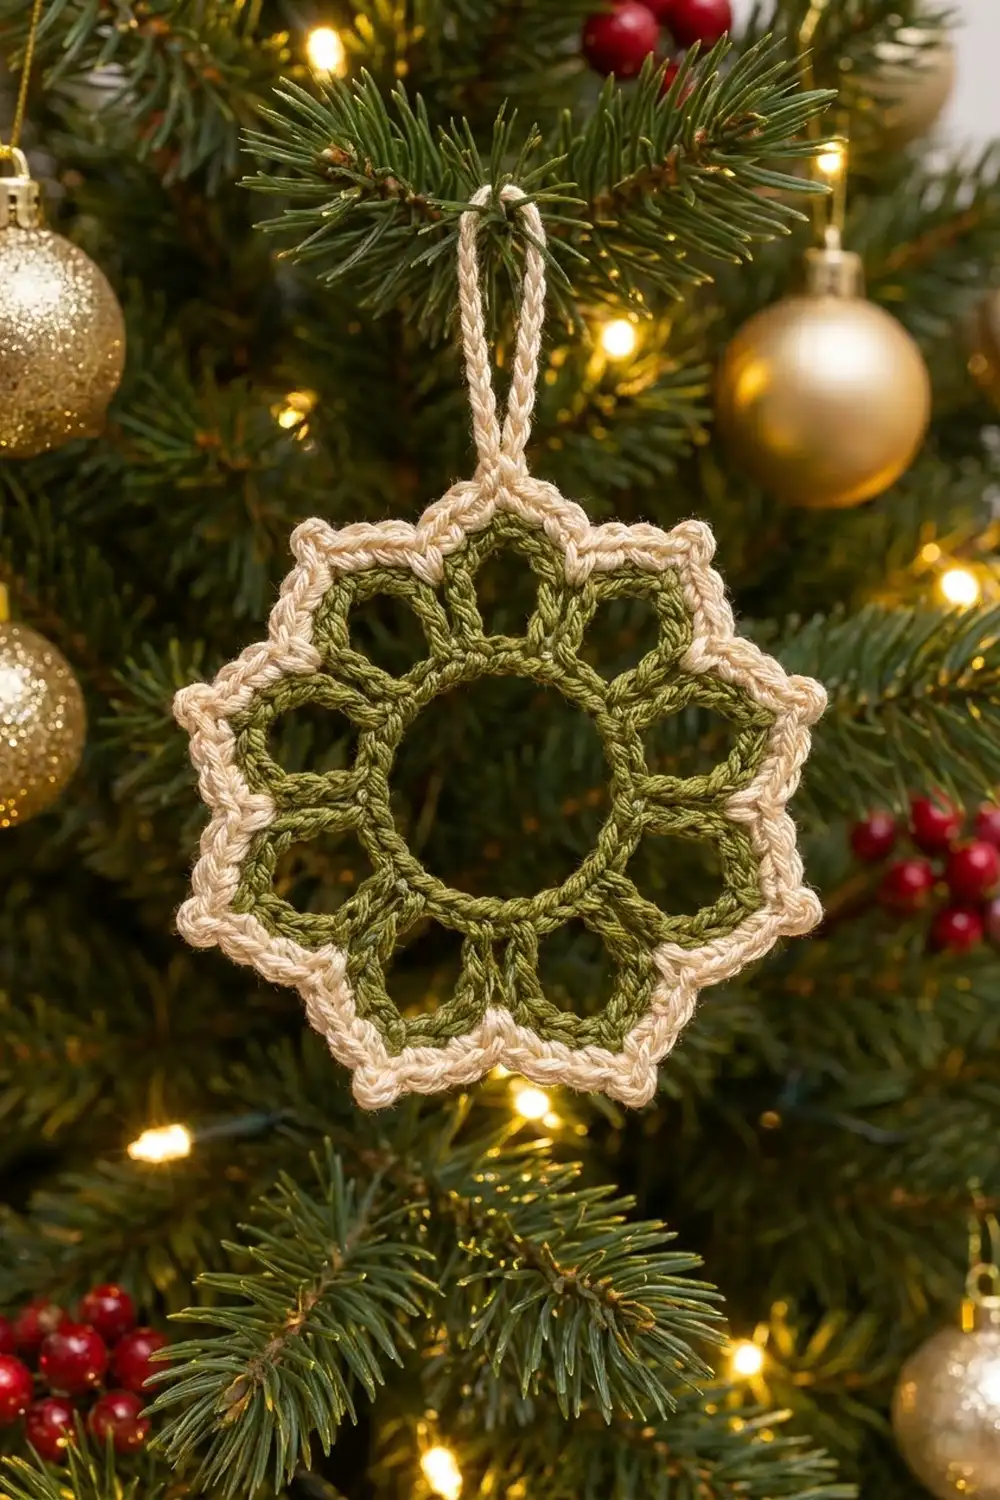
The Evergreen Lace Star is a small openwork ornament with a solid olive ring at its center and ten rounded petal windows around it. A crisp cream border traces the outline and pulls it into a ten-pointed star. At the top, a cream loop lets it hang straight from a branch.
The palette is quiet and classic: olive green for the lace body and warm cream for the edging and hanger. Because the motif is mostly open space, tree lights glow through every petal. That makes it look delicate, but the single-crochet covering keeps it sturdy.
This pattern uses US crochet terms. The finished ornament measures 3.5 in (8.9 cm) from point to point, not counting the hanging loop. The loop adds 1.25 in (3.2 cm) above the top point.
Construction is simple. You make a chain ring, cover it with single crochet, chain ten petal loops, cover each loop with single crochet, then add two cream border rounds and the hanging loop. The ornament is one piece worked in the round, and the only joining is the color change.
Finished Size and Construction
- Finished size: 3.5 in (8.9 cm) point to point; 4.75 in (12.1 cm) tall including the hanging loop
- Skill level: Easy–Intermediate (thread work, simple decreases)
- Terminology: US crochet terms
- Yarn weight: Size 3 cotton crochet thread (similar to light fingering)
- Hook: 2.25 mm (US B-1)
- Number of pieces: 1
- Layout: Single motif worked in the round; no assembly
- Piece size (green body, Rnds 1–3): 2.75 in (7.0 cm) across
- Size before border: 2.75 in (7.0 cm)
- Border depth: 2 rounds, 0.375 in (1.0 cm) per side, adding 0.75 in (1.9 cm) to the total width
Materials
Yarn: Use mercerized cotton crochet thread in size 3. Its tight twist gives the crisp, rope-like stitch definition this lace needs, and it holds its shape after blocking. Avoid fuzzy or very soft yarns, which blur the petal windows.
- Color A, olive green: 6 g, about 16 m (17.5 yd)
- Color B, cream: 8 g, about 22 m (24 yd)
These quantities are for one ornament and include a margin of about 30% for swatching and weaving in ends. One standard ball of each color will make a whole tree’s worth.
Tools:
– 2.25 mm (US B-1) crochet hook
– Fine tapestry needle
– Small sharp scissors
– Stitch marker
– Blocking mat or foam board, plus rustproof pins
– Spray bottle with water (optional: light spray starch)
– Ruler or tape measure
Abbreviations (US Terms)
- ch – chain
- sl st – slip stitch
- sc – single crochet
- sc2tog – single crochet 2 together (decrease)
- sc3tog – single crochet 3 together (double decrease)
- sp – space
- st(s) – stitch(es)
- Rnd – round
Special stitch – sc3tog: (Insert hook in next st, yarn over, pull up a loop) 3 times, so you have 4 loops on the hook. Yarn over and pull through all 4 loops. This turns 3 stitches into 1 and forms the sharp valley between the border points.
Gauge and Checkpoints
Gauge: 16 sc = 2 in (5.1 cm) in Color A with a 2.25 mm hook.
Gauge matters more than usual here because the petal loops are fixed chain lengths. If your sc runs tight, the loops will cup; if it runs loose, they will ruffle. Make one test ornament through Rnd 3 before making a batch.
Checkpoints:
– After Rnd 1: The center opening is 1 in (2.5 cm) across and the ring’s outer edge is 1.25 in (3.2 cm).
– After Rnd 2: The motif with its loops is 2.4 in (6.1 cm) across when laid flat.
– After Rnd 3: The green body is 2.75 in (7.0 cm) across and lies flat.
– After Rnd 4: 3.25 in (8.3 cm) point to point.
– After Rnd 5: 3.5 in (8.9 cm) point to point.
If it’s too big: Go down to a 2.0 mm hook, or tighten your tension on the covering rounds (Rnds 1 and 3).
If it’s too small or cupping: Go up to a 2.5 mm hook, or loosen your chains in Rnd 2. Tight chains are the most common cause of cupping.

Pattern: Green Lace Body (Color A)
Rnd 1 – Center Ring
With Color A, ch 24 and sl st to the first ch to form a ring. Don’t twist the chain.
Ch 1 (does not count as a st). Work 30 sc into the center of the ring, covering the chain completely. Sl st to the first sc to join.
Stitch count: 30 sc.
The 30 sc over a 24-ch ring pack the chain so it lies flat and makes the solid, rope-like center ring. Push the stitches together as you go so they cover the chain evenly. Check that the center opening is 1 in (2.5 cm) across.
Rnd 2 – Petal Loops
Ch 1. Sc in next sc, ch 10, skip next 2 sc. Repeat from * 9 more times. Sl st to the first sc to join.
Stitch count: 10 sc and 10 ch-10 loops.
Check the math: each repeat uses 3 sc of Rnd 1 (1 worked into, 2 skipped), and 10 repeats × 3 = 30 sc. Lay the piece flat and spread the loops evenly. It should measure about 2.4 in (6.1 cm) across.
Rnd 3 – Covering the Petals
Sl st into the first ch-10 loop. Ch 1. Work 13 sc into the ch-10 loop, covering the chain. Repeat from * in each of the remaining 9 loops. Don’t work into the sc between loops; just carry the thread across behind it. Sl st to the first sc to join.
Stitch count: 130 sc (13 sc per petal × 10 petals).
This is a conversion round. It covers 10 chains with 13 sc, which is 10 sc (one per chain) plus 3 extra. The extras let each loop round out into a petal instead of pulling into a straight line. Neighboring petals meet at their bases over the skipped Rnd 2 sc, which makes the touching window outlines you see in the finished piece.
Fasten off Color A. The green body should measure 2.75 in (7.0 cm) across.
Numbering: In each petal, number the sc from 1 to 13, counting counterclockwise. The 7th sc is the petal tip. Place a marker in the 7th sc of any petal.
Border (Color B)
Border Gauge
The border uses the same 16 sc = 2 in (5.1 cm). Each border round adds about 0.1875 in (0.5 cm) per side, so 2 rounds give 0.375 in (1.0 cm) per side. That brings 2.75 in (7.0 cm) up to 3.5 in (8.9 cm).
Because this is a round, ten-pointed piece, a “side” here is one petal section. Each section is 13 stitches plus 1 ch-2 point space.
Rnd 4 – First Border Round (Points Formed)
Join Color B with a sl st in the marked 7th sc (the petal tip). Ch 1.
Work (sc, ch 2, sc) in the tip sc. Sc in sts 8–12. Sc2tog over st 13 of this petal and st 1 of the next petal. Sc in sts 2–6 of the next petal. Move on to that petal’s 7th sc and repeat from * 9 more times. Sl st to the first sc to join.
Per section: You use 13 sts (1 tip + 5 + 2 + 5). You make 2 + 5 + 1 + 5 = 13 sc plus 1 ch-2 sp.
Stitch count: 130 sts + 10 ch-2 sps. As a conversion round, that is 130 sts worked one per stitch, plus 10 extra sc at the points, minus 10 sts taken out by the sc2tog valleys.
The increase at each tip and the decrease in each valley shape the star outline while keeping the total at 130 sts. Check: 3.25 in (8.3 cm) point to point.
Rnd 5 – Second Border Round (Points Sharpened)
Sl st into the first ch-2 sp. Ch 1.
Work (sc, ch 2, sc) in the ch-2 sp. Sc in the next 5 sts. Sc3tog over the next 3 sts (the sc before the valley, the sc2tog, and the sc after it). Sc in the next 5 sts. Repeat from * 9 more times. Sl st to the first sc to join. Don’t fasten off.
Why the math works: Between two ch-2 sps in Rnd 4 there are 13 sts: 1 + 5 + sc2tog + 5 + 1. Rnd 5 uses 5 + 3 + 5 = 13 of them. It makes 2 + 5 + 1 + 5 = 13 sc plus 1 ch-2 sp.
Stitch count: 130 sts + 10 ch-2 sps.
Stacking the sc3tog directly on the Rnd 4 sc2tog deepens each valley, and the stacked (sc, ch 2, sc) sharpens each point. Check: 3.5 in (8.9 cm) point to point.
Hanging Loop
You should now be at the first ch-2 sp. Sl st into that ch-2 sp. Ch 20, then sl st back into the same ch-2 sp to form the loop.
Turn. Work 28 sc into the ch-20 loop, covering it completely, and sl st into the ch-2 sp at the base. That is 20 sc (one per chain) plus 8 extra, so the covered loop curves smoothly instead of kinking.
Fasten off, leaving a 6 in (15.2 cm) tail. The hanging loop stands 1.25 in (3.2 cm) above the top point.
Weave in all ends inside the covered sc of the border and body. Don’t weave across the open windows.
Final Blocking
- Wet the ornament fully in cool water, then gently press it in a towel. Don’t wring it.
- Pin the center opening first so it is a true circle, 1 in (2.5 cm) across. A round object such as a marker cap or wine cork helps.
- Pin the 10 border points so they are evenly spaced and 3.5 in (8.9 cm) apart across the diameter. Pins should sit on a circle of 1.75 in (4.4 cm) radius around the center.
- Use one pin to pull each petal window open into an even, rounded shape.
- Pin the hanging loop straight up from its point.
- For a crisp finish, mist lightly with spray starch.
- Leave it to dry completely, usually 6–12 hours, before you unpin it.
Final Quality-Control Checklist
- [ ] Center opening is round and about 1 in (2.5 cm) across.
- [ ] All 10 petal windows are open and the same size.
- [ ] Rnd 3 has 13 sc per petal, 130 total.
- [ ] Rnds 4 and 5 each have 130 sts + 10 ch-2 sps.
- [ ] All 10 points are sharp and evenly spaced.
- [ ] Each valley sits exactly where two petals meet.
- [ ] Finished width is 3.5 in (8.9 cm) point to point.
- [ ] Hanging loop is 1.25 in (3.2 cm) tall, fully covered, and centered on a point.
- [ ] All ends are woven in invisibly and trimmed.
- [ ] The ornament hangs flat without twisting.
Troubleshooting
The motif cups like a bowl. The Rnd 2 chains are too tight. Redo Rnd 2 with looser chains or go up one hook size just for the chains.
Petals ruffle or flip. Your chains are too loose for 13 sc. Work 12 sc per loop instead. Then Rnds 4 and 5 become 12 sts per section, worked as tip (sc, ch 2, sc), 4 sc, dec, 5 sc. The extra st in the second run of sc keeps the count at 12 per section.
The chain ring shows through Rnd 1. Push the sc closer together, or add 1–2 sc. Then ease the Rnd 2 skips so the count still comes out even: work 32 sc and skip 2 sc twice in the round where it fits.
The points are rounded, not sharp. Make sure the Rnd 5 (sc, ch 2, sc) goes into the ch-2 sp, not into a stitch. Then starch while blocking.
The valleys sit off-center. You started Rnd 4 somewhere other than a tip. Pull it back and rejoin in the 7th sc of a petal.
The hanging loop twists. Make sure the ch-20 isn’t twisted before you sl st it closed. Block the loop flat.
Care
Hand wash in cool water with mild soap, press it dry in a towel, and reshape it flat to dry. Store the ornament flat between tissue paper so the points keep their shape.
Final Notes
This ornament is one piece built on a short measurement chain. A 1 in (2.5 cm) center opening grows to 2.4 in (6.1 cm) with the petal loops, and the covered green body reaches 2.75 in (7.0 cm). The first cream round brings it to 3.25 in (8.3 cm), and the second finishes at 3.5 in (8.9 cm), with a 1.25 in (3.2 cm) hanging loop on top.
The stitch counts stay balanced from start to finish. You have 30 sc in the ring, 10 loops, and 13 sc per petal for 130 sts. Both border rounds also hold steady at 130 sts plus 10 points. If your piece measures right at each checkpoint, the star will come out the right shape.
Make one, check your gauge, then make a whole flurry for the tree, gift tags or garlands of your own.
Happy crocheting!