

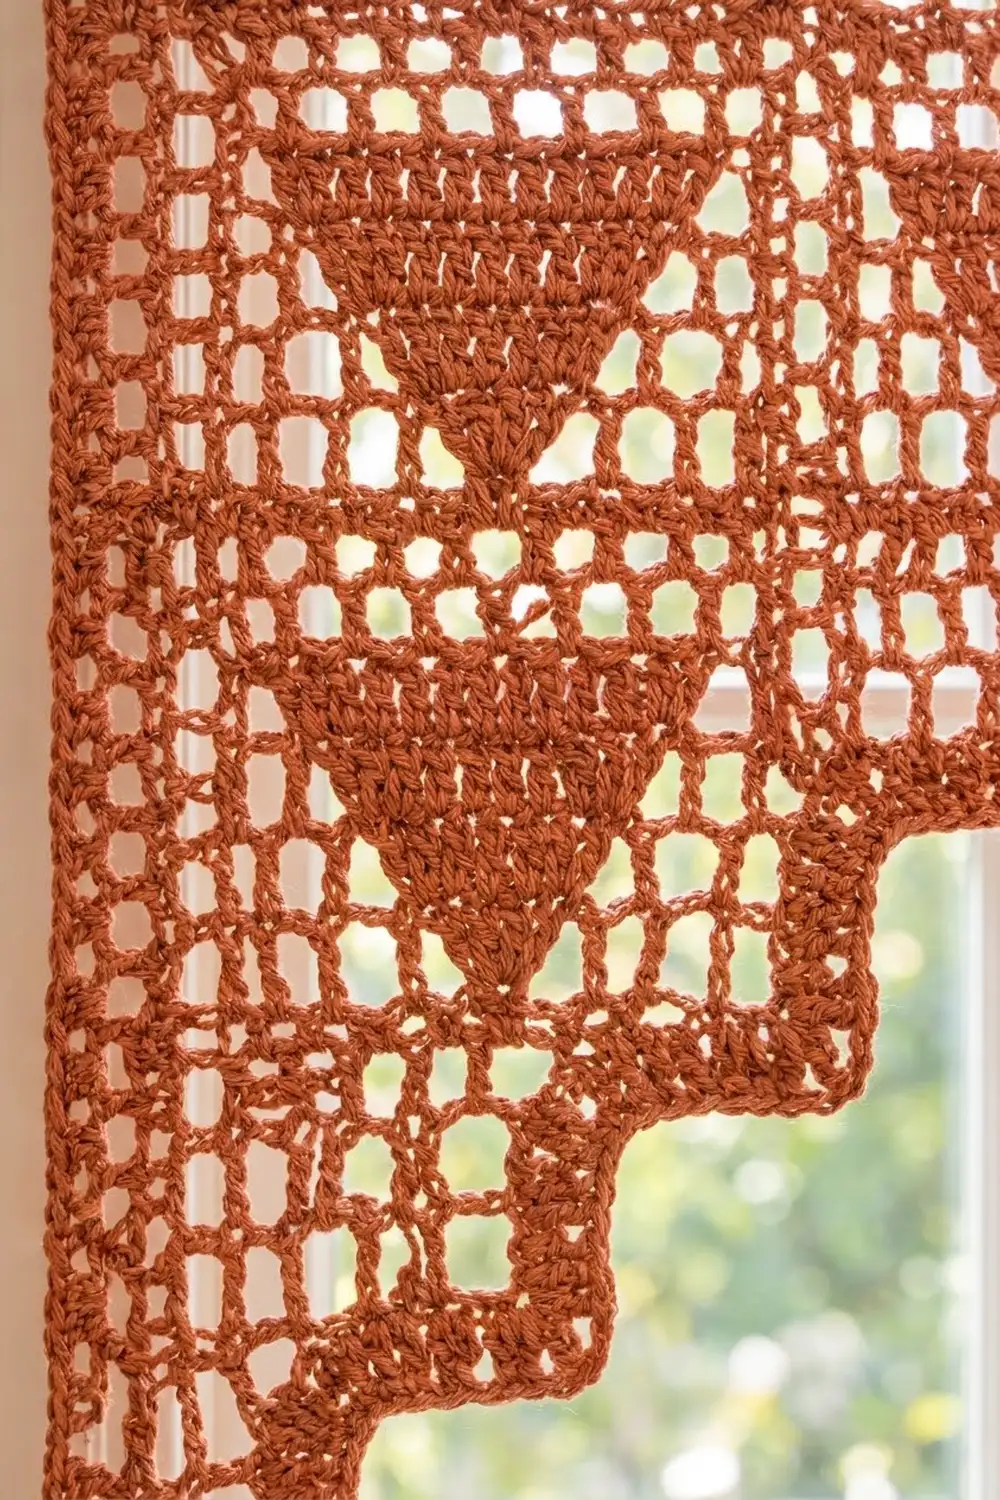
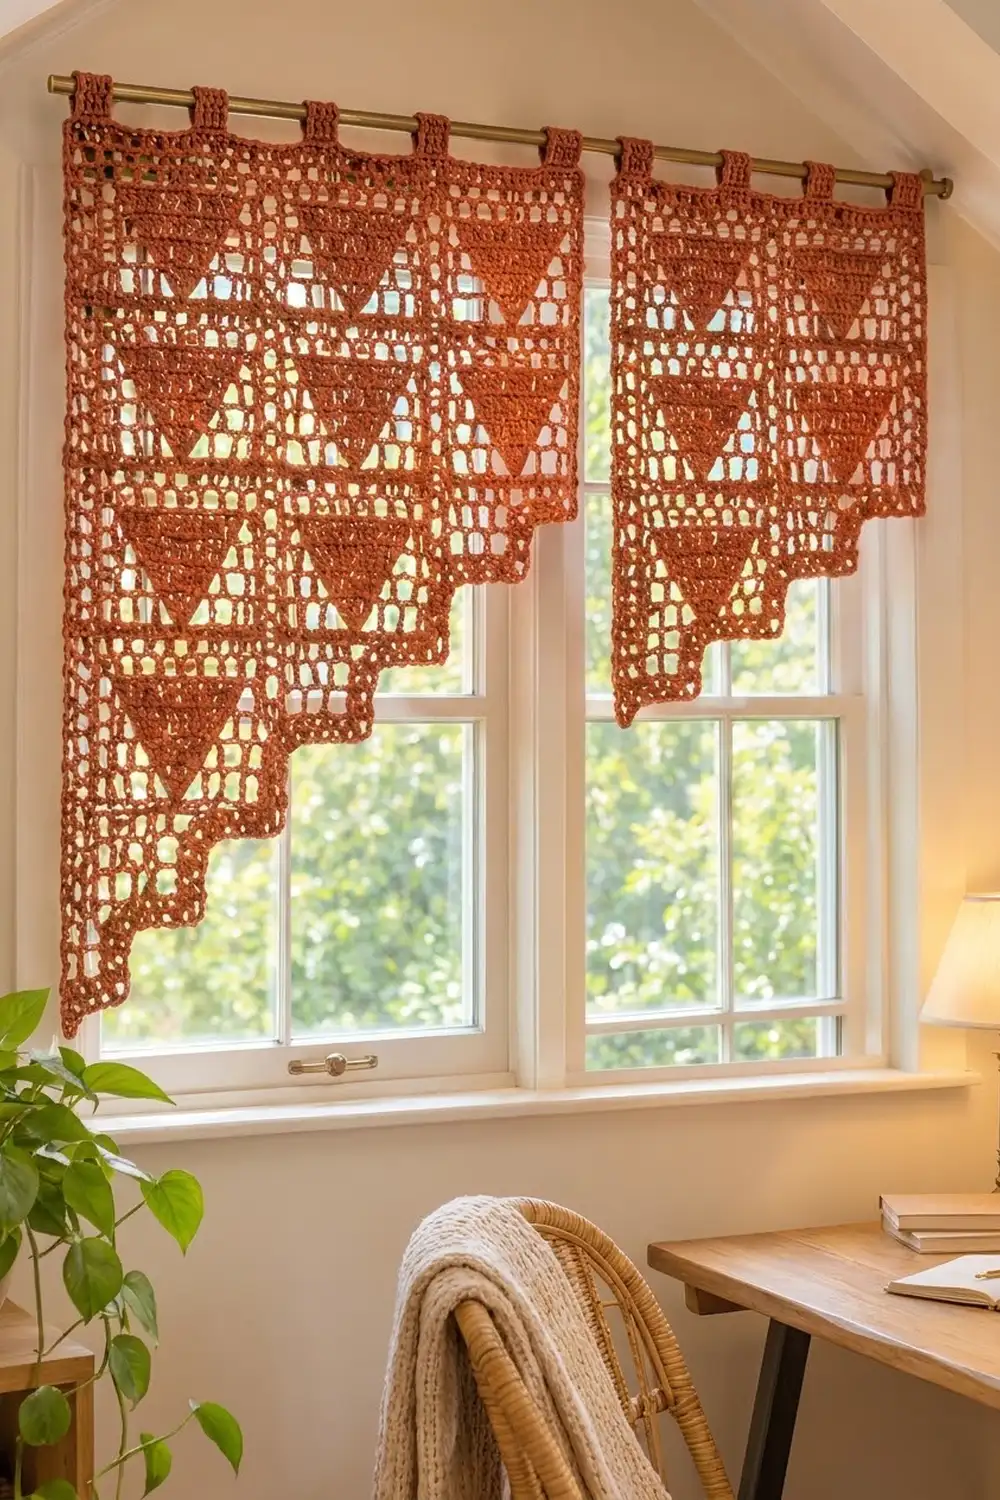
This café curtain pair is open filet mesh with solid triangles that point downward. The triangles sit in tidy columns, and each column stops one tier shorter than the one before it, so the bottom edge steps down toward the outer side. In a window, the light comes through the mesh and the triangles stay solid.
The design uses one warm terracotta yarn throughout. The look is modern boho: geometric, light, and simple. All instructions use US crochet terms.
The left panel measures 25 in wide x 26 in long (63.5 x 66.0 cm) before the border. The right panel measures 17 x 20 in (43.2 x 50.8 cm). With the single crochet border, the finished sizes are 25.5 x 26.5 in (64.8 x 67.3 cm) and 17.5 x 20.5 in (44.5 x 52.1 cm), plus tab loops on top.
Each panel is worked flat from the top down in filet mesh. You make the steps by stopping rows short. A single round of sc edges each panel, and then short sc tabs are sewn along the top edge.
Finished Size and Construction
- Finished size: Left panel 25.5 x 26.5 in (64.8 x 67.3 cm); right panel 17.5 x 20.5 in (44.5 x 52.1 cm), plus 2 in (5.1 cm) tab loops
- Skill level: Easy-intermediate
- Terminology: US
- Yarn weight: Bulky (#5) cotton or cotton blend
- Hook: 6 mm (J-10)
- Number of pieces: 2 panels + 9 tabs (5 on the left panel, 4 on the right)
- Layout: Two panels hung side by side, not joined to each other
- Piece size (before border): Left 25 x 26 in (63.5 x 66.0 cm); right 17 x 20 in (43.2 x 50.8 cm)
- Grid: 1 filet square = 1 x 1 in (2.5 x 2.5 cm); left panel is 25 squares wide, right panel is 17 squares wide
- Border depth: 1 round of sc, 0.25 in (0.6 cm)
Materials
Choose a smooth bulky cotton or cotton-acrylic yarn. Cotton hangs straight, keeps the squares crisp, and doesn’t fade much in sun. Avoid fuzzy yarns, because they blur the mesh.
- Terracotta: 700 g total, about 770 m (based on 100 g = 110 m). That is about 430 g / 473 m for the left panel and about 270 g / 297 m for the right panel, tabs included.
- 6 mm (J-10) crochet hook
- Tapestry needle
- 4 locking stitch markers
- Rust-proof pins and a blocking surface
- Tape measure
These quantities include a margin of about 10% for swatching and blocking differences.
Abbreviations (US Terms)
- ch = chain
- sc = single crochet
- dc = double crochet
- sk = skip
- st(s) = stitch(es)
- sp = space
- RS / WS = right side / wrong side
Special stitches:
- Mesh (open square): ch 2, sk 2 sts (or the ch-2 sp), dc in next dc.
- Block (solid square):
- Over a mesh below: 2 dc in the ch-2 sp, dc in next dc.
- Over a block below: dc in each of the next 3 dc.
- Every square uses 3 sts plus the dc it shares with its neighbor. A row of N squares therefore has 3N + 1 sts.
Gauge and Checkpoints
Filet gauge: 4 squares and 4 rows = 4 x 4 in (10.2 x 10.2 cm), so 1 square = 1 in (2.5 cm) wide and tall.
Sc gauge: 3 sc and 4 rows = 1 in (2.5 cm).
Test one piece first. Ch 32 and work one 9-square column for 6 rows: one triangle (Rows A–D below) followed by 2 mesh rows. It should measure 9 x 6 in (22.9 x 15.2 cm).
- If the test piece is too big: go down one hook size.
- If it is too small: go up one hook size.
- If the width is right but the height is short: pull each dc up a little taller rather than changing hooks.
Checkpoints:
- Left panel after Row 2: 25 in (63.5 cm) wide
- Right panel after Row 2: 17 in (43.2 cm) wide
- After Row 14: 14 in (35.6 cm) long
- After Row 20: 20 in (50.8 cm) long
- Left panel after Row 26: 26 in (66.0 cm) long
Triangle Row Key
Every triangle column is 9 squares wide. The 7 triangle squares sit in the middle, with one mesh square on each side. Neighboring columns share their separating mesh square. Read each row as listed from the start of the row.
3 columns (25 squares):
– Row A: 1 mesh, 7 block, 1 mesh, 7 block, 1 mesh, 7 block, 1 mesh
– Row B: 2 mesh, 5 block, 3 mesh, 5 block, 3 mesh, 5 block, 2 mesh
– Row C: 3 mesh, 3 block, 5 mesh, 3 block, 5 mesh, 3 block, 3 mesh
– Row D: 4 mesh, 1 block, 7 mesh, 1 block, 7 mesh, 1 block, 4 mesh
2 columns (17 squares):
– Row A: 1 mesh, 7 block, 1 mesh, 7 block, 1 mesh
– Row B: 2 mesh, 5 block, 3 mesh, 5 block, 2 mesh
– Row C: 3 mesh, 3 block, 5 mesh, 3 block, 3 mesh
– Row D: 4 mesh, 1 block, 7 mesh, 1 block, 4 mesh
1 column (9 squares):
– Row A: 1 mesh, 7 block, 1 mesh
– Row B: 2 mesh, 5 block, 2 mesh
– Row C: 3 mesh, 3 block, 3 mesh
– Row D: 4 mesh, 1 block, 4 mesh
Each line adds up to its full square count. Because the triangles are symmetrical, the rows read the same in either direction.
Turning chains:
- If a row begins with a mesh: ch 5 (counts as dc + ch 2), then dc in the next dc.
- If a row begins with a block: ch 3 (counts as dc), work 2 dc, then dc in the next dc.
- Work the last dc of every row into the 3rd ch of the turning chain.
Left Panel
Foundation: Ch 80.
Row 1 (WS):
– Dc in the 8th ch from the hook. The skipped chains count as the first dc and ch-2 sp.
– *Ch 2, sk 2 ch, dc in next ch; repeat from * across.
– Count: 25 squares = 76 sts (26 dc + 25 ch-2 sps).
– Turn, and mark the other side as RS.
Row 2 (RS): Mesh across. (76 sts)
Tier 1:
– Rows 3–6: Work 3-column Rows A, B, C, D. (76 sts each row)
– Rows 7–8: Mesh across. (76 sts each row)
Tier 2:
– Rows 9–12: Work 3-column Rows A–D. (76 sts)
– Rows 13–14: Mesh across. (76 sts)
– Checkpoint: 14 in (35.6 cm) long.
First step, Row 15 (WS):
– Work 2-column Row A over the first 17 squares only. The last dc goes into the dc shared by squares 17 and 18.
– Turn, leaving the remaining 8 squares (24 sts) unworked.
– Count: 17 squares = 52 sts.
– With RS facing, the unworked section is at the right-hand edge.
Tier 3:
– Rows 16–18: Work 2-column Rows B, C, D. (52 sts each row)
– Rows 19–20: Mesh across. (52 sts each row)
– Checkpoint: 20 in (50.8 cm) long.
Second step, Row 21 (WS):
– Work 1-column Row A over the first 9 squares.
– Turn, leaving 8 squares (24 sts) unworked.
– Count: 9 squares = 28 sts.
Tier 4:
– Rows 22–24: Work 1-column Rows B, C, D. (28 sts each row)
– Rows 25–26: Mesh across. (28 sts each row)
– Fasten off.
The left panel is 26 in (66.0 cm) long at the outer edge, 20 in (50.8 cm) at the middle column, and 14 in (35.6 cm) at the right column. Each step is 8 in (20.3 cm) wide. The bottom column is 9 in (22.9 cm) wide.
Right Panel
Foundation: Ch 56.
Row 1 (WS):
– Dc in the 8th ch from the hook, *ch 2, sk 2 ch, dc in next ch; repeat from * across.
– Count: 17 squares = 52 sts (18 dc + 17 ch-2 sps).
Row 2: Mesh across. (52 sts)
Tier 1:
– Rows 3–6: Work 2-column Rows A–D. (52 sts)
– Rows 7–8: Mesh across. (52 sts)
Tier 2:
– Rows 9–12: Work 2-column Rows A–D. (52 sts)
– Rows 13–14: Mesh across. (52 sts)
Step, Row 15 (WS):
– Work 1-column Row A over the first 9 squares.
– Turn, leaving 8 squares unworked.
– Count: 28 sts.
Tier 3:
– Rows 16–18: Work 1-column Rows B–D. (28 sts)
– Rows 19–20: Mesh across. (28 sts)
– Fasten off.
The right panel is 20 in (50.8 cm) long at its outer edge and 14 in (35.6 cm) at the right column.
Make All Pieces
All pieces are in Terracotta:
- 1 left panel (25 squares wide, 26 rows)
- 1 right panel (17 squares wide, 20 rows)
- 9 tabs (instructions below)
Tab (make 9):
– Ch 7.
– Row 1: Sc in the 2nd ch from the hook and in each ch across. (6 sc)
– Rows 2–16: Ch 1, turn, sc in each sc across. (6 sc)
– Fasten off, leaving a 12 in (30.5 cm) tail.
– Each tab is 2 x 4 in (5.1 x 10.2 cm).
Layout on the rod (RS facing, T = tab):
T   T   T   T   T        T  T  T  T
[ LEFT 25 squares ]      [ RIGHT 17 ]
[ ▼    ▼    ▼     ]      [ ▼    ▼   ]
[ ▼    ▼    ▼     ]      [ ▼    ▼   ]
[ ▼    ▼    ]            [ ▼  ]
[ ▼  ]
Joining: Tabs to Panels
The two panels are never joined to each other. The only joining is sewing the tabs on. You count tab positions on border stitches, so complete the Border first, then come back here.
Tab method:
1. Fold a tab in half.
2. Sandwich the panel’s top border between the two short ends, with one end on the RS and one end on the WS.
3. Whipstitch each end’s 6 sts to the 6 border sc at that tab’s position, sewing through all layers.
The loop is about 2 in (5.1 cm) deep and fits a rod up to 1 in (2.5 cm) thick.
Tab positions: Count the top edge from the center sc of one corner to the center sc of the other.
– Left panel (78 sts): tabs on sts 1–6, 19–24, 37–42, 55–60, and 73–78. That gives gaps of 12 sts: 6 + 12 + 6 + 12 + 6 + 12 + 6 + 12 + 6 = 78.
– Right panel (52 sts): tabs on sts 1–6, 17–22, 31–36, and 47–52. That gives gaps of 10, 8, and 10: 6 + 10 + 6 + 8 + 6 + 10 + 6 = 52.
Tension: Sew firmly but don’t pull. The top edge should stay at 25.5 in (64.8 cm) and 17.5 in (44.5 cm). If it puckers between tabs, loosen the stitches.
Border
Border gauge: 3 sc = 1 in (2.5 cm), along both horizontal and vertical edges.
How to work the edges:
– Horizontal edges: 1 sc per st.
– Foundation edge: 1 sc in the base of each dc and 2 sc in each ch-2 sp.
– Row-end edges: 3 sc around each dc row-end post.
– Outer corners: 3 sc in the corner st.
– Inner corners: no extra sc. Go straight from the riser into the first shelf st.
The counts below are sc between corner groups. Corner groups are listed separately.
Left Panel, Round 1 (RS):
– Top edge: 74 sc between the two corner groups (76 base sts minus the 2 corner sts)
– Outer side: 26 rows x 3 = 78 sc
– Bottom of column 1 (Row 26, 28 sts): 26 sc between corners
– Riser 1 (Rows 21–26): 6 x 3 = 18 sc
– Shelf 1 (Row 20, sts 29–51): 23 sc, then a corner group in st 52
– Riser 2 (Rows 15–20): 18 sc
– Shelf 2 (Row 14, sts 53–75): 23 sc, then a corner group in st 76
– Inner side (Rows 1–14): 42 sc
– Total: 302 sc + 6 corner groups (18 sc) = 320 sc
Join with a sl st and fasten off.
Right Panel, Round 1:
– Top edge: 50 sc
– Outer side: 60 sc
– Bottom of column 1: 26 sc
– Riser (Rows 15–20): 18 sc
– Shelf (Row 14, sts 29–51): 23 sc, then a corner group in st 52
– Inner side: 42 sc
– Total: 219 sc + 5 corner groups (15 sc) = 234 sc
Join with a sl st and fasten off.
Why the math works:
– One square is 3 sts wide and 1 in tall, and the sc gauge is 3 sc per inch. Three sc per square edge therefore matches the fabric exactly in both directions, so the edges don’t ruffle or pull.
– The top count, from corner center to corner center, is 1 + 1 + 74 + 1 + 1 = 78 for the left panel and 52 for the right panel. Those are the numbers the tab spacing uses.
Final Blocking
- Weave in all ends along the dc posts. Don’t weave them through open mesh.
- Soak each panel in cool water for 15 minutes, then press out the water in a towel. Don’t wring.
- Lay the panel flat RS up and pin the four top corners first.
- Pin the left panel to 25.5 in (64.8 cm) wide and the right panel to 17.5 in (44.5 cm) wide.
- Pin each step corner square. Measure the step heights: 14 in (35.6 cm) and 20 in (50.8 cm) on the body, plus the border.
- Straighten the mesh lines so every column runs vertical.
- Leave the panel to dry fully, then unpin and sew on the tabs.
Final Quality-Control Checklist
- [ ] Every row has 76, 52, or 28 sts, as listed
- [ ] Each triangle narrows 7–5–3–1 and is centered in its column
- [ ] There are 2 mesh rows between tiers and a single mesh column between triangles
- [ ] The steps are at the same edge on both panels, each 8 squares wide
- [ ] The borders total 320 sc (left) and 234 sc (right)
- [ ] The tabs are at the listed positions and evenly sewn
- [ ] The blocked sizes match the measurements above
Troubleshooting
- Squares lean or slant: You probably skipped the wrong number of sts. Recount 3 sts per square.
- Triangle is off-center: Check the row line against the key. The number of mesh squares before the first block sets the position.
- The step lands on the wrong side: Rows 15 and 21 must be WS rows. Recheck your RS marker.
- The border ruffles: Use 2 sc per row-end instead of 3, and go down a hook size for the border only.
- The border cups inward: Go up a hook size for the border.
- The panel hangs short: Block it longer, or work 1–2 more mesh rows at the bottom of the longest column before the border.
- The tabs twist: Line up both tab ends exactly front to back before sewing.
Care
Hand wash in cool water with mild soap, press out the water, and dry flat. Reshape the squares while the panel is damp.
Final Notes
The measurement chain:
- One square = 1 in (2.5 cm).
- The left panel is 25 squares wide and 26 rows long: 25 x 26 in (63.5 x 66.0 cm). The right panel is 17 x 20 in (43.2 x 50.8 cm).
- Each step drops 8 squares (8 in / 20.3 cm) every 6 rows.
- A 0.25 in (0.6 cm) sc border brings the panels to 25.5 x 26.5 in (64.8 x 67.3 cm) and 17.5 x 20.5 in (44.5 x 52.1 cm).
- Tabs go on at 78 and 52 counted top sts.
Check your gauge first, and everything after it will fit.
Happy crocheting!