

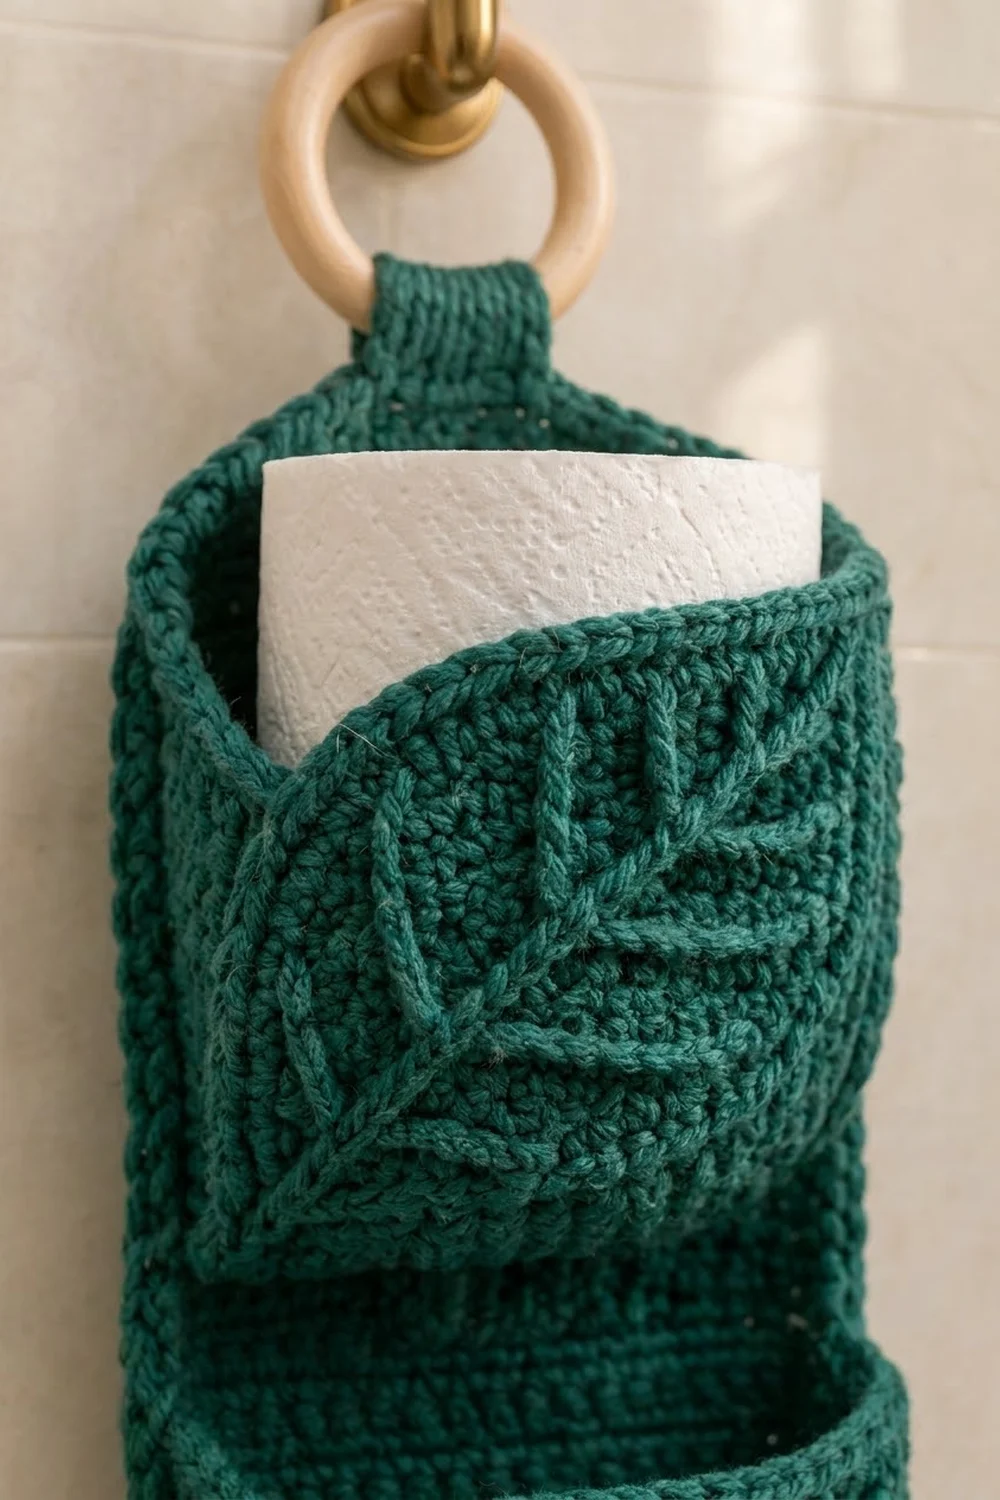
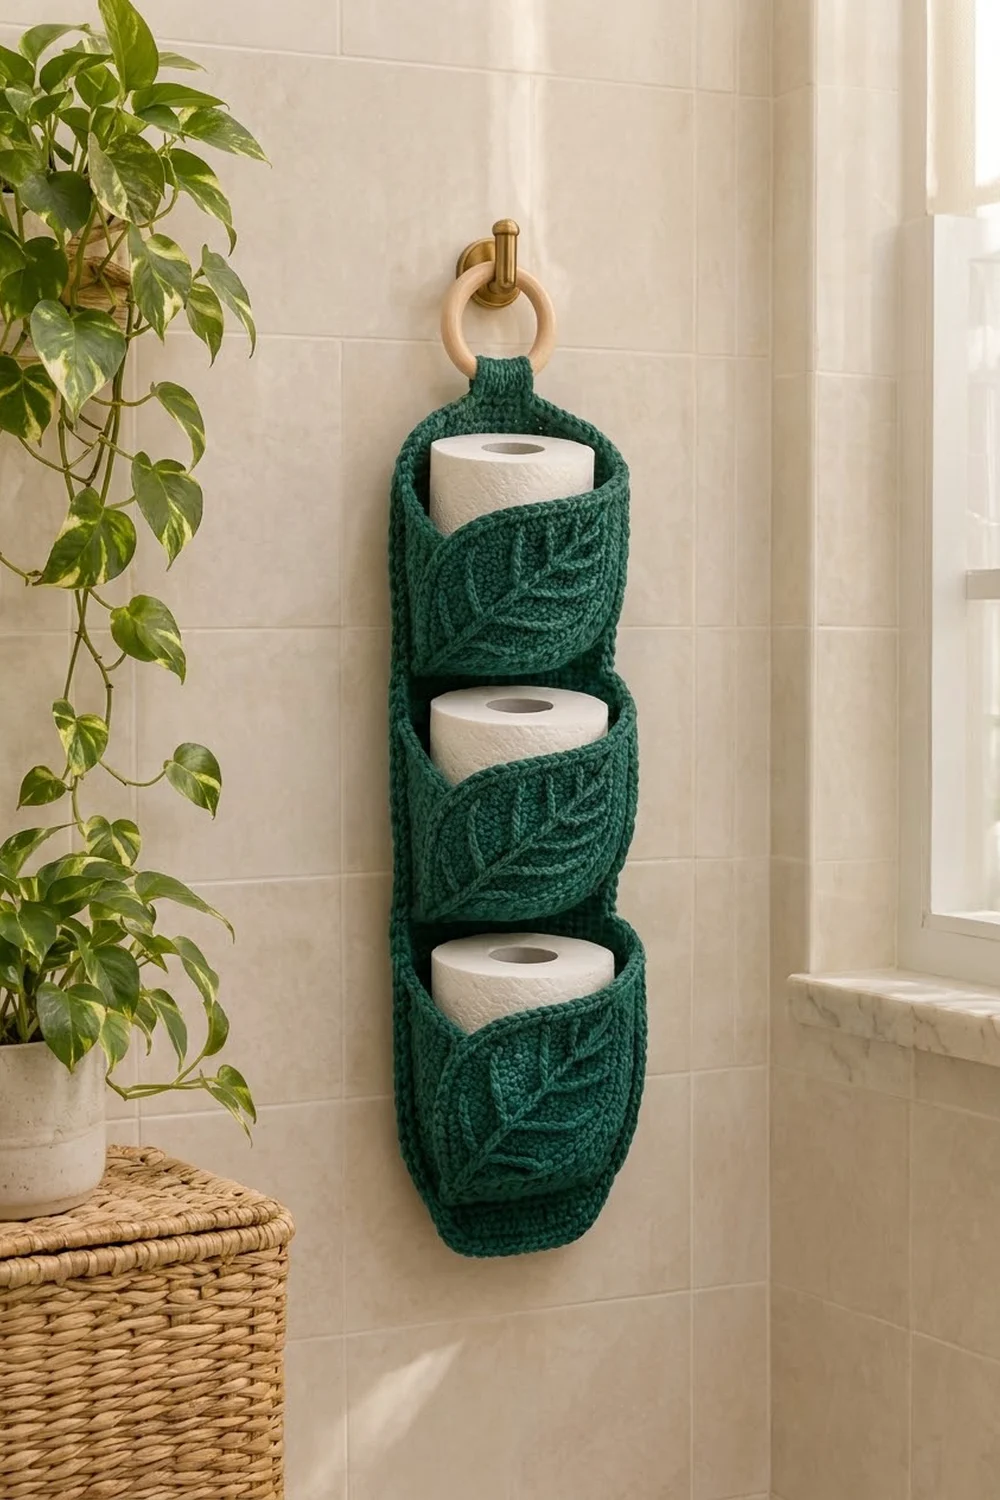
The Evergreen Leaf holder is a slim wall organizer that keeps three spare rolls tidy and in reach. A tall back panel hangs from a wooden ring, and three round-bottomed pockets are stacked down its front. The front of each pocket rises into a leaf with a raised vein pattern.
The sample uses one deep teal-green yarn. Because there’s only one color, the texture does the decorating: dense single crochet, a corded reverse single crochet edge, and slip-stitch veins worked on the surface. It looks botanical and calm, and it suits a bathroom with plants, wood, and brass.
This pattern uses US crochet terms. The finished holder measures 6 in (15.2 cm) wide and 19 in (48.3 cm) long, not counting the hanging tab and ring. Each pocket holds a standard roll up to about 4.25 in (10.8 cm) across.
Here’s the construction in short. You crochet a rectangular back panel in rows, then three pockets in the round. Each pocket starts with a flat circle, adds a short wall, and finishes with leaf rows worked over the front half. The veins are surface crochet. You sew the pockets on stitch-to-stitch, add a two-round border to the panel, attach the tab and ring, and block.
Finished Size and Construction
- Finished size: 6 in × 19 in (15.2 × 48.3 cm), plus the tab and ring
- Skill level: Intermediate
- Terminology: US
- Yarn weight: Worsted (#4), cotton or a cotton blend
- Hook: 5.0 mm (H-8)
- Number of pieces: 5 (1 back panel, 3 pockets, 1 tab)
- Layout: pockets stacked in a single column, centered on the panel
- Panel before border: 5 in × 18 in (12.7 × 45.7 cm)
- Border depth: 0.5 in (1.3 cm) on every side
- Pocket: base 4.75 in (12.1 cm) across; front about 3.75 in (9.5 cm) tall
Materials
Yarn: Use a worsted-weight cotton or cotton blend. It holds its shape under the weight of a roll and handles bathroom humidity well. Pure acrylic works too, but it stretches more, so the pockets may sag over time.
- Deep teal green: 200 g, about 340 m (372 yd)
Tools:
– 5.0 mm (H-8) crochet hook
– Tapestry needle
– 4 locking stitch markers
– Wooden ring, 3 in (7.6 cm) outer diameter
– Rust-proof pins
– Scissors
– Blocking mat and spray bottle
The yarn quantity includes a margin of about 15% for your gauge swatch, surface veins, and seaming.
Abbreviations (US Terms)
- ch: chain
- sc: single crochet
- sl st: slip stitch
- inc: 2 sc in the same stitch
- sc2tog: single crochet 2 together (removes 1 stitch)
- sc3tog: single crochet 3 together (removes 2 stitches)
- BLO: back loop only
- rev sc: reverse single crochet (crab stitch)
- st(s): stitch(es)
- RS / WS: right side / wrong side
Surface slip stitch: Hold the yarn behind the fabric. Insert the hook from front to back between stitches, pull up a loop, then insert the hook one stitch or row further along. Pull up a new loop and draw it through the loop on the hook. This leaves a raised chain on the front.
Gauge and Checkpoints
Gauge: 16 sc × 18 rows = 4 in (10.2 cm) square, which works out to 4 sts and 4.5 rows per inch.
Make one pocket first, before starting the panel. It uses every technique in the pattern and will tell you whether your gauge holds when worked in the round.
Checkpoints:
– Pocket base, after Rnd 10: 4.75 in (12.1 cm) across
– Pocket wall, after Rnd 16: 1.25 in (3.2 cm) tall
– Leaf, after Row 11: front about 3.75 in (9.5 cm) above the base fold
– Panel, after Row 81: 5 in × 18 in (12.7 × 45.7 cm)
– Panel after border: 6 in × 19 in (15.2 × 48.3 cm)
If your work is too big, go down a half size in hook. If it is too small, go up a half size. Don’t change the stitch counts. The pocket’s 20 back stitches have to match the panel’s 20 columns.
Back Panel
Ch 21.
Row 1 (RS): Sc in the 2nd ch from the hook and in each ch across. Turn. (20 sts)
Rows 2–81: Ch 1 (does not count as a stitch), sc in each st across. Turn. (20 sts)
Don’t fasten off. Keep the working loop on a stitch marker for the border.
Checkpoint: The panel measures 5 in × 18 in (12.7 × 45.7 cm). There are 81 rows, and 81 ÷ 4.5 = 18 in.
Pocket (Make 3)
Base
Work in continuous spirals and move a marker up each round.
Rnd 1: 6 sc in a magic ring. (6)
Rnd 2: Inc in each st. (12)
Rnd 3: (Sc 1, inc) × 6. (18)
Rnd 4: (Sc 2, inc) × 6. (24)
Rnd 5: (Sc 3, inc) × 6. (30)
Rnd 6: (Sc 4, inc) × 6. (36)
Rnd 7: (Sc 5, inc) × 6. (42)
Rnd 8: (Sc 6, inc) × 6. (48)
Rnd 9: (Sc 7, inc) × 6. (54)
Rnd 10: (Sc 8, inc) × 6. (60)
Checkpoint: The base lies flat and measures 4.75 in (12.1 cm) across. A circumference of 60 sts ÷ 4 = 15 in (38.1 cm), and 15 ÷ π ≈ 4.75 in.
Wall
Rnd 11: Sc in BLO of each st. (60) This creates a crisp fold between the base and the wall. The unused front loops of Rnd 10 stay visible as a ridge on the outside.
Rnds 12–16: Sc in each st. (60)
Checkpoint: The wall is 6 rounds tall (Rnds 11–16), about 1.25 in (3.2 cm).
Marking the zones. Number the stitches of Rnd 16 from 1 to 60 in working order, with st 1 being the next stitch to work.
– Sts 1–30: leaf front
– Sts 31–35: right side
– Sts 36–55: back, which gets sewn to the panel
– Sts 56–60: left side
Mark st 1, st 30, st 36, and st 55.
Leaf
The leaf is worked in rows over sts 1–30 only. Stitch 1 is at the right edge (the R edge) when the RS faces you. The R edge loses 2 sts per row and the left (L) edge loses 1, so the tip leans to the left, as in the photo.
Row 1 (RS): Sc in sts 1–30. Turn. (30)
Row 2 (WS): Ch 1, sc2tog, sc to the last 3 sts, sc3tog. Turn. (27)
Row 3 (RS): Ch 1, sc3tog, sc to the last 2 sts, sc2tog. Turn. (24)
Row 4: Repeat Row 2. (21)
Row 5: Repeat Row 3. (18)
Row 6: Repeat Row 2. (15)
Row 7: Repeat Row 3. (12)
Row 8: Repeat Row 2. (9)
Row 9: Repeat Row 3. (6)
Row 10 (WS): Ch 1, sc2tog, sc 1, sc3tog. Turn. (3)
Row 11 (RS): Ch 1, sc3tog. (1)
Fasten off. Each of Rows 2–10 removes exactly 3 sts: 1 at one edge and 2 at the other. After Row 10, the R edge has given up 18 sts and the L edge 9, so the tip sits over about st 20.
Checkpoint: The leaf rows add about 2.5 in (6.4 cm) of height. The front now stands about 3.75 in (9.5 cm) above the base fold.
Edging
With the RS facing, join the yarn in st 31 of Rnd 16.
Edging Rnd 1: Sc in sts 31–60 (30 sts). Then work 1 sc in each row end up the R edge of the leaf for Rows 1–10 (10 sts). Work 3 sc in the Row 11 tip (3 sts), then 1 sc in each row end down the L edge for Rows 10–1 (10 sts). Sl st to the first sc. (53 sts: 30 + 10 + 3 + 10)
Edging Rnd 2: Ch 1, rev sc in each st around, then sl st to join. (53) Fasten off.
The rev sc gives the leaf its corded, rope-like outline.
Veins
All veins are worked in surface sl st on the leaf front with the RS facing.
- Midrib: Start at the base ridge, below st 15 of the front. Work 1 surface sl st per row, curving gently toward the tip. Pass through st 17 at Rnd 16, then follow the line about 1 st to the right of the L-edge slope until you reach the tip. Fasten off on the WS.
- Side veins: Work 4 pairs, spaced about 0.75 in (1.9 cm) apart along the midrib, starting 0.5 in (1.3 cm) above the base. Each vein leaves the midrib at about 45 degrees, heading upward and outward. Make each one 4–6 sl sts long, or about 1–1.5 in (2.5–3.8 cm), and keep the lower veins the longest.
Keep the sl sts loose. Tight veins pucker the leaf.
Weave in all the ends.
Hanging Tab
Ch 9.
Row 1: Sc in the 2nd ch from the hook and in each ch across. Turn. (8)
Rows 2–27: Ch 1, sc in each st across. Turn. (8)
Fasten off and leave a 12 in (30.5 cm) tail. The tab measures 2 in × 6 in (5.1 × 15.2 cm).
Make All Pieces
Everything is worked in deep teal green:
- 1 back panel (20 sts × 81 rows)
- 3 pockets (60-st base, 53-st edging)
- 1 tab (8 sts × 27 rows)
Layout (front view, top to bottom):
      [ wooden ring ]
         [ tab ]
 +---------------------+
 |                     |
 |    [ Pocket 3 ]     |  base ridge on row 55
 |                     |
 |    [ Pocket 2 ]     |  base ridge on row 29
 |                     |
 |    [ Pocket 1 ]     |  base ridge on row 3
 +---------------------+
Joining
Method: Whipstitch with the yarn tail, working through both layers.
Stitch-to-stitch logic: The pocket’s back zone (sts 36–55) is 20 stitches wide, and the panel is 20 stitches wide. That gives a one-to-one match, so you don’t need to ease anything in. Each pocket is sewn along two horizontal lines.
- Lower seam: Pin the base ridge so it lies across the panel. That ridge is the unused front loops of Rnd 10, sts 36–55. For Pocket 1, sew each front loop to the matching stitch of panel row 3, working across all 20 columns.
- Upper seam: Sew Edging Rnd 1 sts 31–50 to the matching stitches of panel row 9, which is 6 rows higher and matches the wall’s 6 rounds. These sts sit directly above back sts 36–55.
- Sew Pocket 2 the same way at rows 29 and 35, and Pocket 3 at rows 55 and 61.
The pockets are 26 rows apart, about 5.75 in (14.6 cm). That leaves about 1.5 in (3.8 cm) between the top of one roll and the pocket above it.
Tension: Pull each whipstitch just snug. If you pull harder, the panel puckers across its width.
Size checkpoint: The panel should still measure 5 in (12.7 cm) wide at every seam line. If it has narrowed, loosen the seam and sew it again.
Border
Border gauge: Use the same gauge as the body, 4 sts per inch. Along the side edges, which are row ends, work 8 sc over every 9 rows. Rows (4.5 per inch) are shorter than stitches are wide (4 per inch), so this ratio keeps the edges from rippling or pulling in.
Go back to the live loop at the top of the panel. The RS faces you, and you’re at the end of Row 81.
Border Rnd 1: Ch 1.
– Top: 3 sc in the first st, sc in the next 18 sts, 3 sc in the last st. (24)
– Side: Work 8 sc over each set of 9 row ends. 81 rows ÷ 9 = 9 groups, and 9 × 8 = 72 sc.
– Bottom: Working into the free loops of the foundation ch, 3 sc in the first ch, sc in the next 18, 3 sc in the last ch. (24)
– Second side: 72 sc, as on the first side.
Sl st to the first sc. Total: 24 + 72 + 24 + 72 = 192 sts.
Counts per side: The middle sc of each 3-sc group is the corner stitch, which makes 4 corner sts in total.
– Top and bottom: 20 sts between the corners (1 + 18 + 1), or 22 including both corners.
– Each long side: 74 sts between the corners (1 + 72 + 1), or 76 including both corners.
– Check: 2 × 20 + 2 × 74 + 4 corners = 192 ✓
Border Rnd 2: Ch 1, rev sc in each st around, then sl st to join. (192) Fasten off.
Why the math works: The top edge has 20 working sts at 4 per inch, which is 5 in. The sides have 72 sts, which is 18 in. Each border round adds about 0.25 in (0.6 cm) on every side. Two rounds make 0.5 in (1.3 cm) per side, so the width is 5 + 1 = 6 in (15.2 cm) and the length is 18 + 1 = 19 in (48.3 cm).
Attach the tab: Thread the tab through the wooden ring and fold it in half. Lay both ends against the back of the panel, centered, overlapping the top by 1.5 in (3.8 cm). Whipstitch around both ends, sewing only through the back layer of the panel. About 1 in (2.5 cm) of tab will show above the panel.
Final Blocking
- Spritz the whole holder until it is damp but not soaked.
- Lay it face up and pin the panel to 6 in × 19 in (15.2 × 48.3 cm), with a pin about every 2 in (5.1 cm).
- Stuff each pocket with a roll in a plastic bag so it dries in its rounded shape.
- Lightly shape each leaf tip so it points up and slightly to the left.
- Press the veins gently with your fingertip so they stand evenly.
- Leave it to dry completely, which takes about 24 hours.
Final Quality-Control Checklist
- [ ] The panel measures 6 in × 19 in (15.2 × 48.3 cm)
- [ ] Border Rnd 1 has 192 sts: 20 + 74 + 20 + 74 + 4 corners
- [ ] Each pocket base is 4.75 in (12.1 cm) across with 60 sts
- [ ] Every leaf tip leans the same way
- [ ] The pockets are centered and 26 rows apart
- [ ] The seams are invisible from the front
- [ ] The tab is firmly sewn and the ring turns freely
- [ ] All ends are woven in on the WS
Troubleshooting
The pocket base curls into a bowl. Your gauge is too tight. Go up a hook size for Rnds 1–10 only.
The pocket base ruffles. Your gauge is too loose. Go down a hook size for the base.
The leaf tip is centered instead of leaning. You swapped the decreases. The R edge needs sc3tog and the L edge needs sc2tog on every row.
The veins pucker the leaf. Pick them out and redo them with looser loops, or with a hook one size larger.
The pockets droop forward. Check the upper seam. All 20 stitches need to be sewn, not just the middle few.
The side borders wave. You worked too many stitches. Keep strictly to 8 sc per 9 rows.
The rolls don’t fit. Work one extra increase round (Rnd 11 = 66 sts) and shift the BLO wall round up by one. Note that this breaks the 20-st back match, so ease the extra stitches into the seams.
Care
Hand wash in cool water with mild soap, press out the water in a towel, and dry flat with the pockets reshaped. Don’t tumble dry.
Final Notes
The measurement chain is simple: 4 sts and 4.5 rows per inch gives a panel of 5 in × 18 in (12.7 × 45.7 cm). The 0.5 in (1.3 cm) border brings it to 6 in × 19 in (15.2 × 48.3 cm). Each 60-st pocket base is 4.75 in (12.1 cm) across, and its 20 back stitches match the panel’s 20 columns exactly. The leaf front rises to 3.75 in (9.5 cm). Check your gauge on the first pocket, keep each seam stitch-to-stitch, and the holder will hang straight and hold its shape.
Happy crocheting!