

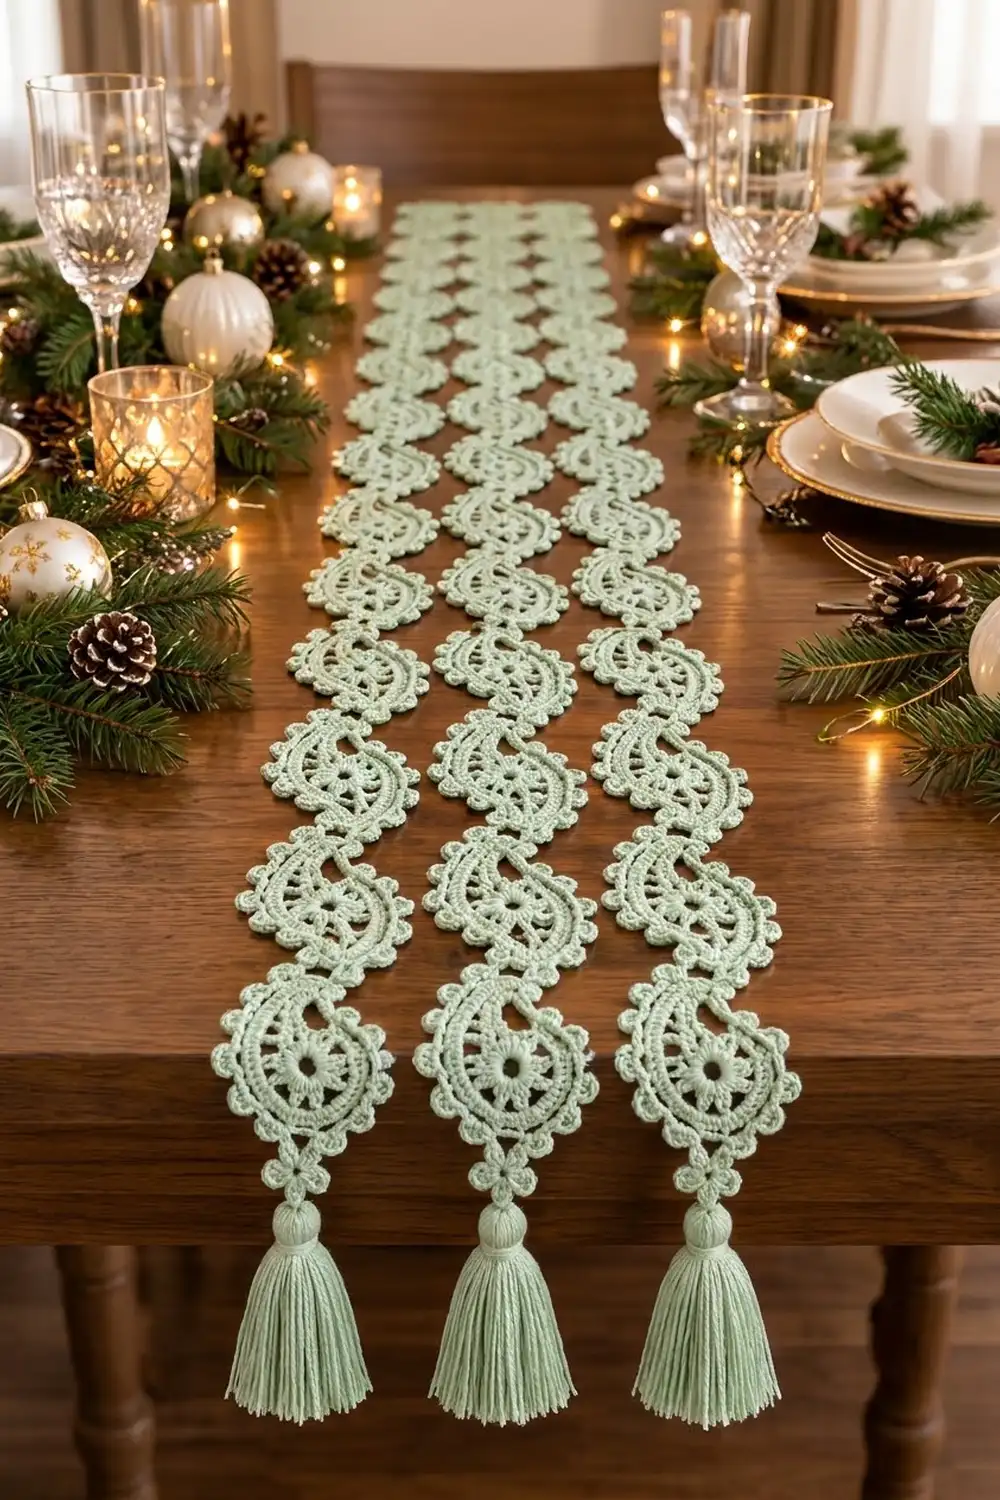
The Evergreen Paisley Lace Table Runner is a lace runner made from small motifs. Teardrop paisleys, each with a flower-like center and a curled tail, are linked by small four-petal flowers into three slim strips. A continuous picot border outlines every paisley, and a wrapped tassel finishes each end.
The whole runner uses one color, a soft sage green. A single color keeps the lace looking calm, so the shapes stand out against wood, linen, or a plain tablecloth. It suits a holiday table but also works the rest of the year.
This pattern uses US crochet terms. Each strip measures 4.25 in (10.8 cm) wide and 62.5 in (158.8 cm) long before tassels, or 70.5 in (179.1 cm) with tassels. With the three strips laid 0.75 in (1.9 cm) apart, the runner covers 14.25 in (36.2 cm) of table width.
Construction is simple:
1. Crochet 27 paisley motifs in the round.
2. Join them into strips of 9 with flower connectors, made join-as-you-go.
3. Work one continuous picot border around each strip.
4. Block, then add the tassels.
Finished Size and Construction
- Finished size: 3 strips, each 4.25 in × 62.5 in (10.8 cm × 158.8 cm) without tassels
- Skill level: Intermediate
- Terminology: US crochet terms
- Yarn weight: #2 Fine (sport), mercerized cotton
- Hook: 3.25 mm (US D-3)
- Number of pieces: 27 paisley motifs, 30 flower connectors, 6 tassels
- Layout: 3 strips × 9 motifs
- Piece size: 5.5 in (14.0 cm) long × 3.75 in (9.5 cm) wide after Round 6
- Size before border: each joined strip is 62 in (157.5 cm) long × 3.75 in (9.5 cm) wide
- Border depth: 0.25 in (0.6 cm), including picots
Materials
Choose a smooth, mercerized cotton in sport weight, about 300 m per 100 g. Mercerized cotton shows stitch detail clearly, blocks crisply, and holds picots well. Avoid fuzzy or very splitty yarns, because the openwork will blur.
- Sage green: 250 g, about 750 m (820 yd)
Approximate breakdown:
– Motifs: 135 g
– Connectors: 30 g
– Borders: 30 g
– Tassels: 15 g
These quantities include a margin of about 40 g for gauge differences and the tassel trims.
Tools:
– 3.25 mm (US D-3) crochet hook
– 2 locking stitch markers per motif
– Tapestry needle
– Sharp scissors
– A 4.5 in (11.4 cm) piece of stiff card for tassels
– Blocking mats, rust-proof pins, and a spray bottle
– Measuring tape
Abbreviations (US Terms)
- ch – chain
- sl st – slip stitch
- sc – single crochet
- hdc – half double crochet
- dc – double crochet
- tr – treble crochet
- sp – space
- st(s) – stitch(es)
- beg – beginning
Picot: ch 4, sl st in the 4th ch from the hook.
Joined petal: ch 3, dc in next sc, sl st into the marked motif dc (insert the hook under both top loops), dc in the same sc as the last dc, ch 3, sl st in next sc.
Gauge and Checkpoints
Make one complete paisley before starting the rest, and check each stage:
- After Round 1: 1 in (2.5 cm) across
- After Round 3: 2 in (5.1 cm) across. This is the main gauge.
- After Round 4: 4.25 in (10.8 cm) long × 2.75 in (7.0 cm) wide
- After Round 5: 4.75 in (12.1 cm) long × 3.25 in (8.3 cm) wide
- After Round 6: 5.5 in (14.0 cm) long × 3.75 in (9.5 cm) wide
If Round 3 is larger than 2 in (5.1 cm), go down a hook size. If it is smaller than 1.75 in (4.4 cm), go up a hook size. A difference of 0.25 in (0.6 cm) per motif adds up to 2.25 in (5.7 cm) over a strip, so it is worth fixing now.
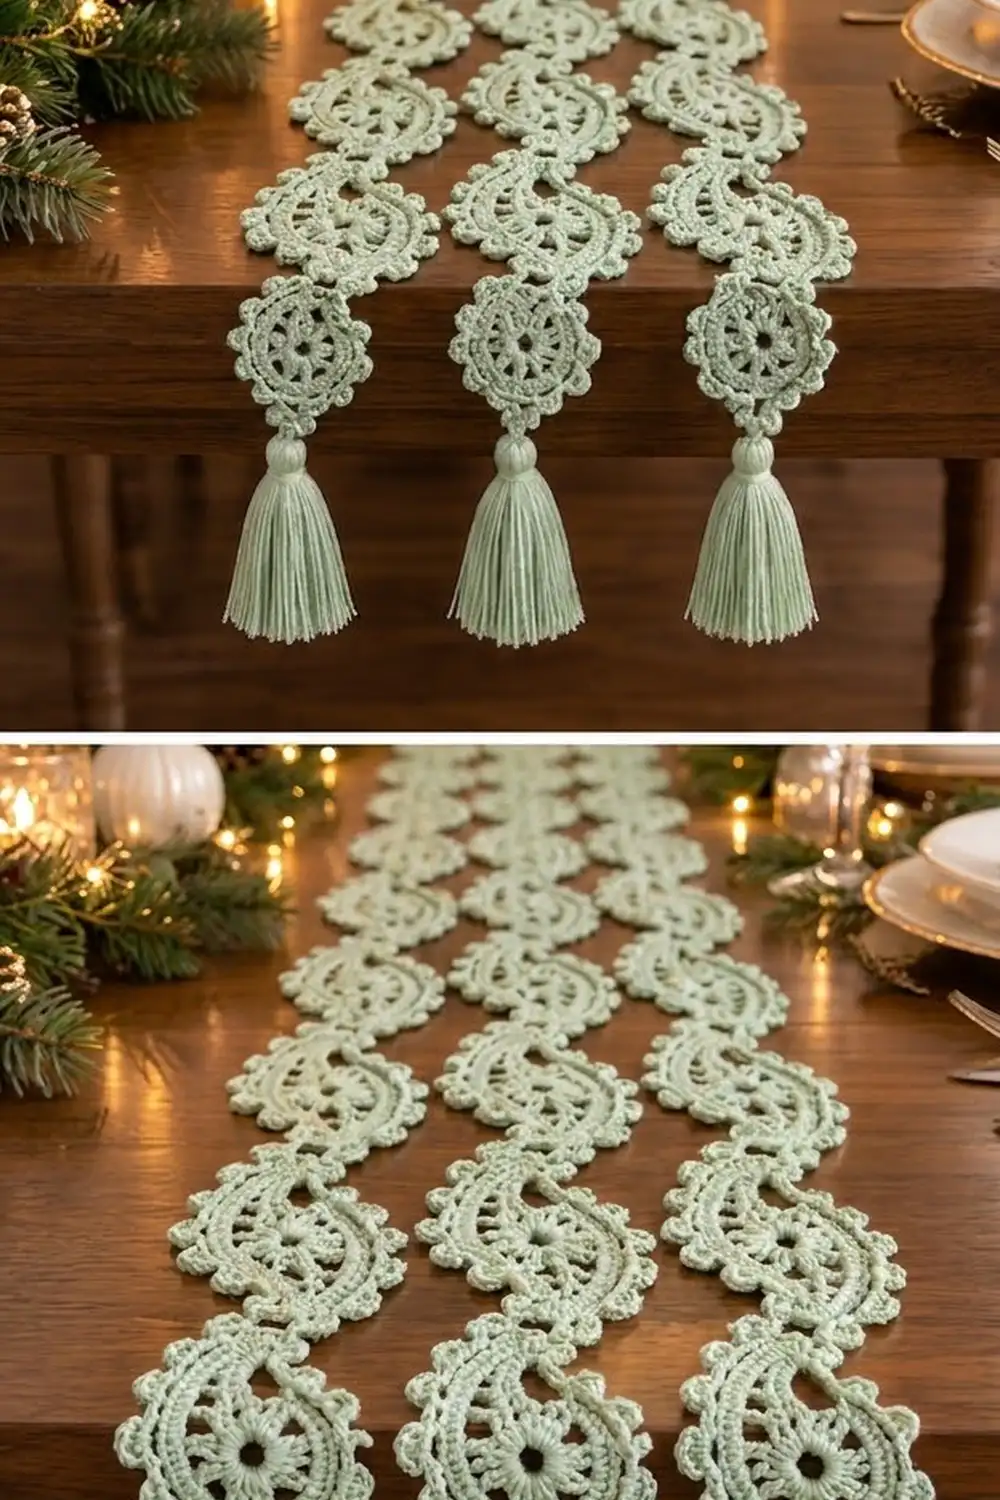
Paisley Motif (Make 27)
Round 1: Make a magic ring. Ch 3 (counts as dc), work 15 dc in the ring, then sl st to the top of the beg ch-3. (16 dc) Pull the ring tight, leaving a small center hole.
Round 2: Ch 3 (counts as dc). Dc in the same st, ch 2, skip next st. 2 dc in next st, ch 2, skip next st; repeat from * 6 more times. Sl st to the top of the beg ch-3. (16 dc in 8 pairs, 8 ch-2 sps)* These 8 pairs form the spokes of the center flower.
Round 3: Ch 1. Sc in each of next 2 dc, 3 sc in next ch-2 sp; repeat from * 7 more times. Sl st to the first sc. (40 sc)* This is the solid ring.
Round 4 (body and tail): This is a growth round.
1. Ch 1. Sc in the same st and in each of the next 9 sts (10 sc).
2. Ch 16 for the tail.
3. Working back down the chain: sc in the 2nd ch from the hook, hdc in next 4 ch, dc in next 5 ch, tr in next 5 ch (15 tail sts).
4. Continuing around Round 3: dc in next st, 2 dc in next st; repeat from * 14 more times (45 dc over the remaining 30 sts)*.
5. Sl st to the first sc.
Round total: 70 sts (10 sc + 15 tail sts + 45 dc)
The tall stitches near the base and short stitches near the tip give the tail its taper.
Round 5: This is a growth round, worked in order around the shape:
– Ch 1. Sc in each of the 10 inner sc. (10)
– Sc in each of the 15 free loops on the underside of the tail chain, working from the base out to the tip. (15)
– Work 3 sc in the skipped tip ch. (3)
– Along the top of the tail stitches, working from the tip back to the base: hdc in next 5 sts, dc in next 5 sts, 2 dc in each of the next 5 sts. (20)
– Around the body: 2 dc in next st, dc in each of the next 2 sts; repeat from * 14 more times. (60)*
– Sl st to the first sc.
Round total: 108 sts (10 + 15 + 3 + 20 + 60)
The tail curls because its outer edge has 20 stitches against 15 on the inner edge.
Round 6 (openwork band): This round keeps the same count and does not grow.
1. Sl st in each of the next 26 sts. You are now in the center sc of the tip.
2. Ch 4 (counts as dc + ch 1), skip next st. *Dc in next st, ch 1, skip next st; repeat from * 52 more times.
3. Sl st to the 3rd ch of the beg ch-4.
(54 dc + 54 ch-1 sps = 108 sts)
Number the dc from the beginning ch-4 (dc 1) onward:
– Place a marker in dc 1, the tail tip.
– Place a marker in dc 28, the bottom of the bulb.
These are the two attachment points. Each motif side between the markers has 53 sts (26 dc + 27 ch-1 sps):
– Side A: sp 1 through sp 27
– Side B: sp 28 through sp 54
Check: 53 + 53 + 2 marked dc = 108. Fasten off and weave in the ends.
Make All Pieces
- Paisley motifs: 27 in sage, 9 per strip
- Flower connectors: 30 in sage, 10 per strip (8 between motifs + 2 at the ends)
- Tassels: 6 in sage, 2 per strip
Layout, with all tails pointing toward the top end:
Strip 1   Strip 2   Strip 3
 [T]       [T]       [T]      <- tassel
  o         o         o       <- end connector
  P1        P1        P1
  o         o         o
  P2        P2        P2
  ...       ...       ...
  P9        P9        P9
  o         o         o       <- end connector
 [T]       [T]       [T]      <- tassel
Joining
The motifs are joined with flower connectors, made join-as-you-go. Each connector has four petals: two opposite petals join to motifs, and two side petals stay free for the border.
Connector Round 1: Make a magic ring. Ch 1, work 8 sc in the ring, then sl st to the first sc. (8 sc)
Connector Round 2: Make 4 petals around the ring.
– Plain petal: ch 3, 2 dc in next sc, ch 3, sl st in next sc.
– Petal 1 (top): a joined petal if there is a motif above, otherwise a plain petal.
– Petal 2 (side): a plain petal.
– Petal 3 (bottom): a joined petal if there is a motif below, otherwise a plain petal.
– Petal 4 (side): a plain petal. Its final sl st goes in the first sc of Round 1.
Each petal uses 2 sc of Round 1, so 4 petals use all 8 sc. A finished connector measures 1.25 in (3.2 cm) from petal tip to petal tip.
Where each petal joins:
– Top end connector: Petal 3 joins dc 1 of Motif 1.
– Middle connectors: Petal 1 joins dc 28 of the motif above, and Petal 3 joins dc 1 of the motif below.
– Bottom end connector: Petal 1 joins dc 28 of Motif 9.
Each joining sl st replaces nothing and adds nothing to the motif’s 108 stitches. It simply hooks into a marked dc.
Tension tips:
– Work the joining sl st snugly but not tight, so the petal does not pucker the motif edge.
– Lay the motifs flat while you join them.
– Keep the tails pointing the same way and the right sides facing up.
Size check: Each strip now measures 9 × 5.5 in plus 10 × 1.25 in, for a total of 62 in (157.5 cm). If it is off by more than 1 in (2.5 cm), re-check your motif gauge.
Border
Border gauge: 13 sc = 2 in (5.1 cm). One motif side of 53 sts measures about 8 in (20.3 cm) along its curved edge.
Work one continuous round around each strip. Start by joining the yarn in sp 1 of Motif 1.
Side A, going down the strip:
- Each motif: Sc in each of the next 6 sts, picot; repeat from * 7 more times. Sc in each of the last 5 sts. (53 sc + 8 picots)*
- Each middle connector: Ch 3, sc between the 2 dc of the side petal, ch 3. (1 sc + 2 ch-3)
- Repeat steps 1 and 2 down the strip, ending with Motif 9.
Bottom end: Ch 3, sc between the dc of the side petal. Ch 3, sc between the dc of the end petal. Ch 3, sc between the dc of the other side petal. Ch 3. (3 sc + 4 ch-3)
Side B, going up the strip: Work sp 28 through sp 54 of each motif with the same 53 sc and 8 picots, with a connector crossing between motifs, from Motif 9 up to Motif 1.
Top end: Work as for the bottom end. Sl st to the first sc and fasten off.
Counts per side of each strip:
– Side A: (9 motifs × 53 sc) + 8 crossing sc = 485 sc, with 72 picots and 16 ch-3 bridges
– Side B: the same, 485 sc with 72 picots and 16 ch-3 bridges
– Each end: 3 sc + 4 ch-3
– Strip total: 976 sc, 144 picots, and 40 ch-3 bridges
Why the math works: Each motif side contributes exactly its own 53 sts. The only extra stitches are the crossing stitches, which are counted separately above. One sc per Round 6 stitch matches the width of each dc and ch-1, so the edge lies flat without ruffling or cupping. The ch-3 bridges span the 0.5 in (1.3 cm) gap between the motif edge and the petal tip. After the border, each strip is 4.25 in (10.8 cm) wide and 62.5 in (158.8 cm) long.
Tassels (Make 6)
- Wrap the yarn 30 times around the 4.5 in (11.4 cm) card.
- Thread a 10 in (25.4 cm) length of yarn under the top loops, pass it through the end petal of a connector, and tie it tightly.
- Cut the bottom loops.
- Wrap a separate strand around the tassel 0.5 in (1.3 cm) below the top to form the head, then knot it and hide the ends inside.
- Trim the tassel to 4 in (10.2 cm).
Final Blocking
- Soak each strip in cool water for 10 minutes, then press out the water gently without wringing.
- Roll the strip in a towel to remove the excess water.
- Lay it flat on the mats and measure it to 62.5 in (158.8 cm) long.
- Pin each paisley to 5.5 in × 4.25 in (14.0 cm × 10.8 cm). Pin the bulb round and curve the tail toward its tip.
- Pin every picot outward so it opens into a round loop.
- Open the center hole and spread the 8 spokes evenly.
- Let the strip dry completely. Keep the tassels unpinned and comb them straight.
- Repeat for the other two strips. Check that all three are the same length to within 0.25 in (0.6 cm).
Final Quality-Control Checklist
- 27 motifs, each with 108 sts in Round 6
- All tails point the same direction on every strip
- 8 middle connectors and 2 end connectors per strip
- Every joined petal is attached to dc 1 or dc 28 only
- 53 sc and 8 picots on each side of every motif
- Strips measure 4.25 in × 62.5 in (10.8 cm × 158.8 cm)
- Tassels are 4 in (10.2 cm) long and firmly tied
- All ends are woven in securely
Troubleshooting
- Tail is straight, not curled: Check the Round 5 counts: 15 sc on the inner edge and 20 sts on the outer edge.
- Motif ruffles: Your Round 5 increases are too loose. Tighten your tension or go down a hook size.
- Motif cups: Work Round 6 more loosely or go up a hook size.
- Connector puckers: The joining sl st is too tight. Redo it with a looser loop.
- Strip lengths differ: Compare the motifs and redo the smallest. Blocking can only even out about 0.5 in (1.3 cm).
- Picots collapse: Pin them open while blocking, and make sure the sl st goes into the 4th ch.
Care
Hand wash in cool water with mild soap, press out the water, and dry flat. Re-pin the picots if they relax over time.
Final Notes
The measurement chain is:
1. 2 in (5.1 cm) after Round 3
2. 5.5 in × 3.75 in (14.0 cm × 9.5 cm) per motif after Round 6
3. 62 in (157.5 cm) per joined strip
4. 4.25 in × 62.5 in (10.8 cm × 158.8 cm) per bordered strip
5. 70.5 in (179.1 cm) including tassels
If each stage matches, the three strips will line up evenly on your table.
Happy crocheting!