

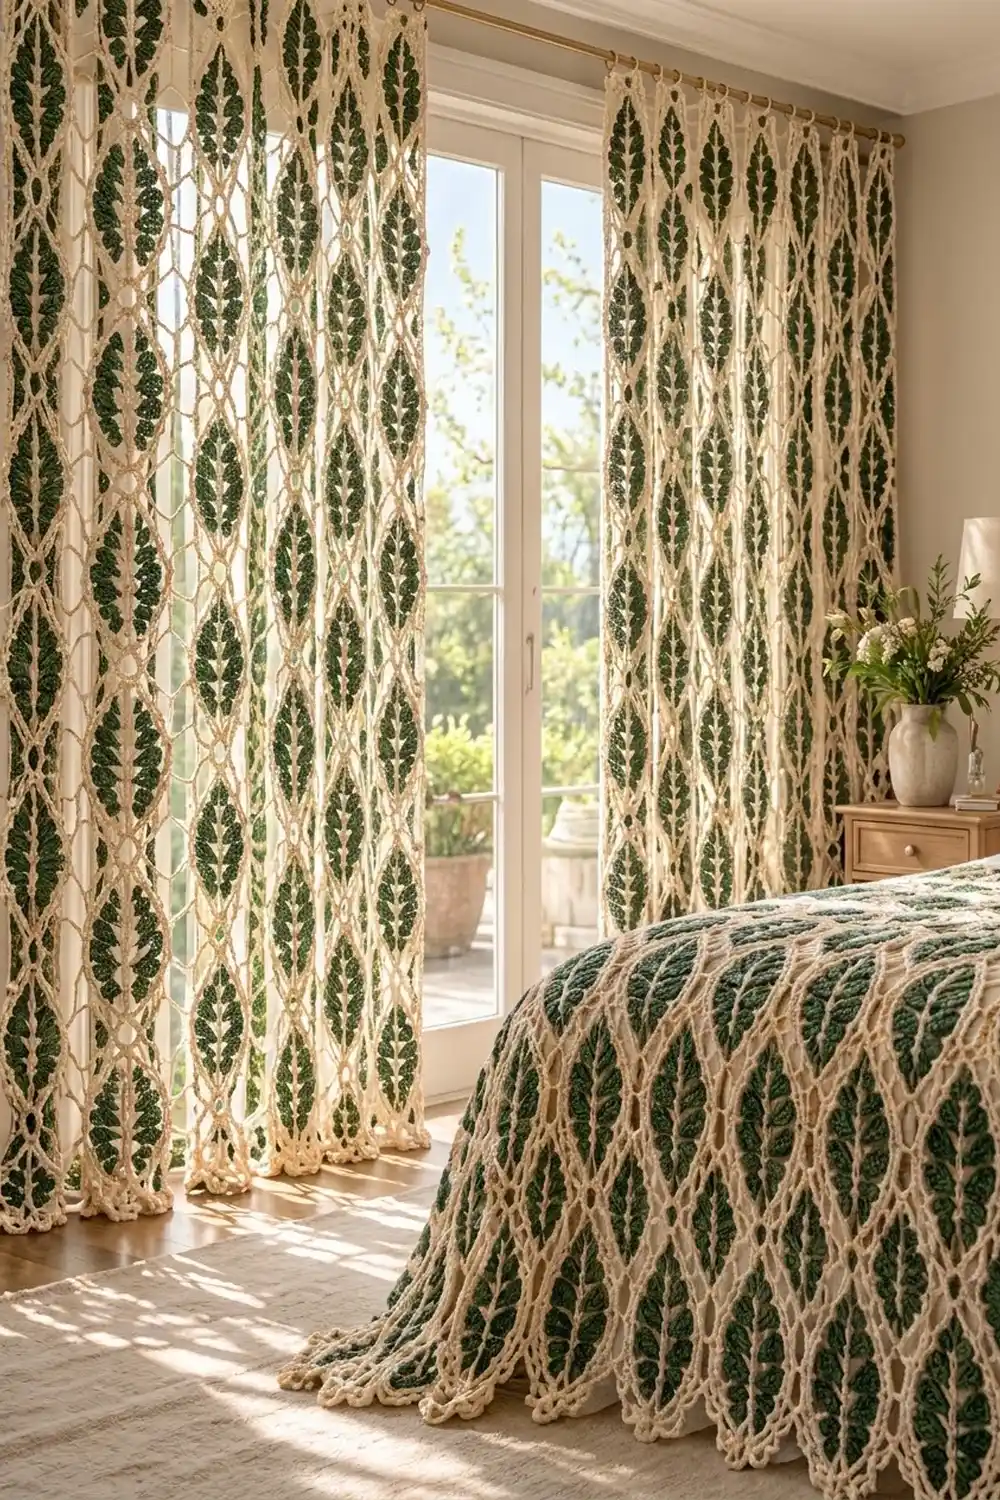
The Fernleaf Lattice Curtain Panel is a light lace curtain made from pointed-oval leaf motifs. Each motif has a cream central spine with forest-green leaflets on both sides, framed by cream chain arches and a fine loop edge. Light passes through the open lattice between motifs, so the panel casts leaf-shaped shadows when it hangs at a window.
The palette has two colors: soft cream for the structure and deep forest green for the leaves. The look is botanical and calm, close to traditional Irish-style motif lace but simpler to work. All instructions use US crochet terms.
One finished panel measures 33.5 in x 79.5 in (85.1 cm x 201.9 cm) after blocking. Make two panels for a standard window pair.
To build it, you make 96 identical motifs in five rounds. They are joined as you go on the last round into a grid 8 motifs wide and 12 motifs tall. Then a two-round border is worked around the scalloped outer edge.
Finished Size and Construction
- Finished size: 33.5 in x 79.5 in (85.1 cm x 201.9 cm)
- Skill level: Intermediate
- Terminology: US
- Yarn weight: DK (#3), mercerized cotton
- Hook: 3.5 mm (E-4)
- Number of pieces: 96 leaf motifs
- Layout: 8 columns x 12 rows
- Piece size: 4 in x 6.5 in (10.2 cm x 16.5 cm)
- Size before border: 32 in x 78 in (81.3 cm x 198.1 cm)
- Border depth: 0.75 in (1.9 cm) on each side
Materials
Use a smooth mercerized cotton or cotton blend. It shows stitch definition, holds its shape when blocked and resists sun fading better than acrylic. Choose a yarn of about 120 m (131 yd) per 50 g.
- Cream (Color A): 700 g, about 1680 m (1837 yd)
- Forest green (Color B): 300 g, about 720 m (787 yd)
Each motif uses about 6 g of cream and 2.5 g of green. The border uses about 25 g of cream. The quantities above include a margin of roughly 15 percent.
Tools:
– 3.5 mm (E-4) hook
– Tapestry needle
– Stitch markers
– Rust-proof pins and a blocking surface
– Spray bottle
– Measuring tape
Abbreviations (US Terms)
- ch – chain
- sl st – slip stitch
- sc – single crochet
- hdc – half double crochet
- dc – double crochet
- sk – skip
- sp – space
- st(s) – stitch(es)
- RS – right side
Special stitches
Leaflet: Ch 6. Sl st in 2nd ch from hook, hdc in next ch, 2 dc in next ch, hdc in next ch, sc in last ch, then sl st in the same spine sc where the ch 6 began. This makes 6 sts on 5 chains: a pointed tip, a full middle and a narrow base.
Top Leaflet: Ch 8. Sl st in 2nd ch from hook, sc in next ch, hdc in next ch, 2 dc in next ch, dc in next ch, hdc in next ch, sc in last ch, then sl st in the same spine sc. This makes 8 sts on 7 chains.
Join loop: Instead of ch 4, work ch 2, sl st into the matching ch-4 loop of the neighboring motif, ch 2.
Gauge and Checkpoints
Swatch gauge: 18 sc and 20 rows = 4 in (10.2 cm).
Make one complete motif first and block it before making the rest. That motif is your real gauge.
- After Rnd 1: 4.5 in (11.4 cm) long and 0.5 in (1.3 cm) wide
- After Rnd 2: about 2.75 in (7.0 cm) wide across the leaflets and 5.25 in (13.3 cm) tall
- After Rnd 4: 3.25 in x 5.75 in (8.3 cm x 14.6 cm)
- After Rnd 5, blocked: 4 in x 6.5 in (10.2 cm x 16.5 cm)
A difference of 0.25 in (0.6 cm) is fine.
- If the motif is too big: go down to a 3.25 mm hook.
- If the motif is too small: go up to a 3.75 mm hook.
- If the frame cups or ripples instead: keep your hook and adjust only the ch-5 and ch-9 arches in Rnd 3. Loosen them if the frame cups; tighten them if it ripples.
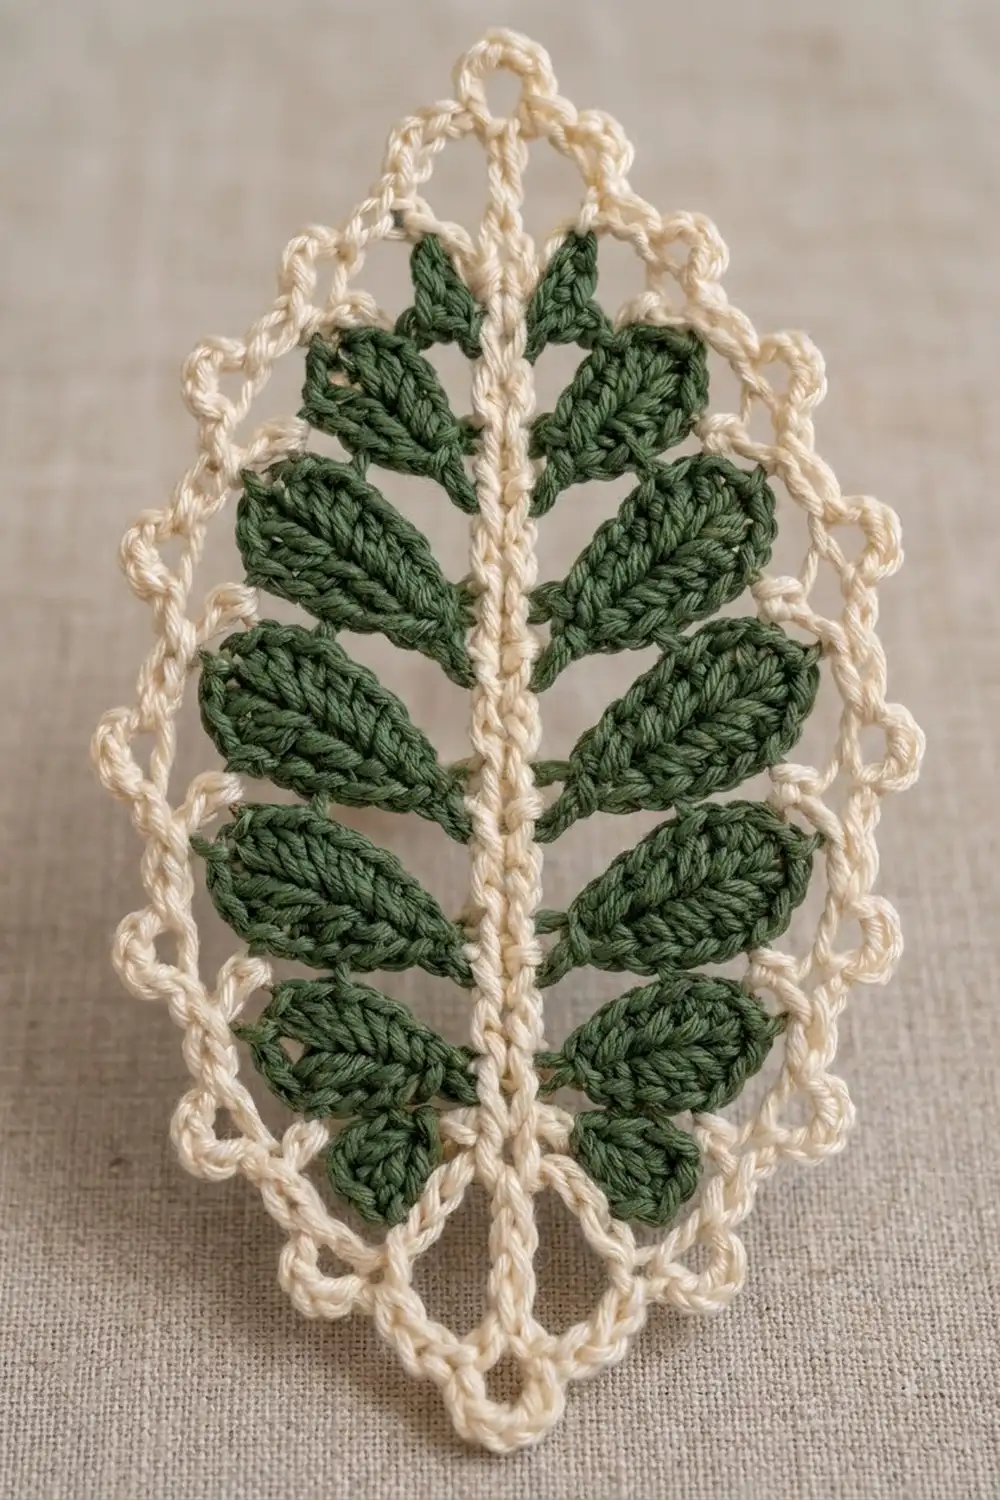
Leaf Motif (make 96)
Work in the round with the RS facing and do not turn. Right-handed crocheters move counterclockwise, so the first long side worked is the right side. If you crochet left-handed, everything is mirrored, but the counts stay the same.
Rnd 1 (Color A – spine): Ch 25.
1. Work 3 sc in 2nd ch from hook (this is the bottom tip).
2. Sc in next 22 ch.
3. Work 3 sc in last ch (this is the top tip).
4. Working along the other side of the foundation chain, sc in next 22 ch.
5. Sl st to first sc. Fasten off. (50 sc)
The two rows of sc on either side of the foundation chain make the double-line spine.
Rnd 2 (Color B – leaflets):
Right side, bottom to top:
1. Join B with sl st in the first sc after the bottom 3-sc group.
2. Sl st in next 3 sc. These 4 sl sts leave the stem without leaflets.
3. (Sl st in next sc and make a Leaflet from it, sl st in next 2 sc). Repeat 6 times in total.
Top tip:
4. Sl st in 1st tip sc.
5. Sl st in center tip sc and make a Top Leaflet from it.
6. Sl st in 3rd tip sc.
Left side, top to bottom:
7. (Sl st in next 2 sc, sl st in next sc and make a Leaflet from it). Repeat 6 times in total.
8. Sl st in last 4 sc.
9. Sl st in the 3 bottom tip sc, then sl st in the first sl st. Fasten off.
(13 leaflets: 6 per side + 1 Top Leaflet)
Each side uses 4 + (6 x 3) = 22 spine sc, so the leaflets on the two sides line up as mirrored pairs.
Rnd 3 (Color A – arch frame):
1. Join A with sc in the center sc of the bottom tip.
2. Ch 9, then sc in the tip ch of the lowest right leaflet.
3. (Ch 5, sc in tip ch of next leaflet). Repeat 6 times, ending at the Top Leaflet.
4. (Ch 5, sc in tip ch of next leaflet). Repeat 6 times, ending at the lowest left leaflet.
5. Ch 9, then sl st to first sc.
(14 sc, 12 ch-5 arches, 2 ch-9 arches)
The two ch-9 arches form the V-shaped cream bars on either side of the bare stem.
Rnd 4 (Color A – solid outline): Do not fasten off after Rnd 3.
1. Ch 1. Work 3 sc in the first sc, then 11 sc in the ch-9 arch.
2. Sc in next sc.
3. (6 sc in next ch-5, sc in next sc). Repeat 5 times.
4. Work 6 sc in next ch-5, then 3 sc in the Top Leaflet sc.
5. (6 sc in next ch-5, sc in next sc). Repeat 5 times.
6. Work 6 sc in next ch-5, then sc in last sc.
7. Work 11 sc in the ch-9 arch, then sl st to first sc.
Count check: 3 + 11 + 1 + 35 + 6 + 3 + 35 + 6 + 1 + 11 = 112 sc
The center sc of the bottom group and the center sc of the top group are exactly 56 stitches apart, so the motif is symmetrical.
Rnd 5 (Color A – loop edge):
1. Sl st into the center sc of the bottom tip.
2. Ch 1, sc in same st, ch 4, sk 1 st.
3. (Sc in next st, ch 4, sk 1 st) around.
4. Sl st to first sc.
(56 sc, 56 ch-4 loops)
For the first motif, fasten off now. All later motifs are joined on this round (see Joining).
Loop map: Number the loops 1 to 56, starting with the bottom-tip loop as Loop 1 and going around in working order.
| Loop(s) | Position | Arc |
|---|---|---|
| 1 | Bottom tip | Bottom |
| 15 | Right widest point | Right |
| 29 | Top tip | Top |
| 43 | Left widest point | Left |
| 51–56 and 1–7 | Around bottom tip | Bottom (13 loops) |
| 8–22 | Right side | Right (15 loops) |
| 23–35 | Around top tip | Top (13 loops) |
| 36–50 | Left side | Left (15 loops) |
Arc check: 13 + 15 + 13 + 15 = 56. The arcs do not overlap, and the motif has no separate corner stitches.
Make All Pieces
Make 96 motifs in total. Every motif uses Color B for Rnd 2 and Color A for Rnds 1, 3, 4 and 5.
Row 12 (top):    M M M M M M M M
Row 11:          M M M M M M M M
  ... Rows 10 to 2 identical ...
Row 1 (bottom):  M M M M M M M M
                 8 columns x 12 rows = 96
All motifs hang vertically, with the Top Leaflet pointing up.
Joining
Join motifs as you go, using the Join loop on Rnd 5 and working Row 1 from left to right.
- To the left neighbor: When you reach Loops 42, 43 and 44 of the new motif, join them to Loops 16, 15 and 14 of the motif on its left, in that order.
- To the motif below (Row 2 and up): Work Loop 1 of the new motif as a Join loop into Loop 29 of the motif directly below.
Every join is loop-to-loop, one to one. No extra stitches are added at any join.
Each new motif therefore touches its neighbors at single points. The tips meet with tips, and the widest points meet over 3 loops. The diamond-shaped openings left between every four motifs form the lattice.
Tension: Keep the ch 2 on each side of a join exactly as loose as a normal ch-4 loop. Joins that are too tight pucker the lattice.
Size checkpoints:
– After Row 1: 32 in (81.3 cm) wide
– After 4 rows: 26 in (66.0 cm) tall
– After all 12 rows: 32 in x 78 in (81.3 cm x 198.1 cm)
Border
Border gauge: The border rounds add 0.75 in (1.9 cm) beyond the motif loops on every side.
The border works only into exposed arcs, so each side’s count is the number of motifs along that side times the matching arc.
- Bottom and top sides: 8 motifs x 13 loops = 104 loops
- Left and right sides: 12 motifs x 15 loops = 180 loops
The joined loops (1, 29 and 14–16 / 42–44) are never on the outer edge. The only stitches added at seams are the valley bridges, which are shown below.
Valley bridge: a ch 7, about 1.5 in (3.8 cm) long, that crosses the dip where two motifs meet along an edge. It is not worked into anything.
Rnd 1:
1. Join A with sc in Loop 51 of the bottom-left motif.
2. Work counterclockwise around the panel. Make (ch 3, sc in next loop) along each arc.
3. Between motifs, ch 7 and sc in the first arc loop of the next motif.
4. At each panel corner, work ch 3 from the last loop of one arc to the first loop of the next arc on the same motif.
5. Finish the last side with ch 3 and sl st to the first sc.
| Side | Sc | Ch-3 sps | Ch-7 bridges | Corner ch-3 |
|---|---|---|---|---|
| Bottom | 104 | 8 x 12 = 96 | 7 | 1 |
| Right | 180 | 12 x 14 = 168 | 11 | 1 |
| Top | 104 | 96 | 7 | 1 |
| Left | 180 | 168 | 11 | 1 |
Totals: 568 sc and 568 spaces (528 + 36 + 4). The round is closed, so the number of spaces equals the number of sc.
Rnd 2:
1. Sl st into the first ch-3 sp and ch 1.
2. In every ch-3 sp, including corners, work (sc, ch 3, sc).
3. In every ch-7 bridge, work 3 sc, ch 3, 3 sc.
4. Sl st to first sc. Fasten off.
| Side | Picot loops | Sc |
|---|---|---|
| Bottom | 96 + 1 + 7 = 104 | 97 x 2 + 7 x 6 = 236 |
| Right | 168 + 1 + 11 = 180 | 169 x 2 + 11 x 6 = 404 |
| Top | 104 | 236 |
| Left | 180 | 404 |
Why the math works: Each side ends with exactly one picot loop per original motif loop on that side (104 or 180). The edge therefore keeps the motifs’ rhythm and does not ruffle or pull. The finished size is 33.5 in x 79.5 in (85.1 cm x 201.9 cm).
Final Blocking
- Weave in all ends along the cream spine or outline, never through the lacy openings.
- Soak the panel in cool water for 15 minutes, then press out the water in a towel. Do not wring it.
- Lay it flat and pin each column to 32 in (81.3 cm) total width, with each motif 4 in (10.2 cm) wide.
- Pin the length to 78 in (198.1 cm) at the motif tips, then pin the border to its full 33.5 in x 79.5 in (85.1 cm x 201.9 cm).
- Angle each leaflet slightly upward toward the top tip and smooth the spines straight.
- Pin out each border picot.
- Let it dry completely before unpinning.
Final Quality-Control Checklist
- [ ] All 96 motifs measure 4 in x 6.5 in (10.2 cm x 16.5 cm), within 0.25 in (0.6 cm)
- [ ] Every motif has 13 leaflets, mirrored in pairs
- [ ] Every Rnd 5 has 56 loops
- [ ] Each vertical join is Loop 1 to Loop 29
- [ ] Each side join is Loops 42–44 to Loops 16–14
- [ ] The bottom and top border sides each have 104 picot loops
- [ ] The left and right border sides each have 180 picot loops
- [ ] All ends are hidden in solid stitches
Troubleshooting
- Leaflets crowd or overlap: You probably skipped fewer than 2 spine sc between leaflets. Recount 4 + 18 per side.
- Motif comes out round instead of pointed: Check that you worked 3 sc at both tips in Rnds 1 and 4.
- Frame pulls the leaflets inward: Loosen the ch-5 arches, or work ch 6 and keep 6 sc in Rnd 4.
- Wrong loop joined: Mark Loops 1, 15, 29 and 43 on every motif before working Rnd 5.
- Panel leans to one side: You may have joined a side to Loops 15–17 instead of 14–16. Check a few seams.
- Border waves: Shorten the valley bridges to ch 6.
- Border pulls in: Lengthen the valley bridges to ch 8.
Care
Hand wash in cool water with mild soap and dry flat, re-pinning if needed. Rotate the panel occasionally so sunlight fades it evenly.
Final Notes
The measurement chain is:
- Rnd 1 spine: 4.5 in (11.4 cm)
- One finished motif: 4 in x 6.5 in (10.2 cm x 16.5 cm)
- 96 motifs joined 8 by 12: 32 in x 78 in (81.3 cm x 198.1 cm)
- Two border rounds of 0.75 in (1.9 cm): 33.5 in x 79.5 in (85.1 cm x 201.9 cm)
If each link in this chain checks out, the panel will hang straight and even. Happy crocheting!