

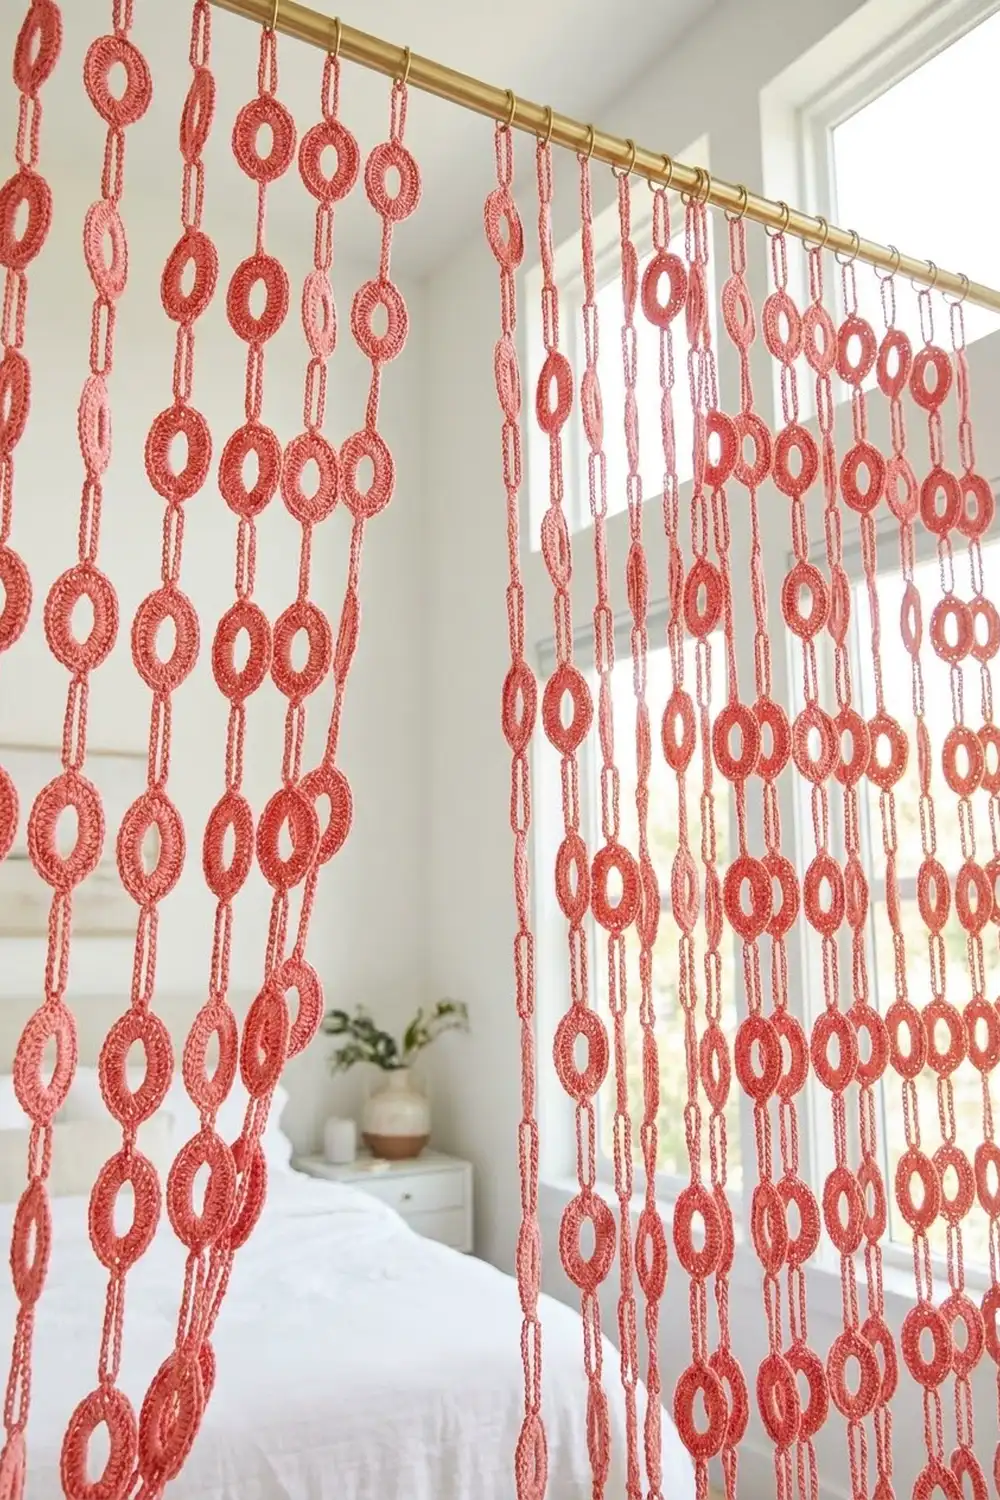
This curtain is made from rows of hollow oval rings hanging in long vertical strands. Short, sturdy chain links join the rings, so each strand moves a little when air passes through it and still lets plenty of light into the room. The whole curtain uses one warm coral-pink yarn, and the rings show a dense stitch texture against the window.
The style is modern and slightly retro, like a beaded doorway curtain made soft. Each ring has two rounds: a round of double crochet worked into a foundation chain ring, then a round of single crochet to firm up the outer edge. The center opening stays clear, so the panel reads as a lattice of pink ovals.
This pattern uses US crochet terms. The finished panel is 36 in (91.4 cm) wide, and it hangs 79.5 in (201.9 cm) from the top of the rod pocket to the bottom of the last ring.
Here is how it comes together. You make 144 separate oval rings, link them into 12 strands of 12 rings each, then crochet a single crochet heading band, fold it into a rod pocket, and hang the strands from its lower edge.
Finished Size and Construction
- Finished panel size: 36 in (91.4 cm) wide x 79.5 in (201.9 cm) long
- Skill level: Advanced beginner
- Terminology: US crochet terms
- Yarn weight: Worsted (#4), cotton or cotton blend
- Hook: 4.5 mm (US 7)
- Number of pieces: 144 oval rings + 1 heading band
- Layout: 12 strands across, 12 rings per strand
- Ring size: 5 in (12.7 cm) tall x 2.5 in (6.4 cm) wide, with an opening of about 3.5 in (8.9 cm) x 1 in (2.5 cm)
- Strand length (before heading): 78 in (198.1 cm)
- Heading band before folding: 36 in (91.4 cm) x 3 in (7.6 cm)
- Heading depth after folding: 1.5 in (3.8 cm)
Materials
Pick a smooth, firm cotton or cotton-blend worsted yarn. Cotton makes crisp stitches and holds the oval shape when it hangs, and it doesn’t stretch much under its own weight. Avoid fuzzy or very stretchy acrylic, because long strands of it will lengthen over time.
- Coral pink: 700 g / about 1,330 m (1,455 yd), for example seven 100 g / 190 m (208 yd) balls
Tools:
– 4.5 mm (US 7) crochet hook
– 2 locking stitch markers
– Tapestry needle
– Scissors
– Measuring tape
– Rustproof pins and a blocking board or towel
– Spray bottle
– Curtain rod up to 0.75 in (1.9 cm) in diameter
The quantity above includes a margin of about 18% for gauge differences, joining tails, and one test ring.
Abbreviations (US Terms)
- ch – chain
- sl st – slip stitch
- sc – single crochet
- dc – double crochet
- st(s) – stitch(es)
- 2 sc / 2 dc / 3 dc in next – work that many stitches into the same stitch or chain
Special technique – back-bump slip stitch: Turn a chain over so its bumps face you. Insert the hook under the single bump on the back of the chain and work a sl st. This makes a neat, doubled link that looks like a twisted cord.
Gauge and Checkpoints
Gauge: 16 sc and 16 sc rows = 4 in (10.2 cm). One dc round is about 0.5 in (1.3 cm) tall, and one sc round is about 0.25 in (0.6 cm) tall.
Make one complete test ring before you start the curtain. The ring is small, so it’s the quickest way to check your gauge.
Checkpoints for one ring:
– After Round 1: 4.5 in (11.4 cm) x 2 in (5.1 cm)
– After Round 2: 5 in (12.7 cm) x 2.5 in (6.4 cm)
Checkpoint for strands: Three rings joined with two links should measure 18 in (45.7 cm) long.
If your ring is too big, use a 4 mm (US G-6) hook. If your ring is too small, use a 5 mm (US H-8) hook. Change the hook, not the stitch counts, because the band spacing depends on each ring being 2.5 in (6.4 cm) wide.
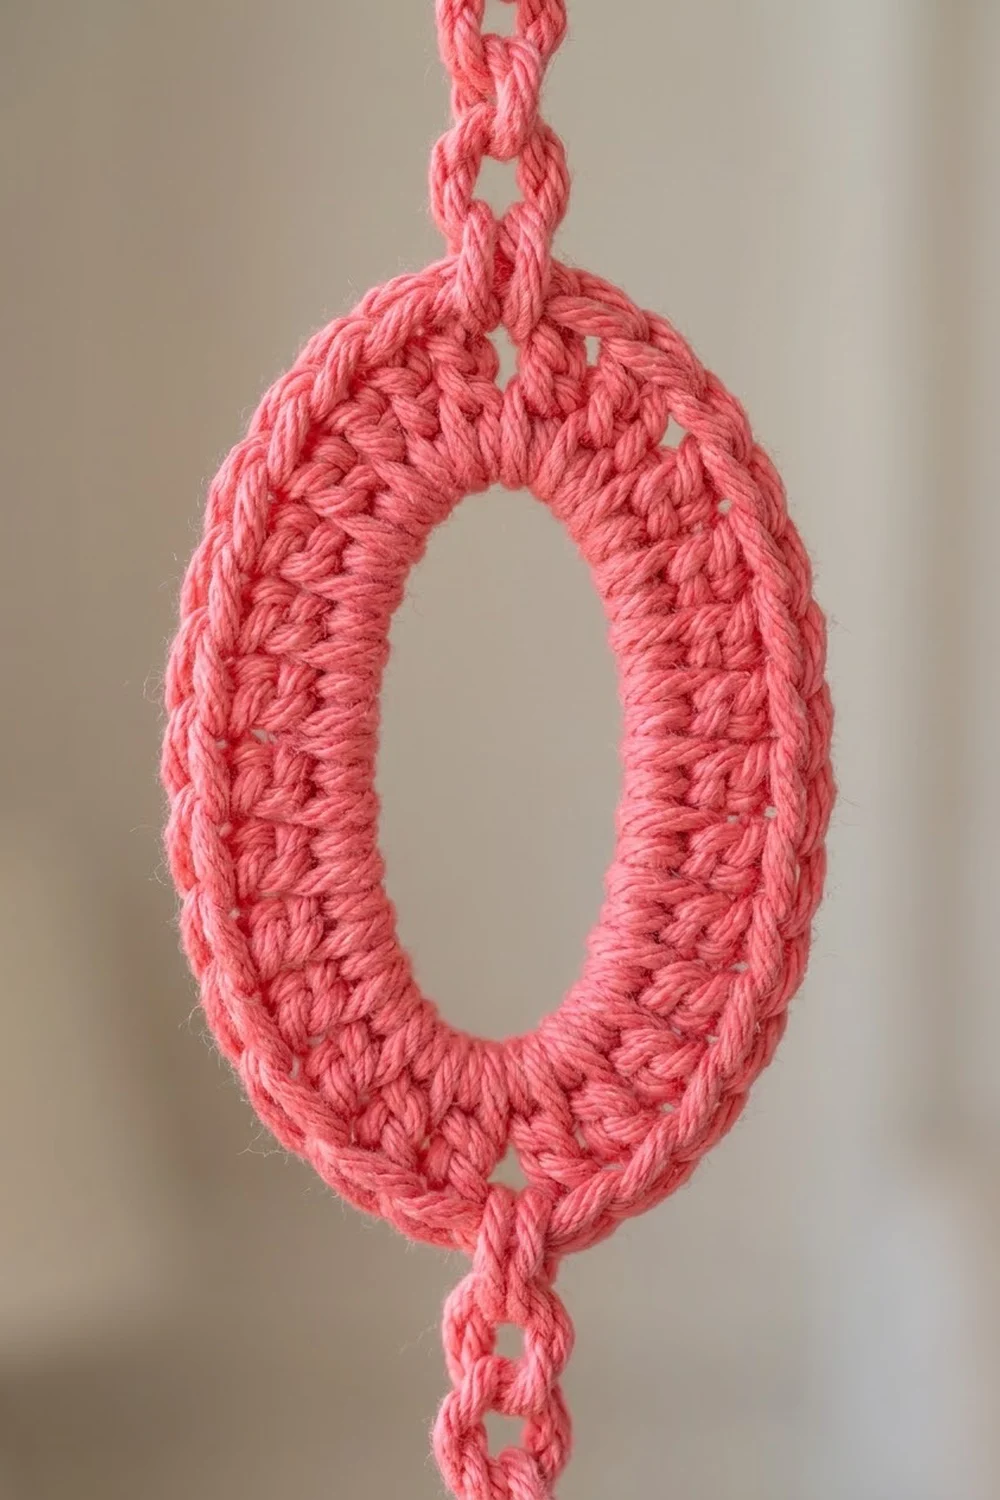
Oval Ring (Make 144)
Each ring starts with a chain loop. You work into each chain one at a time, not into the center of the ring, so the opening keeps straight long sides and rounded ends.
Foundation: Ch 32, sl st in first ch to form a ring, being careful not to twist the chain.
The chains are sorted into four sections:
– Ch 1–5: top end (5 ch)
– Ch 6–16: first side (11 ch)
– Ch 17–21: bottom end (5 ch)
– Ch 22–32: second side (11 ch)
That gives 5 + 11 + 5 + 11 = 32 ch.
Round 1 (dc): Ch 3 (counts as first dc).
– Top end: 1 dc in ch 1 (2 dc in that ch), 3 dc in ch 2, 2 dc in ch 3, 3 dc in ch 4, 2 dc in ch 5. (12 dc)
– First side: 1 dc in each of ch 6–16. (11 dc)
– Bottom end: 2 dc in ch 17, 3 dc in ch 18, 2 dc in ch 19, 3 dc in ch 20, 2 dc in ch 21. (12 dc)
– Second side: 1 dc in each of ch 22–32. (11 dc)
Sl st in the top of the beginning ch-3 to join.
Count: 32 stitches worked 1 per chain + 14 extra stitches (7 per end) = 46 dc.
The extra stitches fan out only around the two ends, so the long sides stay straight and the ring becomes an oval.
Round 2 (sc): Ch 1.
– Top end: sc in same st as join and in next st, 2 sc in next st, sc in next 2 sts, 2 sc in next st; repeat from * 2 more times. (16 sc)
– First side: sc in each of next 11 sts. (11 sc)
– Bottom end: sc in next 2 sts, 2 sc in next st; repeat from * 3 more times. (16 sc)
– Second side: sc in each of next 11 sts. (11 sc)
Sl st in first sc to join.
Count: 46 stitches worked 1 per stitch + 8 extra stitches (4 per end) = 54 sc.
Fasten off and leave a 4 in (10.2 cm) tail. Weave in the tails along the inner edge of the dc round so they don’t show.
Mark the link points: Counting from the first sc of Round 2, sc 8 is the top-center stitch and sc 35 is the bottom-center stitch. These are 27 stitches apart, which is exactly half of 54, so they sit opposite each other. Place a marker in each.
Make All Pieces
Make 144 coral pink rings. Each ring is identical, and either center end can become the top.
Here is a layout for one panel. Each O is a ring, and each | is a 1.5 in (3.8 cm) link. Only the first and last rows of rings are drawn; rows 2–11 repeat the same pattern.
=========== HEADING BAND (144 sc) ===========
 |  |  |  |  |  |  |  |  |  |  |  |   top links
 O  O  O  O  O  O  O  O  O  O  O  O   row 1
 |  |  |  |  |  |  |  |  |  |  |  |
 ...  rows 2-11 repeat  ...
 |  |  |  |  |  |  |  |  |  |  |  |
 O  O  O  O  O  O  O  O  O  O  O  O   row 12
12 strands x 12 rings = 144 rings.
Joining
Each link is a short chain that you slip-stitch back along. That doubles it, so it won’t stretch out of shape.
To link two rings: Lay ring A above ring B. Join yarn with a sl st in the bottom-center sc (sc 35) of ring A. Ch 6, then sl st in the top-center sc (sc 8) of ring B. Turn, sl st in the back bump of each of the 6 ch, and sl st in the bottom-center sc of ring A again. Fasten off and weave in the tails inside the link.
Stitch logic: Each link connects exactly one stitch to one stitch, from center to center. Because sc 8 and sc 35 are directly opposite, every ring hangs straight below the link and the strand doesn’t twist.
Top link: On ring 1 of each strand, join yarn in its top-center sc and ch 6. Leave the hook in the loop and set the strand aside. You will finish this link when you attach the strand to the heading.
Tension: Make the 6 ch at the same tension as your gauge swatch. The return slip stitches should be snug but not tight. If they’re tight, the link puckers and comes out shorter than 1.5 in (3.8 cm).
Size checkpoint: One finished strand is 12 rings x 5 in (12.7 cm) + 11 links x 1.5 in (3.8 cm) + 1 top link of 1.5 in (3.8 cm), so 60 + 16.5 + 1.5 = 78 in (198.1 cm). Lay it flat with no stretching to measure it.
Border: Rod-Pocket Heading Band
The heading band is the finishing edge for this panel. It holds all 12 strands at even spacing and makes the rod pocket.
Border gauge: 16 sc and 16 rows = 4 in (10.2 cm), the same as your main gauge.
Foundation: Ch 145.
Row 1: Sc in 2nd ch from hook and in each ch across. Turn. (144 sc)
Rows 2–12: Ch 1, sc in each st across. Turn. (144 sc per row)
At the end of Row 12, the band measures 36 in (91.4 cm) x 3 in (7.6 cm). Don’t fasten off.
Fold and seam: Fold the band in half lengthwise so Row 12 lies along the foundation chain. Ch 1. Working through each Row 12 stitch and its matching foundation chain together, sl st across. (144 sl st) Fasten off. Leave both short ends open; each one is 6 row-ends deep. The pocket is 1.5 in (3.8 cm) deep and fits a rod up to 0.75 in (1.9 cm) in diameter.
Attach the strands: Count the slip stitches on the seamed lower edge. Strands hang from sl st 6, 18, 30, 42, 54, 66, 78, 90, 102, 114, 126, and 138. For each one, take the top link on hold, sl st into the matching seam stitch, sl st back in the back bump of each of the 6 ch, and sl st in the top-center sc of ring 1. Fasten off.
Why the math works: 12 strands x 12 sc per strand = 144 sc, which matches the band’s stitch count exactly. Twelve stitches at 4 sts per inch is 3 in (7.6 cm), so the strand centers are 3 in (7.6 cm) apart. Each ring is 2.5 in (6.4 cm) wide, which leaves a 0.5 in (1.3 cm) gap between neighboring rings. The first and last strands are about 1.5 in (3.8 cm) in from the band ends. Adding the folded band to the strand gives the total drop: 1.5 + 78 = 79.5 in (201.9 cm).
Final Blocking
- Hang the panel on its rod, or lay it out flat across a clean floor or bed on towels.
- Mist every ring lightly with water until it feels damp but not soaked.
- Shape each ring by hand: stretch it gently to 5 in (12.7 cm) tall and open the center to about 1 in (2.5 cm) wide.
- If you’re working flat, pin the rings that curl.
- Pat the heading band to 36 in (91.4 cm) x 1.5 in (3.8 cm).
- Let everything dry completely, then check that each strand is 78 in (198.1 cm) long.
- Hang the curtain and straighten any links that have twisted.
Final Quality-Control Checklist
- Every ring has 46 dc in Round 1 and 54 sc in Round 2.
- Every ring measures 5 in (12.7 cm) x 2.5 in (6.4 cm).
- Every link joins sc 35 to sc 8 and is 1.5 in (3.8 cm) long.
- There are 12 strands of 12 rings each.
- The band has 144 sc across all 12 rows, and the seam has 144 sl st.
- The strands hang from sl st 6, 18, and so on up to 138, spaced 3 in (7.6 cm) apart.
- All tails are woven in, and none show through the ring openings.
- The panel measures 36 in (91.4 cm) x 79.5 in (201.9 cm).
Troubleshooting
The ring cups or curls: The ends don’t have enough increases, or your dc is tight. Recount 12 dc per end in Round 1, and try a slightly looser tension or a bigger hook.
The ring ruffles at the ends: You added too many increases. Check for exactly 16 sc per end in Round 2.
The opening looks round, not oval: You probably worked Round 1 into the center of the ring. Work into each chain one at a time, so the long sides stay straight.
A strand twists: One of the links is off center. Recount to sc 8 and sc 35.
Strands differ in length: Measure each strand. If one is short, rework its tightest links; if it’s long, check that rings haven’t stretched and reblock them.
The heading curves: Your seam slip stitches are too tight. Redo the seam with a bigger hook.
Care
Hand wash in cool water with a mild detergent, gently squeeze out the water, and dry flat or on the rod. Don’t tumble dry, because it can tangle the strands.
Final Notes
Everything in this curtain builds from one measurement. A 54-stitch ring that measures 5 in (12.7 cm) x 2.5 in (6.4 cm) makes a strand of 78 in (198.1 cm) when combined with 1.5 in (3.8 cm) links. Twelve strands at 12 stitches each fill a 144-stitch band that is 36 in (91.4 cm) wide, and the 1.5 in (3.8 cm) heading brings the total drop to 79.5 in (201.9 cm). Check your test ring first, and the rest of the panel will come out to the right size.
Happy crocheting!