

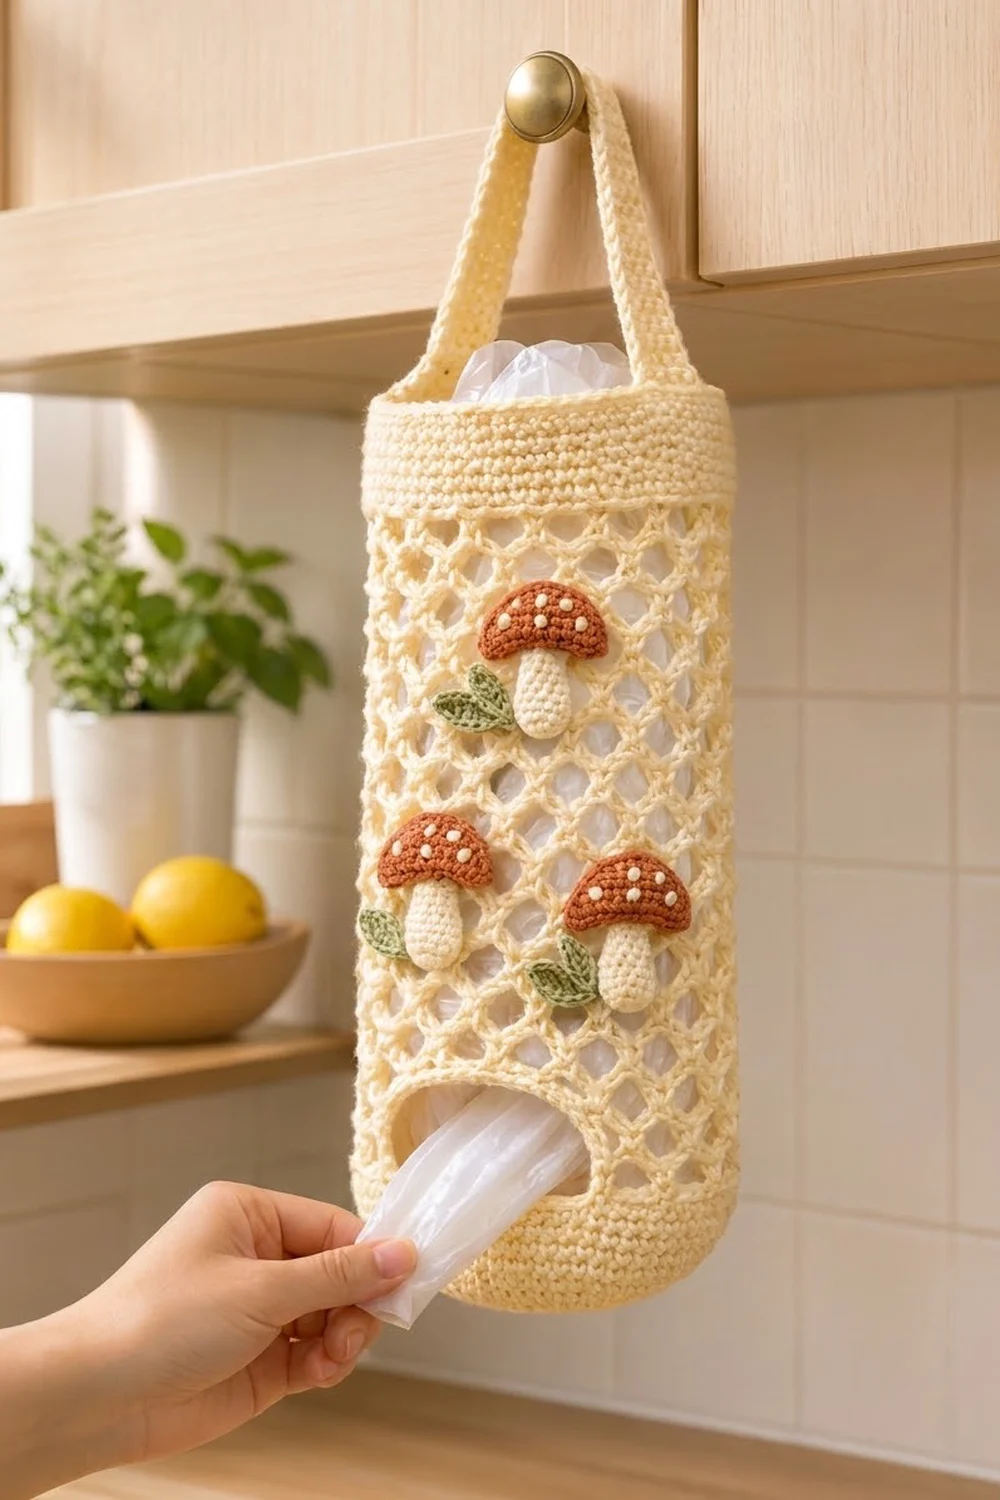
This bag holder gives your plastic grocery bags a tidy home with a bit of woodland charm. The body is a tall tube in soft cream cotton. It has a solid rounded base, an open diamond mesh in the middle and a firm band at the top. You stuff bags in at the top and pull them out one at a time through an oval slot near the bottom.
Three small mushrooms sit on the front of the mesh. Each one has a rust-orange cap with cream dots, a cream stem and a little green leaf sprig. A flat strap with rounded ends lets you hang it from a cabinet knob, a hook or a pantry door.
The pattern uses US crochet terms. The finished body is about 6 in (15.2 cm) wide when flattened and 14.7 in (37.3 cm) tall. The strap loop adds about 5.6 in (14.2 cm), so the whole piece hangs about 20.3 in (51.6 cm) long.
You work the body in one piece from the bottom up. First comes a flat circle base, then solid walls with the dispensing slot worked into them, then the mesh and finally the top band. The strap, caps, stems and leaves are made separately and sewn on.
Finished Size and Construction
- Finished size: 6 in (15.2 cm) flat width × 14.7 in (37.3 cm) body height
- Skill level: Easy–Intermediate
- Terminology: US terms
- Yarn weight: Worsted (#4), 100% cotton
- Hooks: 4.5 mm (US 7) for the body and strap, 4.0 mm (US G-6) for the appliqués
- Number of pieces: 1 body, 1 strap, 3 caps, 3 stems, 6 leaves
- Layout: a single tube, with the slot centered on the front and the appliqués on the front mesh
- Base diameter: about 3.8 in (9.7 cm)
- Size before border: 6 in (15.2 cm) wide × 12.9 in (32.8 cm) tall
- Border depth: top band 1.8 in (4.6 cm), plus a 1-round edging around the slot
Materials
Use a smooth, mercerized or combed worsted-weight cotton. Cotton keeps its shape when the holder is full of bags and holds up to washing. Acrylic will also work, but the mesh will stretch more.
- Cream (main color): 130 g, about 234 m
- Rust (caps): 10 g, about 18 m
- Sage green (leaves): 6 g, about 11 m
These amounts assume about 1.8 m per gram and include a margin of roughly 15%, so you have room for a gauge swatch.
Tools:
– 4.5 mm (US 7) and 4.0 mm (US G-6) crochet hooks
– 4 stitch markers
– Tapestry needle
– Scissors
– Measuring tape
– Pins and a blocking mat
– Spray bottle
Abbreviations (US Terms)
- ch: chain
- sl st: slip stitch
- sc: single crochet
- hdc: half double crochet
- dc: double crochet
- st(s): stitch(es)
- sk: skip
- Rnd: round
- MR: magic ring
- ch-5 loop: the space under a chain of 5
Special stitch: French knot. Wrap cream yarn around the needle twice, then insert the needle back in next to where it came out. You will use these for the cap dots.
Gauge and Checkpoints
Single crochet gauge (4.5 mm hook): 16 sc × 18 rnds = 4 in (10.2 cm). That works out to 4 sc per 1 in (2.5 cm).
Mesh gauge: 1 sc plus 1 ch-5 loop = 1 in (2.5 cm) wide, and 4 mesh rnds = 2 in (5.1 cm) tall. Each mesh round is 0.5 in (1.3 cm).
Before you start the body, crochet the base (Rnds 1–8) as your test piece. It is a true gauge swatch you can keep.
Checkpoints:
– After Rnd 4: 24 sts, diameter about 1.9 in (4.8 cm)
– After Rnd 8: 48 sts, diameter about 3.8 in (9.7 cm), circumference 12 in (30.5 cm)
– After Rnd 21: flat width 6 in (15.2 cm), wall height 2.9 in (7.4 cm)
– After Rnd 41: total height before the band about 12.9 in (32.8 cm)
– After Rnd 49: total height about 14.7 in (37.3 cm)
If your base is too big: go down one hook size. If it is too small: go up one hook size. Being within ±0.25 in (0.6 cm) at Rnd 8 is fine. If the base cups, your increases are too tight. If it ruffles, they are too loose.

Body
Use the 4.5 mm hook and cream yarn. Work in continuous rounds through Rnd 12, moving a marker up to the first st of each round.
Base
- Rnd 1: MR, 6 sc in ring. (6)
- Rnd 2: 2 sc in each st around. (12)
- Rnd 3: sc 1, 2 sc in next × 6. (18)
- Rnd 4: sc 2, 2 sc in next × 6. (24)
- Rnd 5: sc 3, 2 sc in next × 6. (30)
- Rnd 6: sc 4, 2 sc in next × 6. (36)
- Rnd 7: sc 5, 2 sc in next × 6. (42)
- Rnd 8: sc 6, 2 sc in next × 6. (48)
The base should lie flat at 3.8 in (9.7 cm) across.
Lower Walls
- Rnds 9–12: sc in each st around. (48 per round)
Because there are no increases, the walls curve upward and give the bottom its soft, rounded shape.
Dispensing Slot
You now work back and forth over part of the round, leaving a gap that becomes the slot.
- Row 13 (RS): ch 1, sc in the next 34 sts, turn. Leave the last 14 sts of the round unworked. (34)
- Rows 14–17: ch 1, sc in each st across, turn. Do not turn at the end of Row 17. (34 per row)
Row 17 is a right-side row and ends at the edge next to the unworked stitches.
- Rnd 18 (closing round): ch 14 to bridge the 14 unworked sts. Sc in the first sc of Row 17, then sc in the next 33 sts. Sc in each of the 14 ch. Join with a sl st to the first sc. The count is 34 sc + 14 sc in ch = 48.
The slot is 14 sts wide, about 3.5 in (8.9 cm), and 5 rows tall, about 1.1 in (2.8 cm). Its bottom edge sits 0.9 in (2.3 cm) above the base.
- Rnds 19–21: ch 1, sc in each st around, join. (48 per round)
Checkpoint: with the slot centered on the front, the flattened tube should measure 6 in (15.2 cm) wide, which is 24 sts per half. The walls from Rnd 9 to Rnd 21 are 13 rounds, about 2.9 in (7.4 cm).
Mesh
- Rnd 22 (foundation): ch 1, sc in the first st, ch 5, sk 3, sc in next × 11, ch 5, sk the last 3 sts, join with a sl st to the first sc. (12 sc, 12 ch-5 loops)
The math: 12 repeats × 4 sts (1 sc + 3 skipped) = 48.
- Rnds 23–41: sl st in each of the first 3 ch, which puts you at the center of the loop. Ch 1, sc in the same loop, ch 5, sc in next ch-5 loop × 11, ch 5, join to the first sc. (12 sc, 12 ch-5 loops per round)
Placing each sc in the center of a loop from the round below shifts the pattern by half a repeat each round. That offset is what makes the diamond shapes.
The mesh is 20 rounds (Rnds 22–41) at 0.5 in (1.3 cm) each, for 10 in (25.4 cm). The total height is now about 12.9 in (32.8 cm). Gently tug the mesh lengthwise before you measure.
Border
The border has two parts: the solid top band and a single round of edging around the slot. Both use the same sc gauge as the base, 4 sc = 1 in (2.5 cm), so the band holds exactly the same width as the lower walls.
Top Band
- Rnd 42 (conversion round): ch 1, sc in the sc, 3 sc in the next ch-5 loop × 12, join. The count is 12 sc (1 per existing sc) + 36 sc (3 per loop) = 48.
- Rnds 43–49: ch 1, sc in each st around, join. (48 per round, 24 per flattened side)
Fasten off and weave in the end.
Why the math works: the base, the walls and the band all have 48 sts. The mesh uses 12 repeats of 4 sts, and the conversion round puts exactly 4 sts back into each repeat. Every solid section therefore lies at 12 in (30.5 cm) around and 6 in (15.2 cm) flat, so the tube stays straight instead of flaring or pulling in.
The band is 8 rounds (Rnds 42–49), about 1.8 in (4.6 cm) deep.
Slot Edging
Join cream at one bottom corner of the slot. Work 1 rnd of sc as follows:
– Bottom edge: 14 sc, 1 in each unworked st of Rnd 12
– First side: 5 sc, 1 in each row end
– Top edge: 14 sc, 1 in the underside of each ch from Rnd 18
– Second side: 5 sc, 1 in each row end
Join to the first sc for a total of 14 + 5 + 14 + 5 = 38 sc. Fasten off.
Each long edge matches its 14 st count, so the slot lies flat without gaping or puckering. The 1-per-row-end sides keep the short ends from flaring.
Strap
Use the 4.5 mm hook and cream yarn.
- Rnd 1: ch 57. Sc in the 2nd ch from the hook, sc in the next 54 ch, 3 sc in the last ch. Rotate and work along the opposite side of the chain: sc in the next 54 ch, then 2 sc in the same ch as the first sc. Join. The count is 54 + 3 + 54 + 3 = 114, with 3 sc at each end.
- Rnd 2: ch 1, sc in the next 54 sts, 2 sc in each of the 3 end sts, sc in the next 54 sts, 2 sc in each of the 3 end sts, join. The count is 54 + 6 + 54 + 6 = 120.
Fasten off. The strap measures about 14.25 in (36.2 cm) long and 1 in (2.5 cm) wide, with rounded ends.
Mushroom Appliqués
Use the 4.0 mm hook. The smaller hook keeps these pieces dense and crisp.
Cap (make 3, rust)
- Row 1: MR, ch 2 (counts as hdc), 6 hdc in ring, turn. (7)
- Row 2: ch 2 (counts as hdc), hdc in the same st, 2 hdc in each st across, turn. (14)
- Row 3: ch 1, sc 1, 2 sc in next × 7. (21)
Pull the ring closed and fasten off. The cap is a half circle about 2 in (5.1 cm) wide and 1 in (2.5 cm) tall. With cream yarn, add 5 French knots scattered across the cap.
Stem (make 3, cream)
- Rnd 1: ch 5. Sc in the 2nd ch from the hook, sc in the next 2 ch, 4 sc in the last ch. Working along the opposite side, sc in the next 2 ch, then 3 sc in the same ch as the first sc. Join. The count is 1 + 2 + 4 + 2 + 3 = 12.
Fasten off. The stem is an oval about 1.25 in (3.2 cm) long and 0.6 in (1.5 cm) wide.
Leaf (make 6, sage green)
Ch 7. Working into the chain:
– First side: sl st in the 2nd ch from the hook, then sc, hdc, dc, hdc.
– Tip: (sc, ch 1, sc) in the last ch.
– Second side: working along the opposite side, hdc, dc, hdc, sc, sl st.
Fasten off. Each leaf is about 1 in (2.5 cm) long. You will sew them on in pairs as small V-shaped sprigs.
Assembly
- Mushrooms: sew one cap over the top of each stem so the cap overlaps the stem by about 0.25 in (0.6 cm). Tuck a leaf pair at the base of each stem, angled to one side.
- Placement: flatten the body with the slot centered on the front. Pin one mushroom high on the mesh, slightly right of center, about 3 in (7.6 cm) below the band. Pin the other two side by side about 3 in (7.6 cm) below the first, one left and one right.
- Sewing the mushrooms: whipstitch each mushroom through the mesh strands behind it. Keep your stitches inside the body only, so the back stays open.
- Strap: pin each strap end inside the band at the two side folds, overlapping by 1.5 in (3.8 cm). Backstitch a rectangle through the strap and band at each end. This leaves a loop about 5.6 in (14.2 cm) tall above the rim.
Final Blocking
- Lightly mist the whole body and the strap.
- Lay the body flat with the slot centered on the front. Pin the band and walls to 6 in (15.2 cm) wide.
- Gently stretch the mesh lengthwise until the body measures 14.7 in (37.3 cm). Pin the diamonds so they open evenly.
- Pin the strap straight at 1 in (2.5 cm) wide.
- Press the appliqués flat with damp fingers.
- Let everything dry completely before you unpin it.
Final Quality-Control Checklist
- The base lies flat or curves evenly, with no cupping.
- Every solid round has 48 sts, and the slot edging has 38 sts.
- The mesh has 12 loops on every round, with no diagonal drift.
- The slot is centered on the front and lies flat.
- The band and walls both measure 6 in (15.2 cm) flat.
- The strap ends are secure, level and at the side folds.
- The mushrooms are firmly attached, with no stitches showing on the back.
- All ends are woven in through solid stitches.
Troubleshooting
- The mesh is twisting: you are probably starting each round in the wrong place. Always sl st exactly 3 ch to reach the center of the loop.
- The band is wider than the walls: check that Rnd 42 has exactly 3 sc per loop, then try going down one hook size for the band.
- The slot gapes: check that your edging has 14 sc on each long edge and is not overstuffed.
- The base is cupping: your tension is too tight. Loosen it or go up one hook size.
- The strap is twisting: steam block it flat before you sew it on.
- The caps are curling: work Row 3 more loosely, then pin flat to dry.
Care
Hand wash or machine wash cold on a gentle cycle in a mesh laundry bag. Reshape while damp and lay flat to dry.
Final Notes
The measurements build on each other in this order:
- 16 sc = 4 in (10.2 cm) gives a 48 st base that measures 3.8 in (9.7 cm) across and 12 in (30.5 cm) around.
- Those 48 sts form walls 6 in (15.2 cm) wide and 2.9 in (7.4 cm) tall, with a slot 3.5 in (8.9 cm) wide.
- Twelve mesh repeats add 10 in (25.4 cm) of height.
- The conversion round restores exactly 48 sts for a 1.8 in (4.6 cm) band.
- The finished body is 14.7 in (37.3 cm) tall, with a 5.6 in (14.2 cm) strap loop on top.
Check your measurements at each checkpoint and the holder will come out straight and even, ready for your bags.
Happy crocheting!