

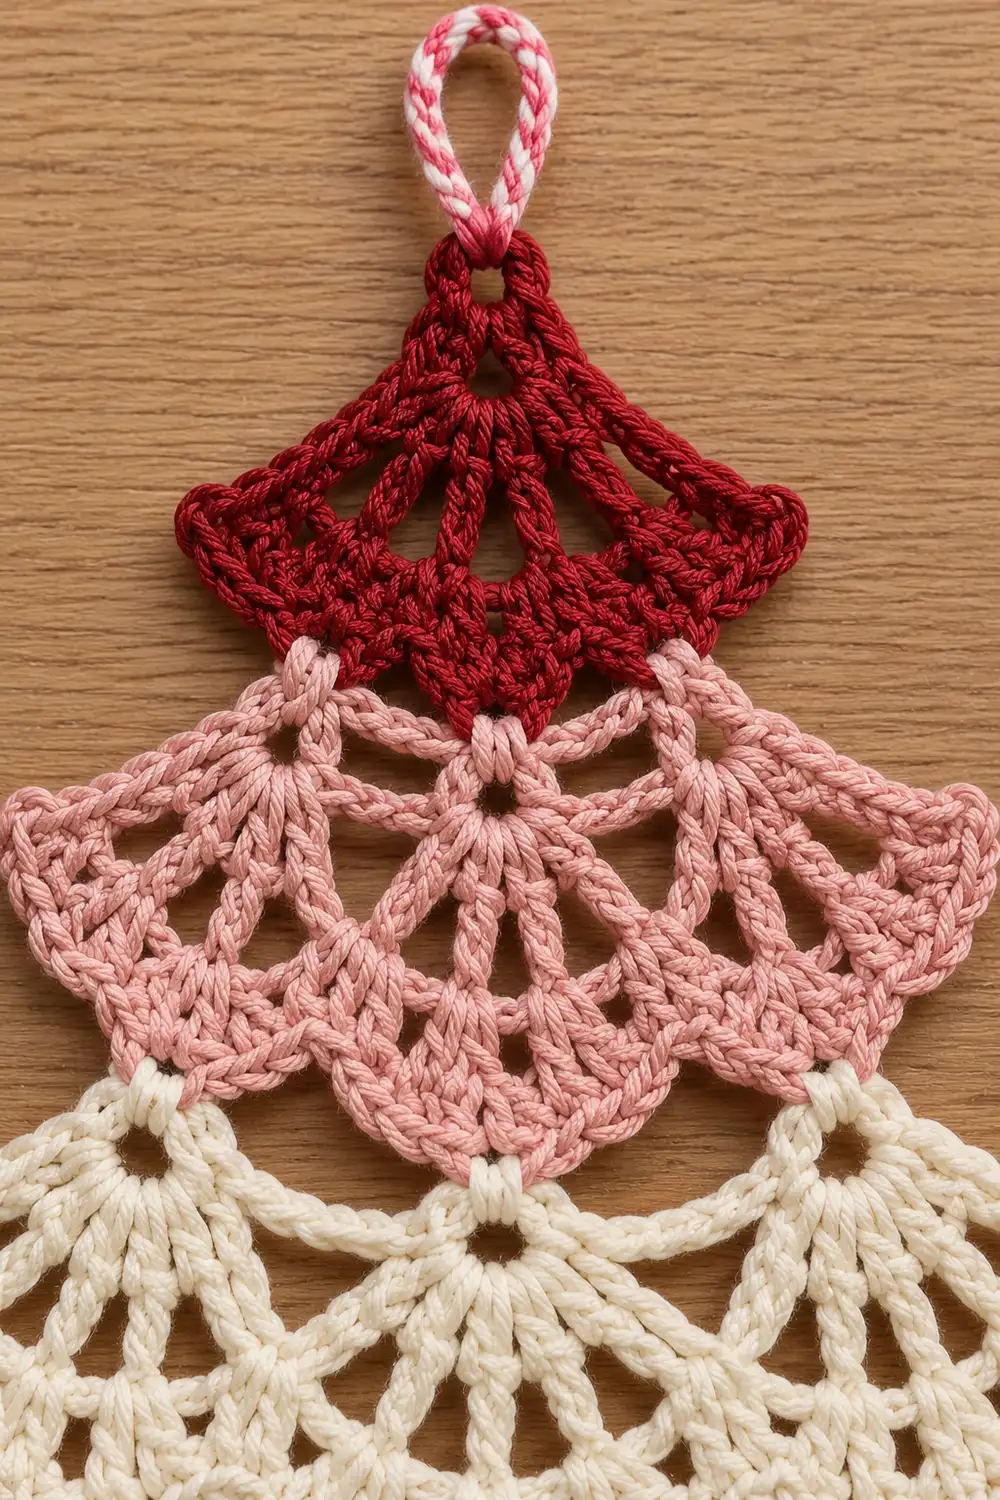
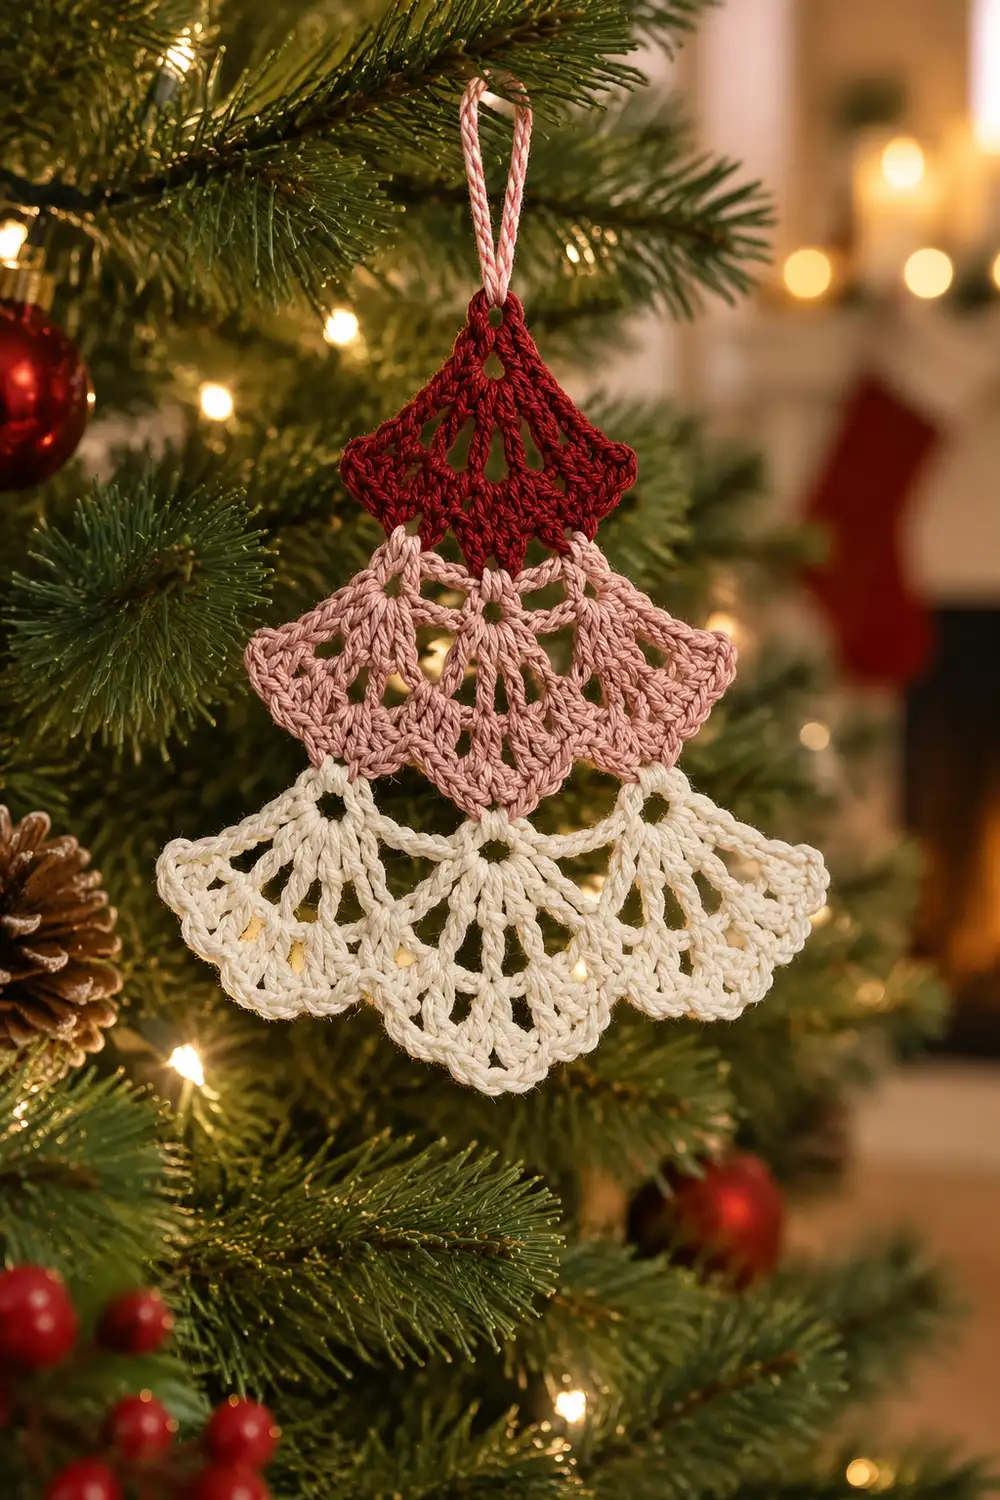
This little tree is made of three lacy fans stacked into a classic Christmas tree silhouette. Each fan is a small doily-style motif with radiating stitch lines, open spaces, and a soft scalloped shell edge.
The colors run from deep red/burgundy at the top, through mauve/dusty pink in the middle, to pale cream at the base. A twisted pink-and-white cord forms a candy-cane-striped hanging loop at the apex. The style is vintage-lace and soft, so it suits a tree, a gift tag, or a window hook.
The pattern uses US crochet terms. The finished ornament measures 5.6 in (14.2 cm) wide and 4.2 in (10.7 cm) tall, plus a 1.5 in (3.8 cm) loop.
Construction is simple. You work three separate fans in turned rows from a small center ring. You tack each lower fan behind the one above it, work a scalloped border on each fan’s curved edge, then add the twisted cord.
Finished Size and Construction
- Finished size: 5.6 in (14.2 cm) wide x 4.2 in (10.7 cm) tall, plus a 1.5 in (3.8 cm) loop
- Skill level: Easy to intermediate
- Terminology: US crochet terms
- Yarn weight: Sport weight (#2) mercerized cotton
- Hook: 3.25 mm (US D-3)
- Number of pieces: 3 fans + 1 twisted cord
- Layout: 3 tiers stacked vertically, small to large
- Piece size (bordered width): red 2.4 in (6.1 cm), mauve 4.0 in (10.2 cm), cream 5.6 in (14.2 cm)
- Size before border: red 1.8 in (4.6 cm), mauve 3.4 in (8.6 cm), cream 5.0 in (12.7 cm)
- Border depth: 0.3 in (0.8 cm)
Materials
Use a smooth mercerized cotton. It shows the radiating lines clearly and holds a crisp shape after blocking. Avoid fuzzy or very stretchy yarns, because the lace will blur and the scallops will droop.
Yarn:
– Deep red/burgundy: 3 g (about 9 m)
– Mauve/dusty pink: 5 g (about 16 m)
– Cream/off-white: 8 g (about 25 m)
Quantities include a margin for the swatch, weaving in ends, and the cord. The cord uses about 20 in (50.8 cm) each of mauve and cream.
Tools:
– 3.25 mm (US D-3) crochet hook
– Tapestry needle
– 3 locking stitch markers
– Scissors
– Ruler or tape measure
– Blocking mat, rustproof pins, and a spray bottle
Abbreviations (US Terms)
- ch – chain
- sl st – slip stitch
- sc – single crochet
- hdc – half double crochet
- dc – double crochet
- st(s) – stitch(es)
- sp – space
- tch – turning chain
- RS / WS – right side / wrong side
- rep – repeat
Special stitches:
– V-st: (dc, ch 1, dc) in the same st.
– Shell: 5 dc in the same st.
– Half shell: 3 dc in the same st (used at each fan’s straight edge).
– Fan cluster: 7 dc in the same sp.
Row 1 of every fan is the RS. Every fan ends its body on a WS row, so every border is worked on the RS.
Gauge and Checkpoints
Gauge is measured as radius, from the center of the ring to the top of a row:
- After Row 1: 0.5 in (1.3 cm)
- Each following dc row adds 0.4 in (1.0 cm)
- The border adds 0.3 in (0.8 cm)
Each fan is a half circle, so its width is twice its radius.
Test one piece first. Make the mauve fan through Row 4 and lay it flat. It should be 3.4 in (8.6 cm) wide.
Radius checkpoints:
– Row 2: 0.9 in (2.3 cm)
– Row 3: 1.3 in (3.3 cm)
– Row 4: 1.7 in (4.3 cm)
– Row 5: 2.1 in (5.3 cm)
– Row 6: 2.5 in (6.4 cm)
If your fan is too big, change to a hook 0.25 mm smaller. If it is too small, go up 0.25 mm. Re-test until the mauve fan reaches 3.4 in (8.6 cm). Keep your tension even, because loose chains make the lace sag.
Tier 1: Red Fan (Top)
With red, ch 4 and sl st in the first ch to form a ring.
Row 1 (RS): Ch 3 (counts as dc), 6 dc in ring, turn. (7 dc)
Row 2 (WS): Ch 3 (counts as dc), 2 dc in the same st (half shell). Ch 1, sc in next dc, ch 1, shell in next dc, ch 1, sc in next dc, ch 1, shell in next dc, ch 1, sc in next dc, ch 1, 3 dc in 3rd ch of tch (half shell).
(16 dc, 3 sc, 6 ch-1 sps)
The 7 spokes from Row 1 now carry: half shell, sc, shell, sc, shell, sc, half shell. The width should be 1.8 in (4.6 cm). Do not fasten off. Put the live loop on a locking marker.
This fan has only small ch-1 gaps, so it reads as the most solid tier.
Tier 2: Mauve Fan (Middle)
With mauve, ch 5 and sl st in the first ch to form a ring.
Row 1 (RS): Ch 3 (counts as dc), 8 dc in ring, turn. (9 dc)
Row 2: Ch 4 (counts as dc + ch 1). Dc in next dc, ch 1; rep from * across to tch. Dc in 3rd ch of tch, turn.
(9 dc, 8 ch-1 sps)*
Row 3: Ch 5 (counts as dc + ch 2). Dc in next dc, ch 2; rep from * across to tch, skipping the ch-1 sps. Dc in 3rd ch of tch, turn.
(9 dc, 8 ch-2 sps)*
Row 4 (WS): Ch 3 (counts as dc), 2 dc in the same st. Ch 1, skip ch-2 sp, sc in next dc, ch 1, skip ch-2 sp, shell in next dc; rep from * 2 more times. Ch 1, sc in next dc, ch 1, 3 dc in 3rd ch of tch.
(21 dc, 4 sc, 8 ch-1 sps)*
The spokes now carry: half shell, sc, shell, sc, shell, sc, shell, sc, half shell. The width should be 3.4 in (8.6 cm). Put the live loop on a marker.
Tier 3: Cream Fan (Bottom)
With cream, work Rows 1–3 exactly as for the mauve fan. You should have 9 dc and 8 ch-2 sps.
Row 4 (WS): Ch 4 (counts as dc + ch 1), dc in the same st (V-st). Ch 1, skip ch-2 sp, V-st in next dc; rep from * across, working the last V-st in 3rd ch of tch, turn.
(9 V-sts = 18 dc; 17 ch-1 sps, 9 inside the V-sts and 8 between them)*
Row 5 (RS): Ch 3 (counts as dc), 2 dc in first V-sp. Ch 2, sc in next V-sp, ch 2, fan cluster in next V-sp; rep from * 2 more times. Ch 2, sc in next V-sp, ch 2, 3 dc in last V-sp, turn.
(27 dc, 4 sc, 8 ch-2 sps)*
Row 6 (WS): Ch 4 (counts as dc + ch 1), dc in next dc, ch 1, dc in next dc. Ch 1, skip ch-2 sp, sc in next sc, ch 1, skip ch-2 sp, dc in next dc, (ch 1, dc in next dc) 6 times; rep from * 2 more times. Ch 1, sc in next sc, ch 1, dc in next dc, ch 1, dc in next dc, ch 1, dc in 3rd ch of tch.
(27 dc, 4 sc, 30 ch-1 sps)*
Each full fan cluster is now 7 dc with 6 ch-1 sps. Each half fan is 3 dc with 2 ch-1 sps. These create the radiating openwork lines. The width should be 5.0 in (12.7 cm). Put the live loop on a marker.
Make All Pieces
- Red: 1 fan
- Mauve: 1 fan
- Cream: 1 fan
- Twisted cord: 1, made last
Layout grid:
TIER 1 (TOP):    RED
TIER 2 (MIDDLE): MAUVE
TIER 3 (BOTTOM): CREAM
Weave in the beginning tails only. Leave the live loops on their markers.
Joining
Method: Tack the fans with a tapestry needle and a 12 in (30.5 cm) tail of the lower fan’s color. Each lower fan sits behind the fan above it. Work every stitch through the back posts on the upper fan’s WS only, so nothing shows on the front.
Placement: Center each lower fan under the upper fan. Place the lower fan’s ring center 0.6 in (1.5 cm) above the upper fan’s body edge. This puts the lower fan’s Row 1 tops inside the upper fan’s last body row.
Stitch-to-stitch logic: Use 3 tack points per join. The lower fan’s Row 1 dc 3, 5, and 7 attach as follows:
- Mauve to red: dc 3 to the base of red’s first full shell, dc 5 to red’s center sc, dc 7 to the base of red’s second full shell.
- Cream to mauve: dc 3 to the 1st dc of mauve’s middle shell, dc 5 to its 3rd dc, dc 7 to its 5th dc.
The spacing of these points matches within about 0.1 in (0.3 cm), so a little ease absorbs the difference.
Tension: Make 2 small stitches at each point and pull them just snug. If the front puckers, loosen the tack.
Size checkpoint: The joined tree should measure 5.0 in (12.7 cm) wide and 3.9 in (9.9 cm) tall before the borders.
Border
Border gauge: The border is worked at the body’s own gauge. Each body dc gets exactly 1 border stitch. Extra stitches are added only at the scallop peaks, where the curve is longest. Ch sps are skipped, and each valley sc gets a sl st. The border adds 0.3 in (0.8 cm) all around the curve.
All borders are worked with the RS facing. The tack points sit on the posts, so the stitch tops stay free. Return each live loop to your hook and turn.
Red border: Ch 2 (does not count), 2 dc in first dc, hdc in next dc, sc in next dc. Skip ch-1, sl st in next sc, skip ch-1. *Sc in next dc, hdc in next dc, 3 dc in next dc, hdc in next dc, sc in next dc, skip ch-1, sl st in next sc, skip ch-1; rep from * once more. Sc in next dc, hdc in next dc, 2 dc in top of tch. Fasten off.
Count: 16 sts worked 1 per existing dc, + 1 extra at each half shell (2) + 2 extra at each full shell (4) = 22 sts, + 3 sl sts in the valleys = 25 sts.
Mauve border: Work as for red, repeating from * 2 times total.
Count: 21 sts worked 1 per existing dc, + 2 + 6 extra = 29 sts, + 4 sl sts = 33 sts.
Cream border: Ch 1, sc in first dc, skip ch-1, shell in next dc, skip ch-1, sc in next dc. *Skip ch-1, sl st in next sc, skip ch-1, sc in next dc, (skip ch-1, shell in next dc, skip ch-1, sc in next dc) 3 times; rep from * 2 more times. Skip ch-1, sl st in next sc, skip ch-1, sc in next dc, skip ch-1, shell in next dc, skip ch-1, sc in top of tch. Fasten off.
Count: 27 sts worked 1 per existing dc (16 sc + 11 shell centers), + 4 extra per shell x 11 = 44, + 4 sl sts = 75 sts.
Why the math works: Every fan has an odd number of spokes, so the scallops are mirror-symmetric around the center. The red and mauve fans end in shells, which the border rounds into scallops. The cream fan ends in openwork, which takes 11 small shells. Because no stitches are added between peaks, the curve lies flat instead of ruffling.
Twisted cord: Knot one 20 in (50.8 cm) strand each of mauve and cream together. Twist until the strands kink, fold in half, and let the cord twist back on itself. Thread the ends through the red ring from front to back. Adjust to a 1.5 in (3.8 cm) loop, knot on the WS, and trim.
Final Blocking
- Weave in all remaining ends on the WS, through the dc posts.
- Draw half circles on paper to use as a template: radius 1.2 in (3.0 cm), 2.0 in (5.1 cm), and 2.8 in (7.1 cm). Stack them to match the tree.
- Lay the ornament face up on the mat over the template.
- Mist it until it is damp, not soaked.
- Pin the center spoke of each fan first, then each straight edge.
- Pin every scallop tip outward to its template line.
- Check that the total is 5.6 in (14.2 cm) wide and 4.2 in (10.7 cm) tall.
- Let it dry completely before unpinning.
Final Quality-Control Checklist
- Red fan: 7 spokes and a 25-st border.
- Mauve fan: 9 spokes, 3 full shells, and a 33-st border.
- Cream fan: 9 spokes, 3 fan clusters, and a 75-st border with 11 shells.
- Fans are centered, and no tack stitches show on the front.
- Finished size is 5.6 in (14.2 cm) x 4.2 in (10.7 cm).
- Loop measures 1.5 in (3.8 cm), is firmly knotted, and is hidden at the back.
- All ends are secure.
Troubleshooting
- Fan cups or curls: The ring is too tight. Remake it with a looser ch 4 or ch 5.
- Fan ruffles: Your chains are too loose. Tighten them, or go down a hook size.
- Uneven scallops: Recount the stitches against the border counts. A missed skip shifts every scallop that follows.
- Lower fan peeks out at the sides: Re-tack it 0.1 in (0.3 cm) higher.
- Cord untwists: Knot the ends tighter, and add one tiny stitch through the ring.
Care
Hand wash in cool water with mild soap, roll it in a towel, and dry flat. Re-pin to the template if the scallops lose their shape.
Final Notes
The measurement chain is short. Row 1 measures 0.5 in (1.3 cm), and each row adds 0.4 in (1.0 cm). That gives body widths of 1.8 in (4.6 cm), 3.4 in (8.6 cm), and 5.0 in (12.7 cm). Joining gives a 3.9 in (9.9 cm) tall tree, and the 0.3 in (0.8 cm) border finishes it at 5.6 in (14.2 cm) x 4.2 in (10.7 cm).
Optional: Make several in different color fades for a matching set of ornaments.
Happy crocheting!