

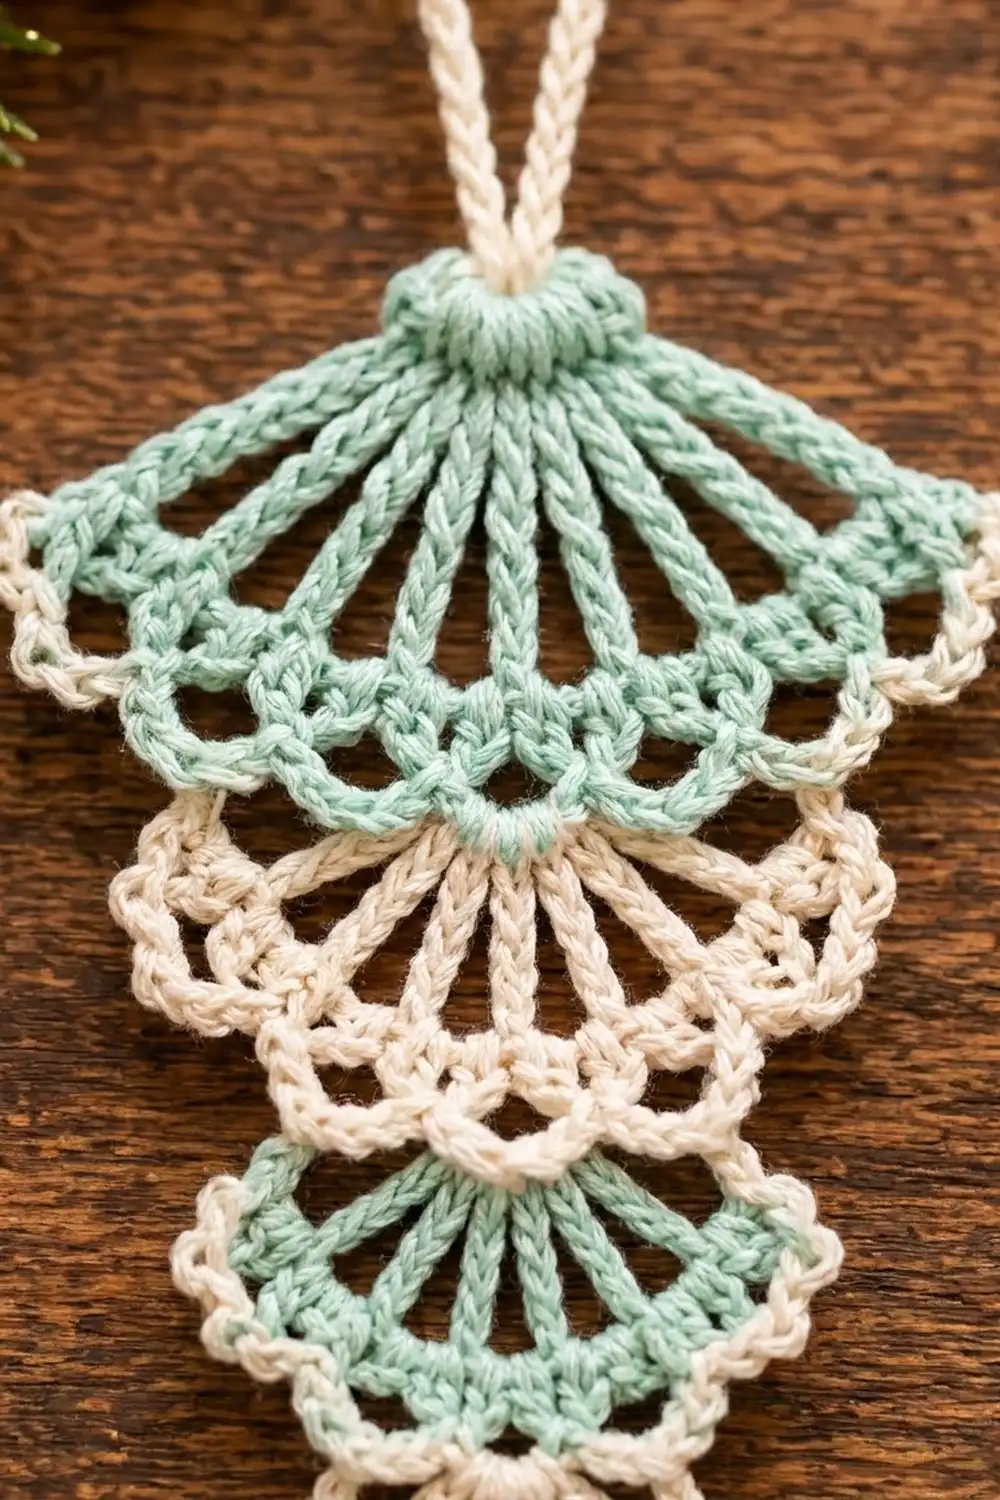
This ornament is a stack of small lacy fans that gets narrower toward the bottom, like an icicle. Each fan has a solid knob at the top and spokes that open into chain loops. A scalloped picot edge finishes every fan. Six fans are stacked from widest to smallest, and a little teardrop tip completes the point.
The colors are soft mint and warm cream, alternating from tier to tier. The ornament looks vintage and delicate, but each fan takes only four short rows. Mercerized cotton shows the spokes and picots clearly and starches well.
This pattern uses US crochet terms. The finished ornament measures 2.75 in (7.0 cm) wide and 6 in (15.2 cm) long. With the hanging loop it measures about 8 in (20.3 cm).
Here is how it is made. You crochet six separate fan tiers and one teardrop tip. Then you add an edging to each fan, stack the tiers with each one slightly overlapping the next, and sew them together from the back. Last, you add a chain loop for hanging.
Finished Size and Construction
- Finished size: 2.75 in (7.0 cm) wide x 6 in (15.2 cm) long; about 8 in (20.3 cm) including the loop
- Skill level: Easy-intermediate
- Terminology: US
- Yarn weight: Fingering (#1 Super Fine) mercerized cotton
- Hook: 2.5 mm
- Number of pieces: 7 (6 fan tiers + 1 tip). The loop is worked directly onto the ornament.
- Layout: A single vertical stack of tiers, from widest at the top to narrowest at the bottom, with each tier overlapping the one above it by 0.3 in (0.8 cm)
- Largest piece size: Tier 1, 2.75 in (7.0 cm) wide x 1.5 in (3.8 cm) tall
- Tier 1 size before border: 2.25 in (5.7 cm) x 1.25 in (3.2 cm)
- Border depth: 0.25 in (0.6 cm) scallop edge on every fan
Materials
Use a smooth, mercerized cotton in fingering weight. The yarn in the ornament shown has about 170 m per 50 g. Size 3 crochet thread also works, but your ornament will come out slightly smaller. Avoid fuzzy yarns, because they hide the open spokes.
- Mint (Color A): 8 g, about 27 m (tiers 1, 3 and 5)
- Cream (Color B): 10 g, about 34 m (tiers 2, 4 and 6, the tip and the hanging loop)
These amounts include a margin for gauge swatches and sewing tails.
Tools:
– 2.5 mm crochet hook
– Tapestry needle
– Scissors
– Rustproof pins and a foam blocking mat
– Spray starch or fabric stiffener
– Ruler or tape measure
Abbreviations (US Terms)
- ch: chain
- sl st: slip stitch
- sc: single crochet
- hdc: half double crochet
- dc: double crochet
- tr: treble crochet
- sp: space
- st(s): stitch(es)
- rep: repeat
Special stitch – Picot: Ch 3 (or ch 2 where stated). In the edge row, the picot chain is worked between the sc groups inside the same loop, so it sticks out as a tiny point. In the tip, the picot is closed with a sl st in the 3rd ch from the hook.
Gauge and Checkpoints
Gauge: 7 sc = 1 in (2.5 cm) using a 2.5 mm hook. Exact gauge is not critical for an ornament. It does matter for how the tiers line up, though, so make Tier 1 first and treat it as your swatch.
Measure Tier 1 at each checkpoint below, pressed flat but not stretched:
- After Row 1 (knob): 0.75 in (1.9 cm) wide
- After Row 2 (spokes): 2.0 in (5.1 cm) wide x 1.0 in (2.5 cm) tall
- After Row 3 (loops): 2.25 in (5.7 cm) x 1.25 in (3.2 cm)
- After Row 4 (edge): 2.75 in (7.0 cm) x 1.5 in (3.8 cm)
If your fan is too big by more than 0.25 in (0.6 cm), go down to a 2.25 mm hook. If it is too small, go up to a 2.75 mm hook. Use the same hook for every tier so the sizes keep shrinking evenly.
Fan Tier Pattern
Every tier uses the same four-row structure. Only the number of spokes (N), the spoke stitch and the chain lengths change. Leave a 10 in (25.4 cm) starting tail on tiers 2 through 6. You will use it to sew each tier to the one above.
Work all rows on the same side of the ring. This makes a half-circle, not a full circle. Turn at the end of each row.
Tier 1 (Mint, N = 9)
Foundation: Ch 4, sl st in the first ch to form a ring.
Row 1 (knob): Ch 3 (counts as dc), 8 dc in ring. Turn. (9 dc)
Row 2 (spokes): Ch 4 (counts as first tr), ch 2, tr in next dc. Rep from * 8 times. Turn. (9 tr, 8 ch-2 sp)
Row 3 (loops): Ch 1, sc in first tr, ch 4, sc in next tr. Rep from * 8 times. The last sc goes in the 4th ch of the turning ch-4. Turn. (9 sc, 8 ch-4 loops)
Row 4 (scallop edge): Ch 1, sc in first sc, (2 sc, ch 3, 2 sc) in next ch-4 loop, sc in next sc. Rep from * 8 times. Fasten off. (9 sc worked into existing sc + 32 sc worked into loops = 41 sc, plus 8 ch-3 picots)
The knob is solid because 9 dc are packed into a small ring. The spokes fan out because each one starts from its own dc.
Tier 2 (Cream, N = 8)
Work the same as Tier 1:
- Row 1: Ch 3, 7 dc in ring. (8 dc)
- Row 2: Ch 4, ch 2, tr in next dc, rep 7 times. (8 tr, 7 ch-2 sp)
- Row 3: Ch 1, sc in first tr, ch 4, sc in next tr, rep 7 times. (8 sc, 7 ch-4 loops)
- Row 4: Ch 1, sc in first sc, (2 sc, ch 3, 2 sc) in next loop, sc in next sc, rep 7 times. (8 + 28 = 36 sc, 7 picots)
Tier 3 (Mint, N = 7)
Make a ring of ch 4, the same as Tier 1. In this tier the spokes are still tr, but the gaps between them shrink to ch 1 and the loops shrink to ch 3.
- Row 1: Ch 3, 6 dc in ring. (7 dc)
- Row 2: Ch 4 (counts as tr), ch 1, tr in next dc, rep 6 times. (7 tr, 6 ch-1 sp)
- Row 3: Ch 1, sc in first tr, ch 3, sc in next tr, rep 6 times. (7 sc, 6 ch-3 loops)
- Row 4: Ch 1, sc in first sc, (2 sc, ch 2, 2 sc) in next ch-3 loop, sc in next sc, rep 6 times. (7 + 24 = 31 sc, 6 ch-2 picots)
Tiers 4–6 (Short Dc Spokes)
The smallest tiers use dc spokes so they stay short.
Foundation: Ch 3, sl st in first ch to form a ring.
- Row 1: Ch 3 (counts as dc), (N − 1) dc in ring. (N dc)
- Row 2: Ch 3 (counts as dc), ch 1, dc in next dc, rep (N − 1) times. (N dc, N − 1 ch-1 sp)
- Row 3: Ch 1, sc in first dc, ch 3, sc in next dc, rep (N − 1) times. (N sc, N − 1 ch-3 loops)
- Row 4: Ch 1, sc in first sc, (2 sc, ch 2, 2 sc) in next loop, sc in next sc, rep (N − 1) times. Fasten off.
| Tier | Color | N | Row 2 | Row 3 | Row 4 | Finished size |
|---|---|---|---|---|---|---|
| 4 | Cream | 6 | 6 dc, 5 sp | 6 sc, 5 loops | 6 + 20 = 26 sc, 5 picots | 1.75 x 1.0 in (4.4 x 2.5 cm) |
| 5 | Mint | 5 | 5 dc, 4 sp | 5 sc, 4 loops | 5 + 16 = 21 sc, 4 picots | 1.5 x 0.9 in (3.8 x 2.3 cm) |
| 6 | Cream | 4 | 4 dc, 3 sp | 4 sc, 3 loops | 4 + 12 = 16 sc, 3 picots | 1.25 x 0.8 in (3.2 x 2.0 cm) |
Teardrop Tip (Cream)
Leave an 8 in (20.3 cm) starting tail.
Foundation: Ch 4, sl st in first ch to form a ring.
Round 1: Ch 1. Into the ring work (sc, hdc, dc, tr, ch 3, sl st in 3rd ch from hook, tr, dc, hdc, sc). Sl st in first sc. Fasten off. (8 sts + 1 picot)
The tallest stitches sit on both sides of the picot, which pulls the shape into a point. The tip measures 0.9 in (2.3 cm) long x 0.6 in (1.5 cm) wide.
Make All Pieces
| Color | Pieces |
|---|---|
| Mint | Tier 1, Tier 3, Tier 5 (3 pieces) |
| Cream | Tier 2, Tier 4, Tier 6, Tip (4 pieces) |
Layout, top to bottom:
      [ Tier 1 – Mint, N=9 ]
     [ Tier 2 – Cream, N=8 ]
      [ Tier 3 – Mint, N=7 ]
      [ Tier 4 – Cream, N=6 ]
       [ Tier 5 – Mint, N=5 ]
       [ Tier 6 – Cream, N=4 ]
             [ Tip ]
Weave in every end except the long starting tails before you join the pieces.
Joining
Method: Whipstitch each tier to the back of the tier above it, using the lower tier’s starting tail.
Stitch-to-stitch logic: Place the lower tier face up behind the upper tier. Line up the center of its ring with the center spoke of the upper tier. Its knob should sit behind the upper tier’s Row 3, with the top of the knob about 0.3 in (0.8 cm) above the lowest scallop point. Whipstitch the knob’s Row 1 stitches to the back loops of the upper tier’s center Row 3 sc, as follows:
- Tier 2 to Tier 1: sc 4–6 (center sc is 5th of 9)
- Tier 3 to Tier 2: sc 4–5 (center falls between 4th and 5th of 8)
- Tier 4 to Tier 3: sc 3–5 (center is 4th of 7)
- Tier 5 to Tier 4: sc 3–4 (center falls between 3rd and 4th of 6)
- Tier 6 to Tier 5: sc 2–4 (center is 3rd of 5)
- Tip to Tier 6: sew the ring to sc 2–3 (center falls between 2nd and 3rd of 4), with the ring overlapping by 0.25 in (0.6 cm)
Tension: Sew snugly enough that the knob doesn’t flop, but not so tight that the upper scallops pucker. Go through back loops only so no stitches show on the front.
Size checkpoint: The visible amounts are 1.5 + 1.1 + 0.95 + 0.7 + 0.6 + 0.5 in from Tiers 1–6, plus 0.65 in from the tip. That adds up to 6.0 in (15.2 cm). If your stack is longer than 6.25 in (15.9 cm), increase the overlaps slightly.
Hanging loop: With cream, join with a sl st at the top center of Tier 1’s ring on the back. Ch 31. Sl st in the 2nd ch from the hook and in each ch across (30 sl st). Sl st again at the starting point to close the loop. Fasten off. The loop stands about 2 in (5.1 cm) tall.
Border
On this ornament, the border is the Row 4 scallop edge on each fan. It works best to treat it as its own step and check it carefully.
Border gauge: Each scallop is 0.25 in (0.6 cm) deep. It adds 0.25 in (0.6 cm) to each side of the fan’s width and 0.25 in (0.6 cm) to its height.
Counts along the curved edge:
- Tier 1: 9 + 32 = 41 sc, 8 picots
- Tier 2: 8 + 28 = 36 sc, 7 picots
- Tier 3: 7 + 24 = 31 sc, 6 picots
- Tier 4: 6 + 20 = 26 sc, 5 picots
- Tier 5: 5 + 16 = 21 sc, 4 picots
- Tier 6: 4 + 12 = 16 sc, 3 picots
The two straight sides (row ends) get no border stitches. They stay hidden behind the tier above.
Why the math works: Row 4 is a trim row. You work 1 sc into each of the N sc from Row 3, plus 4 sc into each of the N − 1 loops. That gives N + 4(N − 1) = 5N − 4 sc. One picot sits in each loop, so there are N − 1 picots. Each Row 3 sc sits directly on top of a spoke, so the sc between scallops line up with the spokes. This makes each scallop fall evenly between two spokes, and the edge lies flat.
Final Blocking
- Soak the joined ornament in cool water for 5 minutes. Gently press out the water in a towel.
- Lay it face up on a blocking mat.
- Pin the Tier 1 knob at the top. Pin the tip’s picot 6 in (15.2 cm) below it.
- Spread the spokes of each tier evenly. Pin the tip of every spoke at the scallop row.
- Pin each picot into a crisp point.
- Check the widths: Tier 1 should be 2.75 in (7.0 cm) and Tier 6 should be 1.25 in (3.2 cm).
- Spray starch evenly, then let it dry completely, at least 6 hours.
- Unpin the ornament. Shape the hanging loop with your fingers.
Final Quality-Control Checklist
- Each tier has the correct count: N spokes, N − 1 loops and 5N − 4 edge sc
- The colors alternate mint, cream, mint, cream, mint, cream, followed by the cream tip
- Every tier is centered under the spoke directly above it
- No sewing stitches show on the front
- The total length is 6 in (15.2 cm), plus a 2 in (5.1 cm) loop
- All picots are pointed and all ends are woven in
Troubleshooting
- Fan curls into a cup: The ring is too tight for Row 1. Loosen the ring chain, or block the fan more firmly.
- Fan ruffles: Your tr stitches are too loose. Shorten each yarn-over pull-through.
- Spokes are uneven: You skipped or doubled a dc in Row 2. Count 1 spoke per dc.
- Tiers lean sideways: Re-sew the tier, centering it on the middle Row 3 sc.
- Tip is floppy: Pull the ring tail tight before sewing, and starch the tip a little more.
- Loop twists: Work the sl st return row into the back bumps of the chain.
Care
Hand wash in cool water, re-shape the ornament, and starch it again if needed. Store it flat between tissue paper so the picots stay crisp.

Final Notes
Everything depends on gauge. Seven sc per 1 in (2.5 cm) gives a Tier 1 that measures 2.25 in (5.7 cm) after Row 3 and 2.75 in (7.0 cm) after the edge. The smaller tiers shrink step by step from there. With overlaps of 0.3 in (0.8 cm), the stack measures 6 in (15.2 cm), and the loop brings it to 8 in (20.3 cm). Check Tier 1 first and the rest will fall into place.
Happy crocheting!