

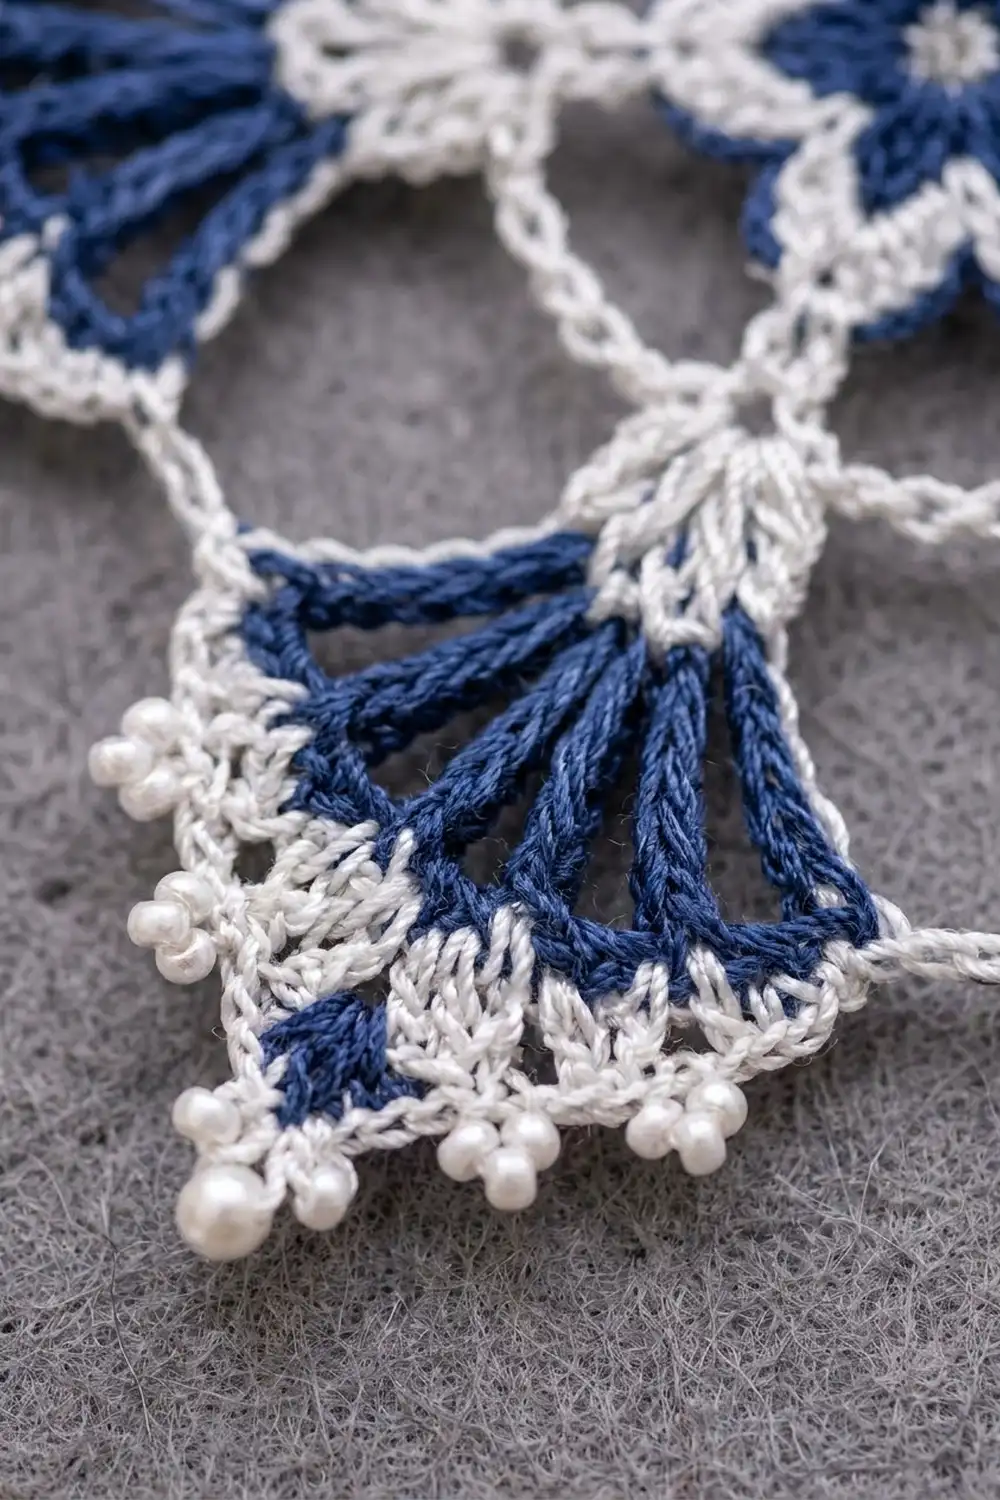
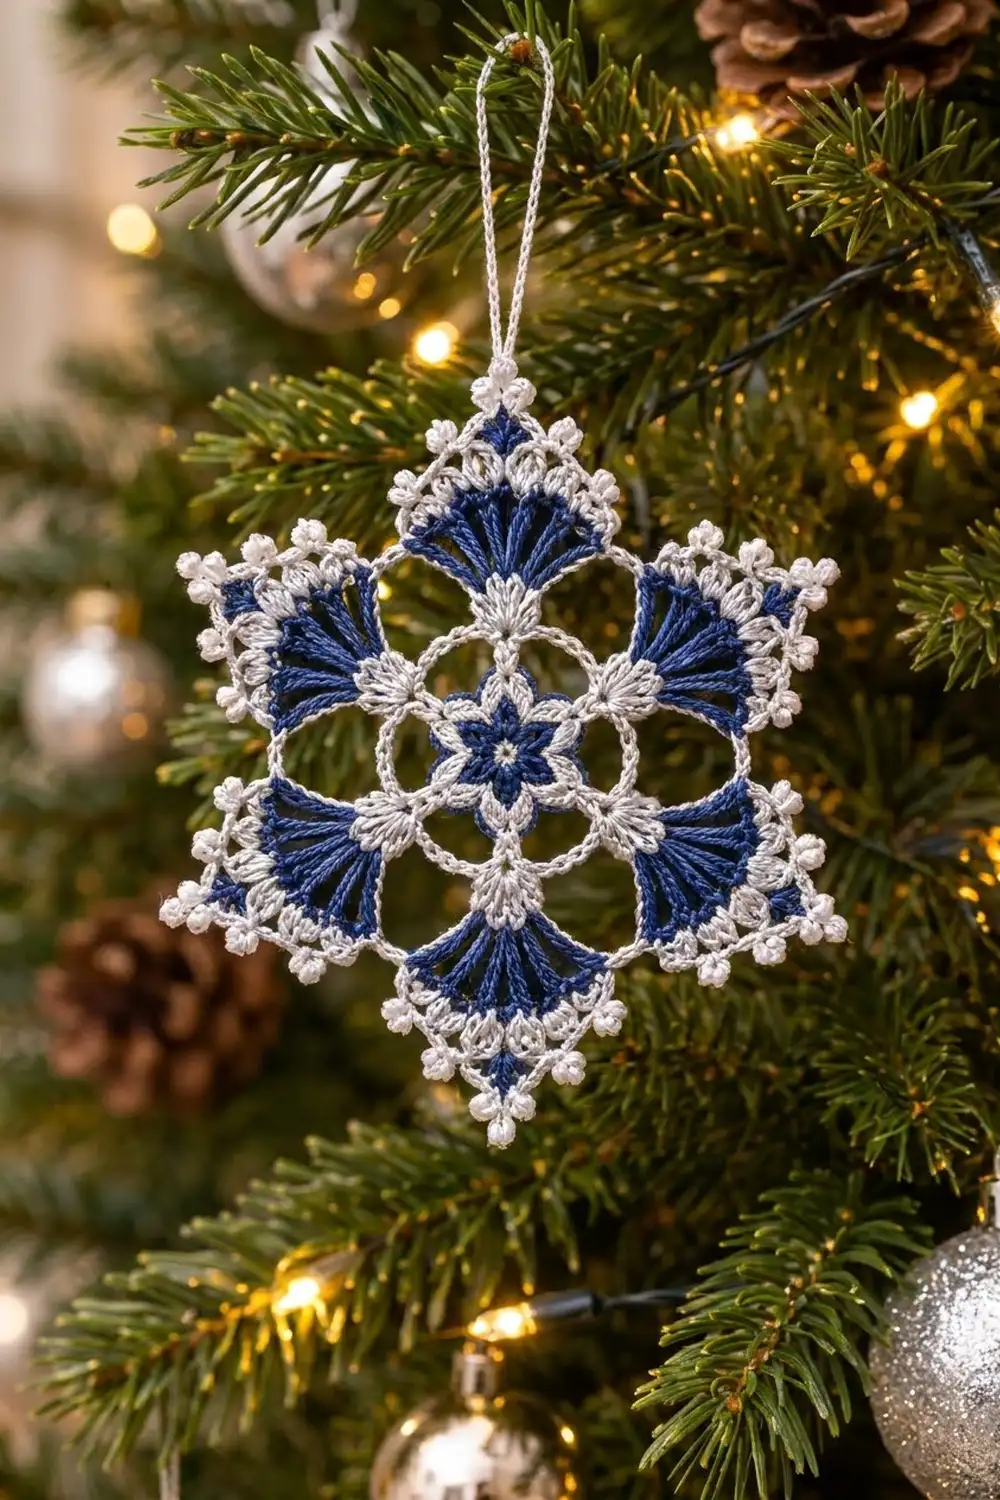
The Frosted Fan Snowflake is a lacy six-pointed thread ornament in crisp white and deep navy blue. A tiny navy star with a white dot sits at the center, framed by a ring of white chain circles. Six white puff-stitch leaves branch outward, and each one holds a solid navy fan edged with white picots. The finished snowflake looks like a ring of little blue bells frosted with snow.
The palette is simple: one white (or silver-white) cotton thread and one navy cotton thread. The contrast looks good on a tree, in a window, or tied onto a gift, and light passes through the open circles at the center.
This pattern uses US crochet terms. After blocking, the ornament measures about 4.5 in (11.4 cm) from point to point, plus a 3 in (7.6 cm) hanging loop.
You work the snowflake as one single piece in the round, starting at the center: a white center, a navy star, white rings and circles, white puff leaves, navy fans, and a final white picot edging. There are no separate pieces to sew or join. You add a hanging loop at the end, then pin the ornament flat and block it.
Finished Size and Construction
- Finished size: 4.5 in (11.4 cm) point to point, blocked
- Skill level: Intermediate (thread work, puff stitches, picots)
- Terminology: US crochet terms
- Yarn weight: Size 10 crochet cotton thread (Lace weight, category 0)
- Hook: 1.75 mm (US steel 6)
- Number of pieces: 1 single motif
- Layout: One six-pointed snowflake, worked in the round
- Piece size: 4.5 in (11.4 cm) point to point
- Size before border: 4 in (10.2 cm) point to point after Round 8
- Border depth: 0.25 in (0.6 cm) on each side, added by Round 9
Materials
Choose a mercerized size 10 cotton thread. Mercerized cotton has a soft sheen, holds starch well, and makes clean, crisp picots. Avoid fuzzy or very soft acrylic threads, because the fans and circles will lose their shape.
- Color A, White or silver-white: about 6 g / 30 m (33 yd)
- Color B, Navy blue: about 4 g / 20 m (22 yd)
These amounts include about 25% extra for your test, the tails, and the hanging loop. One standard ball of each color will make many ornaments.
Tools:
- 1.75 mm (US steel 6) crochet hook
- Fine tapestry needle for thread
- Small sharp scissors
- Stitch marker
- Blocking board or foam mat
- Rust-proof pins
- Spray starch, or a starch solution (optional, for stiffness)
- Ruler or flexible tape measure
Abbreviations (US Terms)
- ch – chain
- sl st – slip stitch
- sc – single crochet
- hdc – half double crochet
- dc – double crochet
- tr – treble crochet
- sp(s) – space(s)
- sk – skip
- st(s) – stitch(es)
- rep – repeat
- p – picot
Special stitches:
- Puff st: (Yarn over, insert hook in the indicated st or sp, yarn over and pull up a loop to about 0.25 in / 0.6 cm) 3 times. Yarn over and draw through all 7 loops on the hook, then ch 1 to close. The closing ch 1 does not count as a separate stitch.
- Picot (p): Ch 3, sl st in the first of those 3 ch. Each picot forms one small bead-like knot.
Gauge and Checkpoints
Gauge is not critical for an ornament, but it controls the final size and how well the fans sit. Work Rounds 1 to 5 as a test and measure before you go on. If you plan to make a set of snowflakes, finish one whole ornament first and use it as your reference.
Checkpoints (measure flat before blocking, edge to edge across the widest point):
- After Round 3 (navy star): 1 in (2.5 cm)
- After Round 5 (white ring): 1.75 in (4.4 cm)
- After Round 6 (chain circles): 2.6 in (6.6 cm)
- After Round 7 (puff leaves): 3 in (7.6 cm)
- After Round 8 (navy fans): 4 in (10.2 cm)
- After Round 9 (edging): 4.5 in (11.4 cm)
A difference of up to 0.25 in (0.6 cm) at any stage is fine, because blocking will even it out.
If your piece is too big: switch to a 1.5 mm (US steel 7) hook and keep your chain loops snug.
If your piece is too small: switch to a 2 mm (US steel 4) hook. Make sure you pull up each puff loop to the full 0.25 in (0.6 cm).
Pattern
Round 1 (Color A, white center)
With white, make a magic ring. Ch 1 and work 6 sc into the ring. Pull the ring closed tightly and sl st to the first sc. (6 sc)
Fasten off white, leaving a 4 in (10.2 cm) tail.
Round 2 (Color B, navy)
Join navy in any sc. Ch 1, then work 2 sc in each sc around. Sl st to the first sc. (12 sc)
Round 3 (Color B, navy star)
Ch 1, sc in the next sc, (hdc, dc, ch 2, dc, hdc) all in the next sc; rep from * 5 more times. Sl st to the first sc. (30 sts and 6 ch-2 sps: 6 sc plus 6 points of 4 sts each)*
The six points form the small navy star, and the white dot from Round 1 stays visible in its center. Fasten off navy.
Round 4 (Color A, white ring)
Join white in any ch-2 point sp. Ch 1, sc in the same sp, ch 7, sc in the next ch-2 sp, ch 7; rep from * 4 more times. Sl st to the first sc. (6 sc and 6 ch-7 sps)*
The chains form a thin white ring around the star, anchored at each star tip.
Round 5 (Color A, filled ring)
Sl st into the first ch-7 sp. Ch 1, then work 9 sc into each ch-7 sp around. Do not work into the Round 4 sc; leave them showing between the groups. Sl st to the first sc. (54 sc, in 6 groups of 9)
Place a marker in the first sc of the first group. You will work the puff stitches of the next round into the 6 exposed sc from Round 4.
Round 6 (Color A, chain circles and first puffs)
Sl st in the 1st and 2nd sc of the first group. Ch 1, sc in the 3rd sc of the group, ch 12, sk the next 3 sc, sc in the 7th sc of the group, ch 3, sk the last 2 sc of the group, puff st in the exposed Round 4 sc between groups, ch 3, sk the first 2 sc of the next group; rep from * 5 more times, ending with sl st to the first sc. (12 sc, 6 ch-12 loops, 6 puff sts, 12 ch-3 sps)*
Each ch-12 loop arches over its group of 9 sc, so together they form a closed white circle. Six circles now surround the center, with a puff pointing outward between each pair of circles.
Round 7 (Color A, puff leaves)
Sl st along the first ch-12 loop until you reach its center. Ch 1, sc around the center of the ch-12 loop, ch 5, sk the ch-3 sp, (puff st, ch 3, puff st) in the top of the next puff, ch 5, sk the ch-3 sp; rep from * 5 more times. Sl st to the first sc. (6 sc, 12 puff sts, 6 ch-3 sps, 12 ch-5 sps)*
The Round 6 puff and the two new puffs form a white V-shaped leaf at each of the six spokes. The ch-3 sp at the top of each V will hold a navy fan. Fasten off white.
Round 8 (Color B, navy fans)
Join navy in any ch-3 sp at the top of a leaf. Ch 4 (counts as the first tr), then work 10 tr in the same sp. Ch 7, sc in the next sc at the top of a circle, ch 7, 11 tr in the next ch-3 sp, ch 7, sc in the next sc, ch 7; rep from * 4 more times. Sl st to the top of the beginning ch-4. (66 tr in 6 fans of 11, 6 sc, 12 ch-7 sps)*
Each fan should spread into a half-circle. If it cups, your tr are too tight. If it ruffles, they are too loose. Fasten off navy.
Checkpoint: 4 in (10.2 cm) point to point.
Border
The border is Round 9, a white picot edging. It outlines each navy fan, adds a three-picot tip at each of the six snowflake points, and covers the navy chain arches between the fans.
Border gauge: about 12 sc per 1 in (2.5 cm) along the fan edge. The finished edging adds 0.25 in (0.6 cm) on every side.
Round 9 (Color A, picot edging)
Join white in the first tr of any fan (the top of the beginning ch-4 counts as the first tr).
Ch 1, *sc in each of the first 3 tr, p, sc in each of the next 2 tr, (sc, p, p, p, sc) in the 6th (center) tr, sc in each of the next 2 tr, p, sc in each of the last 3 tr of the fan; work (4 sc, p, 3 sc) in the next ch-7 sp; sk the sc; work (4 sc, p, 3 sc) in the next ch-7 sp; rep from * 5 more times. Sl st to the first sc and fasten off.
Count for each repeat (one snowflake point):
- Fan edge: 12 sc and 5 picots. That is 11 sc worked one in each tr, plus 1 extra sc at the center tr. Each side of the fan has 1 single picot, and the tip has a 3-picot cluster.
- Two arches: 14 sc and 2 picots (7 sc in each ch-7 sp)
- Total per repeat: 26 sc and 7 picots
Round total: 156 sc and 42 picots. That breaks down as 66 sc worked one in each tr, plus 6 extra sc at the fan tips, plus 84 sc worked into the 12 ch-7 sps (7 in each).
Why the math works: Each fan has 11 tr. Because that’s an odd number, there’s always one true center tr for the tip. Working 1 sc in each tr keeps the fan flat, and the one extra sc at the center makes room for the three-picot cluster, so the tip stays sharp without pulling. Each ch-7 sp holds exactly 7 sc, so the arches lie flat instead of buckling. Skipping the navy sc between the arches creates a small dip at the top of each circle, which gives the snowflake its notched outline.
Hanging Loop
Join white in the center picot of any fan tip. Ch 30, then sl st in the same picot and fasten off. The loop is about 3 in (7.6 cm) long. Weave in all ends along the back of stitches of the same color: white tails in white stitches, navy tails in the navy fans.
Final Blocking
- Wet the snowflake in cool water, then press the water out gently in a towel. Do not wring it.
- Lay it right side up on a blocking board.
- Pin the center picot of each of the six points first. Space them evenly so the snowflake measures 4.5 in (11.4 cm) from point to point, using the board grid or a ruler.
- Open up each chain circle by putting a pin through it, or by rolling a pencil inside it to shape it.
- Ease each navy fan into an even half-circle and pin the single picots along the fan edges.
- For a stiff ornament, mist it with spray starch or brush on a starch solution.
- Let it dry completely, for at least 4 to 6 hours. Remove the pins only when the thread is fully dry.
Final Quality-Control Checklist
- The white center dot is visible, and the navy star has 6 even points.
- There are 6 open, round chain circles of the same size.
- 6 white V-shaped puff leaves point outward.
- There are 6 navy fans, each with 11 tr, opened into a half-circle.
- Each point has a 3-picot tip and 2 single picots along the fan edge.
- Each arch between the fans has 1 picot at its center.
- The ornament measures 4.5 in (11.4 cm) point to point.
- The hanging loop is 3 in (7.6 cm) long and attached at a point tip.
- All ends are woven into stitches of the same color and trimmed.
Troubleshooting
The center star cups. Your Round 3 points are too tight. Loosen your dc, or work the ch-2 point a little looser.
The circles look oval or twisted. Before you work the sc in the 7th st, make sure the ch-12 is not twisted. During blocking, shape each circle with a pencil or pin inside it.
The puff stitches are lumpy or uneven. Pull up every loop to the same height of 0.25 in (0.6 cm), and close each puff with a firm ch 1.
The fans ruffle. Use a smaller hook for Round 8 only, or work 10 tr per fan. If you work 10 tr, place the 3-picot tip between the 5th and 6th tr so it stays centered.
The fans don’t open fully. Your tr are too tight. Use a slightly larger hook for Round 8.
The edging pulls the arches into a curve. Work 8 sc instead of 7 in each ch-7 sp, and keep the picot centered.
The navy chains show through the white arches. Space the 7 sc evenly and pack them close together along each ch-7 sp so they cover the chain completely.
Care
Hand wash in cool water with a mild soap and press dry in a towel. Re-block and re-starch as needed, and store flat between sheets of tissue paper to keep the points crisp.
Final Notes
The measurement chain for this snowflake is short and easy to check. The navy star measures 1 in (2.5 cm), the white ring 1.75 in (4.4 cm), the chain circles 2.6 in (6.6 cm), the puff leaves 3 in (7.6 cm), and the navy fans 4 in (10.2 cm). The picot edging adds 0.25 in (0.6 cm) on each side, for a blocked size of 4.5 in (11.4 cm) point to point, plus a 3 in (7.6 cm) hanging loop. Check your size at each stage, and you’ll be able to make a whole set of matching snowflakes for your tree, gift tags, or window.
Happy crocheting!