

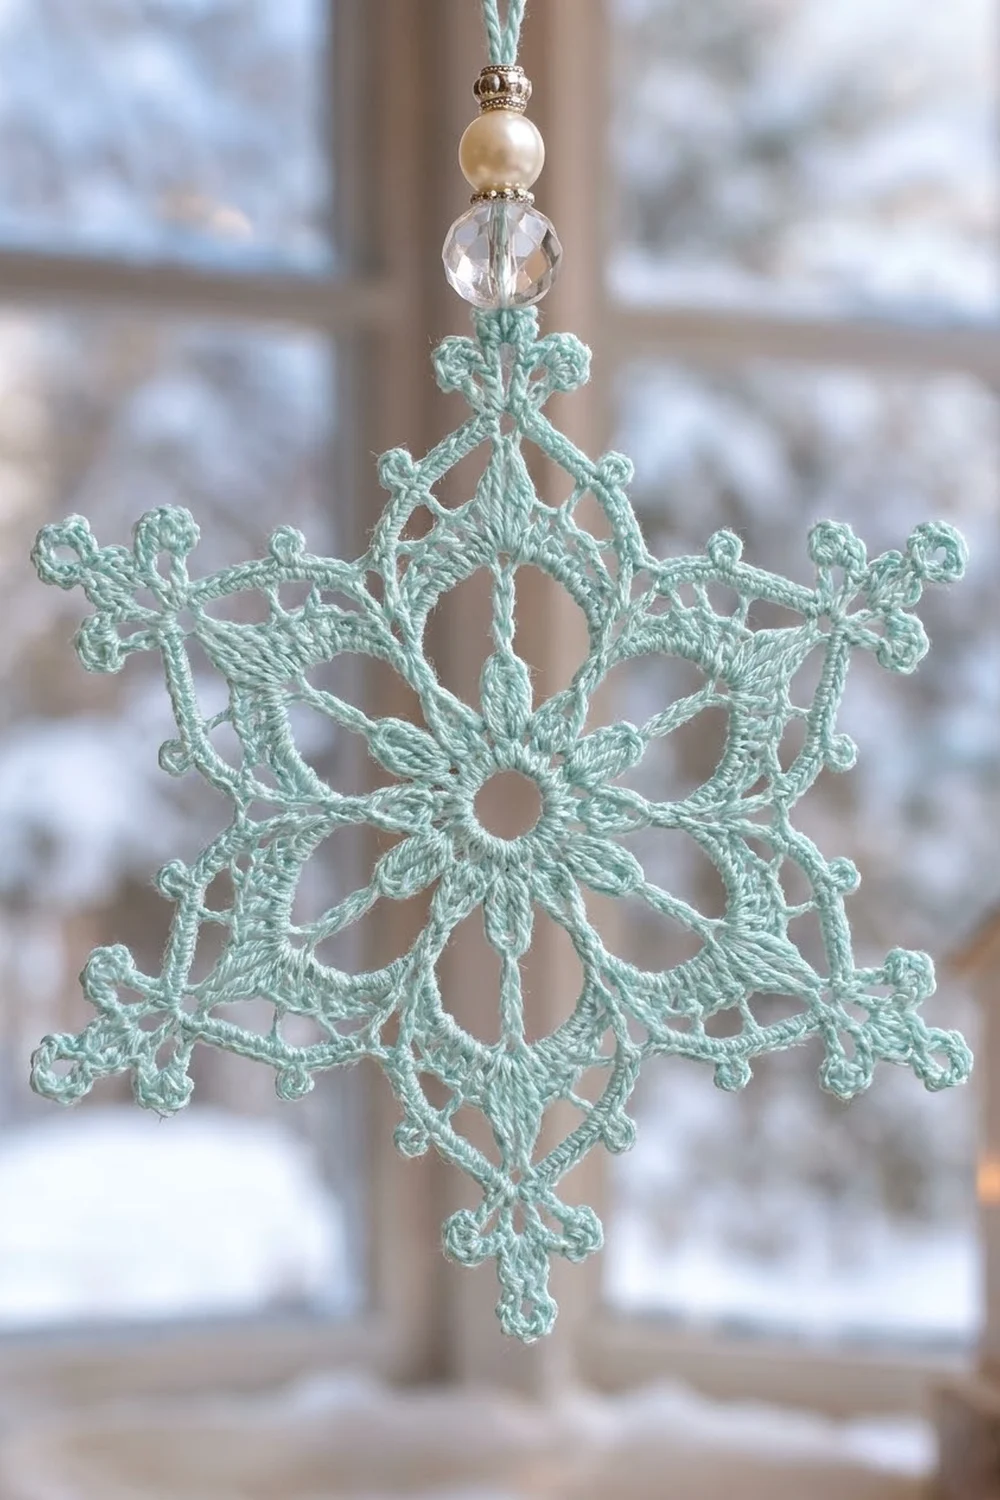
This six-pointed lace snowflake is worked in soft mint-aqua crochet thread. A small open ring sits in the center, circled by six open petals. A lacy hexagonal frame comes next, with a little V point between each pair of arms. Each of the six arms ends in a three-picot trefoil tip, and a beaded chain loop at the top turns it into a hanging ornament.
The style is classic thread lace in a fresh, frosty color. A cream pearl bead and a clear faceted bead sit just above the top arm and catch the light in a window or on a tree.
The pattern uses US crochet terms. The finished snowflake measures 4.25 in (10.8 cm) from point to point. Measured from one inner V point to the opposite one, it is 3.75 in (9.5 cm). These sizes don’t include the hanger.
You work six joined rounds from a chain ring:
– a dc ring
– chain loops for the petals
– petal outlines
– a frame round
– an arm base round
– a picot edge round
Then you add the beaded hanging loop, stiffen the snowflake and block it flat on a template.
Finished Size and Construction
- Finished size: 4.25 in (10.8 cm) point to point; 3.75 in (9.5 cm) inner V to inner V
- Skill level: Intermediate (thread work, picots, chain loops)
- Terminology: US crochet terms
- Yarn weight: Lace (0), size 10 crochet cotton thread
- Hook: 1.5 mm steel hook (US steel 8)
- Number of pieces: 1 single motif
- Layout: single snowflake, no joining
- Piece size: 4.25 in (10.8 cm) point to point after blocking
- Size before border (after Round 5): 3 in (7.6 cm) point to point
- Border depth: the picot edge round adds 0.625 in (1.6 cm) at each arm
Materials
Thread: Use mercerized size 10 cotton crochet thread. It holds crisp picots and takes stiffener well. Avoid fuzzy or acrylic thread, because the lace will blur.
- Mint / pale aqua: 6 g, about 27 m (covers the snowflake and the hanging loop)
These amounts include a margin for swatching and weaving in ends. One snowflake uses closer to 5 g.
Tools and notions:
- 1.5 mm (US steel 8) crochet hook
- Fine tapestry needle that fits size 10 thread
- 1 cream pearl bead, 6 mm
- 1 clear faceted glass bead, 6 mm
- 1 silver spacer bead, 3 mm (optional)
- Scissors
- At least 13 rust-proof pins
- Foam blocking board
- Fabric stiffener, white glue mixed 1:1 with water, or heavy spray starch
- Paper, pencil and ruler for a blocking template
Abbreviations (US Terms)
- ch – chain
- sl st – slip stitch
- sc – single crochet
- hdc – half double crochet
- dc – double crochet
- tr – treble crochet (yarn over twice)
- sp(s) – space(s)
- st(s) – stitch(es)
Special stitches:
- Picot: Ch 3, sl st in the 3rd ch from hook.
- V-st: (Dc, ch 3, dc) in the same st.
- Trefoil Spike (TS): Ch 8, sl st in the 4th ch from hook (first picot). [Ch 4, sl st in the same ch] twice (second and third picots). Sl st in each of the remaining 4 ch back down the stem. This makes a 4-ch stem topped with a three-picot cluster, which forms the tip of each arm.
Gauge and Checkpoints
Exact gauge isn’t critical, but it controls the final size. Work Rounds 1–3 as a test first and measure before you continue.
Gauge: Rounds 1–3 measure 2 in (5.1 cm) from petal tip to opposite petal tip, measured flat and unblocked.
Checkpoints (unblocked, measured flat):
- After Round 1: 0.75 in (1.9 cm) across
- After Round 3: 2 in (5.1 cm) petal tip to petal tip
- After Round 5: 3 in (7.6 cm) tip to tip
- After Round 6 and blocking: 4.25 in (10.8 cm) point to point
Too big: If Round 3 measures more than 2.25 in (5.7 cm), switch to a 1.25 mm hook and tighten your chains.
Too small: If Round 3 measures less than 1.75 in (4.4 cm), switch to a 1.75 mm hook.
Unblocked thread lace often cups a little. Press it gently flat with your fingers before you measure.
Snowflake Pattern
Leave a 6 in (15.2 cm) tail at the start. Don’t turn between rounds; the right side faces you throughout.
Center ring: Ch 6, sl st in the first ch to form a ring.
Round 1 (center ring): Ch 3 (counts as dc). Work 17 dc in the ring. Sl st in the top of the beginning ch-3. (18 dc)
Snug the starting tail, but leave a small round hole open in the middle.
Round 2 (petal loops): Ch 1, sc in the same st as the join. Ch 9, skip the next 2 dc, sc in the next dc; repeat from * 4 more times. Ch 9, skip the last 2 dc, sl st in the first sc. (6 sc, 6 ch-9 loops)*
Check: 6 sc + (6 × 2 skipped dc) = 18, so every Round 1 stitch is used. Each ch-9 loop becomes one open petal.
Round 3 (petal outlines): Sl st in the first ch-9 loop. In each ch-9 loop, work (sc, hdc, 3 dc, ch 3, 3 dc, hdc, sc). Sl st in the first sc. (60 sts: 6 petals of 10 sts each, plus 6 ch-3 tip sps)
The stitches pack around each loop and outline a pointed teardrop with an open center. Neighboring petals meet over the Round 2 sc.
Round 4 (frame):
1. Sl st in each of the next 5 sts (sc, hdc, 3 dc), then sl st in the ch-3 tip sp.
2. Ch 1, (sc, ch 3, sc) in the same tip sp, then ch 5.
3. Work a tr in the Round 2 sc between this petal and the next one, inserting the hook between the two petals. Ch 5.
4. *(Sc, ch 3, sc) in the next petal tip sp, ch 5, tr in the next Round 2 sc between petals, ch 5; repeat from * 4 more times.
5. Sl st in the first sc.
(12 sc, 6 tr, 6 ch-3 tip sps, 12 ch-5 sps)
Each tr stands up between two petals and becomes an inner V point. The chain spans pull straight to form the hexagonal frame.
Round 5 (arm base):
1. Sl st in the next ch-3 tip sp.
2. Ch 3 (counts as dc), then work (2 dc, ch 5, 3 dc) in the same sp.
3. Ch 4, skip the next sc and ch-5 sp, V-st in the next tr. Ch 4, skip the next ch-5 sp and sc.
4. *(3 dc, ch 5, 3 dc) in the next ch-3 tip sp. Ch 4, skip the next sc and ch-5 sp, V-st in the next tr. Ch 4, skip the next ch-5 sp and sc; repeat from * 4 more times.
5. Sl st in the top of the beginning ch-3.
(48 dc: 36 at the arm bases and 12 in the V-sts; 6 ch-5 tip sps, 6 ch-3 V sps, 12 ch-4 sps)
Checkpoint: 3 in (7.6 cm) tip to tip. This is your size before the border.
Border (Picot Edge Round and Arms)
On this single motif, the border is the final edge round. It builds the arms, the trefoil tips and all of the edge picots. In this section, “side” means one of the six repeats, from the middle of one inner V to the middle of the next.
Border gauge: 12 sc = 1 in (2.5 cm) along the edge, measured unstretched.
Round 6 (edge): Ch 1. Work the repeat below six times. In the first repeat, the first sc goes into the same st as the join, which is the top of the beginning ch-3.
- Sc in each of the next 3 dc. (3 sc)
- In the ch-5 tip sp, work (2 sc, picot, 2 sc, TS, 2 sc, picot, 2 sc). (8 sc, 2 picots, 1 TS)
- Sc in each of the next 3 dc. (3 sc)
- In the ch-4 sp, work (2 sc, picot, 2 sc). (4 sc, 1 picot)
- Sc in the first dc of the V-st. Work (sc, picot, sc) in the ch-3 V sp. Sc in the second dc of the V-st. (4 sc, 1 picot)
- In the next ch-4 sp, work (2 sc, picot, 2 sc). (4 sc, 1 picot)
After the sixth repeat, sl st in the first sc. Fasten off and leave a 6 in (15.2 cm) tail.
Per side: 26 sc, 5 picots, 1 TS. Round total: 156 sc, 30 picots, 6 TS.
Why the math works: Every Round 5 stitch and space gets a fixed number of sc:
- 48 dc × 1 sc = 48
- 6 tip sps × 8 sc = 48
- 12 ch-4 sps × 4 sc = 48
- 6 V sps × 2 sc = 12
That adds up to 48 + 48 + 48 + 12 = 156 sc, which matches 6 sides × 26 sc. Each side is worked symmetrically, so all six arms come out identical.
At 12 sc per inch, 26 sc covers about 2.2 in (5.6 cm) of edge per side. That is enough to follow the notched outline without ruffling.
Each TS stem and its picots add 0.625 in (1.6 cm) at the arm. So 3 in + (2 × 0.625 in) = 4.25 in (10.8 cm) point to point.
Hanging Loop with Beads
- Cut a 12 in (30.5 cm) strand. Thread on the clear bead, then the pearl bead, then the spacer bead.
- Make a slip knot on the hook. Insert the hook into the middle picot of one TS (this arm becomes the top) and sl st to join.
- Ch 1. Slide the clear bead up to the hook and ch 1 to lock it. Repeat with the pearl bead and then the spacer bead.
- Ch 30, then sl st in the last ch made before the spacer bead to close the loop.
- Fasten off and weave both tails down into the TS stem.
The loop stands about 1.25 in (3.2 cm) above the beads.
Final Blocking
- Weave in ends. Weave in all tails before you stiffen, splitting the thread, then trim close.
- Make a template. Draw a 4.25 in (10.8 cm) circle and mark six lines through the center, 60 degrees apart. Cover it with plastic wrap and pin it to the board.
- Stiffen. Dip the snowflake and blot the excess in a paper towel without wringing it. Use a pin to clear any film from the ring and the petals.
- Pin the center. Put one pin through the center ring, right over the center of the template.
- Pin the arms. Pin the middle picot of each TS onto the circle at the end of a line. Work in opposite pairs to keep the snowflake even.
- Pin the V points. Pin each V picot on the halfway line between two arms, 1.875 in (4.8 cm) from the center. This gives the 3.75 in (9.5 cm) inner measurement.
- Shape. Open each petal into a clean teardrop and fan the trefoil picots flat.
- Dry. Let it dry completely, usually 6 to 12 hours. Leave the hanging loop unpinned.
- Release. Remove the pins and check that the snowflake lies flat.
Final Quality-Control Checklist
- The center hole is small and round, with 18 dc in Round 1.
- There are six open, even petals of 10 sts each.
- Each of the six tr in Round 4 sits exactly between two petals.
- Round 5 has 48 dc and six matching arm bases.
- Each side of Round 6 has 26 sc, 5 picots and 1 TS.
- Every trefoil tip has three picots fanned flat.
- The snowflake measures 4.25 in (10.8 cm) point to point and 3.75 in (9.5 cm) V to V.
- The beads sit snug above the top arm.
- No tails or stiffener film are visible.
Troubleshooting
The center hole closed up: Loosen the starting tail before you weave it in.
The petals are lopsided: Check for exactly 9 ch per loop and 3 dc on each side of every ch-3 tip.
The frame ruffles: Your Round 4 chains are too loose. Tighten your tension, or work ch 4 instead of ch 5.
The snowflake cups: Your chain spans are too short. Check the ch-4 spaces in Round 5, then block firmly.
The arms are uneven: Count 8 ch for every TS and 4 sl sts back down the stem every time.
The picots are twisted: Sl st into the 3rd ch from the hook, then shape the picots with a pin while blocking.
The beads slide: Add one extra ch between the beads to lock them in place.
Care
Dust gently or spot clean with a damp cloth. Store the snowflake flat between sheets of tissue so the stiffened points don’t bend.

Final Notes
The measurement chain is simple. Round 1 is 0.75 in (1.9 cm) across. Round 3 is 2 in (5.1 cm) tip to tip, and Round 5 is 3 in (7.6 cm). The edge round adds 0.625 in (1.6 cm) at each arm, giving 4.25 in (10.8 cm) point to point after blocking.
If your gauge matches at Round 3 and your counts hold at 18, 6 loops, 60, 48 and 156 sc, the snowflake will block to size. Make one, check it against the template, and then stitch a flurry for your windows and tree.
Happy crocheting!