

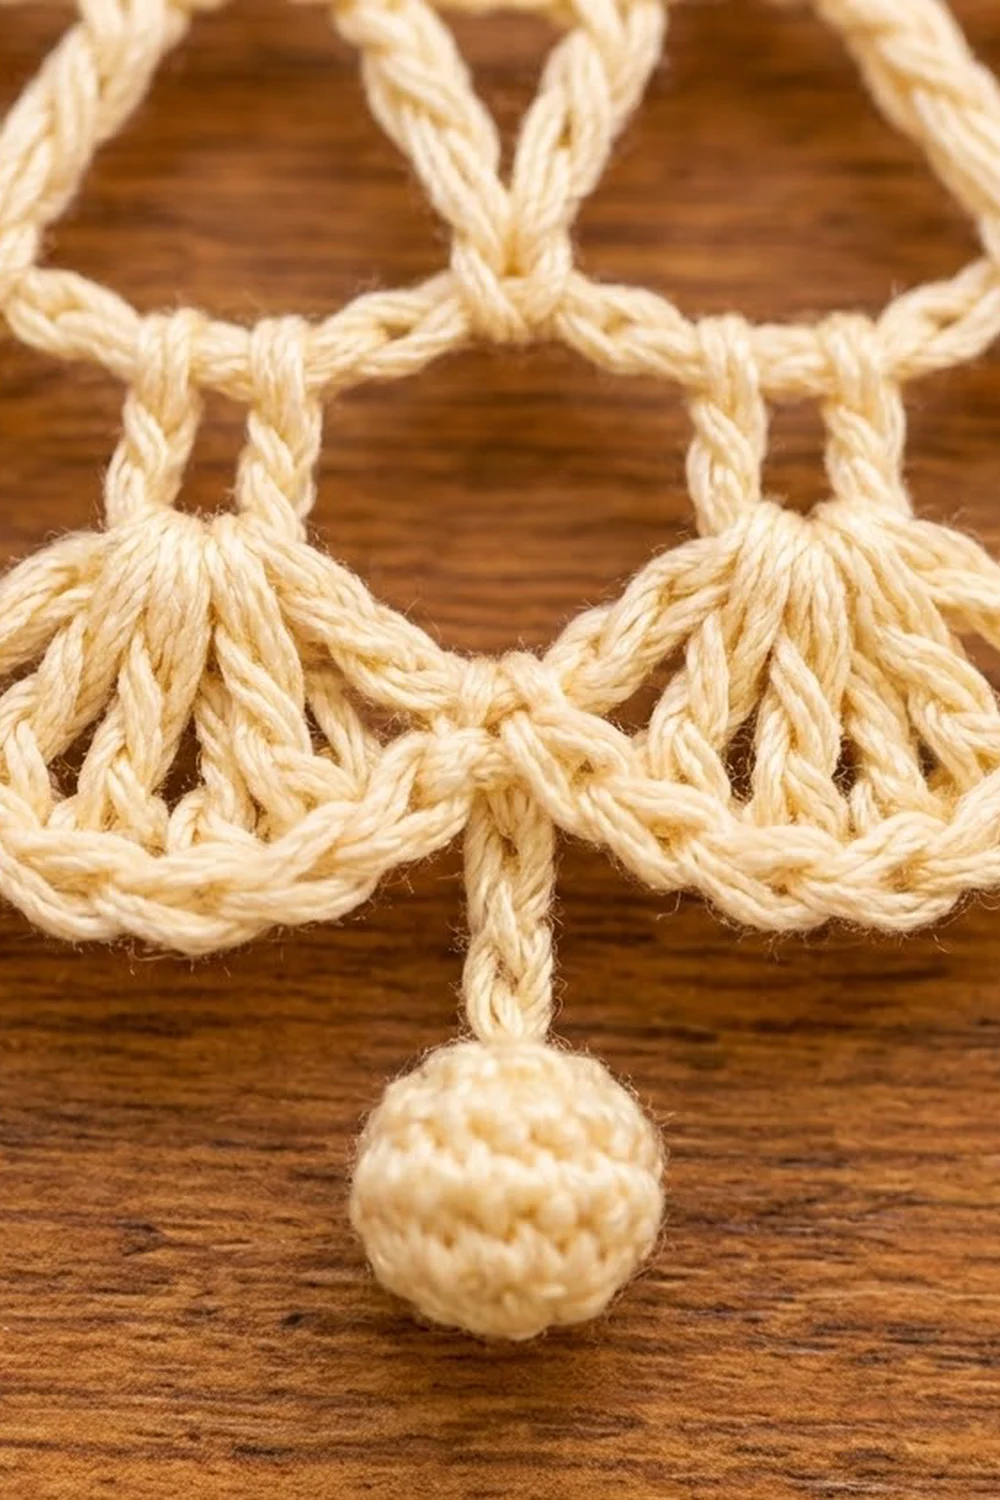
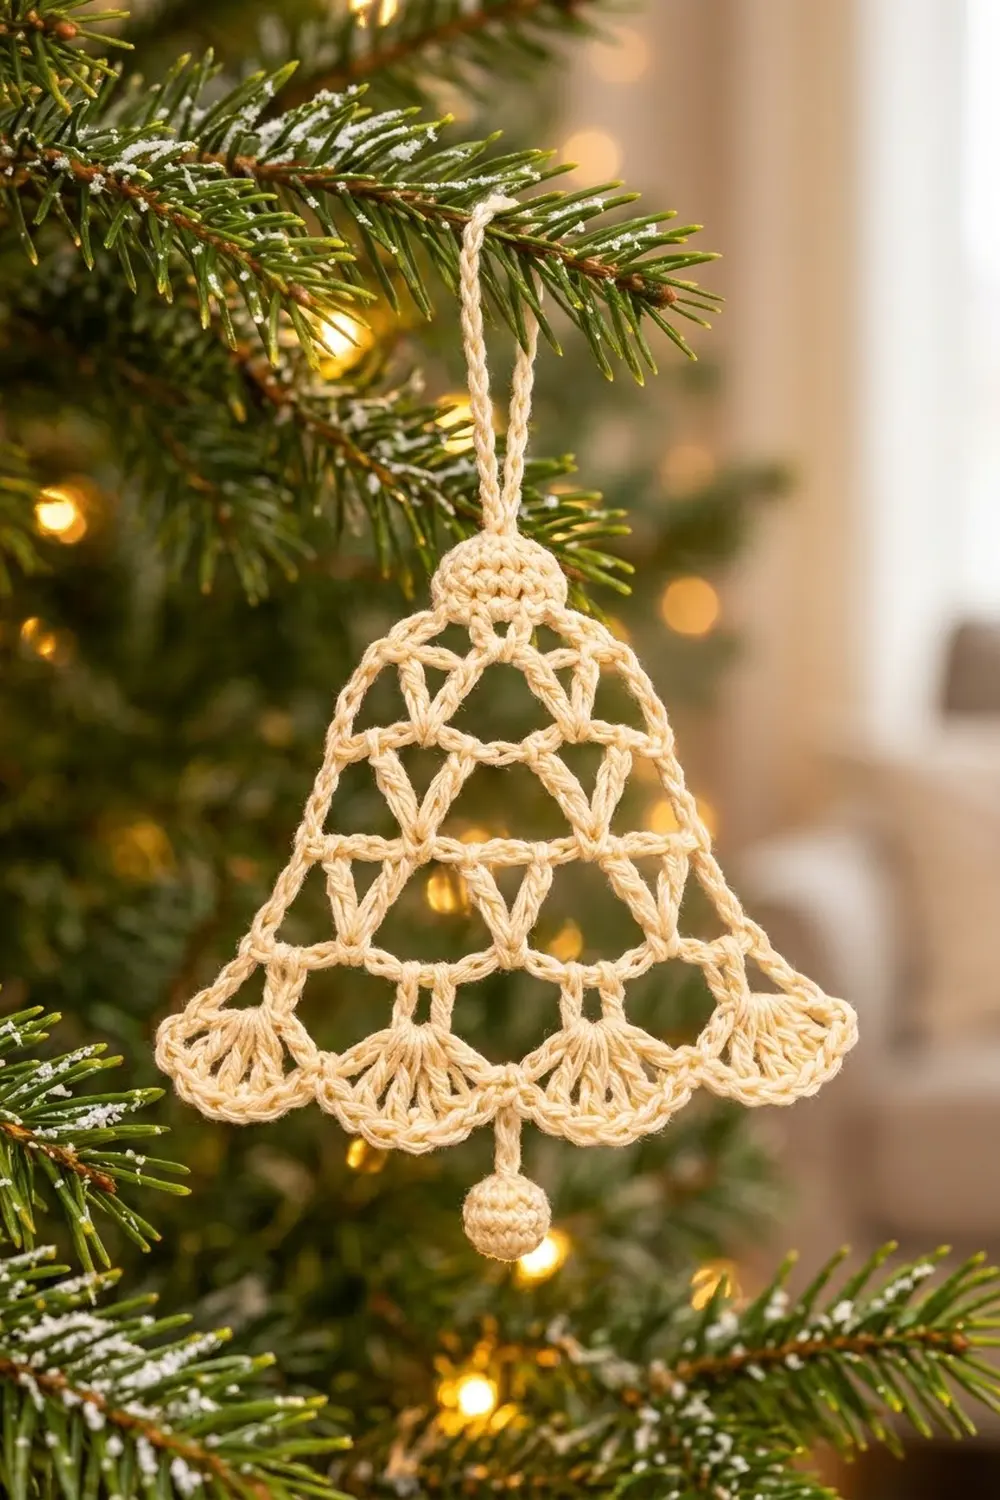
This Frosted Lace Bell is a light, airy Christmas ornament with a classic bell shape. It starts with a small solid cap. Below the cap, an open lattice of V-stitches and chain arches gets wider toward the hem, and five fan-shaped shells give the hem its scalloped edge. A tiny round clapper hangs from the center, and a sturdy loop at the top makes it ready for the tree.
The sample is worked in a single cream cotton, which gives it a frosted, vintage look that suits natural greenery, pinecones, and warm fairy lights. It would also look lovely in white, pale gold, or soft red.
The pattern uses US crochet terms. The finished bell measures 4.5 in (11.4 cm) wide at the hem and 4 in (10.2 cm) tall from the top of the cap to the bottom of the scallops. With the clapper it is 4.75 in (12.1 cm) tall, and the hanging loop adds about 2 in (5.1 cm) more.
You work the bell top-down as one flat piece. You start with a small round cap, then work five flat rows back and forth from the bottom of the cap: four V-stitch lattice rows, then one shell row. A single edging round firms up the sides. The loop and the ball clapper are added at the end.
Finished Size and Construction
- Finished size: 4.5 in (11.4 cm) wide × 4 in (10.2 cm) tall; 4.75 in (12.1 cm) tall including the clapper
- Skill level: Advanced beginner
- Terminology: US crochet terms
- Yarn weight: DK (light worsted, weight 3) cotton
- Hook: 3.5 mm (E-4)
- Number of pieces: 1 bell, plus 1 small ball clapper attached to it
- Layout: A single flat ornament (no assembly grid)
- Piece size: 4.5 in (11.4 cm) wide × 4 in (10.2 cm) tall
- Size before border: 4.5 in (11.4 cm) wide × 4 in (10.2 cm) tall. The edging is worked only along the slanted sides and over the cap, so the widest point (the shell hem) does not change.
- Border depth: about 0.125 in (0.3 cm) along the sides
Materials
Yarn: Use a smooth, tightly plied DK cotton or cotton blend. Mercerized cotton gives the crisp stitch definition and slight sheen seen in the sample. Avoid fuzzy or very stretchy yarns, because they blur the lattice and will not hold the triangles open.
- Cream (main color): 12 g, about 26 m (28 yd). This covers the bell, the edging, the hanging loop, and the clapper.
Tools:
– 3.5 mm (E-4) crochet hook
– Tapestry needle
– Scissors
– Locking stitch marker
– A small pinch of fiberfill or matching yarn scraps for the clapper
– Blocking mat and rustproof pins
– Optional: spray starch or a 1:1 white glue-and-water stiffening mix
All yarn quantities include a safety margin of about 20%. One ornament uses roughly 10 g, so a 50 g ball makes four ornaments comfortably.
Abbreviations (US Terms)
- ch – chain
- sl st – slip stitch
- sc – single crochet
- sc2tog – single crochet 2 together
- dc – double crochet
- tr – treble crochet
- sp(s) – space(s)
- st(s) – stitch(es)
- MR – magic ring
- RS – right side
- rep – repeat
Special stitches:
- V-st (V-stitch): Work (tr, ch 1, tr) in the stitch or space you are told to use. This makes one V with a ch-1 space at its center.
- Shell: Work 7 dc in the space you are told to use.
Gauge and Checkpoints
Lace ornaments do not need perfect gauge, but your tension decides whether the triangles stay crisp and the bell lies flat. Make the cap and Row 1 first as your test, then measure before you go on.
- Base gauge: 20 sc = 4 in (10.2 cm) with a 3.5 mm hook, which is 5 sc per 1 in (2.5 cm)
- Row height: One tr row is about 0.7 in (1.8 cm) tall.
Measurement checkpoints (unblocked, lightly flattened):
- After the cap: 0.75 in (1.9 cm) across
- After Row 1: 1.5 in (3.8 cm) wide at the bottom
- After Row 2: 2.25 in (5.7 cm) wide
- After Row 3: 3 in (7.6 cm) wide
- After Row 4: 3.75 in (9.5 cm) wide, and 3.5 in (8.9 cm) tall from the top of the cap
- After Row 5: 4.5 in (11.4 cm) wide, and 4 in (10.2 cm) tall
If your bell is too big: Go down to a 3.25 mm (D-3) hook, or pull the chain spaces a little snugger. Oversized chain arches make the lattice droop.
If your bell is too small or cupping: Go up to a 3.75 mm (F-5) hook. Also check that you work exactly 3 chains in each ch-3 space and are not skipping the turning-chain stitch at row ends.
Pattern
Cap
The cap is a small, solid circle at the top of the bell. Its lower 5 stitches anchor the lattice, and its upper 7 stitches form the rounded top.
Rnd 1: Make a MR. Ch 1, work 6 sc in the ring. Pull the ring closed and sl st to the first sc. (6 sc)
Rnd 2: Ch 1, work 2 sc in each st around. Sl st to the first sc. (12 sc)
Place a marker in the joining stitch and call it Stitch 1. Count around in the direction you worked: Stitches 1–5 are the bottom of the cap, and Stitches 6–12 are the top.
Checkpoint: The cap should measure 0.75 in (1.9 cm) across and lie flat.
Body (Lattice Rows)
Each lattice row has one tr at each edge, with V-sts in between. Each ch-3 space between them becomes the base for one V-st in the next row, so every row gains exactly one V-st and one ch-3 space.
Row 1 (RS): Ch 4 (counts as tr) in Stitch 1. Ch 3, skip Stitch 2, V-st in Stitch 3, ch 3, skip Stitch 4, tr in Stitch 5. Turn.
(4 tr, 1 V-st, 2 ch-3 sps)
Row 2: Ch 4 (counts as tr). Ch 3, V-st in the next ch-3 sp; rep from * once more. Ch 3, tr in the top of the turning ch. Turn.
(6 tr, 2 V-sts, 3 ch-3 sps)*
Row 3: Ch 4 (counts as tr). Ch 3, V-st in the next ch-3 sp; rep from * 2 more times. Ch 3, tr in the top of the turning ch. Turn.
(8 tr, 3 V-sts, 4 ch-3 sps)*
Row 4: Ch 4 (counts as tr). Ch 3, V-st in the next ch-3 sp; rep from * 3 more times. Ch 3, tr in the top of the turning ch. Turn.
(10 tr, 4 V-sts, 5 ch-3 sps)*
Count check: In any row k, there are k V-sts (2k tr) plus 2 edge tr, which gives 2k + 2 tr and k + 1 ch-3 spaces. Row 4 has k = 4, so it has 10 tr and 5 ch-3 spaces, which matches the count above.
Checkpoint: The bell should be 3.75 in (9.5 cm) wide at Row 4 and 3.5 in (8.9 cm) tall. The open spaces form alternating up- and down-pointing triangles.
Scalloped Hem
Row 5 (RS): Ch 1. Sc in the first tr. Shell (7 dc) in the next ch-3 sp, sc in the ch-1 sp at the center of the next V-st; rep from * 3 more times. Shell in the last ch-3 sp, sc in the top of the turning ch. Do not fasten off.
(5 shells = 35 dc, plus 6 sc = 41 sts)*
There are 5 ch-3 spaces in Row 4, so there are exactly 5 shells. The sc between shells sit at the 4 V-st centers, plus 1 sc at each edge, for 6 sc in total. The two end shells flare outward and give the bell its classic flared rim.
Border (Side Edging)
This one round firms up the slanted sides into the rope-like outline seen on the finished bell, and it neatly closes the top of the cap. The hem is not edged, because the shells already finish it.
Border gauge: 5 sc = 1 in (2.5 cm)
Edging Rnd (RS): Continue from the last sc of Row 5. Ch 1 and do not turn. Rotate the work so you are working along the row-ends of the first slanted side.
- Side 1: Work 4 sc around the post of each edge tr of Rows 4, 3, 2, and 1. (16 sc)
- Cap top: Sl st in each of the 7 top cap stitches (Stitches 6–12, or 12–6 depending on direction). (7 sl st)
- Side 2: Work 4 sc around the post of each edge tr of Rows 1, 2, 3, and 4. (16 sc)
Sl st in the first sc of Row 5 to join. Fasten off and weave in the ends.
(39 sts total: 16 + 7 + 16)
Why the math works: Each tr row rises 0.7 in (1.8 cm) and steps outward by about 0.375 in (1 cm), so each row-end along the slanted side is about 0.8 in (2 cm) long. At 5 sc per inch, 0.8 in calls for 4 sc. Four rows × 4 sc = 16 sc covers 3.2 in (8.1 cm), which is the full slanted length, without ruffling or pulling. The 7 sl sts match the 7 cap stitches one-to-one, so the cap keeps its round shape.
Hanging Loop
Join the yarn with a sl st in the center top cap stitch (Stitch 9). Ch 22, then sl st in the same stitch to form a loop. Work 28 sc into the loop space to thicken it, then sl st in the same cap stitch. Fasten off and weave in the ends.
The loop should stand about 2 in (5.1 cm) tall above the cap.
Ball Clapper
Rnd 1: Make a MR. Work 6 sc in the ring. (6 sc)
Rnd 2: Work 2 sc in each st. (12 sc)
Rnd 3: Sc in each st. (12 sc)
Rnd 4: Sc2tog 6 times. (6 sts)
Stuff the ball firmly with a small pinch of fiberfill or yarn scraps. Fasten off, leaving a 6 in (15.2 cm) tail. Thread the tail through the front loops of the last 6 stitches and pull it closed.
The ball should measure about 0.5 in (1.3 cm) across.
Attach it: Join new yarn in the 4th (center) dc of the middle shell. Ch 3, then sl st into the top of the ball. Fasten off. Use the ball’s tail to sew the stem join securely, and weave in all ends.
The stem shows about 0.25 in (0.6 cm) below the scallop, so the clapper hangs 0.75 in (1.9 cm) below the hem.
Final Blocking
- Soak the bell in cool water for 10 minutes, then gently press out the water in a towel. Do not wring it.
- Lay it RS up on a blocking mat.
- Pin the cap into a circle 0.75 in (1.9 cm) across.
- Pin the hem to 4.5 in (11.4 cm) wide, placing one pin at the center of each of the 5 shells so the scallops fan out evenly.
- Pin the top of the cap so the total height is 4 in (10.2 cm).
- Open each triangle in the lattice with a pin so the V-sts stand straight and the chain arches lie taut.
- Straighten both slanted sides so they mirror each other.
- Optional: Mist with spray starch or brush on a 1:1 glue-and-water mix for a stiff ornament.
- Let the bell dry completely, at least 12 hours, before unpinning. Leave the loop and clapper free while it dries.
Final Quality-Control Checklist
- The cap is round, flat, and 0.75 in (1.9 cm) across.
- Row 4 has 10 tr, 4 V-sts, and 5 ch-3 spaces.
- Row 5 has 5 shells of 7 dc each and 6 sc.
- Each slanted side has 16 sc, and the cap top has 7 sl sts.
- The bell is 4.5 in (11.4 cm) wide and 4 in (10.2 cm) tall.
- The two sides are the same length and slant evenly.
- The clapper hangs centered under the middle shell.
- The hanging loop is centered above the cap and sewn securely.
- All ends are woven in and invisible from the RS.
Troubleshooting
The bell curls into a cone. Your chain spaces are too tight. Go up a hook size, or loosen your ch-3s.
The sides ripple after edging. You worked too many sc per row-end. Keep exactly 4 per tr post.
The sides pull in after edging. You worked fewer than 4 sc per row-end, or your sc are too tight. Rework the round more loosely.
The shells don’t fan out. Check that you have 7 dc in each shell, then block with a pin at each shell’s center.
The bell is lopsided. You most likely missed the turning-chain tr at one row end. Count 2k + 2 tr in each row.
The clapper hangs off-center. Re-attach it at the 4th dc of the 3rd (middle) shell.
The lattice triangles collapse. Stiffen the bell lightly with starch, then re-pin and let it dry.
Care
Hand wash in cool water with mild soap, press dry in a towel, and re-block flat. Store ornaments flat in tissue paper so the shells and loop keep their shape.
Final Notes
The measurement chain is easy to follow:
- The cap measures 0.75 in (1.9 cm).
- Each lattice row adds about 0.75 in (1.9 cm) of width and 0.7 in (1.8 cm) of height, which brings Row 4 to 3.75 in (9.5 cm) wide.
- Row 5’s five shells flare the hem to 4.5 in (11.4 cm) and bring the height to 4 in (10.2 cm).
- The 16-sc side edging matches the 3.2 in (8.1 cm) slanted sides exactly.
- The clapper adds 0.75 in (1.9 cm) below the hem, and the loop adds 2 in (5.1 cm) above the cap.
If you check the cap and the first row before going on, the rest of the bell follows almost automatically. Make one for each branch of the tree.
Happy crocheting!