

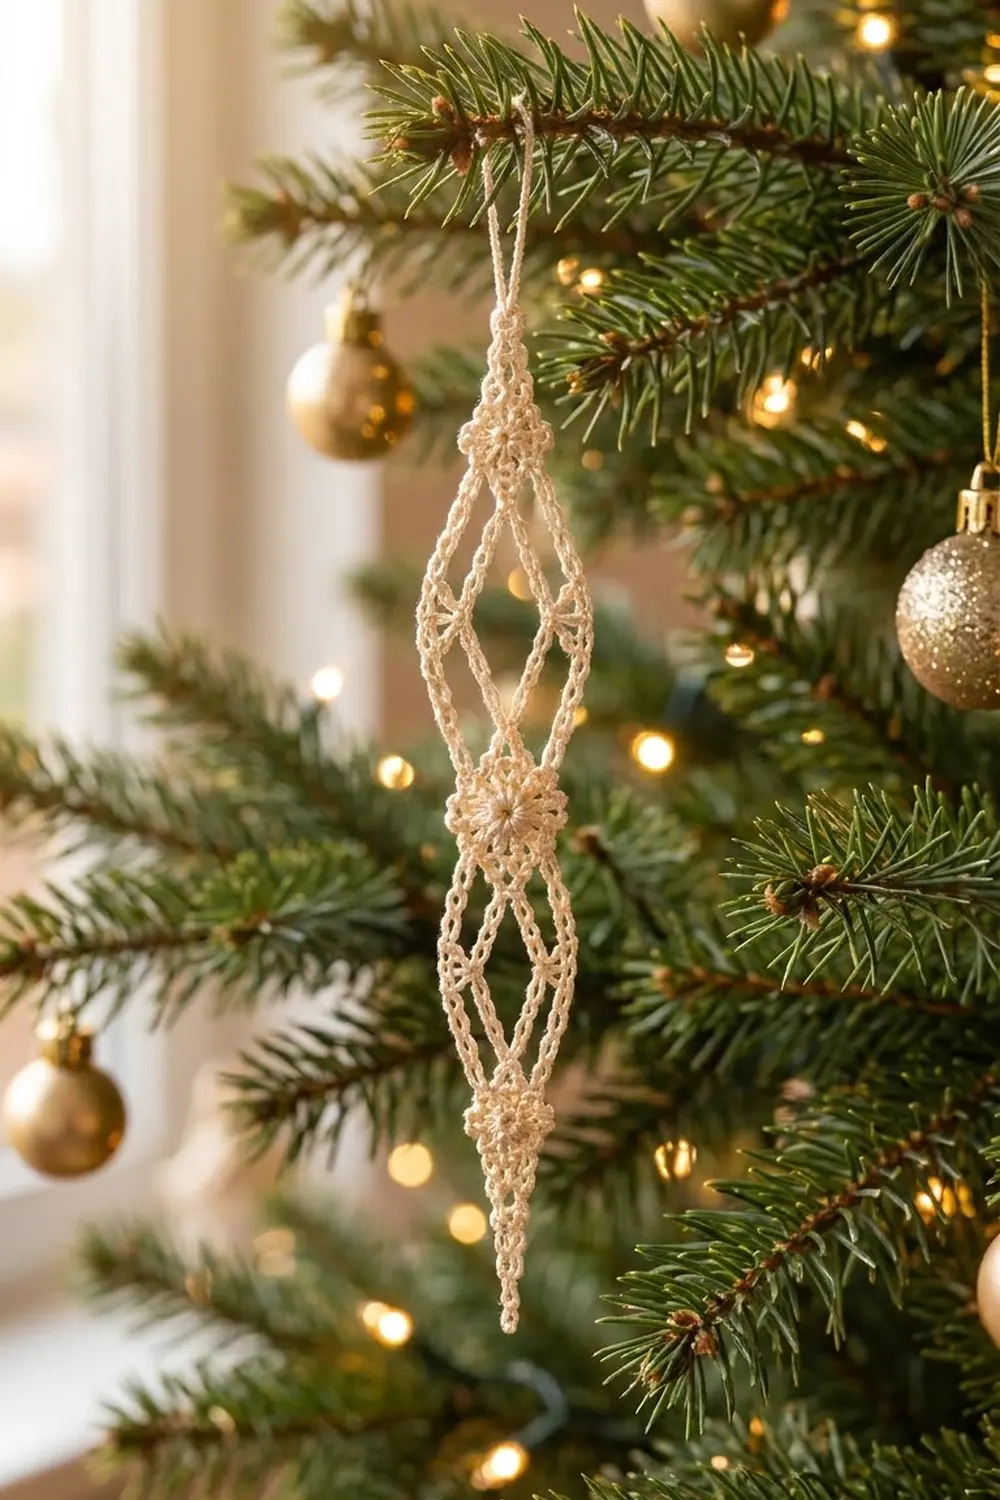
The Frosted Lace Icicle is a slim, airy thread ornament that catches the tree lights much like real frost does. Three rosettes run down its center: a small one at the top, a fuller one in the middle and a small one near the tip. Each pair of rosettes is linked by chain lines that form nested diamonds.
This design uses one color only: cream or ivory size 10 crochet cotton. It looks classic and vintage, and it works on both natural and white-themed trees. All terms are US crochet terms.
The finished ornament is 6.5 in (16.5 cm) long, plus a 0.75 in (1.9 cm) hanging loop, so it measures 7.25 in (18.4 cm) in total. It is 1.25 in (3.2 cm) wide at its widest point.
The whole ornament is one piece worked in one continuous strand. Pass 1 travels down one side and makes all three rosettes. Pass 2 climbs back up the other side and closes the inner diamonds. Pass 3 adds the outer outline, the side clusters and the tail lines. A single edging pass then firms up the outer outline.
Finished Size and Construction
- Finished size: 6.5 in (16.5 cm) long × 1.25 in (3.2 cm) wide, plus a 0.75 in (1.9 cm) loop
- Skill level: Intermediate (thread work, joining into chains)
- Terminology: US
- Yarn weight: Size 10 crochet cotton (lace weight)
- Hook: 1.5 mm steel hook (US steel 7)
- Number of pieces: 1
- Layout: Vertical, with 3 rosettes and 2 diamond sections, ending in a tail
- Piece size: 6.5 in × 1.25 in (16.5 cm × 3.2 cm)
- Size before border: 6.5 in × 1.25 in (16.5 cm × 3.2 cm)
- Border depth: about 1/16 in (0.2 cm). The edging covers the existing outer lines rather than adding a band.
Materials
Choose a firm, mercerized size 10 cotton. It holds starch well and shows the stitch definition. Avoid fuzzy or very soft threads, because the chain lines need to stay crisp.
- Cream/ivory size 10 cotton: about 5 g (15 m / 16.4 yd) per ornament
Tools:
- 1.5 mm (US steel 7) hook
- Tapestry needle for thread
- Small scissors
- Blocking board or foam, plus rust-proof pins
- Spray starch or fabric stiffener
The quantity above includes a margin of about 30% for gauge swatching and weaving in ends.
Abbreviations (US Terms)
- ch – chain
- sl st – slip stitch
- sc – single crochet
- dc – double crochet
- sk – skip
- st(s) – stitch(es)
- sp – space
- p – picot
Special stitches:
- Picot (p): Ch 3, sl st in the 3rd ch from the hook.
- Side node: Ch 4, sl st in the 13th (center) ch of the named inner line. Ch 4, then sl st in the last ch of the ch-13 you just made (the base of the bar). Work 2 p.
Gauge and Checkpoints
Gauge: 12 ch = 1 in (2.5 cm), measured relaxed.
Test the gauge by making the top rosette and its first ch-25 line before you go further. These are the checkpoints:
- Top rosette after Rnd 2: 0.4 in (1.0 cm) across, not counting the hanging loop.
- Ch-25 line: about 2.1 in (5.3 cm) when relaxed.
- Center rosette after Rnd 2: 0.5 in (1.3 cm).
- Center rosette after Rnd 3: 0.6 in (1.5 cm).
- Each outer ch-13 segment: about 1.1 in (2.8 cm).
If your ch-25 line measures more than 2.3 in (5.8 cm), go down a hook size. If it measures less than 1.9 in (4.8 cm), go up a size. The piece is forgiving to within about 1/4 in (0.6 cm), because blocking sets the final shape.
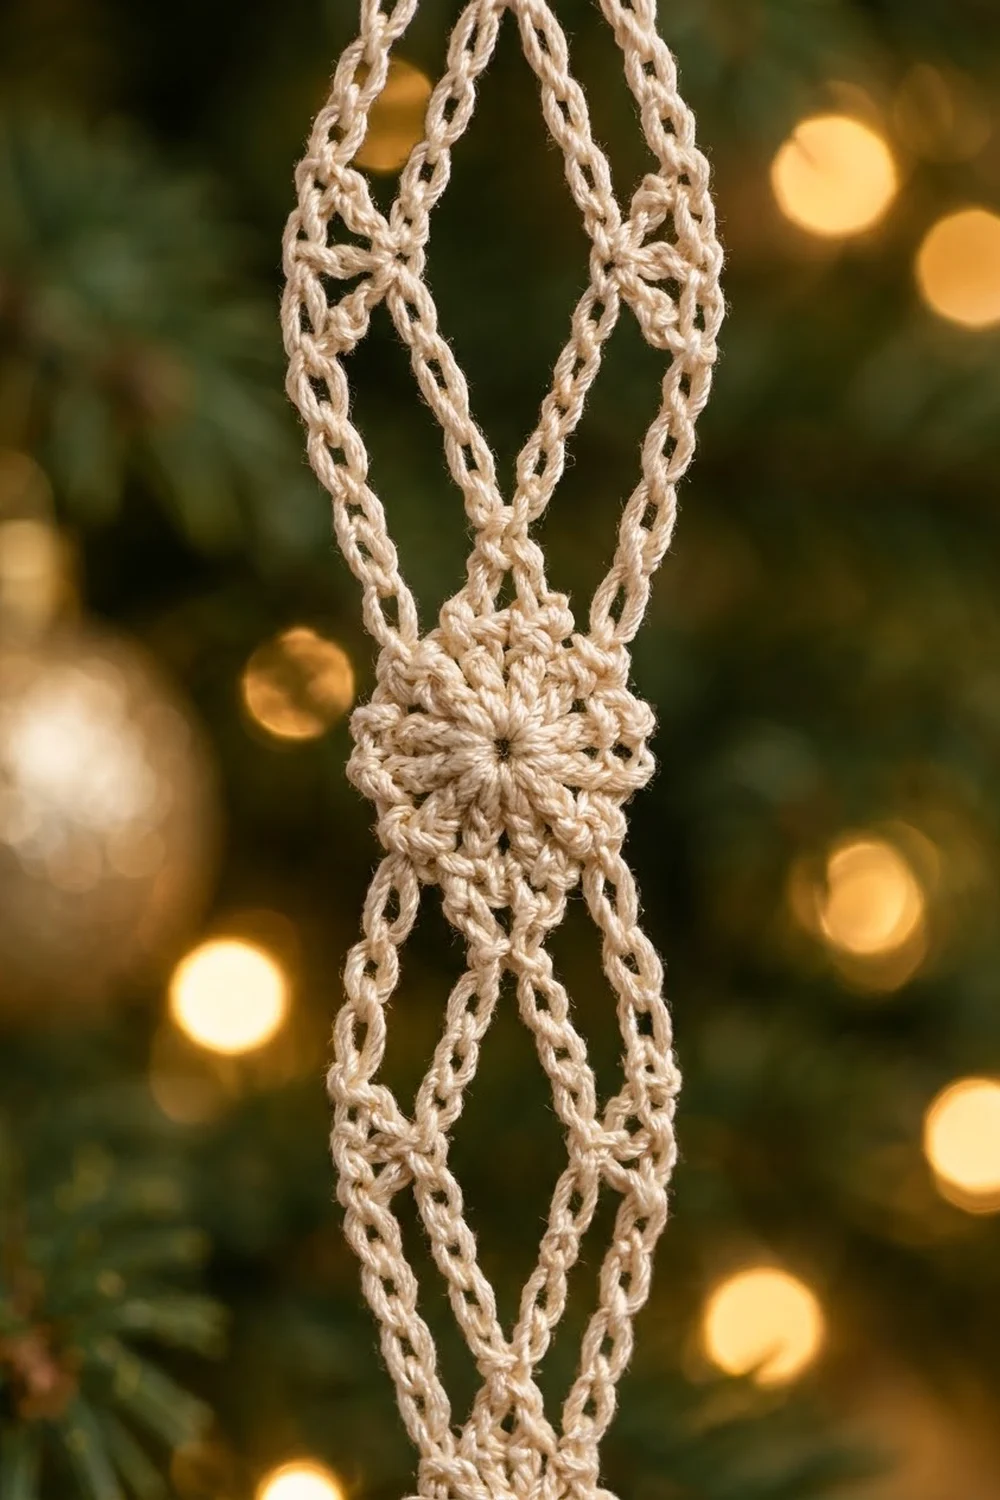
Pass 1: Down the First Side
Top Rosette
Ch 5, then sl st in the first ch to form a ring.
Rnd 1: Ch 1, work 8 sc in the ring, then sl st in the first sc. (8 sc)
The first sc of this round is the bottom point of the top rosette.
Rnd 2: Ch 1. Work (sc in the next sc, ch 3) 4 times for sc 1–4 and loops 1–4. Sc in sc 5. Ch 18, then sl st in the same sc 5 to make the hanging loop. Ch 3 for loop 5. Work (sc in the next sc, ch 3) 3 times for sc 6–8 and loops 6–8. Sl st in the first sc. (8 sc, 8 ch-3 loops, 1 hanging loop)
Sc 5 sits at the top, opposite sc 1. Loop 2 points to the lower right and loop 7 to the lower left.
Upper Inner Line and Center Rosette
Ch 25 for the upper left inner line. Ch 6 more (31 ch total), then sl st in the 6th ch from the hook to form a ring. The point where the line meets the ring is the top of the center rosette.
Rnd 1: Ch 1, work 12 sc in the ring, then sl st in the first sc. (12 sc)
Rnd 2: Ch 3 (counts as dc), dc in the same st. Work 2 dc in each remaining sc, then sl st in the top of the beginning ch-3. (24 dc)
Number the dc 1–24, counterclockwise from the top. Dc 13 sits at the bottom.
Rnd 3, first half: Ch 1, sc in the same st (dc 1), ch 3, sk the next dc. Work (sc in the next dc, ch 3, sk the next dc) 5 times. Sc in dc 13. (7 sc, 6 ch-3 loops, called L1–L6 from the top)
L3 sits just above the widest point on this side and L4 sits just below it.
Lower Inner Line and Bottom Rosette
Ch 25 for the lower left inner line. Ch 5 more, then sl st in the 5th ch from the hook to form a ring.
Rnd 1: Ch 1, work 8 sc in the ring, then sl st in the first sc. (8 sc)
Sc 1 is at the top, where the line joins the ring.
Rnd 2: Ch 1. Work (sc in the next sc, ch 3) 4 times. Sc in sc 5. Make the tail: ch 15, sl st in the 4th ch from the hook for the tip picot, sc in each of the next 11 ch, then sl st in sc 5. Ch 3. Work (sc in the next sc, ch 3) 3 times. Sl st in the first sc. (8 sc, 8 ch-3 loops, 1 tail of 11 sc)
Loop 3 points to the lower left and loop 6 to the lower right.
Pass 2: Up the Second Side
Ch 25 for the lower right inner line, then sl st in the sc at dc 13 of the center rosette.
Rnd 3, second half: Ch 3, sk dc 14. Work (sc in the next dc, ch 3, sk the next dc) 5 times, then sl st in the first sc of Rnd 3. (5 new sc, 6 ch-3 loops, called R1–R6 from the bottom)
The center rosette now has 12 sc and 12 ch-3 loops.
Ch 25 for the upper right inner line, then sl st in sc 1 of the top rosette. The two inner diamonds are now closed.
Pass 3: Outer Outline
To get into position, sl st in loop 1, sl st in sc 2, then sl st in loop 2.
Upper right: Ch 13 and work a side node into the upper right inner line. Ch 13 again, then sl st in R4 of the center rosette. Sl st in the sc below it, then sl st in R3.
Lower right: Ch 13 and work a side node into the lower right inner line. Ch 13 again, then sl st in loop 6 of the bottom rosette.
Tail lines: Ch 8, then sl st in the 6th sc of the tail, counting from the rosette. Ch 8 again, then sl st in loop 3 of the bottom rosette.
Lower left: Ch 13 and work a side node into the lower left inner line. Ch 13 again, then sl st in L4 of the center rosette. Sl st in the sc above it, then sl st in L3.
Upper left: Ch 13 and work a side node into the upper left inner line. Ch 13 again, then sl st in loop 7 of the top rosette.
Each side node pulls its inner line outward into a narrow diamond, about 0.6 in (1.5 cm) wide. The 4-ch bars are about 0.3 in (0.8 cm) long. Do not fasten off.
Border (Edging Pass)
Border gauge: 12 sc = 1 in (2.5 cm) when worked over the chain.
Ch 1, then work down the left side:
- Work 13 sc over each of the 2 upper ch-13 segments.
- At the center rosette, sl st in L3, then in the sc below it, then in L4.
- Work 13 sc over each of the 2 lower ch-13 segments, then sl st in loop 3.
- Work 8 sc over the ch-8, then sl st in the 6th sc of the tail.
Then work up the right side:
- Work 8 sc over the ch-8, then sl st in loop 6.
- Work 13 sc over each of the 2 lower ch-13 segments.
- At the center rosette, sl st in R3, then in the sc above it, then in R4.
- Work 13 sc over each of the 2 upper ch-13 segments, then sl st in loop 2 of the top rosette.
Fasten off.
Counts per side: (4 × 13) + 8 = 60 sc. Across both sides, the edging has 120 sc.
Why the math works: Each chain segment gets exactly 1 sc per chain. At 12 ch and 12 sc per inch, the covered line stays the same length as the bare chain, so the outline neither ruffles nor pulls in. The slip stitches are travel stitches only and add no length.
Final Blocking
- Weave in both ends along the rosette stitches, not along the chain lines.
- Soak the ornament in starch or diluted stiffener, then press out the extra liquid in a towel.
- Lay it flat on the board and pin the hanging loop and the tail tip 7.25 in (18.4 cm) apart.
- Pin each side node so the width across the picots is 1.25 in (3.2 cm).
- Pin the inner diamonds open to 0.6 in (1.5 cm) wide.
- Open each picot and rosette loop with a pin tip.
- Let it dry completely, at least 12 hours, before unpinning.
Final Quality-Control Checklist
- The total length is 7.25 in (18.4 cm) and the width is 1.25 in (3.2 cm).
- The center rosette has 12 sc and 12 loops, and each small rosette has 8.
- All four inner lines are 25 ch, joined at their 13th ch.
- Each side has 60 border sc.
- The left and right sides mirror each other.
- The ornament hangs straight without twisting.
Troubleshooting
- The center rosette cups. Rnd 2 is too tight. Loosen your dc or go up a hook size for that round only.
- The rosette ruffles. Check that you have exactly 24 dc.
- The inner diamonds collapse. A bar is attached to the wrong chain. Count to the 13th ch of 25 again.
- The outline waves after the border. You added extra sc. Keep it to 13 sc per ch-13 segment.
- The ornament twists. A line is twisted. Untwist it before you starch, or pin it flat while it is wet.
- The two sides are uneven. Compare each ch-13 segment and re-block.
Care
Hand wash in cool water, then re-starch and re-block flat. Store the ornament flat between tissue paper so the points stay crisp.
Final Notes
The measurement chain runs like this. A gauge of 12 ch per inch makes the ch-25 lines about 2.1 in (5.3 cm), and they bow into the 2 in (5.1 cm) diamond sections. The rosettes add 0.4 in, 0.6 in and 0.4 in (1.0, 1.5 and 1.0 cm), and the tail adds 1.1 in (2.8 cm), for 6.5 in (16.5 cm) in total. The loop brings the full length to 7.25 in (18.4 cm). The ch-13 outline sets the 1.25 in (3.2 cm) width, and the 1-sc-per-chain border keeps every dimension unchanged. If your gauge is right, the blocked ornament will match these numbers.
Happy crocheting!