

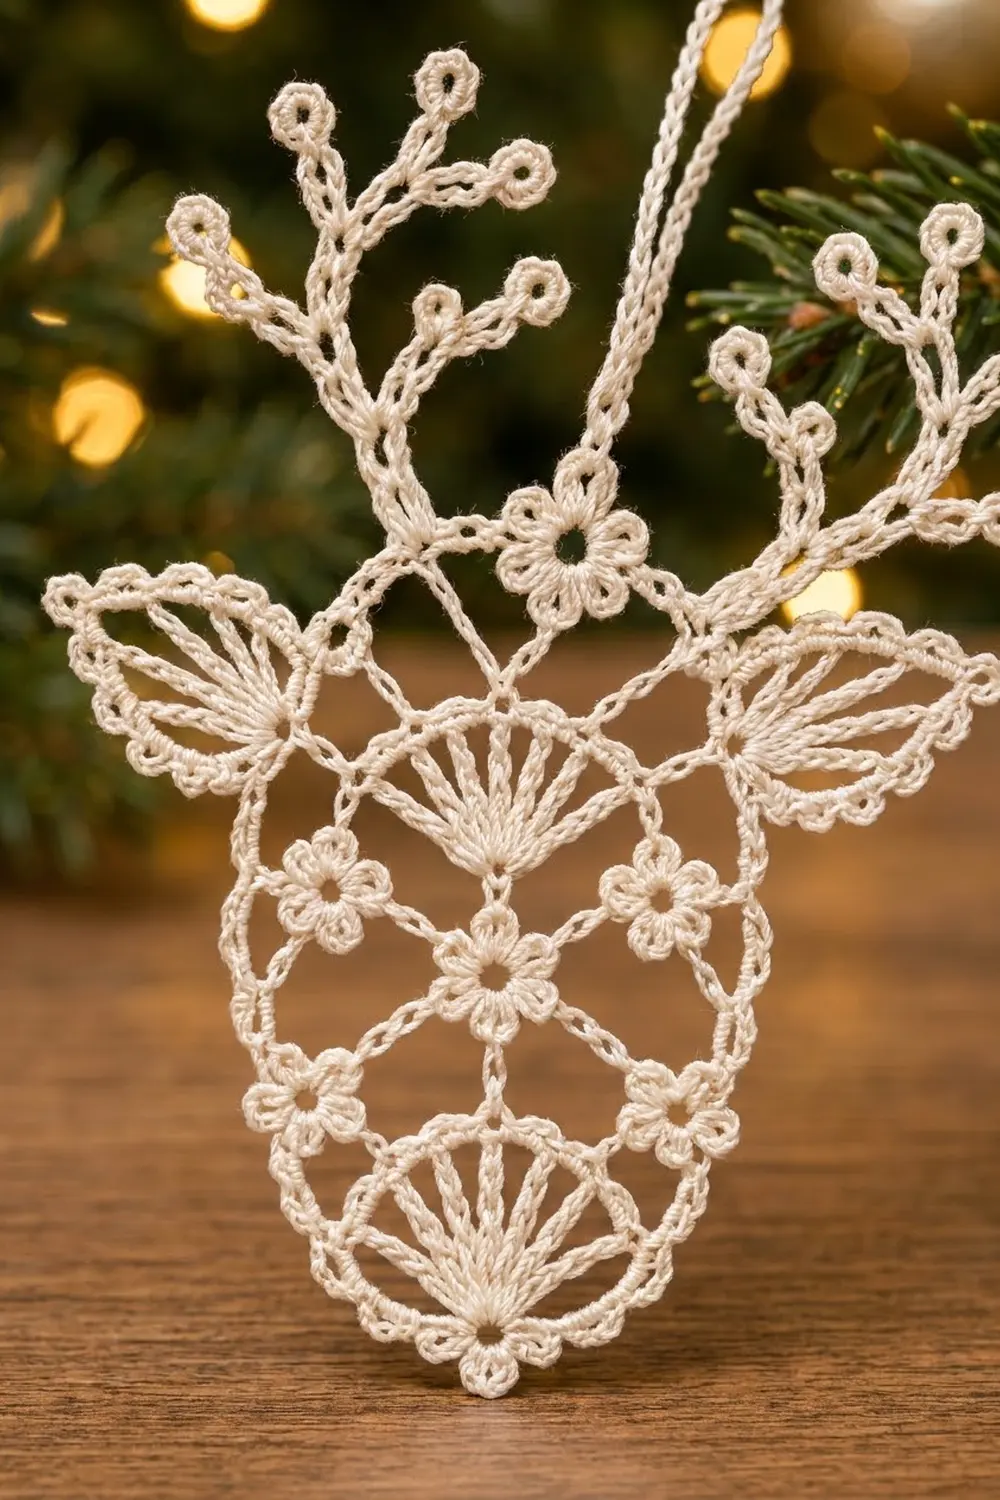
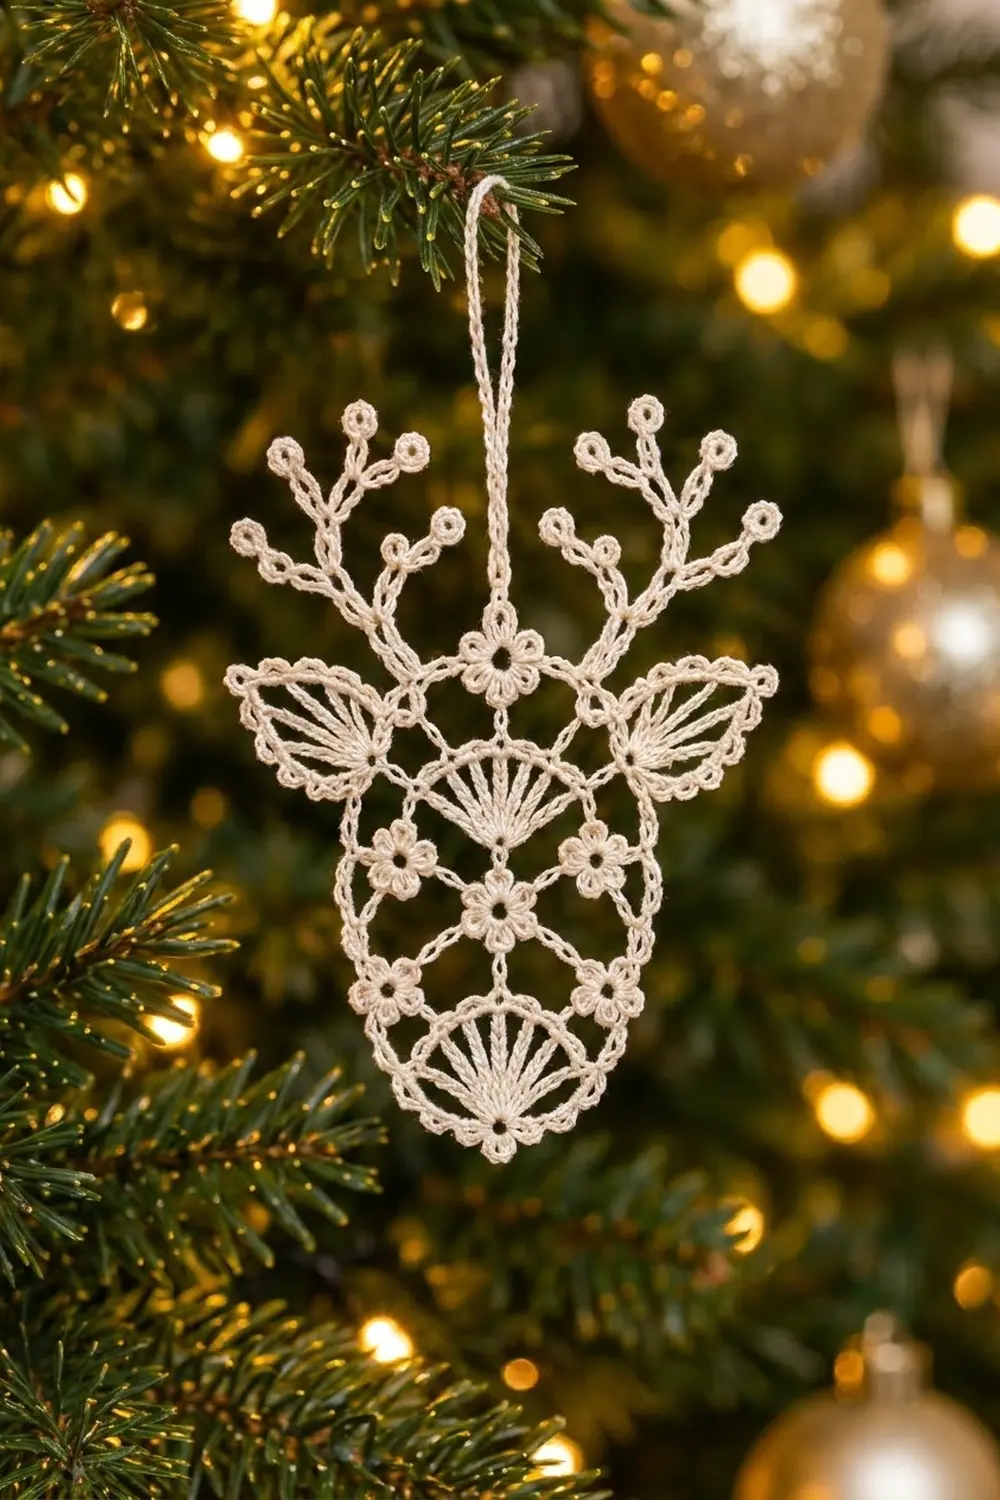
This little reindeer head is a flat, lacy ornament made in fine cream cotton thread. It looks delicate on the tree, but it is built from just a few repeating ideas: small chain-ring flowers, fans of long stitches, and simple chain arcs.
The face is a rounded shield with a central flower, four flowers set in an X around it, a forehead fan, and a larger chin fan. A tiny flower on a stem sits on top of the head and holds the hanging loop. Two fan-filled leaf ears and two branching antlers finish the shape.
The pattern uses US crochet terms. The finished ornament measures about 3.5 in (8.9 cm) wide across the ears and 4 in (10.2 cm) tall from chin to antler tips, plus a 1.25 in (3.2 cm) hanging loop.
You work from the center out. The face takes four rounds starting at the center flower, then one solid border round. The ears and antlers are worked directly off that border. It is one single piece with no sewing.
Finished Size and Construction
- Finished size: 3.5 in (8.9 cm) wide x 4 in (10.2 cm) tall, plus 1.25 in (3.2 cm) loop
- Skill level: Intermediate (thread lace, tall stitches)
- Terminology: US crochet terms
- Yarn weight: Size 10 crochet cotton thread
- Hook: 1.5 mm steel hook (US steel size 8)
- Number of pieces: 1
- Layout: Single ornament; ears and antlers worked on, not sewn
- Face size before border: 1.75 in (4.4 cm) wide x 2.25 in (5.7 cm) tall
- Face size after border: 2 in (5.1 cm) wide x 2.5 in (6.4 cm) tall
- Border depth: 0.125 in (0.3 cm) on every side
Materials
Choose a mercerized size 10 cotton thread. It has a soft sheen, holds starch well, and shows the fan rays clearly. Avoid fuzzy or acrylic thread, which blurs the lace and will not hold a blocked shape.
- Cream / ecru: 5 g, about 26 m (28 yd)
One ornament actually uses about 3 g. The amount above includes extra thread for a gauge swatch and a second try at the antlers.
Tools:
- 1.5 mm steel hook (US steel size 8)
- Fine tapestry needle
- Small sharp scissors
- Rust-proof pins and a foam blocking board
- Fabric starch or a 1:1 mix of white craft glue and water
- Ruler or tape measure
Abbreviations (US Terms)
- ch – chain
- sl st – slip stitch
- sc – single crochet
- dc – double crochet
- tr – treble crochet (yarn over twice)
- dtr – double treble crochet (yarn over 3 times)
- trtr – triple treble crochet (yarn over 4 times)
- sk – skip
- sp(s) – space(s)
- RS – right side
Special stitches:
- Mini Flower (MF): Ch 4, sl st in 4th ch from hook to form a tiny ring. (Ch 3, sl st in ring) 5 times. This makes 5 petals. The 3rd petal is the “middle petal” and points outward. Keep working from the ring.
- Ring Tip (RT): Ch 4, sl st in 4th ch from hook. Used at every antler tip.
Gauge and Checkpoints
Gauge matters less here than in a garment, but it controls how well the ears and antlers fit the face. Make one complete face (Rounds 1–5) before adding anything else. Measure it flat and lightly pressed.
Border gauge: 17 sc = 1 in (2.5 cm), measured along the Round 5 edge.
Checkpoints:
- After Round 2: the center flower is 0.5 in (1.3 cm) across.
- After Round 3: the piece is 1.5 in (3.8 cm) wide x 2 in (5.1 cm) tall, measured flower tip to flower tip and fan to fan.
- After Round 4: 1.75 in (4.4 cm) wide x 2.25 in (5.7 cm) tall.
- After Round 5: 2 in (5.1 cm) wide x 2.5 in (6.4 cm) tall.
If your face is too big, change to a 1.25 mm hook (US steel size 10) and keep your chains snug. If it is too small, change to a 1.75 mm hook (US steel size 7). A difference of 0.125 in (0.3 cm) is fine and disappears in blocking.
Face
Keep the RS facing throughout. Do not turn.
Round 1: Ch 6, sl st in first ch to form a ring. Ch 1, 12 sc in ring, sl st in first sc. (12 sc)
Round 2 (center flower petals): Ch 1, sc in same st, ch 3, sk next sc, sc in next sc, ch 3, sk next sc; rep from * 4 more times, sl st in first sc. (6 sc, 6 ch-3 petals)*
Label the petals P1 to P6 in your working direction, with P1 at the top of the head. P4 will be at the bottom.
Round 3 (fans and flower mesh): Sl st into P1.
- Forehead fan: Ch 5 (counts as first tr + ch 1), (tr, ch 1) 7 times in P1, tr in P1. (9 tr, 8 ch-1 sps)
- Ch 6, MF, ch 6, sc in P2.
- Ch 11, sc in P3.
- Ch 6, MF, ch 6.
- Chin fan: In P4 work (dtr, ch 1) 10 times, dtr. (11 dtr, 10 ch-1 sps)
- Ch 6, MF, ch 6, sc in P5.
- Ch 11, sc in P6.
- Ch 6, MF, ch 6, sl st in 4th ch of beginning ch-5.
Round 3 count: 9 tr in the forehead fan, 11 dtr in the chin fan, 4 sc, 4 Mini Flowers on ch-6 stems, and 2 ch-11 side loops. The fans spread like half-circles. Ease them open with your fingers so the rays lie flat.
Round 4 (outline mesh and top flower): Ch 1, sc in same st (first ray of the forehead fan).
- (Ch 2, sc in next tr) 4 times. You are now at the 5th (middle) ray.
- Top flower stem: Ch 4, MF, sl st in each of the 4 stem ch, ending back at the sc.
- (Ch 2, sc in next tr) 4 times. (9 sc across forehead fan)
- Ch 6, sc in middle petal of next MF.
- Ch 7, sc in ch-11 side loop.
- Ch 7, sc in middle petal of next MF.
- Ch 6, sc in first dtr of chin fan, (ch 2, sc in next dtr) 10 times. (11 sc across chin fan)
- Ch 6, sc in middle petal of next MF.
- Ch 7, sc in ch-11 side loop.
- Ch 7, sc in middle petal of next MF.
- Ch 6, sl st in first sc.
Round 4 count: 26 sc and 26 spaces: 18 ch-2 sps (8 + 10), 4 ch-6 sps, and 4 ch-7 sps. The top flower stem is not counted. It hangs free above the 5th forehead sc.
Border
The border is one dense round of sc that firms up the lacy edge into a smooth shield outline. It also gives you exact stitches to anchor the ears and antlers.
Border gauge: 17 sc = 1 in (2.5 cm).
Round 5: Ch 1. Work sc in each sc, 2 sc in each ch-2 sp, 6 sc in each ch-6 sp, and 7 sc in each ch-7 sp. At the 5th forehead sc, work into the sc only and keep the top flower stem in front of your work. Sl st in first sc. Fasten off and weave in the tail.
Counts per side. The shield has no corners, so there are no corner stitches. The sides are divided where the fans end:
- Top arc (forehead fan): 9 sc + (8 x 2) = 25 sc
- Right side: 6 + 1 + 7 + 1 + 7 + 1 + 6 = 29 sc
- Chin arc: 11 sc + (10 x 2) = 31 sc
- Left side: 6 + 1 + 7 + 1 + 7 + 1 + 6 = 29 sc
- Total: 25 + 29 + 31 + 29 = 114 sc
Each sc in this list belongs to only one side, so nothing is counted twice.
Why the math works: The Round 5 edge runs around an oval about 1.9 in x 2.4 in (4.8 cm x 6.1 cm) at its midline. The distance around that oval is about 6.8 in (17.3 cm). At 17 sc per inch, 114 sc covers 6.7 in (17.0 cm), so the edge lies flat with no ruffling and no cupping. In thread lace, one sc for each chain keeps an edge flat, which is why the ch-6 and ch-7 spaces take exactly 6 and 7 sc.
Ears
Make both ears directly on the border. Number the side stitches starting from the top arc on the right side and ending at the top arc on the left side.
Right ear
Row 1 (rays): With RS facing, join thread with a sl st in the 3rd sc of the right side. Ch 4 (counts as dc). In the same sc work: ch 1, tr, ch 1, dtr, ch 1, trtr, ch 1, dtr, ch 1, tr, ch 1, dc. Sl st in the 5th sc of the right side. (7 rays, 6 ch-1 sps)
Row 2 (outline arcs): Turn. Ch 1, sc in top of first ray, (ch 3, sc in top of next ray) 2 times, ch 3, (sc, ch 3, sc) in top of trtr, (ch 3, sc in top of next ray) 3 times, sl st in the 3rd sc of the right side. (8 sc, 7 ch-3 sps)
Row 3 (edge): Turn. Work 3 sc in each of the first 3 ch-3 sps, (2 sc, ch 3, 2 sc) in the tip ch-3 sp, 3 sc in each of the last 3 ch-3 sps, sl st in the 5th sc of the right side. (22 sc, 1 ch-3 tip) Fasten off.
The trtr in the middle is the longest ray, which gives the ear its pointed leaf shape. The ear should measure 0.75 in (1.9 cm) from base to tip.
Left ear
Work as for the right ear, but join in the 27th sc of the left side. End Rows 1 and 3 with a sl st in the 25th sc, and end Row 2 in the 27th sc. This puts the left ear in the mirror position.
Checkpoint: The width across both ear tips is 3.5 in (8.9 cm).
Antlers
Each antler starts as a chain. You then work sc back down it, making branches as you go. Work each sc into the back bump of the chain for a neat, rounded look.
Right antler: Join with a sl st in the 21st sc of the top arc.
- Ch 18 (main beam). RT.
- Sc in next 3 beam ch.
- Branch A: Ch 6, RT, sc in each of the 6 branch ch.
- Sc in next 3 beam ch.
- Branch B: Ch 5, RT, sc in each of the 5 branch ch.
- Sc in next 3 beam ch.
- Branch C (forked): Ch 8, RT, sc in next 3 branch ch, ch 4, RT, sc in each of the 4 fork ch, sc in remaining 5 branch ch.
- Sc in remaining 9 beam ch. Sl st in the 21st sc of the top arc. Fasten off.
Count check: Beam: 3 + 3 + 3 + 9 = 18 sc. Branch C: 3 + 5 = 8 sc. Each antler has 41 sc and 5 Ring Tips.
Left antler: Work it the same way, but join in the 5th sc of the top arc. Both antlers now sit 5 stitches in from the ends of the 25-stitch top arc, with the top flower centered between them.
Checkpoint: The antler tips reach about 1.5 in (3.8 cm) above the top of the face, for a total height of 4 in (10.2 cm).
Hanging Loop
Join thread with a sl st in the middle petal of the top flower. Ch 36, sl st in the same petal. Turn and work 44 sc over the chain loop, packing them tightly. Sl st in the petal and fasten off. The loop hangs about 1.25 in (3.2 cm) long.
Final Blocking
- Weave in every tail along the solid sc edges, not through the open mesh.
- Soak the ornament in starch (or the glue mix) for 1 minute.
- Blot it in a towel until it is damp but not dripping.
- Lay it RS up on the blocking board.
- Pin the face to 2 in (5.1 cm) x 2.5 in (6.4 cm), and check that both side loops are level.
- Open each fan so the rays are evenly spaced, and pin the forehead and chin arcs smooth.
- Pin each ear tip outward and up, 3.5 in (8.9 cm) apart.
- Pin every Ring Tip, spreading the branches so no two touch.
- Pin the hanging loop straight up.
- Let it dry completely, at least 12 hours, before you unpin it.
Final Quality-Control Checklist
- The face measures 2 in (5.1 cm) x 2.5 in (6.4 cm).
- The border has 114 sc: 25, 29, 31, and 29.
- The forehead fan has 9 rays and the chin fan has 11 rays.
- There are 5 Mini Flowers (four in the mesh, one on top) and one six-petal center flower.
- Both ears are the same size and mirror each other.
- Each antler has 5 Ring Tips, and both antlers start 5 stitches from the ends of the top arc.
- All tails are hidden and trimmed.
- The ornament hangs straight from its loop.
Troubleshooting
Fans cup or ruffle: Ruffling means the rays are too long, so work them more snugly. Cupping means the ch-1 sps are too tight, so loosen them slightly.
Border ruffles: You may have added stitches. Recount each side against 25, 29, 31, and 29.
Border pulls in: Your sc are too tight for the chain spaces. Go up one hook size for Round 5 only.
Flowers twist: Check that you worked the Round 4 sc into the middle (3rd) petal, not an outer one.
Ears are uneven: Recount the 3rd and 5th side stitches. Being off by one stitch tilts the ear.
Antlers droop: Use a stronger starch and let them dry fully while pinned.
Care
Hand wash in cool water with mild soap, starch again, and pin to dry. Store flat in tissue paper so the antlers do not bend.
Final Notes
The whole ornament follows one chain of measurements. The center flower is 0.5 in (1.3 cm). Round 3 reaches 1.5 in (3.8 cm) x 2 in (5.1 cm), and Round 4 reaches 1.75 in (4.4 cm) x 2.25 in (5.7 cm). The 114-stitch border brings the face to 2 in (5.1 cm) x 2.5 in (6.4 cm). The ears widen it to 3.5 in (8.9 cm), and the antlers raise it to 4 in (10.2 cm) tall. If each checkpoint matches, the finished reindeer will match too.
Make one for your own tree, then a few more for gift toppers. Happy crocheting!