

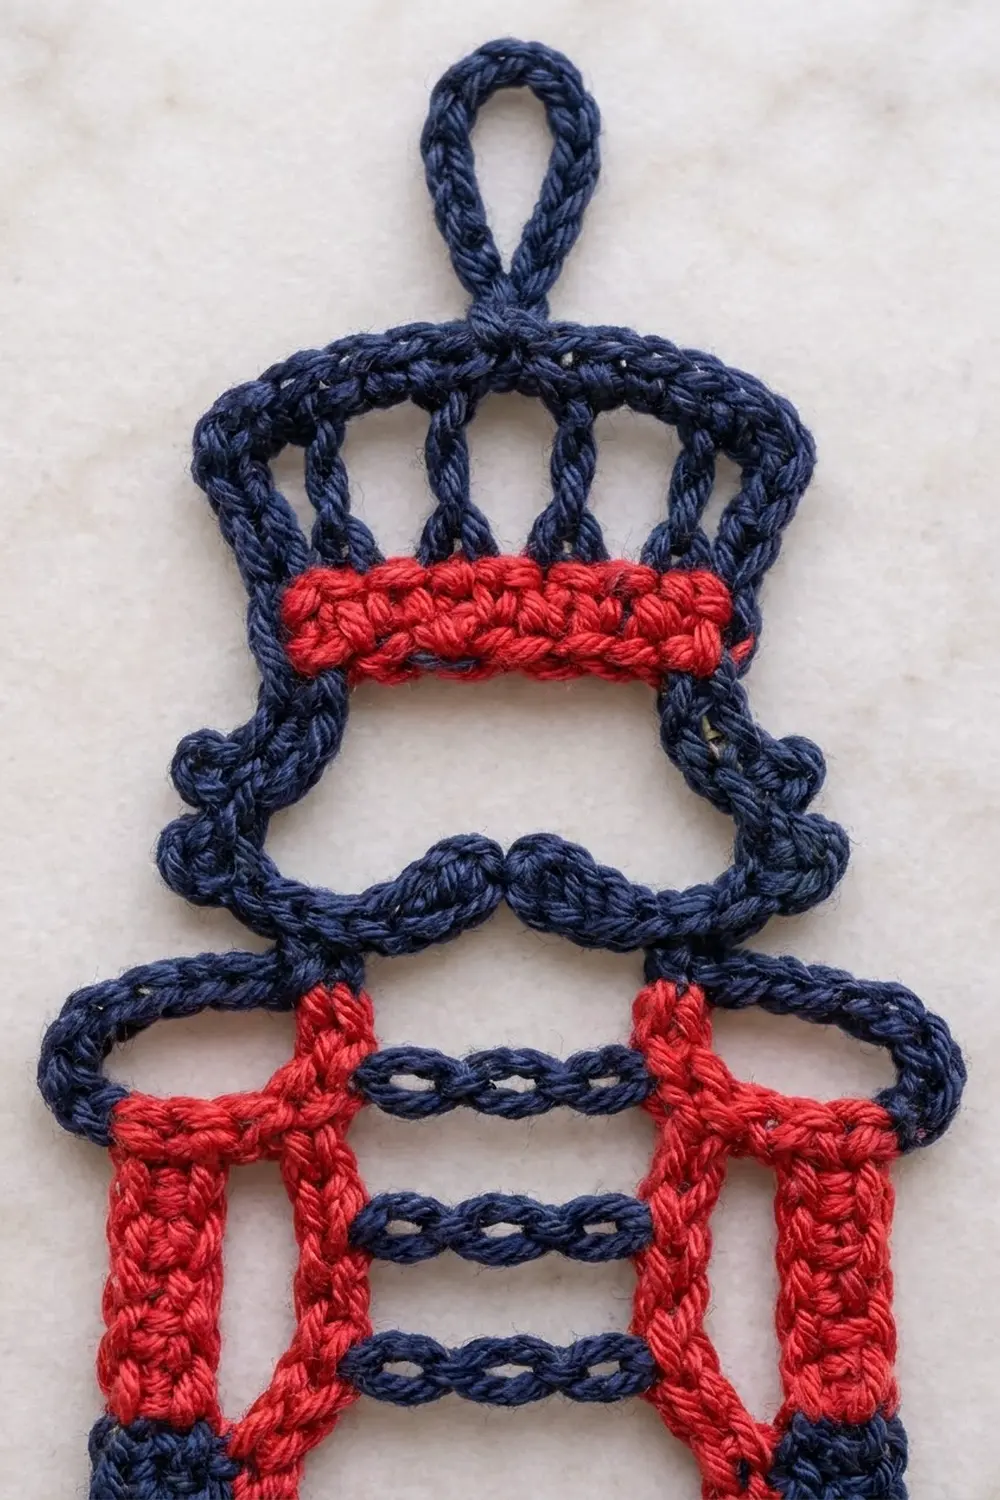
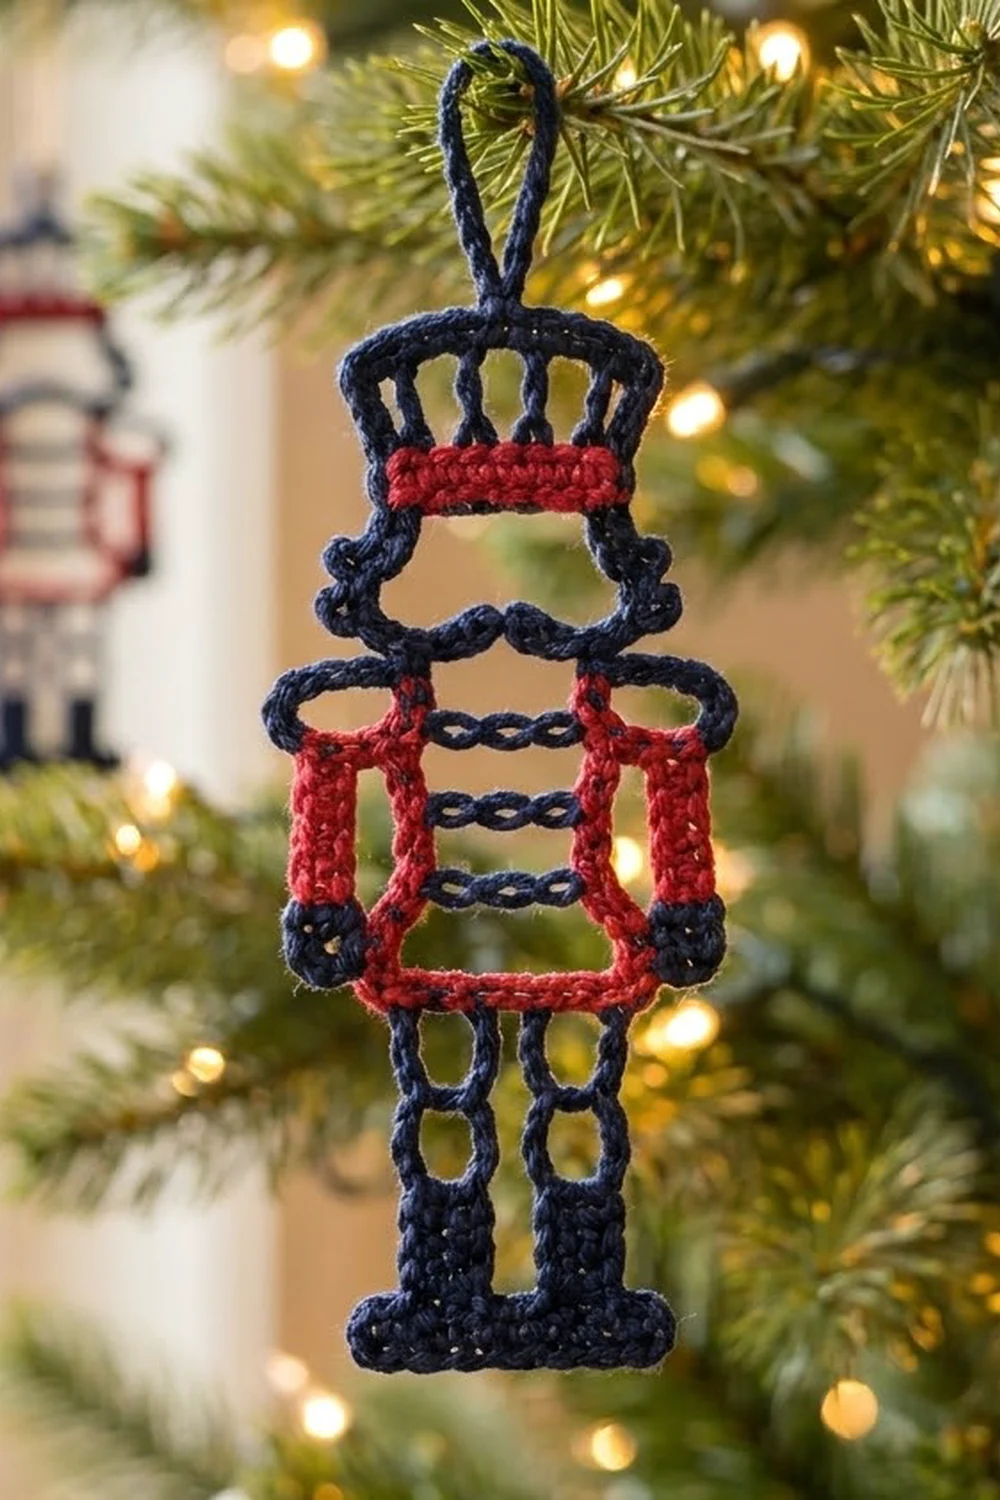
This openwork nutcracker is a flat, lace-like Christmas ornament that looks like a line drawing made of yarn. It is one single piece. Navy outlines form the boots, legs, face and tall crown hat, and bright red marks the jacket, sleeves and hat band. Navy chain “rungs” cross the open chest, and two small picot curls form the mustache.
The style is graphic and modern, closer to wire art than to a stuffed toy. Most of the shape is open space, so the ornament weighs almost nothing and the tree lights shine through every window.
This pattern uses US crochet terms. The finished ornament measures 3 in (7.6 cm) wide across the sleeves and 7 1/3 in (18.6 cm) tall from the base to the hat top. With the hanging loop it is 8 1/3 in (21.2 cm) tall.
You work bottom-up in rows: first a solid base, then two boots and open legs, then a hip bar that joins the legs. The jacket, face and hat are filet-style rows. Solid edge posts make the vertical lines and chain spans make the horizontal lines. The sleeves, hands, hair curls and navy rung overlays are added at the end.
Finished Size and Construction
- Finished size: 3 in (7.6 cm) wide x 7 1/3 in (18.6 cm) tall; 8 1/3 in (21.2 cm) with loop
- Skill level: Easy-intermediate (row counting, color changes, working into row ends)
- Terminology: US crochet terms
- Yarn weight: Sport-weight (#2) mercerized cotton
- Hook: 2.75 mm (C-2)
- Number of pieces: 1 (the ornament is worked as a single piece)
- Layout: Single standing figure, no assembly
- Piece size: body 2 in (5.1 cm) wide; head 1 1/3 in (3.4 cm) wide; hat top 2 in (5.1 cm) wide
- Size before edge finishing: 2 in (5.1 cm) wide x 7 1/3 in (18.6 cm) tall
- Edge finishing depth: each sleeve adds 1/2 in (1.3 cm) per side
Materials
Choose a smooth, tightly plied mercerized cotton. It holds crisp lines, keeps the chain spans straight and blocks flat. Avoid fuzzy or very soft acrylic, because the open windows will sag and the outline will look blurry.
- Navy: 10 g (about 31 m) for the base, boots, legs, shoulder bar, face, crown, loop, hands, curls and rung overlays
- Red: 5 g (about 16 m) for the hip bar, jacket, sleeves and hat band
These amounts include extra yarn for a gauge test and for the tails at color changes. One standard ball of each color will make several ornaments.
Tools:
- 2.75 mm (C-2) crochet hook
- Tapestry needle
- Scissors
- 1 stitch marker
- Rust-proof pins and a foam blocking mat
- Spray bottle with water
- Optional: fabric stiffener or starch
Abbreviations (US Terms)
- ch – chain
- sl st – slip stitch
- sc – single crochet
- dc – double crochet
- tr – treble crochet
- sk – skip
- sp – space
- st(s) – stitch(es)
- tch – turning chain
- RS / WS – right side / wrong side
Special stitch – ch-4 picot: Ch 4, then sl st in the 4th ch from the hook. This makes a small closed ring that hangs off the chain you are working. Picots are never counted as stitches.
Counting note: In open rows, each dc counts as 1 st and each chain in a span counts as 1 st. The beginning ch 3 counts as a dc, and the beginning ch 4 counts as a tr. The ch 1 at the start of sc rows does not count.
Gauge and Checkpoints
Gauge: 12 sc and 12 sc rows = 2 in (5.1 cm). That is 6 sts and 6 rows per 1 in (2.5 cm). One dc row = 1/2 in (1.3 cm), and one tr row = 2/3 in (1.7 cm).
Test one boot first. Work Rows 1–6 of the left boot and measure. The base should be 2 in (5.1 cm) wide, and the 6 rows should be 1 in (2.5 cm) tall. If both match, keep going with the pattern.
Checkpoints (height from the bottom edge):
- After Row 9 (legs): 2 1/2 in (6.4 cm)
- After Row 15 (shoulder bar): 4 5/6 in (12.3 cm)
- After Row 18 (top of face): 6 in (15.2 cm)
- After Row 23 (hat top): 7 1/3 in (18.6 cm)
Too big? Change to a 2.5 mm hook. Too small? Change to a 3 mm hook. If only the height is off, your dc are too tall or too short. Keep the same hook and pull the first loop snug for shorter dc, or lift it a little for taller dc.
The Pattern
Base and Left Boot (Navy)
Row 1 (RS): With navy, ch 13. Sc in the 2nd ch from the hook and in each ch across, turn. (12 sc)
Row 2: Ch 1, sc in each st across, turn. (12 sc)
The base now measures 2 in (5.1 cm) wide and 1/3 in (0.8 cm) tall. Count from the end where you just finished and place a marker in st 8 of Row 2.
Rows 3–6 (left boot): Ch 1, sc in the first 5 sts only, turn. (5 sc per row)
The boot is 5/6 in (2.1 cm) wide and 2/3 in (1.7 cm) tall, and solid navy like the boots in the photo.
Left Leg (Navy)
Row 7: Ch 3 (counts as dc), ch 3, sk the next 3 sts, dc in the last st, turn. (2 dc + 3 ch = 5 sts)
Rows 8–9: Ch 3 (counts as dc), ch 3, sk the ch-3 sp, dc in the top of the tch, turn. (5 sts each row)
Fasten off after Row 9. The leg is two vertical navy posts with a chain rung at the top of each row, and it is 1 1/2 in (3.8 cm) tall.
Right Boot and Right Leg (Navy)
With RS facing, join navy in the marked st 8 of Row 2. Sts 6–7 stay unworked, which leaves a 1/3 in (0.8 cm) gap between the boots.
Rows 3–6: Ch 1, sc in the 5 sts (sts 8–12), turn. (5 sc per row)
Rows 7–9: Work as for the left leg. (5 sts per row)
On the last yarn-over of the final dc in Row 9, change to red. Do not fasten off.
Hip Bar (Red)
Row 10: Ch 1, sc in each of the 5 sts across the right leg (dc, 3 ch, dc), ch 2, then sc in each of the 5 sts across the left leg, turn. (5 sc + 2 ch + 5 sc = 12 sts)
The 2 chains bridge the gap between the legs, so the hip bar stays at 12 sts, the same as the base. This bar covers the Row 9 rungs, so each leg shows 2 open rungs (Rows 7 and 8).
Jacket (Red)
Row 11: Ch 3 (counts as dc), dc in the next st, ch 8, sk the next 8 sts, dc in the last 2 sts, turn. (4 dc + 8 ch = 12 sts)
Rows 12–14: Ch 3 (counts as dc), dc in the next dc, ch 8, sk the ch-8 sp, dc in the next dc, dc in the top of the tch, turn. (12 sts each row)
You now have two red side panels, each 2 dc wide, with an open chest between them. The chest is 2 in (5.1 cm) tall. On the last yarn-over of Row 14, change to navy.
Shoulder Bar (Navy)
Row 15: Ch 1, sc in the first 2 dc, sc in each of the 8 ch, then sc in the last dc and in the top of the tch, turn. (12 sc)
This row covers the Row 14 span, which leaves 3 visible chest rungs (Rows 11, 12 and 13). Checkpoint: 4 5/6 in (12.3 cm) tall and 2 in (5.1 cm) wide.
Face and Mustache (Navy)
Row 16: Sl st in the first 3 sts. Ch 3 (counts as dc in st 3), ch 2, ch-4 picot, ch 2, ch-4 picot, ch 2, sk the next 6 sts, dc in st 10, turn. Leave sts 11–12 unworked. (2 dc + 6 base ch = 8 sts; picots not counted)
The two picots sit side by side near the center of the span and hang down into the lower face window. They are the mustache curls. The head is 2 sts (1/3 in / 0.8 cm) narrower than the shoulders on each side.
Row 17: Ch 3 (counts as dc), ch 6, sk the 6 base ch of the previous row (don’t work into the picots), dc in the top of the tch, turn. (2 dc + 6 ch = 8 sts)
Row 18: Ch 1, sc in the first dc, sc in each of the 6 ch, sc in the top of the tch, turn. (8 sc)
The face is 1 1/3 in (3.4 cm) wide and 1 in (2.5 cm) tall, measured from the shoulder bar to the top of Row 17. Checkpoint: 6 in (15.2 cm) total height. On the last yarn-over of Row 18, change to red.
Hat Band (Red)
Row 19 (growth row): Ch 1, 2 sc in the first st, sc in the next 6 sts, 2 sc in the last st, turn. (8 sts worked + 2 added = 10 sc)
Rows 20–21: Ch 1, sc in each st across, turn. (10 sc each row)
The solid red band is 1 2/3 in (4.2 cm) wide and 1/2 in (1.3 cm) tall. On the last yarn-over of Row 21, change to navy.
Crown and Hat Top (Navy)
Row 22: Ch 4 (counts as tr), [ch 2, sk the next 2 sts, tr in the next st] 3 times, turn. (4 tr + 6 ch = 10 sts)
This row makes 4 tall navy spokes with open windows between them, like the crown in the photo.
Row 23 (growth row): Ch 1, 2 sc in the first tr, [2 sc in the ch-2 sp, sc in the next tr] twice, 2 sc in the last ch-2 sp, 2 sc in the top of the tch, turn. (12 sc)
Count check: 2 + 3 + 3 + 2 + 2 = 12. The hat top flares to 2 in (5.1 cm), the same width as the shoulders. The full hat (band, crown and top) is 1 1/3 in (3.4 cm) tall.
Hanging Loop (Navy)
Row 24: Ch 1, sl st in the first 6 sts, ch 12, sl st in the same (6th) st, then sl st in the remaining 6 sts. Fasten off.
The ch-12 loop folds in half to make a 1 in (2.5 cm) hanger.
Border: Edge Finishing
This ornament has no border round that goes all the way around. Instead, the edge finishing adds the sleeves, hands, hair curls and navy rungs. All of it uses one pickup rate: 1 sc per sc row-end and 3 sc per dc row-end. This works because one dc row (1/2 in / 1.3 cm) is as tall as 3 sc rows, so every pickup matches the gauge of 6 sts per inch.
Sleeves (Red) – Both Sides
With RS facing, join red at the top corner of the right side edge (the end of Row 15).
Row 1: Ch 1. Working down the side edge, sc once in the Row 15 end, then work 3 sc in each dc row-end of Rows 14, 13, 12 and 11, turn. (1 + 12 = 13 sc)
Rows 2–3: Ch 1, sc in each st across, turn. (13 sc each row)
Fasten off. Repeat on the left edge, again joining at the end of Row 15. Each sleeve is 2 1/6 in (5.5 cm) long and 1/2 in (1.3 cm) wide. The sleeves bring the width from 2 in (5.1 cm) to 3 in (7.6 cm).
Hands (Navy) – Both Sides
Join navy at the bottom end of one sleeve.
Row 1: Ch 1, work 3 sc across the 3 row-ends of the sleeve, turn. (3 sc)
Row 2: Ch 1, sc in each st, turn. (3 sc) Fasten off.
Each hand is 1/2 in (1.3 cm) wide and 1/3 in (0.8 cm) deep, and it hangs beside the hip bar. Repeat on the other sleeve.
Hair Curls (Navy) – Both Sides
Join navy at the end of Row 17 on one side of the face. Work (sc, ch 3, sc) in the Row 17 row-end, then (sc, ch 3, sc) in the Row 16 row-end. Fasten off. That gives 2 curls per side, which form the scalloped hair outline. Repeat on the other side.
Navy Rung Overlays
Hold the navy yarn behind the work. Insert the hook from front to back beside the first chain of the Row 11 span and pull up a loop. Then work 1 sl st through each of the 8 ch along the span and fasten off. Repeat on the Row 12 and Row 13 spans, for 3 rungs with 8 sl sts each. The navy sitting over the red chain gives each rung a doubled, twisted look.
Final Blocking
- Weave in all ends along solid sections only: the base, boots, bars and hat band. Never weave across an open span.
- Mist the ornament until it is damp but not dripping.
- Lay it RS up on the blocking mat.
- Pin the base corners 2 in (5.1 cm) apart. Pin the hat top corners 2 in (5.1 cm) apart and 7 1/3 in (18.6 cm) above the base.
- Pin each chain span straight and level, with one pin at each end.
- Pin the sleeves out to an overall width of 3 in (7.6 cm), with the hands hanging straight down.
- Shape the mustache picots so they curl outward and the hair curls fan out to the sides.
- Optional: brush on fabric stiffener for a crisp, wire-like finish.
- Let the ornament dry for at least 12 hours before you unpin it.
Final Quality-Control Checklist
- Base and hip bar: 12 sts each, 2 in (5.1 cm) wide
- Boots: 5 sts each, with a 1/3 in (0.8 cm) gap between them
- Each leg: 2 visible rungs
- Chest: 3 navy-covered rungs between the red side panels
- Shoulder bar and hat top: 12 sc each
- Face: 8 sts wide, with 2 mustache picots and 2 hair curls per side
- Hat band: 10 sc in solid red; crown has 4 tr spokes
- Sleeves: 13 sc long and 3 rows deep, with navy hands
- Total size: 3 in x 7 1/3 in (7.6 cm x 18.6 cm), with a 1 in (2.5 cm) loop
Troubleshooting
Chain spans sag or curve. Your chains are looser than your stitches. Chain a little tighter, and pin the spans straight when you block.
Hip bar pulls the legs together. The ch-2 bridge is too tight. Work it loosely so the 2 chains sit as wide as 2 sc.
Sleeves ruffle. You picked up too many stitches. Recount and keep to 3 sc per dc row-end and 1 per sc row-end, for 13 total.
Sleeves pucker or pull the body. You picked up too few stitches. Check that you have 13 sc.
Mustache picots are hidden. You worked into a picot in Row 17. Rip back Row 17 and redo it, keeping the picots free.
Ornament leans. Your rows are uneven in height. Pin all four main corners firmly when you block and use stiffener.
Care
Hand wash in cool water with mild soap, then roll the ornament in a towel to press out the water and re-block it flat to dry. Store it flat in tissue so the loop and picots keep their shape.
Final Notes
The measurement chain starts with the gauge: 6 sts and 6 rows per inch give the 2 in (5.1 cm) base. That width carries through the hip bar, jacket and shoulder bar at 12 sts. The head narrows to 8 sts at 1 1/3 in (3.4 cm), and the hat flares back to 12 sts at 2 in (5.1 cm). The height grows to 2 1/2 in (6.4 cm) at the legs, 4 5/6 in (12.3 cm) at the shoulders, 6 in (15.2 cm) at the face and 7 1/3 in (18.6 cm) at the hat top. The 1/2 in (1.3 cm) sleeves then bring the width to 3 in (7.6 cm). If you check each stage, the ornament will finish at the right size.
Happy crocheting!