

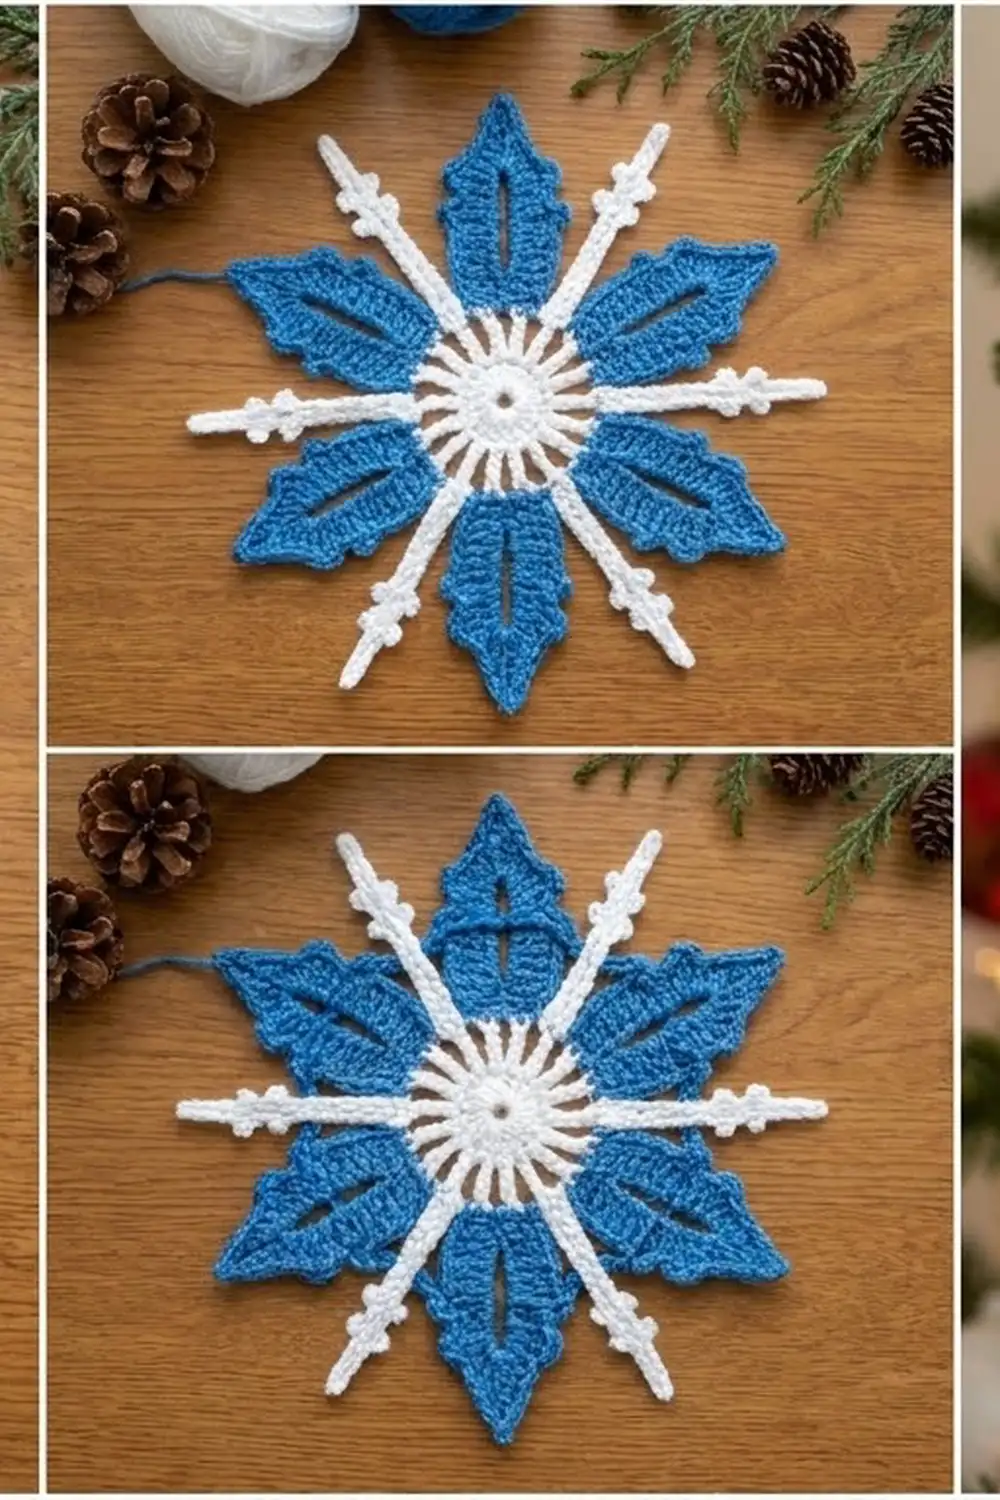
The Frosted Leaf Snowflake is a two-color, six-pointed crochet snowflake with a crisp white outline. Six broad blue leaf points alternate with slim white picot spikes around a lacy white center, so the star reads clearly even from across the room.
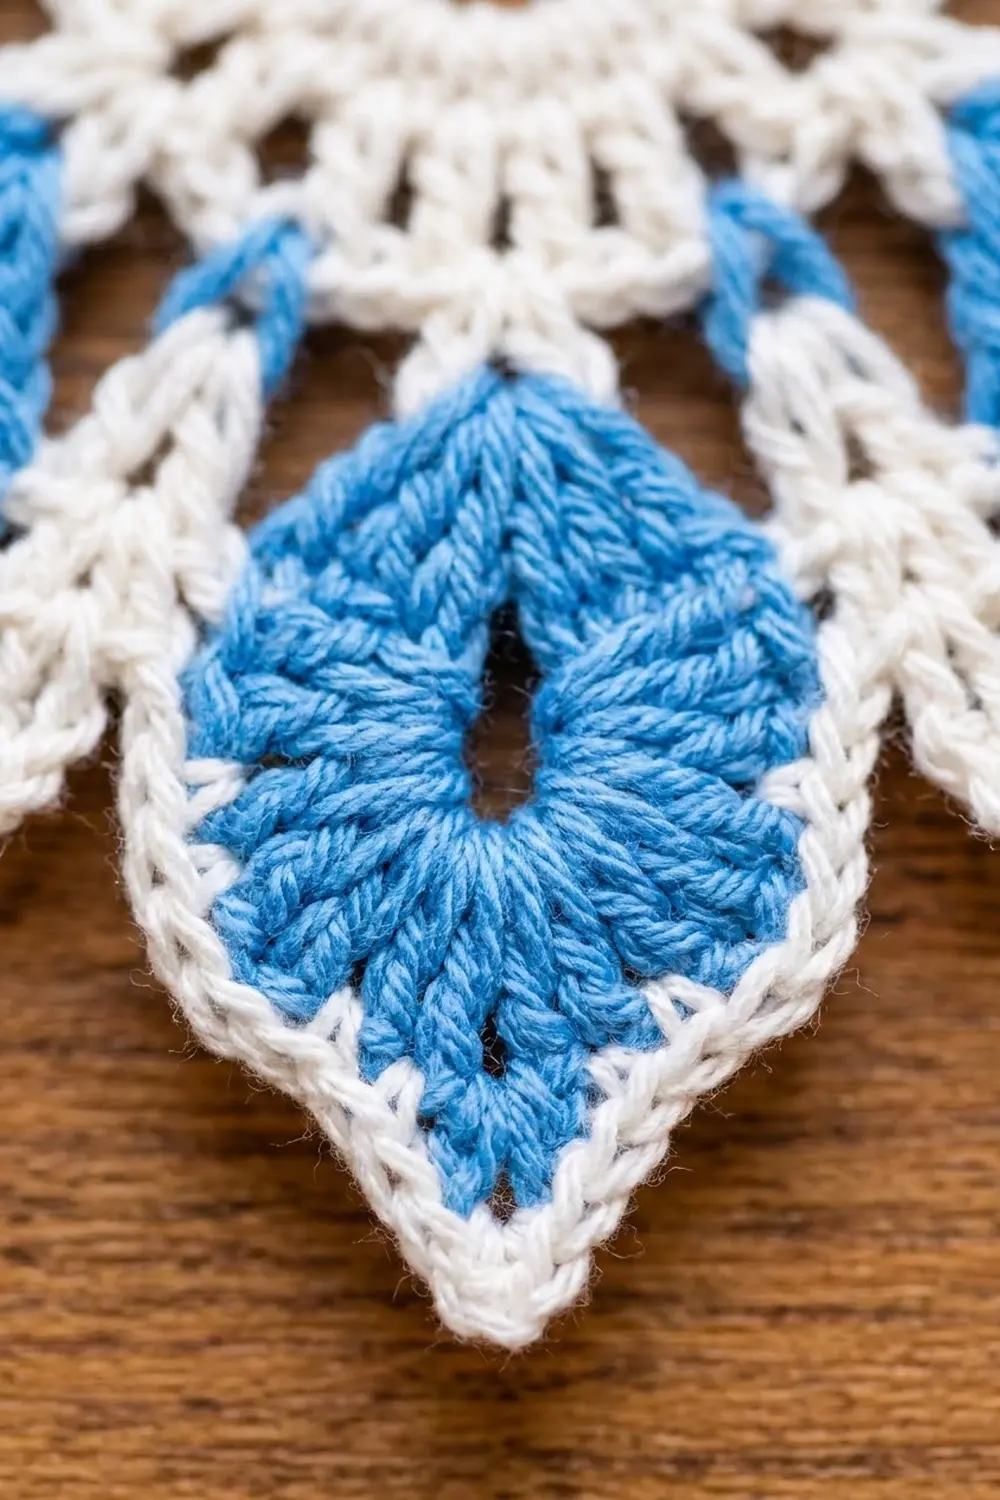
The palette is white and sky blue. White makes the center, the spikes, and the outline. Blue fills the six points. Each blue point has a narrow open slit up its middle, which gives it the look of a frosted leaf.
The pattern uses US crochet terms. The finished ornament measures 5 in (12.7 cm) from point to point and about 4.25 in (10.8 cm) from one inner corner to the opposite inner corner.
You work the whole ornament in the round as one piece. Rounds 1–3 make the white center, spikes, and chain loops. Round 4 adds the blue leaves. Round 5 is the white single-crochet border. A short chain loop finishes it for hanging.
Finished Size and Construction
- Finished size: 5 in (12.7 cm) point to point; 4.25 in (10.8 cm) inner corner to inner corner
- Skill level: Easy-intermediate
- Terminology: US crochet terms
- Yarn weight: DK (light worsted, #3)
- Hook: 3.5 mm (E-4)
- Number of pieces: 1 (single motif)
- Layout: Single six-pointed star, worked in the round
- Center medallion (after Round 2): 2 in (5.1 cm) across
- Size before border (after Round 4): 4.75 in (12.1 cm) point to point
- Border depth: about 0.125 in (0.3 cm), one round of sc
Materials
Yarn: Use a smooth DK cotton or cotton blend. Cotton gives sharp stitch definition and holds its shape after blocking. Avoid fuzzy or very stretchy acrylics, because the spikes can curl.
- Color A – White: 8 g / about 18 m (20 yd)
- Color B – Sky Blue: 5 g / about 11 m (12 yd)
These quantities include a margin for a gauge swatch and weaving in ends.
Tools:
– 3.5 mm (E-4) crochet hook
– Tapestry needle
– Scissors
– Stitch marker
– Blocking mat and rust-proof pins
– Spray bottle with water (or fabric stiffener, optional)
Abbreviations (US Terms)
- ch – chain
- sl st – slip stitch
- sc – single crochet
- hdc – half double crochet
- dc – double crochet
- tr – treble crochet
- sp – space
- st(s) – stitch(es)
Special stitches
Picot: Ch 3, sl st in 3rd ch from hook.
Spike: Ch 8, sl st in 3rd ch from hook (tip picot made). Working back down the remaining chains: sc in next ch, picot, hdc in next ch, picot, hdc in next ch, dc in last 2 ch. This uses all 8 chains: 3 for the tip, then 1 + 1 + 1 + 2. You get a tapered spike about 1.1 in (2.8 cm) long with a picot tip and two side nubs.
Leaf (worked into a ch-11 loop): (hdc, 2 dc, 3 tr, ch 3, 3 tr, 2 dc, hdc). That makes 12 sts, 6 on each side of a ch-3 tip.
Gauge and Checkpoints
Gauge is not critical for an ornament, but it decides whether the points and spikes meet the border neatly. Make one test snowflake before you make a set.
Checkpoint 1 – after Round 2: The medallion measures 2 in (5.1 cm) across.
Checkpoint 2 – after Round 3: The white spike tips measure about 4.25 in (10.8 cm) from tip to opposite tip.
Checkpoint 3 – after Round 4: The blue leaf tips measure 4.75 in (12.1 cm) from tip to opposite tip.
Checkpoint 4 – after Round 5 and blocking: 5 in (12.7 cm) point to point.
If your piece is too big: Go down to a 3.25 mm hook, or tighten your chains. Loose chains in the ch-11 loops are the most common cause.
If your piece is too small: Go up to a 3.75 mm hook. Check that your tr stitches are fully drawn up, because short tr make stubby leaves.
Pattern
Round 1 – Center Ring (Color A, White)
Ch 8, sl st in first ch to form a ring.
Ch 1, work 24 sc into the ring. Join with sl st to first sc. (24 sc)
The ring leaves an open center hole about 0.25 in (0.6 cm) across. Pull the starting tail gently to firm it up, but keep the hole open.
Round 2 – Spokes (White)
Ch 3 (counts as dc), dc in next sc, ch 2. Dc in next 2 sc, ch 2. Repeat from * 10 more times. Join with sl st to top of starting ch-3.
(24 dc in 12 pairs, 12 ch-2 sps)
The 12 dc pairs are the white spokes. Checkpoint: 2 in (5.1 cm) across.
Round 3 – Spikes and Leaf Loops (White)
Sl st in next dc and into the first ch-2 sp.
Ch 1. (Sc, Spike, sc) in current ch-2 sp, ch 1. (Sc, ch 11, sc) in next ch-2 sp, ch 1. Move to the next ch-2 sp and repeat from * 5 more times. Join with sl st to first sc.
(24 sc, 6 Spikes, 6 ch-11 loops, 12 ch-1 sps)
The Spikes and ch-11 loops now alternate around the medallion. Each ch-11 loop will become the open center slit of a blue leaf. Fasten off white and weave in the ends.
Checkpoint: Spike tip to opposite Spike tip is about 4.25 in (10.8 cm).
Round 4 – Blue Leaf Points (Color B, Blue)
Join blue with sl st into any ch-11 loop.
Work a Leaf in the ch-11 loop: (hdc, 2 dc, 3 tr, ch 3, 3 tr, 2 dc, hdc). Ch 2. Sc in next ch-1 sp. Ch 4, passing behind the base of the Spike. Sc in the ch-1 sp on the other side of the Spike. Ch 2. Repeat from * 5 more times. Join with sl st to first hdc.
(6 Leaves = 72 leaf sts and 6 ch-3 tips; 12 sc; 12 ch-2 sps; 6 ch-4 sps)
Technique notes:
– Before you work into the ch-11 loop, spread the chain evenly. Push the stitches together so they cover the loop completely. The chain itself stays visible as a narrow white slit up the middle of the blue leaf.
– While you work the ch-4, fold the Spike toward you so the blue chain sits behind it.
– The two groups of 3 tr form the broad, lobed shoulders of each leaf.
Fasten off blue and weave in the ends.
Checkpoint: Leaf tip to opposite leaf tip is 4.75 in (12.1 cm).
Hanging Loop
You add the loop after the border; instructions are in the Border section below.
Border
Border Gauge
The border is one round of white sc. Work about 5 sc per 1 in (2.5 cm) along the leaf edges. Each sc adds about 0.125 in (0.3 cm) of depth, which brings the piece from 4.75 in (12.1 cm) to 5 in (12.7 cm) point to point.
Round 5 – White Outline (Color A, White)
Join white with sl st in the first hdc of any Leaf. Ch 1.
Sc in each of the next 6 leaf sts. (Sc, ch 3, sc) in ch-3 tip. Sc in each of the next 6 leaf sts. 2 sc in ch-2 sp. Sc in next sc. Ch 3, sc in tip picot of the Spike, ch 3. Skip the ch-4 sp and sc in next sc. 2 sc in next ch-2 sp. Repeat from * 5 more times. Join with sl st to first sc. Fasten off.
Count per point section (one Leaf plus one Spike valley):
– Leaf edges: 6 + 2 + 6 = 14 sc
– Leaf tip: 1 ch-3 sp
– Before the valley: 2 + 1 = 3 sc
– At the valley: 1 sc into the Spike tip, with a ch-3 on each side (2 ch-3 sps)
– After the valley: 1 + 2 = 3 sc
That is 21 sc and 3 ch-3 sps per section.
Round total: 6 × 21 = 126 sc, and 6 × 3 = 18 ch-3 sps.
Why the Math Works
Each Leaf has exactly 12 sts, 6 on each side, and the border places exactly 1 sc in each one. That keeps the edge flat with no ruffling. The 2 extra sc in the leaf tip, plus the ch-3, give the point room to turn sharply.
The ch-2 sps of Round 4 each take 2 sc, so the curve into the valley lies flat. Anchoring the border to the Spike tip pulls the inner corner inward and creates the star silhouette. The two ch-3 bridges on either side of the Spike tip are long enough to reach it without pulling it out of shape.
All 6 sections are identical, so the totals are a simple 6 × 21 sc and 6 × 3 ch-3 sps, with no extra stitches added anywhere.
Hanging Loop
Join white with sl st in the ch-3 tip of any Leaf. Ch 20, then sl st in the same ch-3 tip. Fasten off and weave in the ends. The loop hangs about 1.5 in (3.8 cm) above the point.
Final Blocking
- Weave in all remaining ends along stitches of the same color, so no white shows on blue or blue on white.
- Lightly mist the snowflake with water until it is damp but not soaked. To make it stiffer, dip it in diluted fabric stiffener and squeeze out the excess.
- Lay it face up on the blocking mat.
- Pin the 6 leaf tips through their ch-3 sps, 2.5 in (6.4 cm) from the center. That gives 5 in (12.7 cm) point to point.
- Pin the 6 valleys at the Spike tips, about 2.1 in (5.3 cm) from the center.
- Straighten each Spike and nudge its two picot nubs so they sit on opposite sides.
- Open each leaf slit with a pin so the white center line shows clearly.
- Let it dry completely, at least 12 hours, before you unpin it.
Final Quality-Control Checklist
- Round 1 has 24 sc, and the center hole is open and round.
- Round 2 has 12 dc pairs and 12 ch-2 sps.
- Round 3 has 6 Spikes and 6 ch-11 loops, alternating.
- Each blue Leaf has 12 sts plus a ch-3 tip, with a visible slit up its center.
- The blue ch-4 sits behind each Spike, not in front of it.
- The border has 126 sc and 18 ch-3 sps.
- The ornament measures 5 in (12.7 cm) point to point and 4.25 in (10.8 cm) valley to valley.
- All 6 points are the same size and evenly spaced.
- The hanging loop is secure and centered on one tip.
- All ends are hidden in matching colors.
Troubleshooting
The center cups or ruffles: Your Round 2 chains are too tight or too loose. Rework Round 2 with even ch-2s, or change your hook size.
The leaves are floppy or too long: Your ch-11 loop is loose. Crochet it slightly tighter, or redo it as a ch-10 loop and keep the same Leaf stitches.
The leaf slit closed up: The Leaf stitches are bunched at one end of the loop. Spread them evenly along the whole chain, then reopen the slit during blocking.
The Spike twists: This is normal for chain-back stitches. Pin it straight while it is damp, and use stiffener if it keeps rolling.
The valley pulls into a V that is too deep: Your border ch-3 bridges are tight. Rework them as ch-4.
The border ripples along the leaves: You added extra sc. Work exactly 1 sc in each leaf stitch.
Blue shows through to the front at the Spike: Rework the ch-4 behind the Spike rather than in front of it.
Care
Hand wash in cool water with a mild soap, then press out the water in a towel and reshape it flat to dry. If you stiffened the ornament, rinse it and apply stiffener again after washing.
Final Notes
Everything in this snowflake depends on a short measurement chain:
- A 24-sc ring opens into a 2 in (5.1 cm) medallion.
- The Spikes reach 4.25 in (10.8 cm) tip to tip.
- The blue Leaves extend to 4.75 in (12.1 cm).
- One border round of 126 sc finishes the star at 5 in (12.7 cm) point to point.
Check each stage against these numbers on your first piece. After that, every snowflake you make will match. Hang one on the tree, tie one to a gift, or make a whole flurry for the window.
Happy crocheting!