

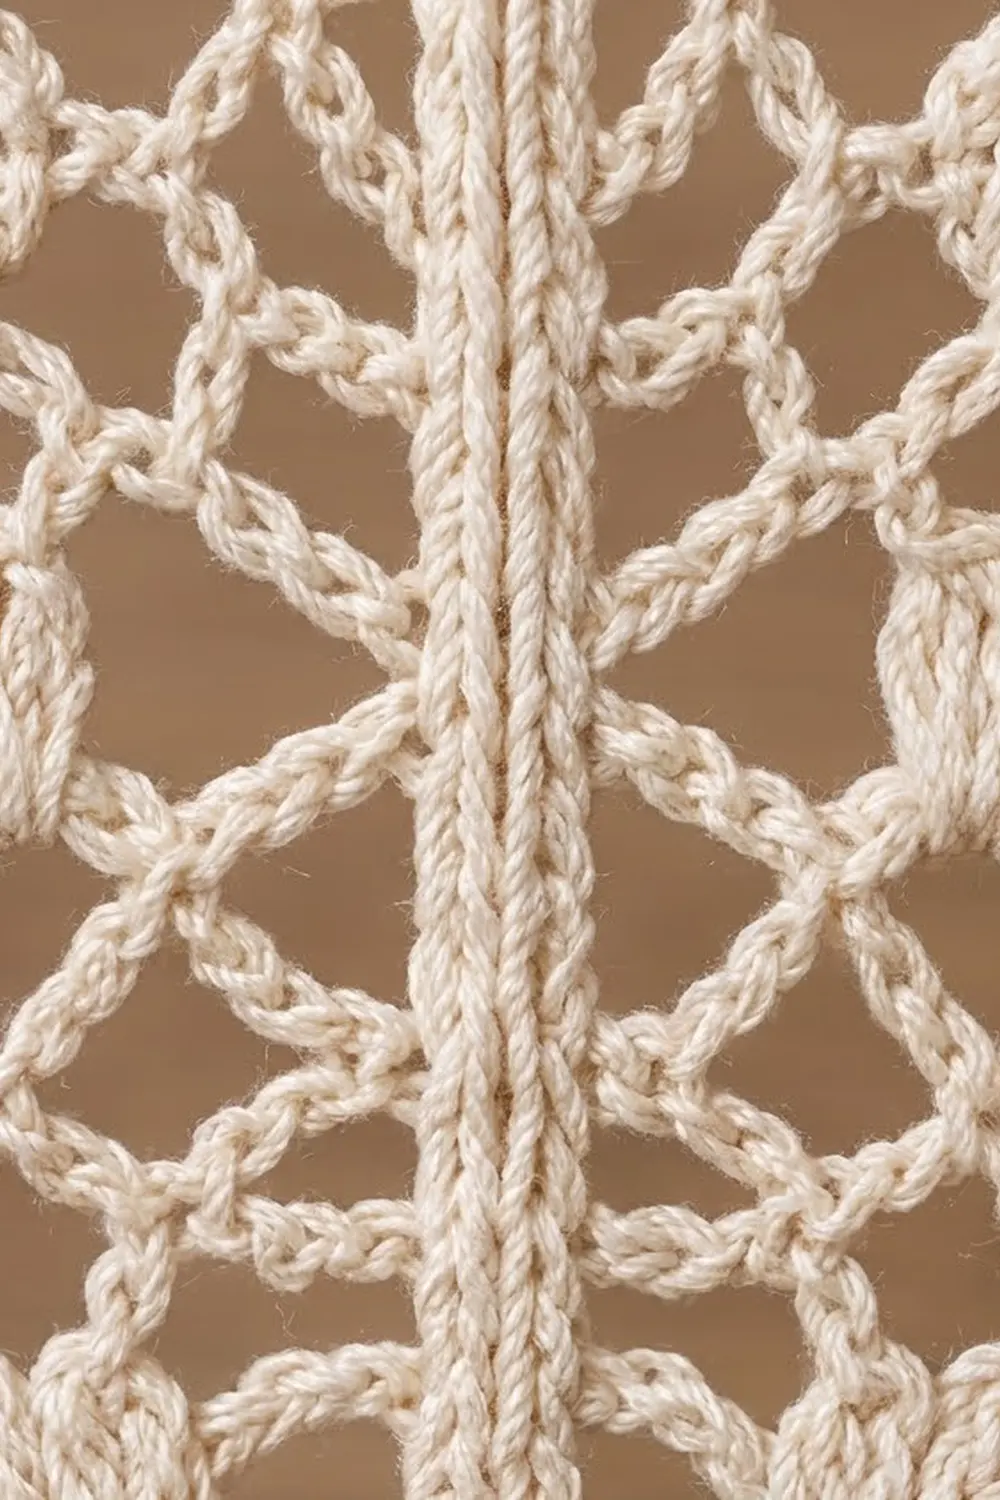
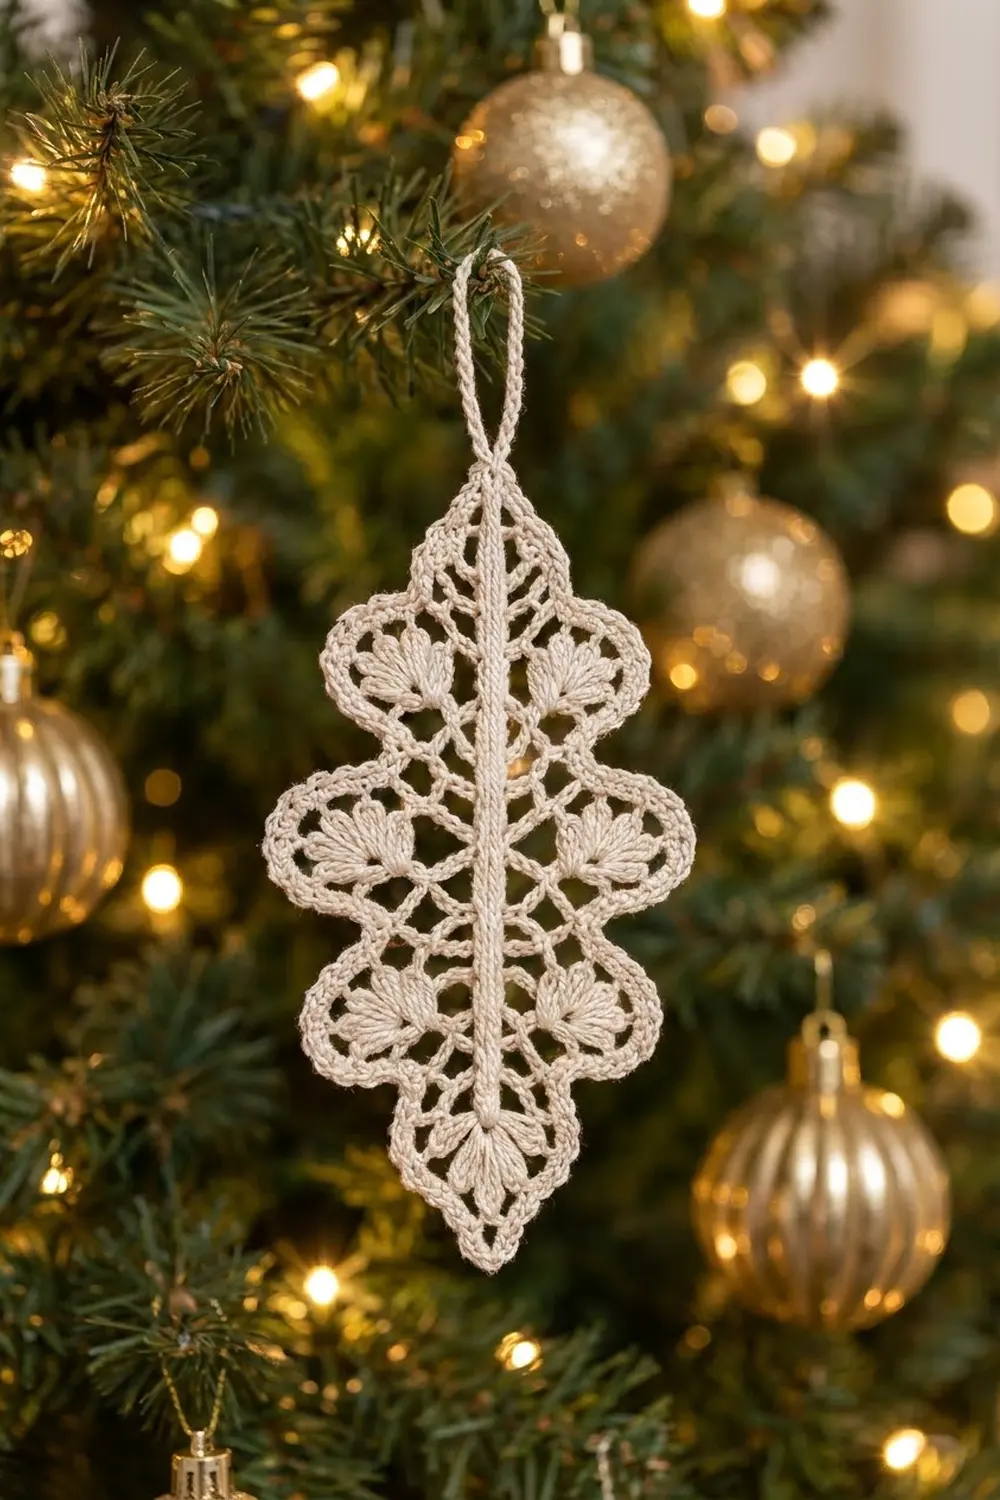
The Frosted Oak ornament is a single lace leaf made in fine cream cotton thread. Each side has three rounded lobes. There is a pointed tip at the bottom and a small point at the top. A thick corded spine runs down the center, open chain mesh fills each half, and a five-petal puff fan sits inside every lobe.
The leaf uses only one warm ivory, so the texture does the work. A twisted crab-stitch cord holds the scalloped outline, and a covered loop finishes the top. On green branches with gold baubles it looks like frosted lace, in a quiet heirloom style.
This pattern uses US crochet terms. The finished leaf measures 5.5 in (14.0 cm) long and 2.8 in (7.1 cm) wide across the widest lobes. The hanging loop adds 1 in (2.5 cm), so the total hanging length is 6.5 in (16.5 cm).
You start with a foundation chain and work single crochet around both sides of it to form the spine. Next come two mesh rounds, with the fans in the second one. A shaping round with graded stitch heights builds the lobes. Two border rounds then tidy the edge and turn it into a cord.
Finished Size and Construction
- Finished size: 5.5 in x 2.8 in (14.0 cm x 7.1 cm), plus a 1 in (2.5 cm) loop
- Skill level: Intermediate
- Terminology: US crochet terms
- Yarn weight: Lace (0), size 10 crochet cotton thread
- Hook: 1.5 mm (US steel 8)
- Number of pieces: 1 (single motif, no joining)
- Layout: one vertical leaf worked in the round around a central foundation chain
- Piece size before border: 5.1 in x 2.4 in (13.0 cm x 6.1 cm)
- Border depth: 0.2 in (0.5 cm) on every edge
- Size after border: 5.5 in x 2.8 in (14.0 cm x 7.1 cm)
Materials
Use a mercerized size 10 cotton thread. It has a soft sheen, holds starch well and shows the puff fans clearly. Avoid fuzzy threads, because they hide the open mesh.
- Ivory / cream size 10 cotton thread: 6 g, about 30 m (33 yd)
This is the only color. The quantity includes about a 30 percent margin for checking gauge, the hanging loop and weaving in ends.
Tools:
- 1.5 mm (US steel 8) crochet hook
- Fine tapestry needle
- 2 locking stitch markers
- Small scissors
- Fabric stiffener or spray starch
- Foam blocking board and rustproof pins
- Ruler or tape measure
Abbreviations (US Terms)
- ch = chain
- sl st = slip stitch
- sc = single crochet
- hdc = half double crochet
- tr = treble crochet
- rsc = reverse single crochet (crab stitch)
- st(s) = stitch(es)
- sp = space
- RS = right side
Special stitches:
- Puff: (yo, insert hook in loop, yo and pull up a loop to dc height) 3 times, yo and pull through all 7 loops on hook.
- Fan: all in the same ch-3 loop, (puff, ch 1) 4 times, puff. That makes 5 puffs and 4 ch-1 sps.
- Point: (sc, ch 3, sc) in the same loop or space.
Gauge and Checkpoints
Gauge: 10 sc = 1 in (2.5 cm) with size 10 thread and a 1.5 mm hook.
This is a single motif, so the ornament is its own test piece. Work Rounds 1 to 3, then stop and measure. Lay the piece flat, straighten it gently and measure before starching.
- After Round 1: 4 in x 0.3 in (10.2 cm x 0.8 cm)
- After Round 2: 4.4 in x 0.8 in (11.2 cm x 2.0 cm)
- After Round 3: 4.7 in x 1.6 in (11.9 cm x 4.1 cm)
- After Round 4 (before border): 5.1 in x 2.4 in (13.0 cm x 6.1 cm)
- After Round 6 (finished): 5.5 in x 2.8 in (14.0 cm x 7.1 cm)
If Round 1 is longer than 4.25 in (10.8 cm), restart with a 1.25 mm hook. If it is shorter than 3.75 in (9.5 cm), switch to a 1.75 mm hook. Every later measurement depends on the spine length, so correct it at this stage.
Pattern
Foundation and Round 1 (Spine)
Ch 40.
Round 1 (RS): Sc in 2nd ch from hook (this is the top ch), sc in next 37 ch, then 3 sc in last ch (the bottom ch). Rotate and work along the opposite side of the foundation chain: sc in next 37 ch, then 2 sc in the top ch (the same ch as the first sc). Join with sl st to first sc. (80 sc)
That gives 37 sc on each long side and 3 sc around each end. The foundation chain is now held between two lines of sc, and this firm double band forms the spine.
Place a marker in the center sc of the 3 bottom sc to mark the leaf tip.
Round 2 (First Mesh)
Round 2: Ch 1, sc in same st as join, ch 3, skip next st, sc in next st, ch 3, skip next st; repeat from * around. Join with sl st to first sc. (40 sc, 40 ch-3 loops)*
Number the loops 1 to 40 in working order:
- Loop 1 sits beside the top end.
- Loops 1 to 19 run down the first side.
- Loop 20 passes over the marked sc and becomes the tip loop.
- Loops 21 to 39 run up the second side.
- Loop 40 passes over the top end and becomes the top loop.
Round 3 (Mesh and Fans)
Sl st in first ch-3 loop.
Round 3: Ch 1, sc in same loop (loop 1), ch 4.
- [Sc in next loop, ch 4] 4 times (loops 2 to 5).
- Fan in next loop (loop 6), ch 4.
- [Sc in next loop, ch 4] 5 times (loops 7 to 11).
- Fan in next loop (loop 12), ch 4.
- [Sc in next loop, ch 4] 5 times (loops 13 to 17).
- Fan in next loop (loop 18), ch 4.
- Sc in next loop (loop 19), ch 4.
- Point in next loop (loop 20, the tip), ch 4.
- Sc in next loop (loop 21), ch 4.
- Fan in next loop (loop 22), ch 4.
- [Sc in next loop, ch 4] 5 times (loops 23 to 27).
- Fan in next loop (loop 28), ch 4.
- [Sc in next loop, ch 4] 5 times (loops 29 to 33).
- Fan in next loop (loop 34), ch 4.
- [Sc in next loop, ch 4] 5 times (loops 35 to 39).
- Point in last loop (loop 40, the top), ch 4.
Join with sl st to first sc.
Stitch count: 32 single-sc anchors, 2 Points (4 sc and 2 ch-3 sps), 6 fans (30 puffs) and 40 ch-4 sps.
The fans in loops 6, 12 and 18 mirror the fans in loops 34, 28 and 22. Each fan sits in the middle of its lobe and opens outward from the spine.
Round 4 (Lobe Shaping)
This round builds the scallops. Short stitches pull in the valleys, and tall stitches push out the lobes. Work only into the ch-4 sps and the two ch-3 Point sps, and skip every sc anchor and every fan.
Number the ch-4 sps 1 to 40 in working order. Space 1 comes after the sc in loop 1, and space 40 comes after the top Point.
Stitch groups:
- S (sc space): 4 sc
- H (hdc space): 4 hdc
- T (tr space): 5 tr
- Lobe unit (6 sps): S, H, T, T, H, S = 26 sts
Sl st in first ch-4 sp.
First side (top to tip):
- Spaces 1 and 2: S in each (8 sc).
- Spaces 3 to 8: Lobe unit (26 sts).
- Spaces 9 to 14: Lobe unit (26 sts).
- Spaces 15 to 19: S, H, T, T, H (22 sts).
- Tip ch-3 sp: 2 sc, ch 3, 2 sc.
Second side (tip to top):
- Spaces 20 to 24: H, T, T, H, S (22 sts).
- Spaces 25 to 30: Lobe unit (26 sts).
- Spaces 31 to 36: Lobe unit (26 sts).
- Spaces 37 to 39: S in each (12 sc).
- Top ch-3 sp: 2 sc, ch 3, 2 sc.
- Space 40 (belongs to the first side): S (4 sc).
Join with sl st to first sc.
Per side: The first side has 8 + 26 + 26 + 22 + 4 (space 40) = 86 sts. The second side has 22 + 26 + 26 + 12 = 86 sts. Each Point has 4 sc.
Round 4 total: 86 + 86 + 4 + 4 = 180 sts plus 2 ch-3 Points.
The two T spaces of each lobe sit on either side of a fan, so every lobe peaks right over its fan. Each valley falls where two S spaces meet. Checkpoint: the leaf should now measure 5.1 in x 2.4 in (13.0 cm x 6.1 cm).
Spine Cord
With RS facing, join thread with a sl st at the top end of the foundation chain. Surface sl st down the center line, working over each foundation ch to the bottom end, for 39 sl sts. Fasten off and weave in the ends on the wrong side. This line sits on top of the spine and gives it the raised, corded look.
Border
Border gauge: about 12 sc per 1 in (2.5 cm) along the curved outer edge. Each side’s edge measures about 7.7 in (19.6 cm) when you follow the lobes from the top Point to the tip.
Round 5 (sc edge): Ch 1, sc in each st around, working (sc, ch 3, sc) in each ch-3 Point. Join with sl st to first sc.
- Count: 180 sc worked 1 per existing st + 4 sc added at the Points = 184 sc plus 2 ch-3 Points.
- Per side: 86 + 2 (tip sc on that side) + 2 (top sc on that side) + 1 (added at tip) + 1 (added at top) = 92 sc. 2 x 92 = 184.
Round 6 (crab-stitch cord): Ch 1. Working from left to right, rsc in each sc around and 2 rsc in each ch-3 Point. Join with sl st to first rsc.
- Count: 184 rsc worked 1 per existing sc + 4 rsc in the Points = 188 rsc.
- Per side: 92 + 1 (half of tip pair) + 1 (half of top pair) = 94 rsc. 2 x 94 = 188.
Why the math works: Along the sides, Rounds 5 and 6 are worked strictly 1 stitch per existing stitch. That keeps the lobe shape from Round 4 exactly as it is. Extra stitches go only into the two Points, which keeps the tip and top sharp. At 12 sts per in, 92 sc covers about 7.7 in (19.6 cm). That matches the edge length, so the border lies flat without rippling or cupping. The border adds 0.2 in (0.5 cm) on every edge, taking the leaf from 5.1 in x 2.4 in (13.0 cm x 6.1 cm) to 5.5 in x 2.8 in (14.0 cm x 7.1 cm).
Hanging Loop
Sl st to the top ch-3 Point. Ch 30, then sl st in the same Point. Work 36 sc over the ch-30 loop until it is fully covered, then sl st in the Point. Fasten off and weave in the end. The covered loop stands about 1 in (2.5 cm) above the leaf.
Final Blocking
- Weave in any remaining ends along the spine or inside the border, never across the mesh.
- Soak the leaf in fabric stiffener, or wet it and spray it evenly with starch.
- Press out the excess liquid in a towel without wringing.
- Lay the leaf RS up on the board. Pin the top Point and the tip 5.5 in (14.0 cm) apart, keeping the spine straight.
- Pin the widest lobes 2.8 in (7.1 cm) apart.
- Pin each lobe peak outward and each valley inward so the lobes match across the spine.
- Open each ch-4 space with a pin tip, and spread the 5 puffs of each fan.
- Pin the hanging loop flat above the top Point.
- Let the leaf dry fully, usually 12 to 24 hours, before you unpin it.
Final Quality-Control Checklist
- Round 1: 80 sc, with a straight, firm spine.
- Round 2: 40 ch-3 loops.
- 6 fans, 3 per side, mirrored across the spine.
- Round 4: 86 sts per side, plus 4 sc at each Point.
- Round 5: 184 sc. Round 6: 188 rsc.
- 3 rounded lobes per side, with clear valleys between them.
- The surface sl st line runs the full length of the spine.
- Finished size: 5.5 in x 2.8 in (14.0 cm x 7.1 cm).
- The loop is centered, fully covered and about 1 in (2.5 cm) long.
- No ends show on the RS.
Troubleshooting
The spine curves or twists. The foundation chain is too tight. Make the chain with a hook one size larger, then switch back.
The fans look bunched. Pull each puff up to full dc height before closing it, and keep the ch-1 sps relaxed.
The lobes are shallow. Check that each T space has 5 tr and each S space has only 4 sc. Pin the valleys firmly when blocking.
The edge ruffles. You probably added stitches along the sides in Round 5. Recount: there should be 92 sc per side.
The edge cups. The crab stitch is too tight. Rework Round 6 more loosely or with a 1.75 mm hook.
The leaf is lopsided. A fan is in the wrong loop. Count from loop 1 and check each fan against its mirror fan.
Care
Hand wash in cool water with mild soap, then re-starch and pin the leaf back into shape. Store it flat in tissue paper.
Final Notes
The measurement chain is easy to follow. The 80-sc spine sets the 4 in (10.2 cm) length, and Round 2 opens it into 40 loops. Round 3 places 6 fans and 2 Points. Round 4 shapes 86 sts per side into three lobes, at 5.1 in x 2.4 in (13.0 cm x 6.1 cm). The border keeps the sides at 92 sc and then 94 rsc, adding stitches only at the Points, to reach 5.5 in x 2.8 in (14.0 cm x 7.1 cm). Starch the leaf, hang it from its 1 in (2.5 cm) loop, and it is ready for the tree.
Happy crocheting!