

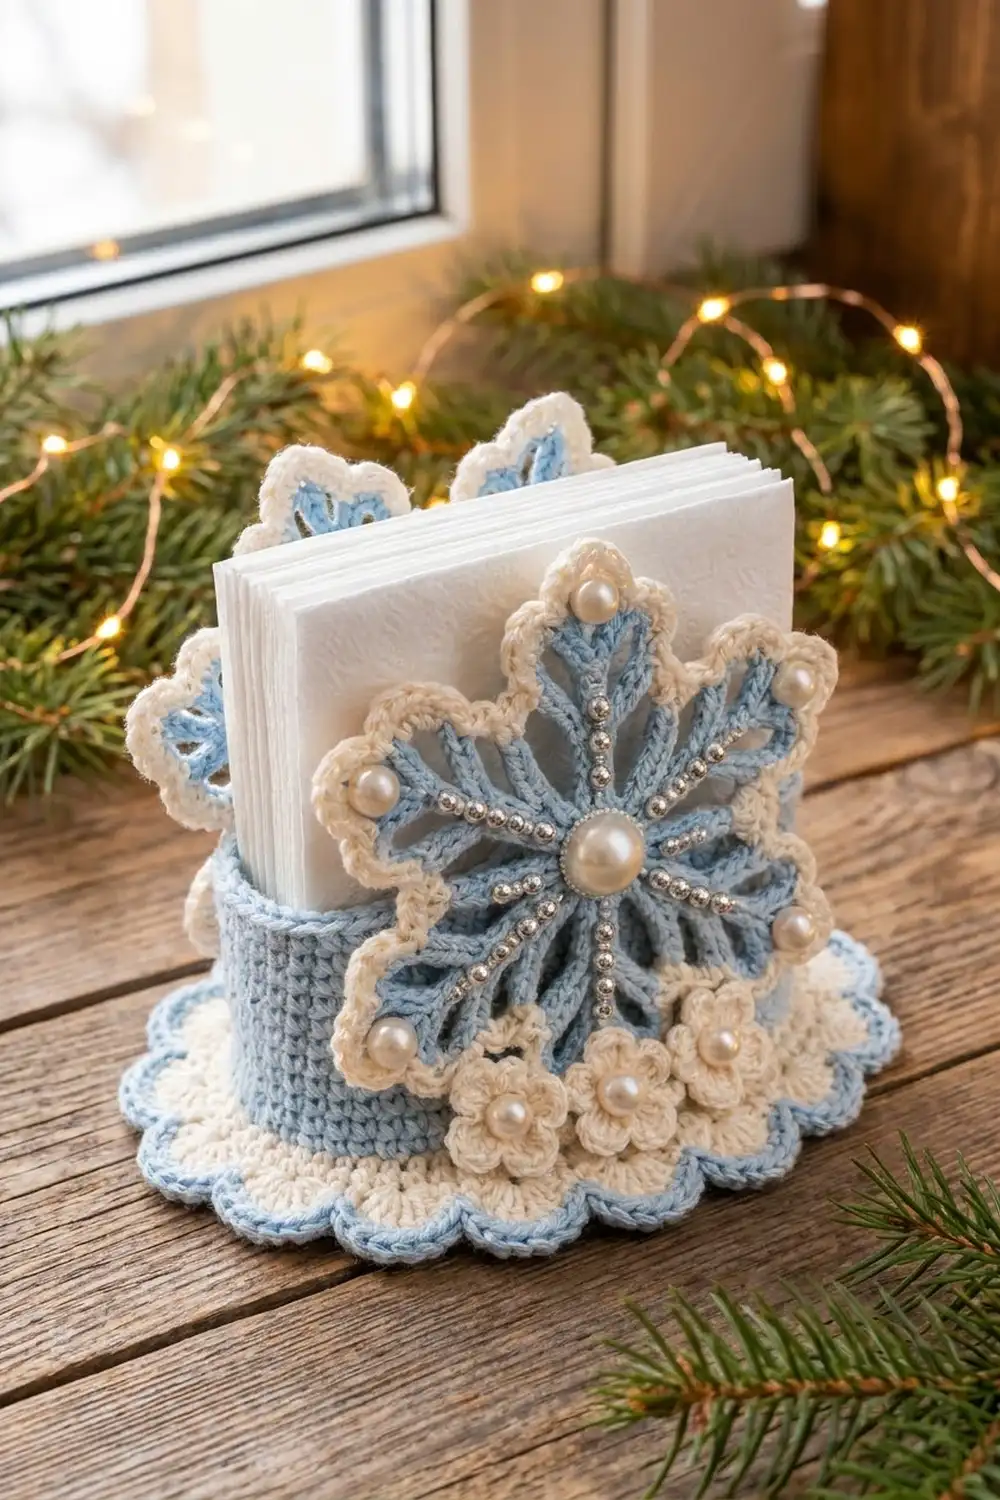
This napkin holder brings a quiet winter look to the table. A cream oval base with a scalloped edge holds a light blue band. Two lacy snowflakes stand against the front and back of the band, framing a stack of napkins.
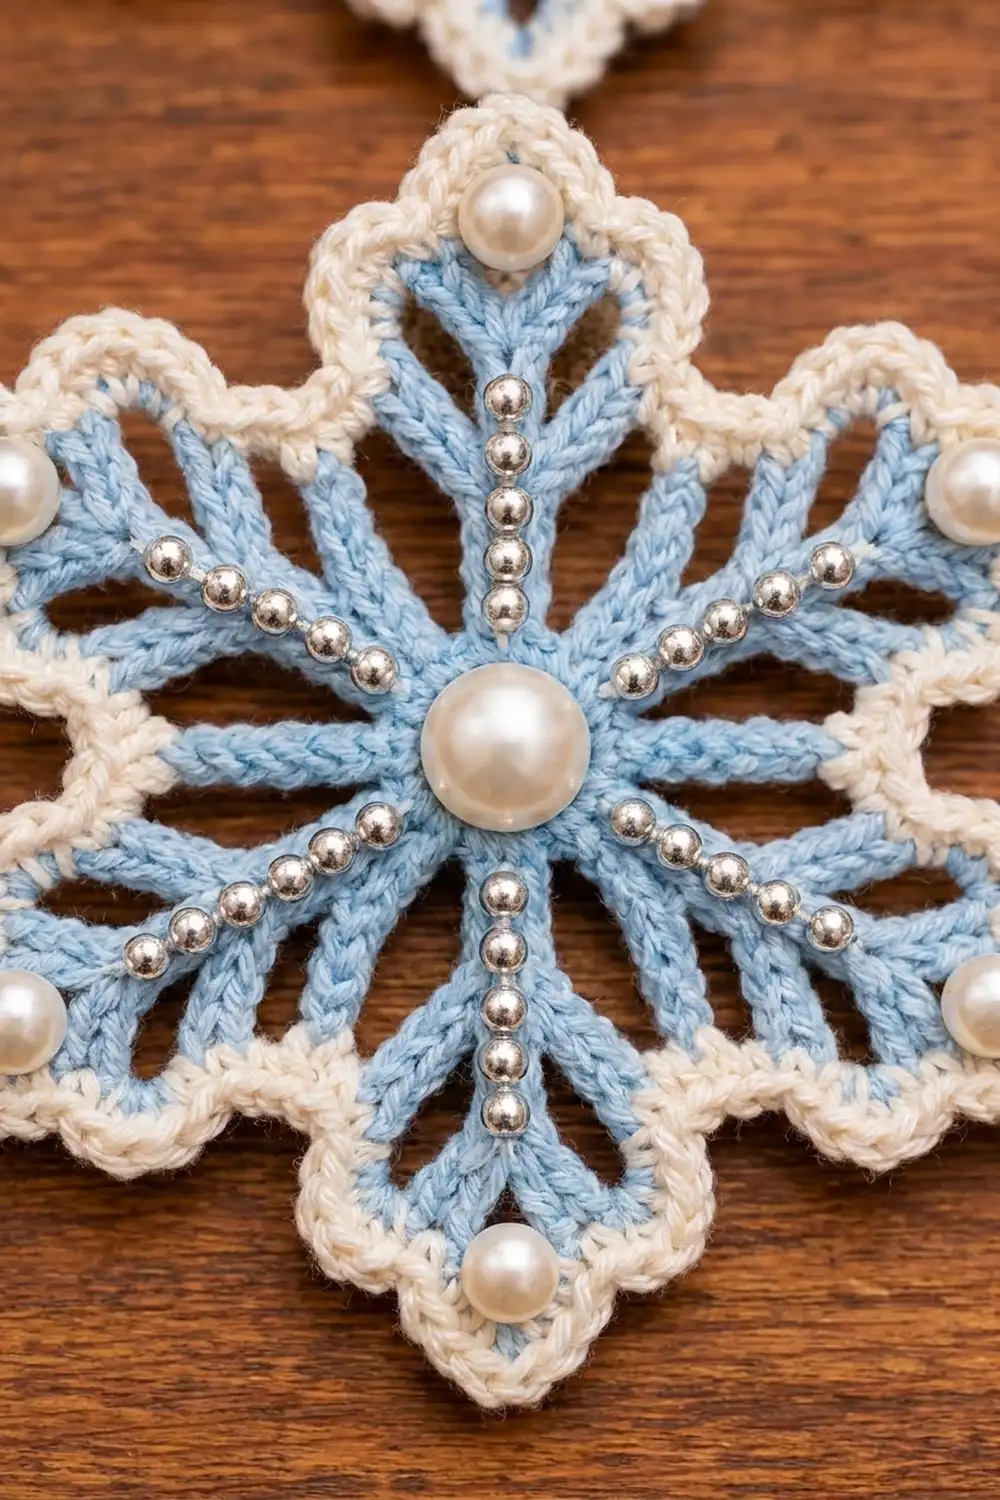
The palette is just light blue and cream, with pearl and silver accents. Each snowflake is worked in light blue and outlined with a corded cream edge. The front snowflake has pearls and tiny silver beads, and three small cream flowers sit along its lower edge.
This pattern uses US crochet terms. The finished base measures 8.75″ x 5.5″ (22.2 x 14.0 cm). The band is 2.5″ (6.4 cm) tall, and each snowflake is 6.25″ (15.9 cm) from tip to tip.
You will crochet seven pieces: one oval base, one band, two snowflakes, and three flowers. Each piece is blocked and stiffened, and then the pieces are sewn together.
Finished Size and Construction
- Finished base: 8.75″ x 5.5″ (22.2 x 14.0 cm)
- Skill level: Intermediate
- Terminology: US
- Yarn weight: Sport (2), mercerized cotton
- Hook: 3.25 mm (US D/3)
- Number of pieces: 7 (base, band, 2 snowflakes, 3 flowers)
- Layout: The band is centered on the base, with one snowflake on the front of the band and one on the back. The flowers sit in a row along the front.
- Piece sizes: snowflake 6.25″ (15.9 cm) tip to tip; band 15.25″ x 2.5″ (38.7 x 6.4 cm) before seaming; flower 1.25″ (3.2 cm)
- Base size before border: 7.25″ x 4″ (18.4 x 10.2 cm)
- Border depth: 0.75″ (1.9 cm) on all sides
Materials
Use a smooth mercerized cotton in sport weight. Cotton holds stiffener well and shows clear stitch definition, which the band needs so it can stand on its own.
- Light blue: 60 g (about 180 m)
- Cream: 45 g (about 135 m)
These quantities include a margin of about 15% for swatching and seaming.
Tools and notions:
- 3.25 mm (US D/3) crochet hook
- Tapestry needle
- Beading needle and cream sewing thread
- 4 locking stitch markers
- Fabric stiffener or heavy spray starch
- Rustproof pins and a blocking mat
- 1 pearl bead, 12 mm (snowflake center)
- 6 pearl beads, 6 mm (snowflake tips)
- 3 pearl beads, 8 mm (flower centers)
- 48 silver round beads, 3 mm (snowflake arms)
Abbreviations (US Terms)
- ch: chain
- sl st: slip stitch
- sc: single crochet
- hdc: half double crochet
- dc: double crochet
- tr: treble crochet
- sp: space
- st(s): stitch(es)
- BLO: back loop only
- RS / WS: right side / wrong side
Special stitch: reverse single crochet (rev sc). With the RS facing, work from left to right. Insert the hook into the next stitch to the right, yarn over, and pull up a loop. Yarn over again and pull through both loops. This makes a corded, rope-like edge.
Gauge and Checkpoints
Gauge: 22 sc and 24 rows = 4″ (10.2 cm) in sc worked in rows. That is 5.5 sts and 6 rows per inch.
Make the band first, because it also serves as your gauge swatch. After 6 rows, the strip should measure 15.25″ (38.7 cm) long and 1″ (2.5 cm) tall.
Checkpoints:
- Base after Round 8: about 6″ x 2.75″ (15.2 x 7.0 cm)
- Base after Round 12: 7.25″ x 4″ (18.4 x 10.2 cm)
- Base after border: 8.75″ x 5.5″ (22.2 x 14.0 cm)
- Snowflake after Round 3: 2.25″ (5.7 cm) across
- Snowflake after the arms: 5.75″ (14.6 cm) tip to tip
- Snowflake after the edging: 6.25″ (15.9 cm) tip to tip
If your pieces come out too big, use a hook 0.25 mm smaller. If they come out too small, use a hook 0.25 mm larger. The band has to match Round 8 of the base stitch for stitch, so check the band length most carefully.
Part 1: Oval Base (Cream)
Work the base in joined rounds without turning. Each round starts at the first stitch of a curved end. The straight sides stay at 18 sts each, and each curved end gains 3 sts per round.
Round 1: Ch 21. Work 3 sc in the 2nd ch from the hook, sc in the next 18 ch, and 3 sc in the last ch. Then work along the other side of the foundation chain: sc in the next 18 ch. Join with a sl st to the first sc. (42 sts)
Round 2: Ch 1. Work 2 sc in each of the next 3 sts, then sc in the next 18. Repeat once more: 2 sc in each of the next 3 sts, sc in the next 18. Join. (48 sts)
Round 3: Ch 1. Work (sc in the next st, 2 sc in the next st) 3 times, then sc in the next 18. Repeat this sequence once more. Join. (54 sts)
Rounds 4–12: Ch 1. On each curved end, work (sc in the next X sts, 2 sc in the next st) 3 times, where X is the round number minus 2. Then sc in the next 18 for the straight side. Repeat once more for the second end and side, and join. For example, Round 4 uses (sc in the next 2, 2 sc in the next).
| Round | Each curved end | Total |
|---|---|---|
| 4 | 12 | 60 |
| 5 | 15 | 66 |
| 6 | 18 | 72 |
| 7 | 21 | 78 |
| 8 | 24 | 84 |
| 9 | 27 | 90 |
| 10 | 30 | 96 |
| 11 | 33 | 102 |
| 12 | 36 | 108 |
Work Round 9 in the BLO. This leaves a ring of free front loops on Round 8, which is where the band will be sewn. Work all other rounds through both loops.
After Round 12, you have 36 + 18 + 36 + 18 = 108 sts. Don’t fasten off. The border continues from here.
Part 2: Band (Light Blue)
Row 1: Ch 85. Sc in the 2nd ch from the hook and in each ch across. (84 sc)
Rows 2–15: Ch 1, turn. Sc in each st across. (84 sc)
The strip should measure 15.25″ x 2.5″ (38.7 x 6.4 cm). Fold it so the short ends meet, with the RS facing in. Join the ends with 1 sl st through both layers at each row end, for 15 sl sts. Turn the band RS out.
Place markers along the foundation edge to match the base: sts 1–24 (end), 25–42 (side), 43–66 (end), and 67–84 (side). The seam falls at the center of an end.
Part 3: Snowflakes (Make 2, Light Blue and Cream)
Round 1: With light blue, make a magic ring. Ch 3 (counts as dc), then work 17 dc in the ring. Join to the top of the ch-3. (18 dc)
Round 2: Ch 4 (counts as dc + ch 1). Work (dc in the next st, ch 1) 17 times. Join to the 3rd ch of the ch-4. (18 dc, 18 ch-1 sps)
Round 3: Sl st into the first ch-1 sp. Ch 3 (counts as dc), dc in the same sp, 2 dc in the next ch-1 sp, ch 3, and skip the next ch-1 sp. Then work (2 dc in each of the next 2 ch-1 sps, ch 3, skip the next ch-1 sp) 5 times. Join to the top of the ch-3. (24 dc in 6 groups of 4; 6 ch-3 sps)
Arms
Work each arm in rows on one 4-dc group. Leave the ch-3 sps between groups unworked.
Row 1 (RS): Ch 4 (counts as dc + ch 1). Work (dc in the next dc, ch 1) twice, then dc in the last dc of the group. Turn. (4 dc, 3 ch-1 sps)
Row 2 (WS): Ch 3 (counts as dc). Dc in the next ch-1 sp, ch 2, then work (dc, ch 3, dc) in the center ch-1 sp. Ch 2, dc in the last ch-1 sp, and dc in the 3rd ch of the turning ch. Turn. (6 dc, 2 ch-2 sps, 1 ch-3 sp)
Row 3 (RS): Ch 3 (counts as dc), dc in the next dc, ch 2. Skip the next ch-2 sp and dc, and work (dc, ch 2, dc) in the ch-3 sp. Ch 2, skip the next dc and ch-2 sp, dc in the next dc, and dc in the top of the turning ch. Turn. (6 dc, 3 ch-2 sps) The skipped ch-2 sps open into the V-shaped side lobes.
Row 4 (WS, point): Ch 1. Sc in the first 2 dc, 2 hdc in the ch-2 sp, and dc in the next dc. Work (dc, tr, ch 3, tr, dc) in the center ch-2 sp. Then dc in the next dc, 2 hdc in the ch-2 sp, and sc in the last 2 sts. (14 sts, 1 ch-3 tip) Fasten off.
For each of the remaining 5 arms, join light blue with a sl st to the first dc of the next group, with the RS facing. Repeat Rows 1–4. Weave in all ends.
Cream Edging
Edging Round 1: With the RS facing, join cream in any ch-3 sp of Round 3. Work each repeat as follows:
- 3 sc in the ch-3 sp
- 2 sc in the side of each of Rows 1–3, going up the arm
- sc in each of the next 7 sts of Row 4
- (sc, ch 3, sc) in the tip sp
- sc in each of the next 7 sts
- 2 sc in the side of each of Rows 3–1, going down the arm
Repeat around and join. Each repeat has 3 + 6 + 7 + 2 + 7 + 6 = 31 sc. (186 sc, 6 ch-3 tips)
Edging Round 2: Ch 1. Work rev sc in each sc, and 3 rev sc in each tip sp. Join. (186 + 18 = 204 sts) Fasten off.
Part 4: Flowers (Make 3, Cream)
Round 1: Make a magic ring. Ch 1 and work 10 sc in the ring. Join. (10 sc)
Round 2: Work [(hdc, 3 dc, hdc) in the next st, sl st in the next st] 5 times. (5 petals, 30 sts) Fasten off, leaving a 10″ (25.4 cm) tail. Each flower measures 1.25″ (3.2 cm).
Make All Pieces
| Piece | Qty | Colors |
|---|---|---|
| Oval base | 1 | Cream body and shells, light blue outline |
| Band | 1 | Light blue |
| Snowflake | 2 | Light blue, cream edging |
| Flower | 3 | Cream |
Layout (top view):
         [ back snowflake ]
   ( (================) )   <- band on base Round 8
   ( (    napkins     ) )
   ( (================) )
         [ front snowflake ]
         (fl)  (fl)  (fl)
  ~~~~~~ scalloped border ~~~~~~
Joining
1. Sew the band to the base. Line up the band seam with the center of one curved end of the base. Match the band markers to the curved ends (24 sts each) and straight sides (18 sts each) of Round 8. With light blue, whipstitch each foundation loop of the band to one free front loop of Round 8. That is 84 loops to 84 loops, with no extra stitches. Keep your tension snug but not tight, so the band stands straight without puckering the base.
2. Bead the front snowflake. Sew the 12 mm pearl to the center ring and one 6 mm pearl to each tip. Then sew 8 silver beads along the center line of each arm, from Round 3 out to the tip.
3. Attach the snowflakes. Center the plain snowflake against the back straight side of the band, with one tip pointing straight down. Tack that bottom tip to Round 11 of the base. Tack the two lower arms to the face of the band and to its top edge where they cross. Attach the beaded snowflake to the front in the same way.
4. Attach the flowers. Sew the 3 flowers in a row across the front of the base on Rounds 10–12, with the petals just touching. Center the middle flower under the front snowflake. Sew an 8 mm pearl to the center of each flower.
Size checkpoint: The band opening should be about 6″ x 2.75″ (15.2 x 7.0 cm). This fits cocktail napkins folded to 5″ (12.7 cm).
Border (Base)
Work the border before assembly, continuing from Round 12 of the base.
Border gauge: Each 6-st repeat makes one shell about 1.1″ (2.8 cm) wide and 0.5″ (1.3 cm) deep. The blue round adds 0.25″ (0.6 cm).
Border Round 1 (cream): Ch 1 and sc in the first st. Work (skip 2 sts, 7 dc in the next st, skip 2 sts, sc in the next st) around. End the last repeat with skip 2, and join to the first sc. (18 shells; 18 × 8 = 144 sts)
Each curved end has 36 sts, which makes 6 shells. Each straight side has 18 sts, which makes 3 shells. That gives 6 + 3 + 6 + 3 = 18 shells.
Border Round 2 (light blue): Join light blue in any sc. Work sc in each st, and 2 sc in the center (4th) dc of each shell. Join. (144 + 18 = 162 sts) Each curved end has 54 sts and each straight side has 27, for 54 + 27 + 54 + 27 = 162.
Why the math works: 108 is divisible by 6, and so are both section sizes (36 and 18). This means no shell straddles the point where a curved end meets a straight side. Each shell spreads 7 dc over 6 sts, which makes a gentle scallop that still lies flat.
Final Blocking
- Wet-block the base, both snowflakes, and the flowers before assembly.
- Pin each snowflake to 6.25″ (15.9 cm) tip to tip. Put a pin at each tip and in each side lobe so the V-spaces stay open.
- Pin the base to 8.75″ x 5.5″ (22.2 x 14.0 cm), easing each shell into a round scallop.
- Brush stiffener onto the snowflakes and the base border, and let them dry completely.
- Soak the band in stiffener. Shape it around an oval container about 6″ x 2.75″ (15.2 x 7.0 cm), and let it dry upright.
- Assemble only once every piece is fully dry.
Final Quality-Control Checklist
- Base Round 12 has 108 sts, and Border Round 2 has 162 sts.
- The band has 84 sts and 15 rows, and its seam is centered on an end.
- Each snowflake edging has 186 sc in Round 1 and 204 sts in Round 2.
- All 6 arm tips are the same length.
- The band stands straight without leaning.
- The pearls and beads are secure, and the thread ends are hidden.
- The flowers lie flat and are evenly spaced.
Troubleshooting
- The base cups: Your tension on the curves is too tight. Use a larger hook, or stagger the placement of the increases.
- The base ruffles: Check that you made exactly 3 increases per curved end in each round.
- The band doesn’t match the base: Remake the band to exactly 84 sts, using a different hook size to get the right gauge.
- The arms twist: Block again, and pin the side lobes open.
- The edging puckers at the tips: Check that you worked 3 rev sc in each tip sp.
- The band slumps: Apply a second coat of stiffener.
Care
Spot clean only, with a damp cloth. Washing removes the stiffener and can loosen the beads.
Final Notes
Here is the measurement chain. A gauge of 22 sc per 4″ (10.2 cm) gives a 108-st base measuring 7.25″ x 4″ (18.4 x 10.2 cm). The 0.75″ (1.9 cm) border brings the base to 8.75″ x 5.5″ (22.2 x 14.0 cm). The 84-st band matches Round 8 exactly, and the two 6.25″ (15.9 cm) snowflakes frame the napkins. Check each number as you go and every piece will fit without easing.
Happy crocheting!