

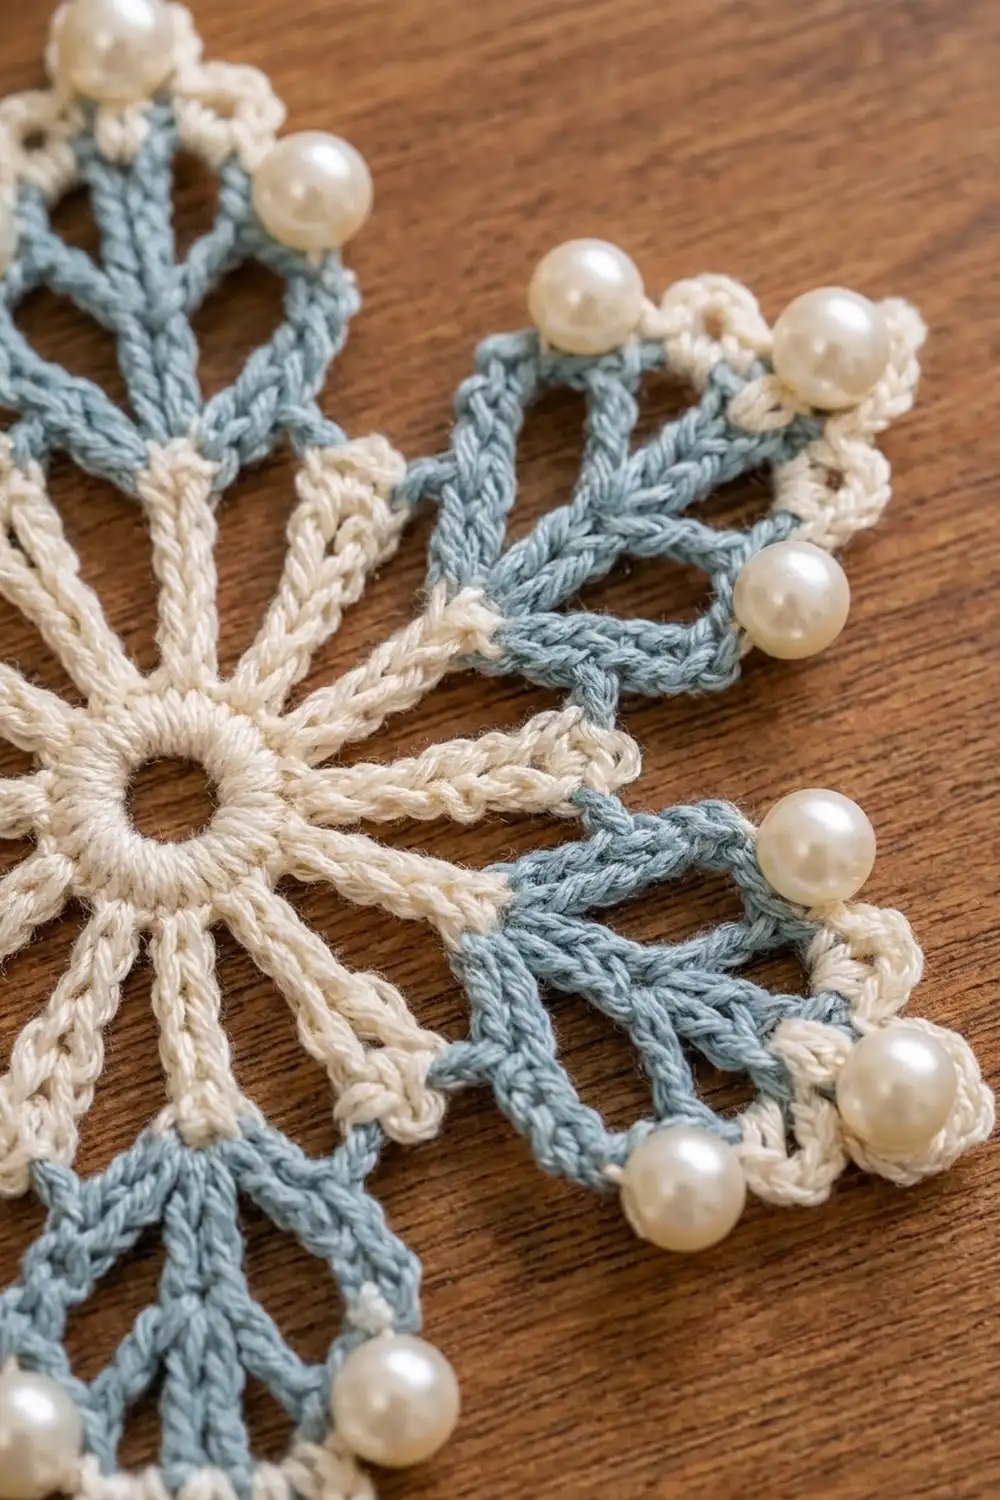
This snowflake has a lacy cream center and six dusty blue fern-like arms. Each arm has two pairs of V-shaped branches, and a cream edging with picots runs around every tip. Pearl beads sit at the branch tips, the arm points, and the valleys between the arms. The result looks wintery and delicate, a little vintage, and still easy to read from across the room.
The palette is soft: cream for the center, the spokes, and the edging, with a gray-leaning pale blue for the arms. The pearls tie the two colors together and catch the light on a tree. The colors also work on a plain white wall or in a window.
The pattern uses US crochet terms. The finished snowflake measures 5 in (12.7 cm) from point to point. It works as a tree ornament, a gift topper, or a window hanging. One snowflake takes about an evening once you know the arm sequence.
You make it in one piece and five rounds. Rounds 1–3 build the cream center. Round 4 makes all six blue arms in one pass using chain stems and sc worked back down them. Round 5 is the cream picot edging. Sew on the pearls after blocking.
Finished Size and Construction
- Finished size: 5 in (12.7 cm) point to point
- Skill level: Intermediate
- Terminology: US crochet terms
- Yarn weight: Size 3 crochet cotton (super fine, weight 1)
- Hook: 2.25 mm (US B-1)
- Number of pieces: 1
- Layout: Single motif with six arms
- Piece size: 5 in (12.7 cm) point to point
- Size before border (after Round 4): 4.5 in (11.4 cm) point to point
- Border depth: 0.25 in (0.6 cm) at each point, so it adds 0.5 in (1.3 cm) across the snowflake
Materials
Yarn: Use mercerized size 3 cotton crochet thread. It holds a crisp shape after blocking, and the sheen goes well with the pearls. Skip fuzzy or very soft cottons, because they blur the fine branches.
- Cream: 8 g / 13 m (center, edging, and hanging loop)
- Dusty blue: 4 g / 7 m (arms)
These amounts include a margin of about 30% for your gauge swatch and for weaving in ends.
Tools and notions:
- 2.25 mm (US B-1) crochet hook
- 30 cream pearl beads, 6 mm, with holes
- 6 cream pearl beads, 4 mm, with holes
- Optional: 1 cream pearl bead, 8 mm, for the center
- Beading needle and cream sewing thread
- Tapestry needle
- Blocking board or foam mat, and rustproof pins
- Fabric stiffener, or starch mixed with water
- Scissors
Abbreviations (US Terms)
- ch – chain
- sl st – slip stitch
- sc – single crochet
- dc – double crochet
- tr – treble crochet
- sp – space
- st(s) – stitch(es)
- beg – beginning
- rep – repeat
Special stitch: Ring. Ch 4, then sl st in the 4th ch from the hook. This makes a small closed loop with a 3-ch opening. Rings form the arm tips and branch tips, and Round 5 is worked into them.
Special stitch: Picot. Ch 3 (or ch 5 where stated), then the next st goes into the same ring or sp. The picot is not closed back on itself, so it stays as a small open arch for the pearl to sit on.
Gauge and Checkpoints
There’s only one piece, so use Rounds 1–2 as your swatch. Make them, pin them flat, and measure before you continue.
- After Round 1: 1 in (2.5 cm) across
- After Round 2: 1.75 in (4.4 cm) across (this is the gauge check)
- After Round 3: 2 in (5.1 cm) across
- After Round 4: 4.5 in (11.4 cm) point to point
- After Round 5: 5 in (12.7 cm) point to point
If Round 2 measures more than 1.75 in (4.4 cm), go down to a 2 mm hook. If it measures less, go up to a 2.5 mm hook. A difference of 0.125 in (0.3 cm) at Round 2 grows to about 0.375 in (1.0 cm) at the points, so it’s worth fixing now.
Center (Cream)
Round 1: With cream, ch 6 and sl st in the first ch to form a ring. Ch 3 (counts as dc), then 17 dc in the ring. Join with a sl st to the top of the beg ch-3. (18 dc)
Don’t pull the ring closed. The open center is part of the design.
Round 2 (spokes): Ch 4 (counts as tr), ch 2. Tr in next dc, ch 2; rep from * 16 more times. Join with a sl st to the top of the beg ch-4. (18 tr, 18 ch-2 sps)*
The tr posts are the cream spokes. Keep each ch-2 the same size so the spokes spread evenly.
Round 3 (solid ring): Ch 1, sc in the same st as the join, 2 sc in the next ch-2 sp. Sc in next tr, 2 sc in next ch-2 sp; rep from * 16 more times. Join with a sl st to the first sc. Fasten off. (54 sc: 18 sc worked one per tr + 36 sc added in the spaces)*
Count the round as 6 groups of 9 sc. Place a marker in the 5th sc of any group, and in the 5th sc of every 9 after that, for 6 markers in total. Each marker shows where an arm will go.
Arms (Blue)
Round 4: Join blue with a sl st in any marked sc. Ch 1, sc in the same st. This is the arm base.
Arm:
- Stem and tip: Ch 13, then sl st in the 4th ch from the hook to make the tip Ring. That leaves 9 stem ch below the Ring.
- Top of stem: Sc in each of the next 3 stem ch.
- Upper branch pair: Ch 8, sl st in the 4th ch from the hook (Ring), then sc in each of the 4 branch ch back to the stem. Lay this branch to the left. Make one more the same way and lay it to the right. (2 branches of 4 sc each)
- Middle of stem: Sc in each of the next 3 stem ch.
- Lower branch pair: Ch 9, sl st in the 4th ch from the hook (Ring), then sc in each of the 5 branch ch back to the stem. Lay this branch to the left. Make one more the same way and lay it to the right. (2 branches of 5 sc each)
- Base of stem: Sc in each of the last 3 stem ch, then sl st in the arm base sc.
Each arm has 9 stem sc + 8 upper branch sc + 10 lower branch sc = 27 sc and 5 Rings.
Between arms: Ch 2, skip the next sc, sc in the next sc. Ch 5, skip 4 sc, sc in the next sc. Ch 2, skip the next sc. You should now be at the next marked sc. Sc in it for the next arm base.
Work the Arm and Between-arms steps 5 more times, but leave out the last arm base sc. Join with a sl st to the first sc and fasten off.
Round 4 totals: 6 arms, so 162 arm sc + 18 sc on the ring (3 per repeat) = 180 sc. You’ll also have 30 Rings, 6 ch-5 sps, and 12 ch-2 sps.
Check the ring math: each repeat takes 1 base st + 1 skipped + 1 sc + 4 skipped + 1 sc + 1 skipped = 9 sts, and 6 × 9 = 54 sts, which matches Round 3.
Before moving on, pin the snowflake out to 4.5 in (11.4 cm) and open each V-branch to about 45° from its stem.
Border (Cream Picot Edging)
Border gauge: each ch-3 picot is about 0.125 in (0.3 cm) tall, and the ch-5 tip picot is about 0.25 in (0.6 cm). That tip picot is the 0.25 in (0.6 cm) border depth at each point.
Round 5: Join cream with a sl st in any ch-5 sp between two arms.
Repeat for each arm (the “per side” count):
- In the ch-5 sp: 2 sc, ch 3 (picot), 2 sc.
- 2 sc in the next ch-2 sp, then ch 4.
- In the lower left branch Ring: sc, ch 3, sc. Then ch 3.
- In the upper left branch Ring: sc, ch 3, sc. Then ch 3.
- In the tip Ring: sc, ch 3, sc, ch 5, sc, ch 3, sc. Then ch 3.
- In the upper right branch Ring: sc, ch 3, sc. Then ch 3.
- In the lower right branch Ring: sc, ch 3, sc. Then ch 4.
- 2 sc in the next ch-2 sp.
Do this 6 times in total. Join with a sl st to the first sc. Before fastening off, ch 40 (about 6 in / 15.2 cm), sl st in the joining st to make the hanging loop, and then fasten off.
Per-repeat count: 4 sc in the ch-5 sp + 4 sc in the two ch-2 sps + 8 sc in the 4 branch Rings + 4 sc in the tip Ring = 20 sc. Each repeat also has 7 ch-3 picots, 1 ch-5 tip picot, and 6 connecting chains (ch 4, ch 3, ch 3, ch 3, ch 3, ch 4).
Round total: 6 × 20 = 120 sc, plus 42 ch-3 picots, 6 ch-5 picots, and 36 connecting chains.
Why the math works: Round 5 only goes into spaces and Rings from Round 4, never into the blue sc. Every arm offers the same 5 Rings and 3 spaces, so every repeat comes out identical. The connecting chains (ch 4 at the base, ch 3 higher up) are about the same length as the branch edges they run alongside, so the edging sits flat instead of pulling the branches closed.
Final Blocking
- Weave in all ends along the back of the blue stems so they don’t show.
- Soak the snowflake in fabric stiffener, or in starch mixed with water, and gently squeeze out the extra.
- Pin the center ring into a circle 2 in (5.1 cm) across, using pins through the ch-2 sps of Round 2.
- Pin the six arm tips evenly on a 5 in (12.7 cm) circle, 60° apart.
- Pin each branch Ring so each V opens to about 45°.
- Pin the ch-5 picots between the arms so they point straight out.
- Let it dry completely, at least 8 hours.
- Unpin. Sew a 6 mm pearl onto each branch picot (4 per arm) and onto each ch-5 tip picot, for 30 in total. Sew a 4 mm pearl onto each ch-3 picot between the arms, for 6 in total. If you like, sew an 8 mm pearl across the center ring.
Final Quality-Control Checklist
- Point to point measures 5 in (12.7 cm) on all three axes
- The center ring is open and round, 2 in (5.1 cm) across
- All six arms are straight and have 27 sc and 5 Rings each
- Each V-branch opens evenly on both sides of its stem
- Round 5 has 120 sc and 48 picots
- All 30 large pearls and 6 small pearls are sewn on securely
- No loose ends show from the front
- The hanging loop is centered above one arm tip
Troubleshooting
The center cups or ruffles. Your chain tension doesn’t match your stitch tension. Redo Round 2 and keep each ch-2 the same height as one stitch, about 0.125 in (0.3 cm).
The arms twist. You may have worked sc into the back bump of the stem chain on some stitches and the front loop on others. Use the same part of the chain for all stem and branch sc.
The branches cross over the stem. Lay each first branch to the left before you make the second one, and pin them out while damp.
The arms are different lengths. Count the stem chains again. Every arm needs exactly ch 13 before the tip Ring, which leaves 9 stem ch.
The Rings are too small for the edging. Your chains are tight. Loosen up on the ch 4 of each Ring so 2 sc and a picot fit inside easily.
The edging pulls the Vs closed. Your connecting chains are too tight. Add 1 ch to each, or go up 0.25 mm for Round 5 only.
The pearls flop around. Sew each pearl through its picot twice and knot it on the back.
Care
Hand wash in cool water with mild soap and lay flat to dry. Stiffen it again and re-block after washing.

Final Notes
The measurement chain is short and easy to check: Round 2 at 1.75 in (4.4 cm), Round 3 at 2 in (5.1 cm), Round 4 at 4.5 in (11.4 cm) point to point, and Round 5 at 5 in (12.7 cm). Every stage depends on the one before, so checking each one keeps the snowflake on target. Make one, hang it in the light, and see how the pearls catch it.
Happy crocheting!