

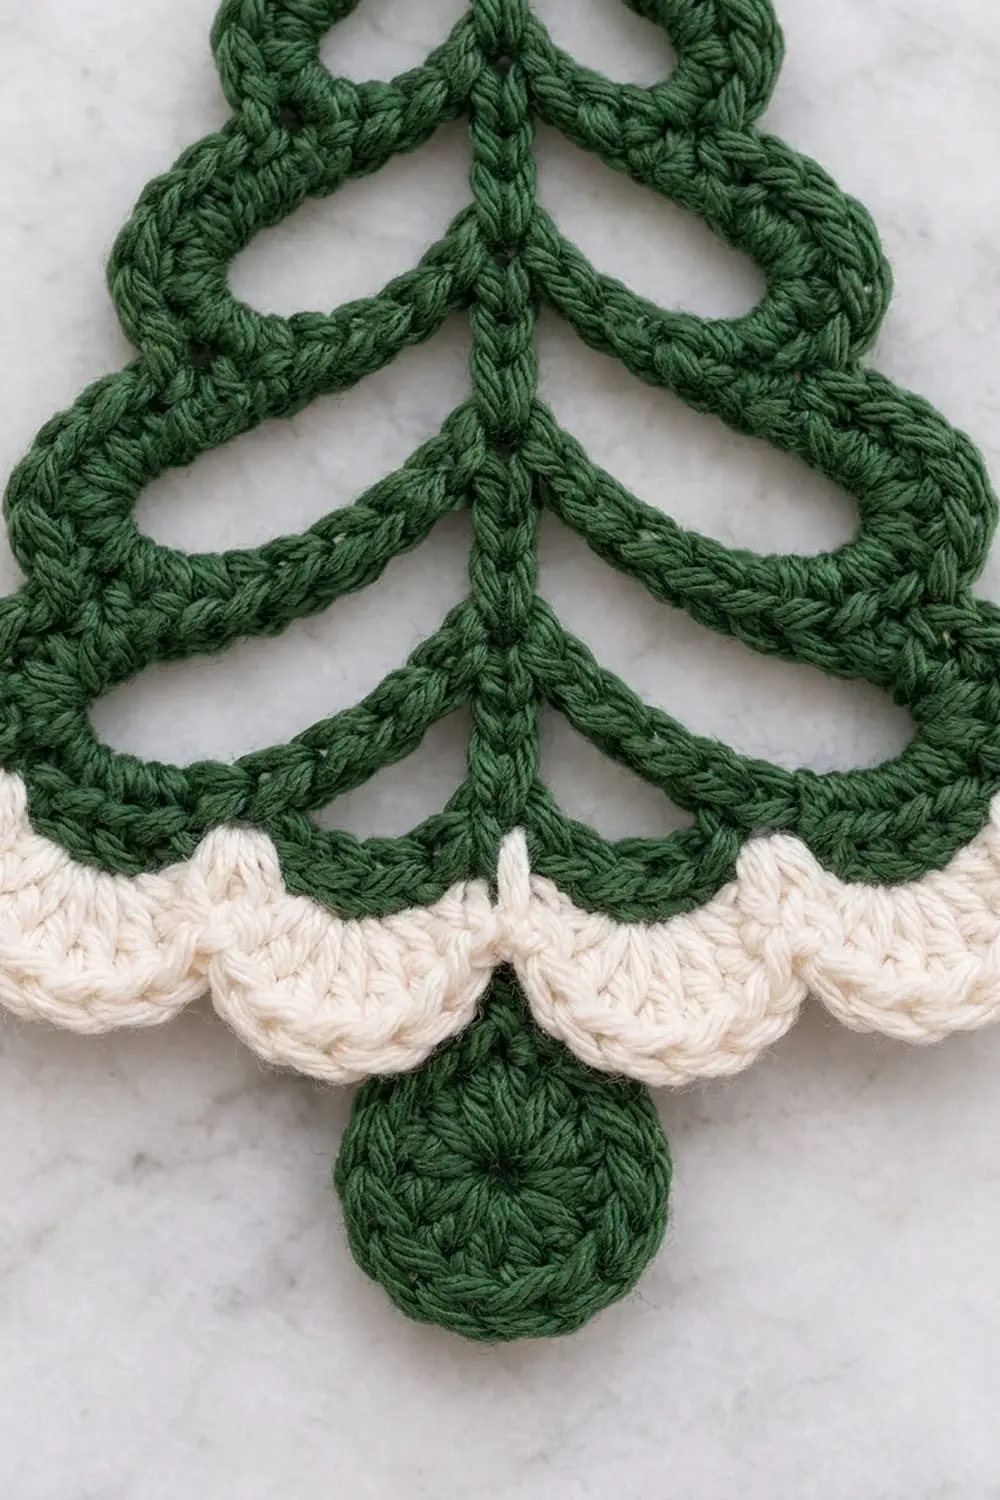
This small lace tree is light and quick to make. A deep pine-green cord frame forms five tiers of open teardrop “branches” on each side of a central spine. A cream scalloped band finishes the base like a dusting of snow, and a small round green trunk hangs just below the scallops. A green loop at the top makes it ready to hang.
The style is classic and simple: two colors, crisp outlines and lots of open space, so the branches of a real tree show through. It looks lovely on its own, tied to a gift or hung in a window.
This pattern uses US crochet terms. The finished ornament measures 4.5 in (11.4 cm) wide at the base and 4.5 in (11.4 cm) tall, from the base of the hanging loop to the bottom of the scallops. With the 1 in (2.5 cm) hanging loop and the 0.75 in (1.9 cm) trunk, the overall length is 6.25 in (15.9 cm).
The whole frame is worked in one continuous strand. You chain the hanging loop, then work down a chain spine. At five junction points you make a pair of chain loops and cover each one with single crochet right away, joining each new loop to the tier above. You work a trunk disc at the bottom, slip stitch back up the spine and cover the hanging loop. A two-row cream border finishes the base.
Finished Size and Construction
- Finished size: 4.5 in (11.4 cm) wide x 4.5 in (11.4 cm) tall, body only
- Overall length: 6.25 in (15.9 cm) including hanging loop and trunk
- Skill level: Intermediate
- Terminology: US crochet terms
- Yarn weight: Sport (2), cotton
- Hook: 2.75 mm (C-2)
- Number of pieces: 1 (a single ornament worked in one piece, plus a 2-row border)
- Layout: central spine with 5 paired tiers of covered loops and a trunk disc at bottom center
- Piece size before border: 4.25 in (10.8 cm) wide x 4 in (10.2 cm) tall
- Border depth: 0.5 in (1.3 cm)
Materials
Choose a smooth mercerized or combed cotton in sport weight. Cotton gives sharp stitch definition and keeps the open loops crisp after blocking. Avoid fuzzy or very soft acrylic yarns, which blur the lace and let the tiers droop. If you plan to make a set, choose one dye lot so every tree matches.
- Color A, pine green: 8 g, about 25 m
- Color B, cream: 3 g, about 10 m
These amounts include a margin of roughly 25 percent for a gauge test and weaving in ends.
Tools:
– 2.75 mm (C-2) crochet hook
– Tapestry needle
– Scissors
– 2 locking stitch markers
– Rust-proof pins and a foam blocking board
– Spray starch or fabric stiffener (optional)
Abbreviations (US Terms)
- ch: chain
- sl st: slip stitch
- sc: single crochet
- dc: double crochet
- sp: space
- st(s): stitch(es)
- rep: repeat
- J1–J5: spine junctions 1 to 5 (the last chain made in each spine segment)
Special stitch, covering sc: Work the sc into the chain-space, around the whole chain, not into individual chains. Push the stitches together as you go so the chain is completely hidden inside a firm, rounded cord.
Gauge and Checkpoints
Gauge: 7 sc and 8 rows = 1 in (2.5 cm) in sc worked in rows. Exact gauge matters less here than for a garment, but it controls the final size and how firm the tiers feel.
Test the ornament itself first. Work the hanging loop, Tier 1 and Tier 2, then lay the work flat and measure.
- After Tier 1: tip to tip about 1.25 in (3.2 cm)
- After Tier 2: tip to tip about 2 in (5.1 cm)
- After Tier 3: tip to tip about 2.75 in (7.0 cm)
- After Tier 5: tip to tip about 4.25 in (10.8 cm); hanging loop base to J5 about 3 in (7.6 cm)
- Trunk disc: about 0.75 in (1.9 cm) across
If Tier 2 measures more than 2 in (5.1 cm), switch to a 2.5 mm hook. If it is smaller, or the covered loops look crowded and curl, switch to a 3 mm hook. Do not change the stitch counts; change the hook instead.
Pattern: Tree Frame (Color A)
Before you begin: Work all tiers without turning. Cover each left loop upper edge first (the side closer to the hanging loop). Cover each right loop lower edge first. This mirrors the joins on the two sides so the tree hangs straight. Count the covering sc on every loop; one extra or missing stitch moves the tip and throws off the join below.
Hanging Loop and Tier 1
Hanging loop: With Color A, ch 14 and sl st in the first ch to form a ring. Leave it uncovered for now.
Spine segment 1: Ch 3. The last ch made is J1. Place a marker in J1.
Tier 1, left: Ch 8, sl st in J1. Work 13 covering sc in the ch-8 sp, then sl st in J1. (13 sc)
Tier 1, right: Ch 8, sl st in J1. Work 13 covering sc in the ch-8 sp, then sl st in J1. (13 sc)
The tip of each Tier 1 loop is its center sc, the 7th sc.
Tier 2
Spine segment 2: Ch 4. The last ch is J2. Move the marker to J2.
Tier 2, left: Ch 12, sl st in J2. Work 6 covering sc, sl st in the 7th (tip) sc of Tier 1 left, work 11 covering sc, then sl st in J2. (17 sc)
Tier 2, right: Ch 12, sl st in J2. Work 11 covering sc, sl st in the 7th (tip) sc of Tier 1 right, work 6 covering sc, then sl st in J2. (17 sc)
The tip of each Tier 2 loop is the 9th sc. Check your gauge now.
Tier 3
Spine segment 3: Ch 5. The last ch is J3.
Tier 3, left: Ch 16, sl st in J3. Work 8 covering sc, sl st in the 9th (tip) sc of Tier 2 left, work 13 covering sc, then sl st in J3. (21 sc)
Tier 3, right: Ch 16, sl st in J3. Work 13 covering sc, sl st in the 9th (tip) sc of Tier 2 right, work 8 covering sc, then sl st in J3. (21 sc)
The tip of each Tier 3 loop is the 11th sc.
Tier 4
Spine segment 4: Ch 6. The last ch is J4.
Tier 4, left: Ch 20, sl st in J4. Work 10 covering sc, sl st in the 11th (tip) sc of Tier 3 left, work 15 covering sc, then sl st in J4. (25 sc)
Tier 4, right: Ch 20, sl st in J4. Work 15 covering sc, sl st in the 11th (tip) sc of Tier 3 right, work 10 covering sc, then sl st in J4. (25 sc)
The tip of each Tier 4 loop is the 13th sc.
Tier 5
Spine segment 5: Ch 6. The last ch is J5.
Tier 5, left: Ch 24, sl st in J5. Work 12 covering sc, sl st in the 13th (tip) sc of Tier 4 left, work 17 covering sc, then sl st in J5. (29 sc)
Tier 5, right: Ch 24, sl st in J5. Work 17 covering sc, sl st in the 13th (tip) sc of Tier 4 right, work 12 covering sc, then sl st in J5. (29 sc)
On the left loop, sc 1–14 are the upper edge, sc 15 is the tip and sc 16–29 are the lower edge. On the right loop, sc 1–14 are the lower edge, sc 15 is the tip and sc 16–29 are the upper edge. Place a marker in the tip sc of each Tier 5 loop.
Tier totals: Each side has 13 + 17 + 21 + 25 + 29 = 105 sc, so the frame has 210 covering sc in all. The spine has 3 + 4 + 5 + 6 + 6 = 24 ch.
Trunk
Stub: Ch 3.
Ring: Ch 4, then sl st in the 4th ch from the hook to form a small ring.
Disc: Ch 3 (counts as a dc), work 13 dc in the ring, then sl st in the top of the ch-3. (14 dc)
Spine Finish and Hanging Loop Cover
Sl st in the back bump of each stub ch (3 sl st). Continue up the spine with 1 sl st in the back bump of each spine ch, passing through each junction (24 sl st). That makes 27 sl st in total, and you are now at the base of the hanging loop.
Cover the loop: Work 20 covering sc in the ch-14 ring, then sl st in the base of the loop. Fasten off and weave in the ends.
The spine now looks like a neat raised braid, and every edge of the tree is a solid cord.
Border (Color B)
Border gauge: Row 1 works out to about 7.5 to 8 sc per inch (2.5 cm) along the lower edges of Tier 5. Work snugly so the band lies flat without rippling.
Row 1 (band): With the right side facing, join Color B in the marked tip sc (sc 15) of Tier 5 left. Then:
– Ch 1 and work 2 sc in the same sc.
– Sc in each of sc 16–29 of Tier 5 left (14 sc).
– Sc in J5 (1 sc).
– Sc in each of sc 1–14 of Tier 5 right (14 sc).
– Work 2 sc in the marked tip sc (sc 15) of Tier 5 right, then turn.
(2 + 14 + 1 + 14 + 2 = 33 sc)
The trunk stub hangs below J5 and is not worked into. Keep it pulled down and out of the way.
Row 2 (scallops): Ch 1, sc in the first sc, *skip 1 sc, 5 dc in the next sc, skip 1 sc, sc in the next sc; rep from * 7 more times. (8 scallops: 40 dc + 9 sc)
Fasten off and weave in the ends.
Why the math works: Each scallop repeat uses exactly 4 stitches: a skip, a 5-dc group, a skip and an sc. Eight repeats use 32 stitches and the opening sc uses 1, so 1 + (8 x 4) = 33. That matches Row 1 exactly, so the first and last scallops end in an sc at both tips.
The 2-sc increases at the tips give the band enough length to turn the corners. They add about 0.25 in (0.6 cm) to the width, which brings the ornament from 4.25 in (10.8 cm) to 4.5 in (11.4 cm). The two rows add 0.5 in (1.3 cm) of depth, which brings the height from 4 in (10.2 cm) to 4.5 in (11.4 cm).
Final Blocking
- Soak the ornament in cool water for 5 minutes, then press out the water in a towel. Do not wring it.
- Lay it right side up on the blocking board.
- Pin the base of the hanging loop and the top of the spine so the spine runs straight down.
- Pin the bottom center at J5 so the body measures 4.5 in (11.4 cm) from the loop base to the scallop edge.
- Pin the Tier 5 tips so the base is 4.5 in (11.4 cm) wide and the bottom edge runs straight across.
- Open each teardrop loop with a pin inside it, working from Tier 1 down, so every opening is even and matches the other side.
- Pin each of the 8 scallops into a rounded arch.
- Pin the trunk disc flat, centered below the scallops.
- Shape the hanging loop into a 1 in (2.5 cm) teardrop.
- Mist with spray starch if you want a firm finish, and let it dry completely before you remove the pins.
Final Quality-Control Checklist
- Each side has 5 tiers with 13, 17, 21, 25 and 29 covering sc.
- Tiers 2–5 are each joined to the tip of the tier above.
- No chain shows through the covering sc.
- The spine is straight and slip-stitched all the way from the trunk to the hanging loop.
- The hanging loop has 20 sc and the trunk has 14 dc.
- Border Row 1 has 33 sc, and Row 2 has 8 even scallops.
- The body measures 4.5 in (11.4 cm) wide x 4.5 in (11.4 cm) tall.
- The overall length is 6.25 in (15.9 cm).
- All ends are woven in and trimmed close.
Troubleshooting
Chain shows between the covering sc: Push the stitches tighter together along the chain. Do not add stitches, because the tip positions depend on the counts.
Loops twist: Make sure the chain is not twisted before you sl st into the junction.
Tree leans to one side: Check that you covered the left loops upper edge first and the right loops lower edge first, so the joins mirror each other.
Border ripples: Use a hook one size smaller for the cream rows only.
Border pulls the base into a curve: Row 1 is too tight. Use a hook one size larger for the cream rows only.
Tiers droop after drying: Re-wet the ornament, pin it again and use starch or stiffener.
Trunk cups: Work the 14 dc more loosely, or pin the disc flat when blocking.
Care
Hand wash in cool water with mild soap and dry flat, re-pinning if needed. Store it flat or hanging, away from heavy ornaments that could crush the loops.

Final Notes
The measurements are easy to check as you go. Tier 2 should measure 2 in (5.1 cm) across, and after Tier 5 the frame should be 4.25 in (10.8 cm) wide by 4 in (10.2 cm) tall. The 33-stitch cream border then brings the body to 4.5 in (11.4 cm) by 4.5 in (11.4 cm). The loop and trunk give an overall length of 6.25 in (15.9 cm). Check each stage, trust the counts and block carefully.
Happy crocheting!