

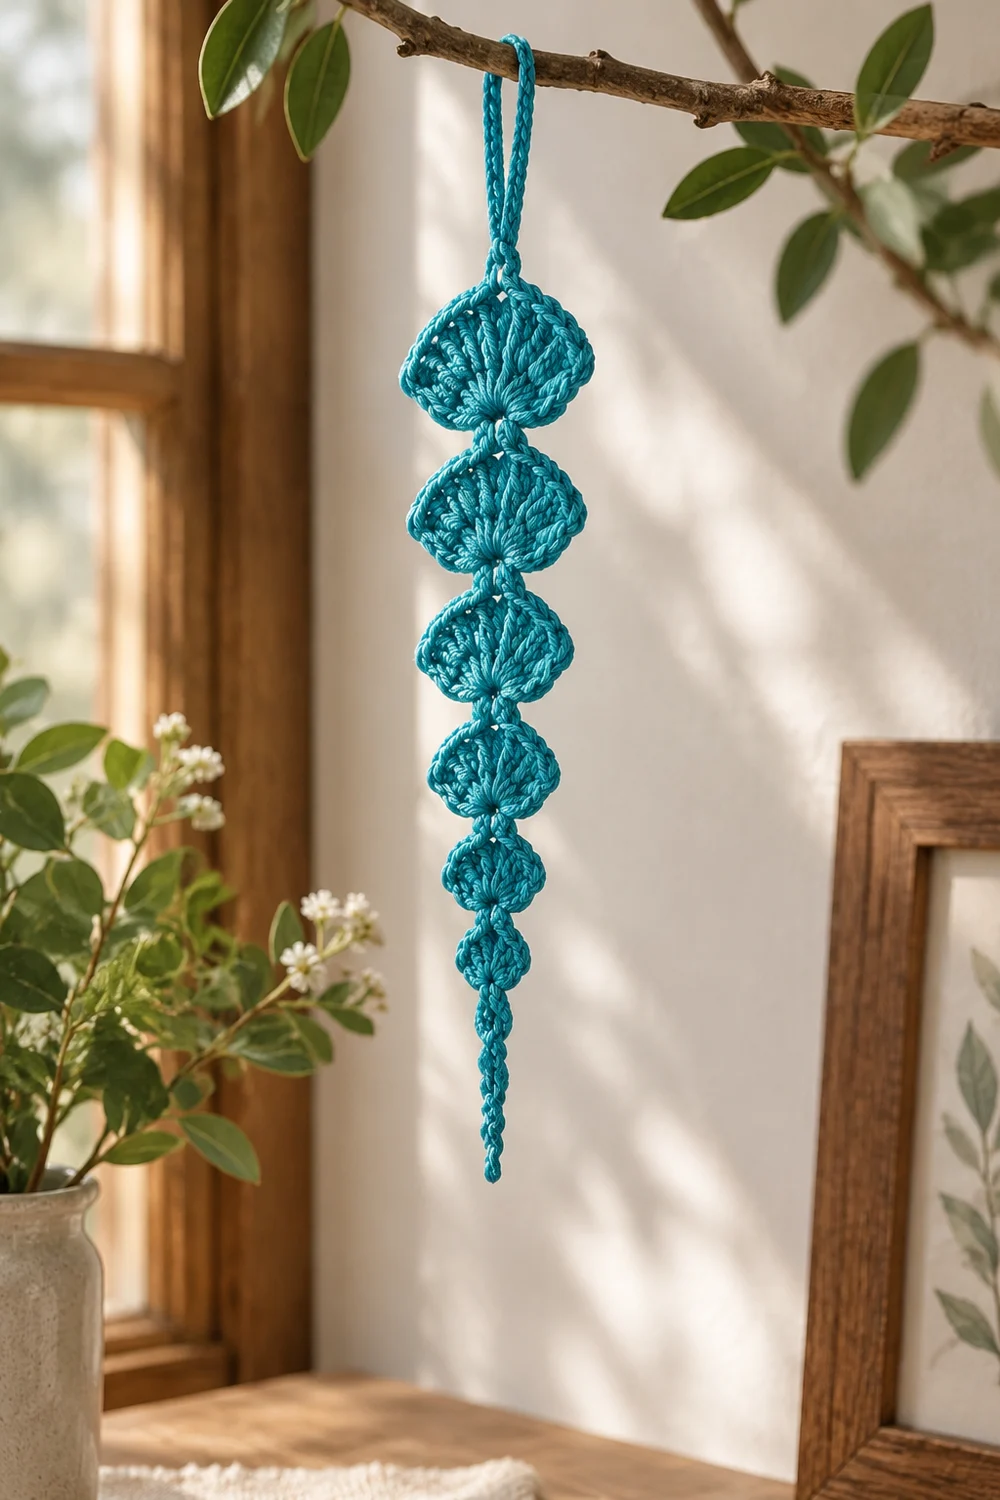
This little ornament is a single turquoise strand of six shell fans stacked along a chain spine. The shells shrink from top to bottom, which gives it a slim icicle or teardrop shape. A hanging loop sits at the top, and a twisted chain tail at the bottom adds length and movement.
The look is simple and wintry. Each shell is a fan of tall stitches worked into one chain, so the top edge of every fan forms a soft scallop. Worked in a smooth turquoise cotton, it reads like frosted ice against a green tree.
This pattern uses US crochet terms. The finished ornament measures about 4.5 in (11.4 cm) from the top of the largest shell to the tip of the tail. The hanging stem and loop add about 1.5 in (3.8 cm) more.
You work it in one continuous piece, from the bottom up. You make the twisted tail first. Then you build six fans, each anchored on a short length of spine chain. You finish with a chain stem and a hanging loop. There is no sewing and no joining.
Finished Size and Construction
- Finished size: about 4.5 in (11.4 cm) long, from the top of Shell 6 to the tail tip. The widest shell is about 1.4 in (3.6 cm) across.
- Hanging stem and loop: about 1.5 in (3.8 cm) extra.
- Skill level: Easy / advanced beginner.
- Terminology: US crochet terms.
- Yarn weight: Light / DK (3), cotton or cotton blend.
- Hook: 3.5 mm (E-4).
- Number of pieces: 1. The whole ornament is one continuous strand.
- Layout: vertical. From the bottom up: tail, Shells 1–6, stem, loop.
- Piece size: same as finished size.
- Size before border: same as finished size. No separate border is worked.
- Border depth: none. The fan tops form the scalloped edge.
Materials
Yarn advice: Choose a smooth, tightly plied DK cotton. Cotton holds the fan shape crisply and blocks flat. Fuzzy or very soft acrylic will blur the scallops and make the shells droop.
- Turquoise (Main Color): 5 g, about 12 m (13 yd).
That amount is enough for one ornament. It includes a margin of roughly 25 percent for your gauge swatch and weaving in ends.
Tools:
- 3.5 mm (E-4) crochet hook
- Tapestry needle
- Scissors
- Ruler or tape measure
- Blocking mat or folded towel
- Rust-proof pins
- Spray bottle with water
- Optional: diluted fabric stiffener or spray starch
Abbreviations (US Terms)
- ch – chain
- sl st – slip stitch
- hdc – half double crochet
- dc – double crochet
- tr – treble crochet
- st(s) – stitch(es)
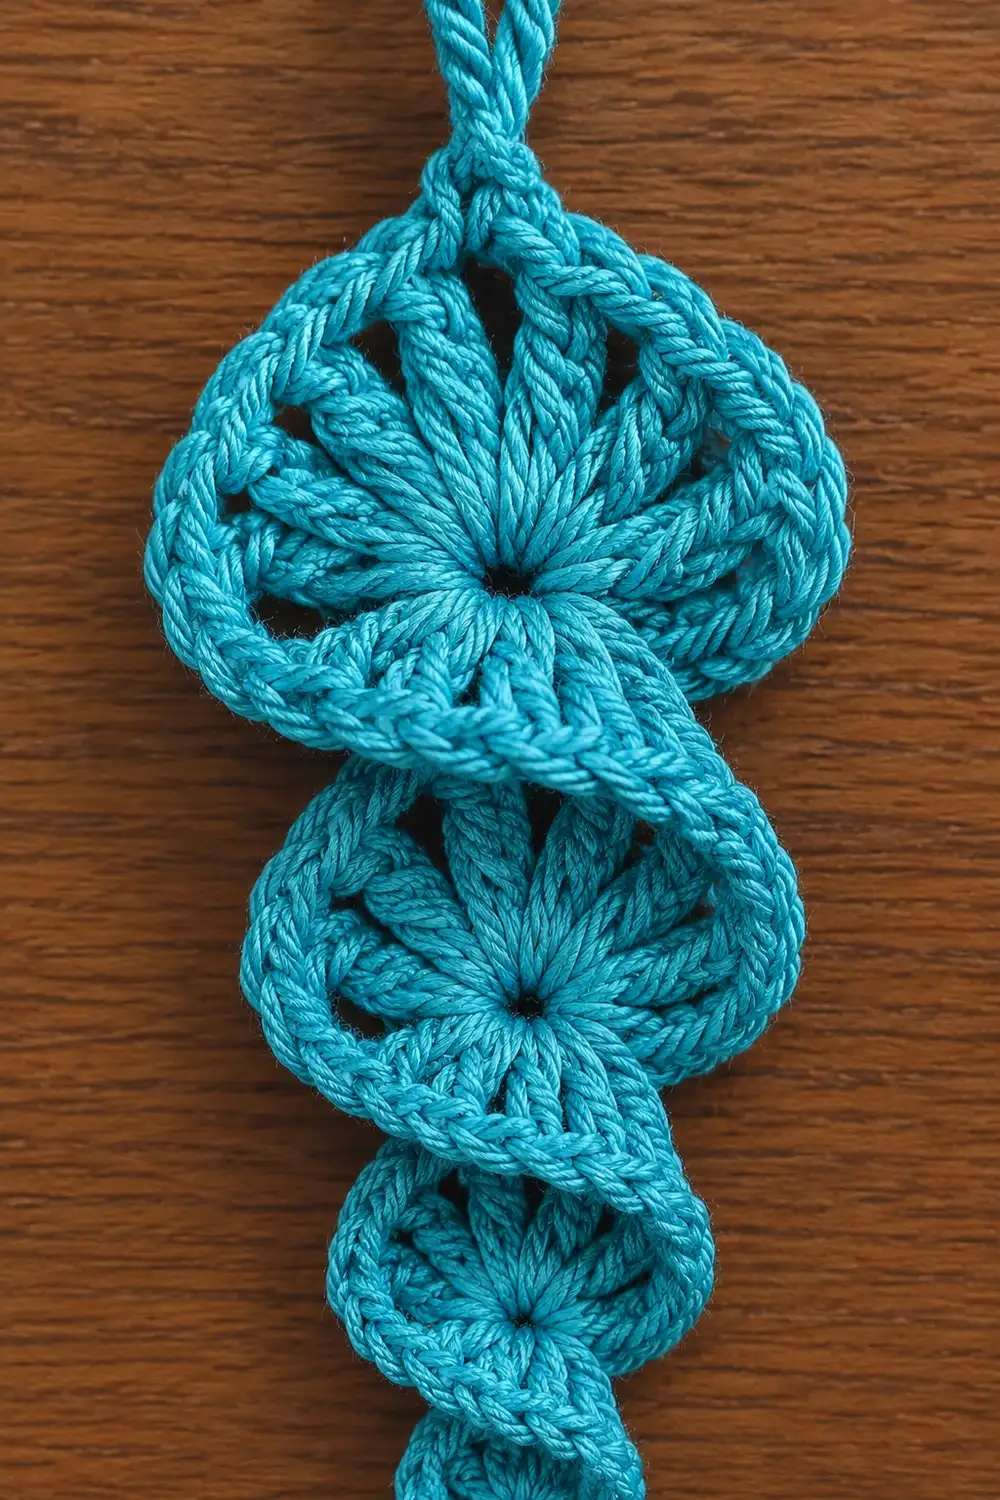
Special stitch – Fan: Work all of the stated stitches into one single chain, called the base chain. The turning chain at the start of each fan counts as the first stitch. When the fan is done, sl st into that same base chain. This returns your hook to the center point, or hub, at the bottom of the fan.
Gauge and Checkpoints
Gauge is not critical for an ornament. Proportion matters, though, so test before you commit.
Test piece: Ch 9 and work Shell 6 as written (10 sts). It should measure about 1.4 in (3.6 cm) across the widest point. It should stand about 0.6 in (1.5 cm) tall from the base chain to the top of the stitches.
Checkpoints at each stage:
- After the tail: about 1.8 in (4.6 cm) long.
- After Shell 3: the strand above the tail measures about 1.0 in (2.5 cm).
- After Shell 6: about 2.7 in (6.9 cm) from the top of the tail to the top of Shell 6. Total length is about 4.5 in (11.4 cm).
- After the stem: the stem rises about 0.6 in (1.5 cm) above Shell 6.
If your test fan is too big: drop to a 3.25 mm (D-3) hook, or use a slightly finer cotton.
If your test fan is too small: go up to a 3.75 mm (F-5) hook.
Keep all spine chains at the same tension as your fans. Loose spine chains make the ornament long and gappy. Tight ones make the shells crowd and overlap too much.
Pattern
Tail (Twisted Chain Cord)
Ch 13.
Row 1: Sl st in 2nd ch from hook and in each ch across. (12 sl st)
Your hook is now at the slipknot end, which becomes the top of the tail. The free end you just turned at is the tail tip. Do not fasten off.
Check: the tail measures about 1.8 in (4.6 cm). The sl st cord has a natural twist. You will set that twist during blocking.
Shell 1 (smallest, hdc)
Ch 2 (counts as first hdc). Work 4 hdc into the last sl st worked, which is the top of the tail. Sl st into that same st to return to the hub.
Stitch count: 5 sts in the fan.
Width: about 0.6 in (1.5 cm).
Shell 2 (hdc)
Ch 5. Work 5 hdc in the 3rd ch from hook. Sl st into that same base ch.
Stitch count: 6 sts (ch-2 plus 5 hdc).
Width: about 0.7 in (1.8 cm).
Chain logic:
– The first 2 ch you made are spine. They lift this fan clear of Shell 1, because 2 ch is about the height of 1 hdc.
– The 3rd ch is the base chain.
– The last 2 ch form the turning chain.
Shell 3 (dc)
Ch 6. Work 6 dc in the 4th ch from hook. Sl st into that same base ch.
Stitch count: 7 sts (ch-3 plus 6 dc).
Width: about 0.9 in (2.3 cm).
Chain logic: 2 spine ch + 1 base ch + 3 turning ch = 6 ch. The 2 spine ch clear the hdc fan below.
Shell 4 (dc)
Ch 7. Work 7 dc in the 4th ch from hook. Sl st into that same base ch.
Stitch count: 8 sts (ch-3 plus 7 dc).
Width: about 1.0 in (2.5 cm).
Chain logic: 3 spine ch + 1 base ch + 3 turning ch = 7 ch. You need 3 spine ch here to clear the taller dc fan below.
Shell 5 (tr)
Ch 8. Work 8 tr in the 5th ch from hook. Sl st into that same base ch.
Stitch count: 9 sts (ch-4 plus 8 tr).
Width: about 1.2 in (3.0 cm).
Chain logic: 3 spine ch + 1 base ch + 4 turning ch = 8 ch.
Shell 6 (largest, tr)
Ch 9. Work 9 tr in the 5th ch from hook. Sl st into that same base ch.
Stitch count: 10 sts (ch-4 plus 9 tr).
Width: about 1.4 in (3.6 cm).
Chain logic: 4 spine ch + 1 base ch + 4 turning ch = 9 ch. The 4 spine ch clear the tr fan below.
Check: the strand from the top of the tail to the top of Shell 6 measures about 2.7 in (6.9 cm).
Stem and Hanging Loop
Stem: Ch 4. These chains rise from the hub of Shell 6 and lift above its fan, about 0.6 in (1.5 cm).
Loop: Ch 12. Sl st into the 4th (last) ch of the stem to close the loop.
The loop hangs about 0.9 in (2.3 cm). Fasten off, leaving a 4 in (10.2 cm) tail.
How the Shells Connect
Each spine chain leaves the hub of the shell below it. It runs up through the center of that fan to reach the next base chain. This central line connects every layer into one seamless strand. It also makes the stitches look like they radiate from the middle.
The fans grow by exactly 1 st per shell: 5, 6, 7, 8, 9, 10 = 45 fan sts total. The stitch height steps up every two shells (hdc, hdc, dc, dc, tr, tr). Together, the count and the height create the smooth taper.
Border (Scalloped Edge Finish)
This ornament has no separate border round. The tops of the fan stitches are the finished edge. Adding a round of sc would fill in the scallops and stiffen the shells.
Edge gauge: Each fan’s outer edge holds one stitch top per fan stitch. Those tops sit about 0.15–0.2 in (0.4–0.5 cm) apart along the curve.
Edge stitch counts per shell:
| Shell | Stitch tops | Width |
|---|---|---|
| Shell 1 | 5 | 0.6 in (1.5 cm) |
| Shell 2 | 6 | 0.7 in (1.8 cm) |
| Shell 3 | 7 | 0.9 in (2.3 cm) |
| Shell 4 | 8 | 1.0 in (2.5 cm) |
| Shell 5 | 9 | 1.2 in (3.0 cm) |
| Shell 6 | 10 | 1.4 in (3.6 cm) |
Why the math works: All of a fan’s stitches share one base chain. The edge length therefore depends on two things: how many stitches the fan has, and how tall they are. The edge does not depend on any row below it.
Adding 1 st per shell spreads each fan a little wider. Stepping from hdc to dc to tr lengthens the radius. Together they give a steady widening of roughly 0.1–0.2 in (0.3–0.5 cm) per shell, with no gaps or ruffling.
Final Blocking
- Weave in both ends. Run the slipknot end into the tail cord and the top end into the stem. Trim close.
- Mist the ornament lightly with water until it is damp, not soaked.
- Lay it flat on the mat with the loop at the top.
- Open each fan with your fingers so the stitches radiate evenly from the hub. Pin the outermost stitch on each side of each fan.
- Check the widths against the table in the Border section. Shell 6 should be about 1.4 in (3.6 cm) across, and Shell 1 about 0.6 in (1.5 cm).
- Straighten the spine so the shells line up vertically. Check that the length is about 4.5 in (11.4 cm), excluding the stem and loop.
- Roll the tail cord between your fingers a few times in one direction to set its twist. Pin the tip.
- Optional: brush on diluted fabric stiffener or spray starch for crisper shells.
- Let it dry completely, at least 6 hours, before unpinning.
Final Quality-Control Checklist
- [ ] One continuous piece with no sewn seams.
- [ ] Six shells, with fan stitch counts of 5, 6, 7, 8, 9, and 10 from bottom to top.
- [ ] Each fan is worked into a single base chain and closed with a sl st at the hub.
- [ ] Spine chains are 2, 2, 3, 3, and 4 ch, in that order, for Shells 2–6.
- [ ] Tail is 12 sl st, about 1.8 in (4.6 cm), and twisted.
- [ ] Length is about 4.5 in (11.4 cm) from the top of Shell 6 to the tail tip.
- [ ] Stem is 4 ch, and the loop is 12 ch closed securely.
- [ ] All ends are woven in and invisible.
- [ ] The shells taper evenly with no sudden jumps in width.
Troubleshooting
Shells overlap too much. Your spine chains are too tight. Loosen your chain tension, or add 1 spine ch to each of Shells 3–6.
Gaps between shells. Your spine chains are too loose. Tighten them, or remove 1 spine ch from the longer segments (Shells 4–6).
Fans cup or ruffle. Your fan stitches are too tight for their count. Go up a hook size for the fans only.
Fans look skimpy or open. Your tension is loose. Drop a hook size, or check that the turning chain is not overly long.
Hard to sl st back into the base chain. The base chain is crowded. Insert your hook under just the front loop of that chain, then sl st.
Ornament hangs crooked. The spine is twisted. Re-wet it, straighten it, and re-pin it during blocking.
Tail untwists. Re-twist it while damp. A drop of stiffener on the cord will hold the spiral.
Care
Hand wash in cool water and lay flat to dry, reshaping the fans while damp. If you stiffened the ornament, re-block it and re-stiffen after washing.
Final Notes
The measurement chain is simple. The tail is 12 sl st, about 1.8 in (4.6 cm). Six shells of 5 to 10 stitches climb about 2.7 in (6.9 cm) on spine chains of 2, 2, 3, 3, and 4 ch. Together they make a 4.5 in (11.4 cm) ornament. A 4-ch stem and 12-ch loop add about 1.5 in (3.8 cm) for hanging.
Check your test fan first, keep your chain tension even, and block the fans open. You will end up with a crisp turquoise icicle that catches the light on any branch.
Optional: make several of these in different blues and whites for a frosty set.
Happy crocheting!