

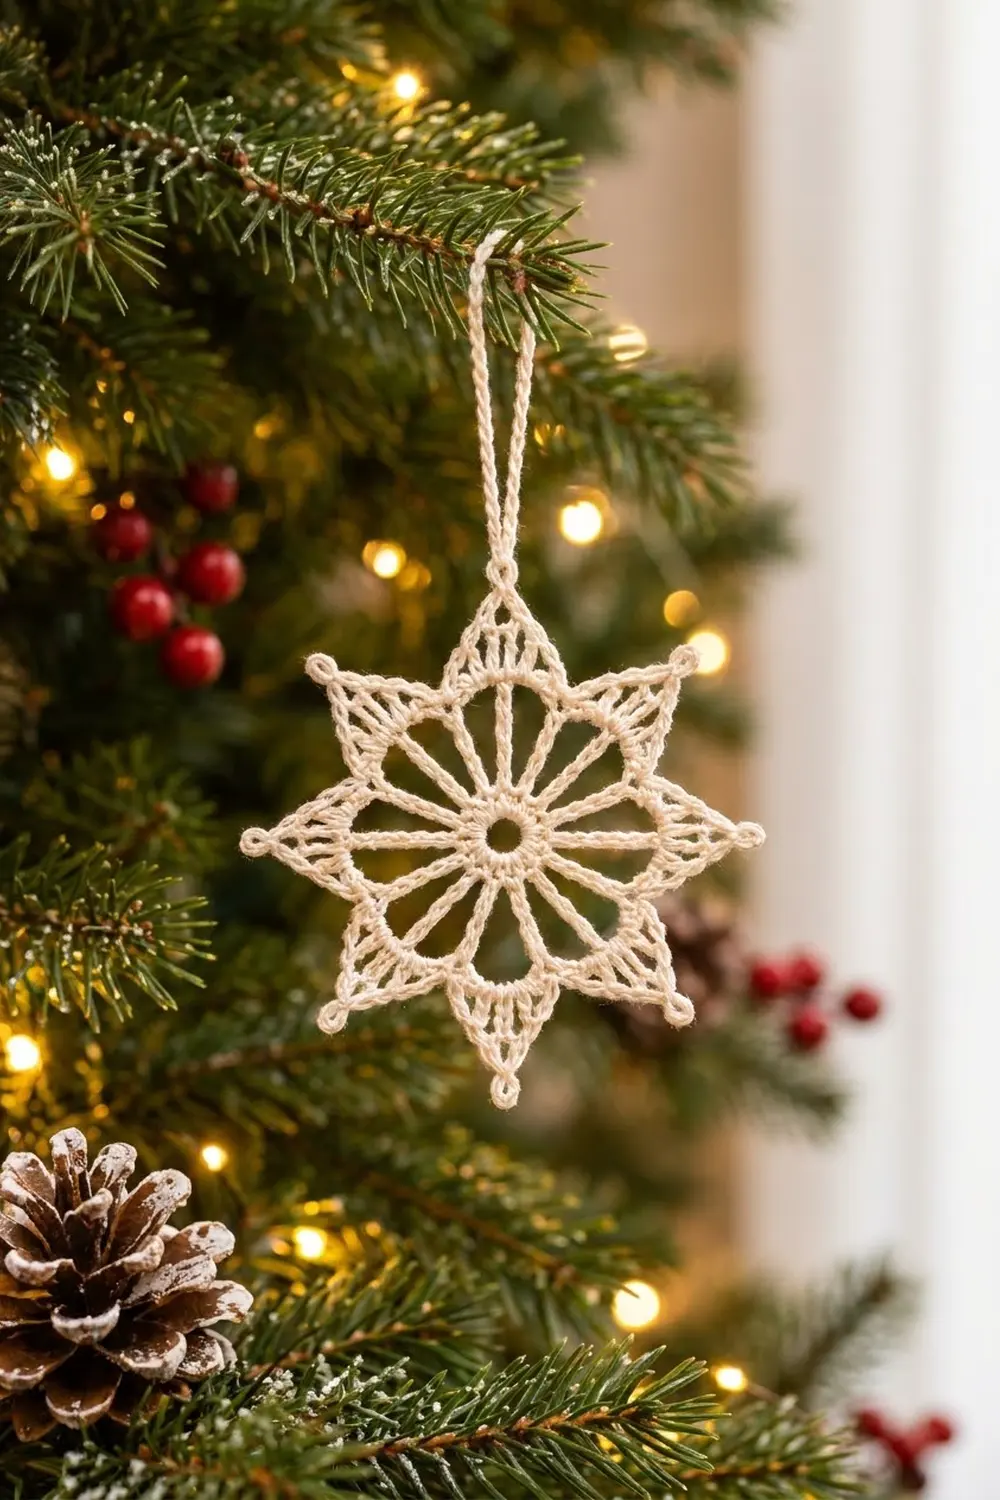
This eight-point star ornament is crisp and lacy. It has an open center ring, sixteen straight spokes like the ribs of a wheel, and eight sharp triangular points with tiny picot tips. Make it in cream for a snowy look, or work it in gold, deep green or red for a traditional Christmas tree.
The pattern uses US crochet terms throughout. The finished star measures about 4 in (10.2 cm) from one point to the opposite point, and the hanging loop is extra. It’s worked in size 3 crochet thread with a 2.0 mm steel hook, so the stitches stay firm and the points hold their shape after blocking.
You’ll work the center in the round: a chain ring, a round of spokes and a solid single crochet round. Then you’ll build each of the eight points in short rows without fastening off, slip-stitching from one point to the next. A final single crochet edge outlines the star, adds the picot tips and makes the hanging loop all at once.
The whole ornament is one piece, with no sewing or joining. Expect about 45 to 60 minutes per star once you know the rounds.
Finished Size and Construction
- Finished size: about 4 in (10.2 cm) point to point, before the hanging loop
- Skill level: Easy intermediate (dtr, decreases, short rows)
- Terminology: US crochet terms
- Yarn weight: Size 3 mercerized cotton crochet thread (Lace / #0)
- Hook: 2.0 mm steel hook
- Number of pieces: 1 (single motif)
- Layout: Single star, no assembly
- Center circle (after Rnd 3): 2 in (5.1 cm) across
- Size before edging (after Rnd 4): 3.75 in (9.5 cm) point to point
- Edging depth: about 0.125 in (0.3 cm) per side
- Hanging loop: ch 30, about 1.5 in (3.8 cm) long when folded
Materials
Use a tightly twisted mercerized cotton thread in size 3. Mercerized cotton blocks crisply, keeps the spokes straight and won’t fuzz on the tree. Avoid soft or loosely plied thread, because the points will curl.
Thread (per star):
– Main color – Cream: 6 g, about 25 m (27 yd)
– Optional colorways: the same amount in metallic or plain gold, deep green or red, one color per star
Tools:
– 2.0 mm steel crochet hook
– Fine tapestry needle
– Small sharp scissors
– Blocking board or foam mat
– Rustproof pins
– Spray starch or a 1:1 mix of white craft glue and water (optional, for stiffening)
– Ruler or tape measure
The quantities include roughly a 25% margin for the gauge swatch, tails and tension differences.
Abbreviations (US Terms)
- ch – chain
- sl st – slip stitch
- sc – single crochet
- dc – double crochet
- dtr – double treble crochet
- dc2tog – double crochet 2 together
- dc3tog – double crochet 3 together
- sp(s) – space(s)
- sk – skip
- st(s) – stitch(es)
- rnd(s) – round(s)
Special stitches:
- dtr (double treble): Yarn over 3 times, insert the hook in the stitch, yarn over and pull up a loop (5 loops on the hook). Then [yarn over, pull through 2 loops] 4 times.
- dc3tog: [Yarn over, insert the hook in the next st, yarn over, pull up a loop, yarn over, pull through 2 loops] 3 times (4 loops on the hook). Yarn over and pull through all 4 loops.
- Picot: Ch 3, then sl st in the front loop and side of the sc just made.
Gauge and Checkpoints
This is a single motif, so the first star is your gauge swatch. Work Rnds 1–3, lay the piece flat without stretching it and measure it.
Checkpoints:
– After Rnd 1: the ring of 16 sc measures about 0.6 in (1.5 cm) across.
– After Rnd 2: the spoke circle measures about 1.75 in (4.4 cm) across, from spoke tip to spoke tip.
– After Rnd 3: the solid sc circle measures 2 in (5.1 cm) across.
– After Rnd 4: the star measures 3.75 in (9.5 cm) point to point.
– After Rnd 5: the star measures 4 in (10.2 cm) point to point.
If the star is too big (Rnd 3 is over 2.125 in / 5.4 cm), the circle may ruffle. Change to a 1.75 mm hook or tighten your dtr loops.
If the star is too small (Rnd 3 is under 1.875 in / 4.8 cm), Rnd 3 may cup. Change to a 2.25 mm hook.
Most size differences come from the spokes. Pull each dtr loop up to full height, because short spokes shrink the whole star.

Pattern
Center Ring and Spokes
Rnd 1: Ch 6, sl st in the first ch to form a ring. Ch 1, work 16 sc in the ring. Join with a sl st to the first sc. (16 sc)
Leave a 6 in (15.2 cm) tail and work over it as you go.
Rnd 2 (spokes): Ch 5 (counts as the first dtr), ch 2. [Dtr in the next sc, ch 2] 15 times. Join with a sl st to the 3rd ch of the beginning ch-5. (16 dtr, 16 ch-2 sps)
Each dtr is one straight spoke. Keep all 16 the same height so the circle stays round.
Rnd 3 (conversion round): Ch 1, sc in the same st as the join. Work 2 sc in the next ch-2 sp. [Sc in the next dtr, 2 sc in the next ch-2 sp] 15 times. Join with a sl st to the first sc.
(48 sc = 16 sc worked 1 per dtr + 32 sc added in the ch-2 sps)
Checkpoint: the circle measures 2 in (5.1 cm) across. The spokes should be straight and evenly spaced, with no ruffling.
The Eight Points
The points are worked in short rows directly on Rnd 3, and you don’t fasten off between them. Each point uses 5 sc of Rnd 3 as its base. The sixth sc stays unworked as the V-shaped notch between that point and the next one.
8 points × (5 base sc + 1 notch sc) = 48 sc, which matches Rnd 3 exactly.
Rnd 4:
Point 1, Row A: Ch 3 (counts as dc) in the same sc as the join. Dc in each of the next 4 sc. Turn. (5 dc)
Row B: Ch 3 (counts as dc). Dc3tog over the next 3 dc. Dc in the top of the turning ch. Turn. (3 sts)
Row C: Ch 2 (does not count). Dc2tog over the next 2 sts (the dc3tog and the turning ch). (1 st, the tip)
Travel to the next point: Work 3 sl sts down the side of the point, one in the side of each of Rows C, B and A. Sl st in the next unworked sc on Rnd 3 (the notch sc). Sl st in the next sc.
Points 2–8: Repeat Rows A–C and the travel 7 more times. Work each Row A from the sc that holds your last sl st, so the ch-3 counts as the dc in that sc.
After Point 8, finish the travel with the sl st in the notch sc and stop. Don’t work the extra sl st.
(8 points; each point has 5 dc in Row A, 3 sts in Row B and 1 st in Row C)
Checkpoint: the star measures 3.75 in (9.5 cm) point to point. Each point is about 0.875 in (2.2 cm) tall from the circle to the tip, and the 8 notches are evenly spaced.
Edging and Hanging Loop
Rnd 5: Ch 1, sc in the same notch sc (the notch before Point 1). Then, for Point 1:
- 3 sc evenly up the right side of the point, one in the side of each of Rows A, B and C.
- In the tip, work (sc, ch 30, sl st in the sc just made, sc). This makes the hanging loop.
- 3 sc down the left side of the point, one in the side of each of Rows C, B and A, working over the travel sl sts.
Points 2–8: Sc in the next notch sc. Work 3 sc up the right side, then (sc, picot, sc) in the tip, then 3 sc down the left side. Repeat 6 more times.
Join with a sl st to the first sc. Fasten off, leaving a 6 in (15.2 cm) tail.
(Per point: 1 notch sc + 3 side sc + 2 tip sc + 3 side sc = 9 sc. Total: 72 sc, 7 picots and 1 hanging loop.)
Edging Gauge and Why the Math Works
Each side of a point is 3 rows tall, and you work exactly 1 sc per row-end. This size 3 thread gives about 3 sc per 0.875 in (2.2 cm) of point edge, so the edge lies flat without pulling the point narrow or making it wave.
The single notch sc in each valley keeps the V sharp. With 2 sc there, the notch would fill in, and with none, the valley would pucker.
The 2 sc at each tip, with the picot or loop between them, turn the corner and keep it pointed. One point’s edging is 9 sc, and 8 × 9 = 72 sc. That total follows directly from the 48-sc base of Rnd 3, with no stitches added at the joins between points.
The edging adds about 0.125 in (0.3 cm) beyond each tip. That takes the star from 3.75 in (9.5 cm) to 4 in (10.2 cm) point to point.
Final Blocking
- Weave in both tails. Run them through the backs of the sc on Rnd 3 or along the edging, never through the spokes.
- Soak the star in cool water for 5 minutes. For a stiff ornament, use starch or the glue mix instead.
- Press out the excess water between two towels. Don’t wring the star.
- Lay it on the blocking mat, right side up.
- Pin the center ring open to 0.6 in (1.5 cm) across.
- Pin the 8 picot tips (including the loop tip) evenly on a 4 in (10.2 cm) circle, with the points 45 degrees apart.
- Pin each notch sc toward the center so the V is sharp.
- Straighten each spoke with your fingers so all 16 run directly from the ring to the circle.
- Let it dry completely, usually 6–12 hours.
- Unpin the star. Lay the hanging loop flat and press it lightly with your fingers.
Final Quality-Control Checklist
- The center ring is open and round, about 0.6 in (1.5 cm) across.
- All 16 spokes are the same length and evenly spaced.
- Rnd 3 lies flat and measures 2 in (5.1 cm) across.
- There are 8 points, and each is 0.875 in (2.2 cm) tall.
- All 8 notches have a single sc at the base and form a clean V.
- Each point has 3 sc on each side.
- There are 7 picots plus 1 hanging loop, all at the tips.
- The star measures 4 in (10.2 cm) point to point after blocking.
- No tails show from the front.
- The star hangs straight from its loop.
Troubleshooting
The spoke circle ruffles. Your dtr stitches are too tall or too loose. Go down half a hook size or shorten the loops.
The spoke circle cups. The dtr stitches are too short. Pull up each loop fully, or use a 2.25 mm hook for Rnd 2 only.
A point leans to one side. You may have worked Row A over 4 or 6 sc. Count 5 base sc and 1 notch sc for every point.
The notches are shallow. Check that the notch sc holds only one stitch in Rnd 5. Pin the notches firmly when blocking.
The tips are blunt. The Row C dc2tog must close over exactly 2 sts. In Rnd 5, work both tip sc into that single stitch.
The edge waves. You’re working more than 1 sc per row-end. Work exactly 3 per side.
The star tilts when hung. Center the hanging loop between the 2 tip sc, and block the loop flat.
Care
Hand wash in cool water and dry flat, re-pinning the points if needed. Store the stars flat in tissue between seasons so the points stay sharp.
Final Notes
The measurement chain: Rnd 1 makes a 0.6 in (1.5 cm) ring. Rnd 2’s spokes take it to 1.75 in (4.4 cm), and Rnd 3 closes the circle at 2 in (5.1 cm) with 48 sc. Rnd 4 builds eight 5-stitch points to 3.75 in (9.5 cm). Rnd 5 adds 72 sc of edging, the picots and the hanging loop for a finished star of 4 in (10.2 cm).
If each checkpoint matches, the finished star will measure 4 in (10.2 cm). Make one in cream for a snowy look, or work up gold, green and red stars for a traditional tree.
Happy crocheting!