

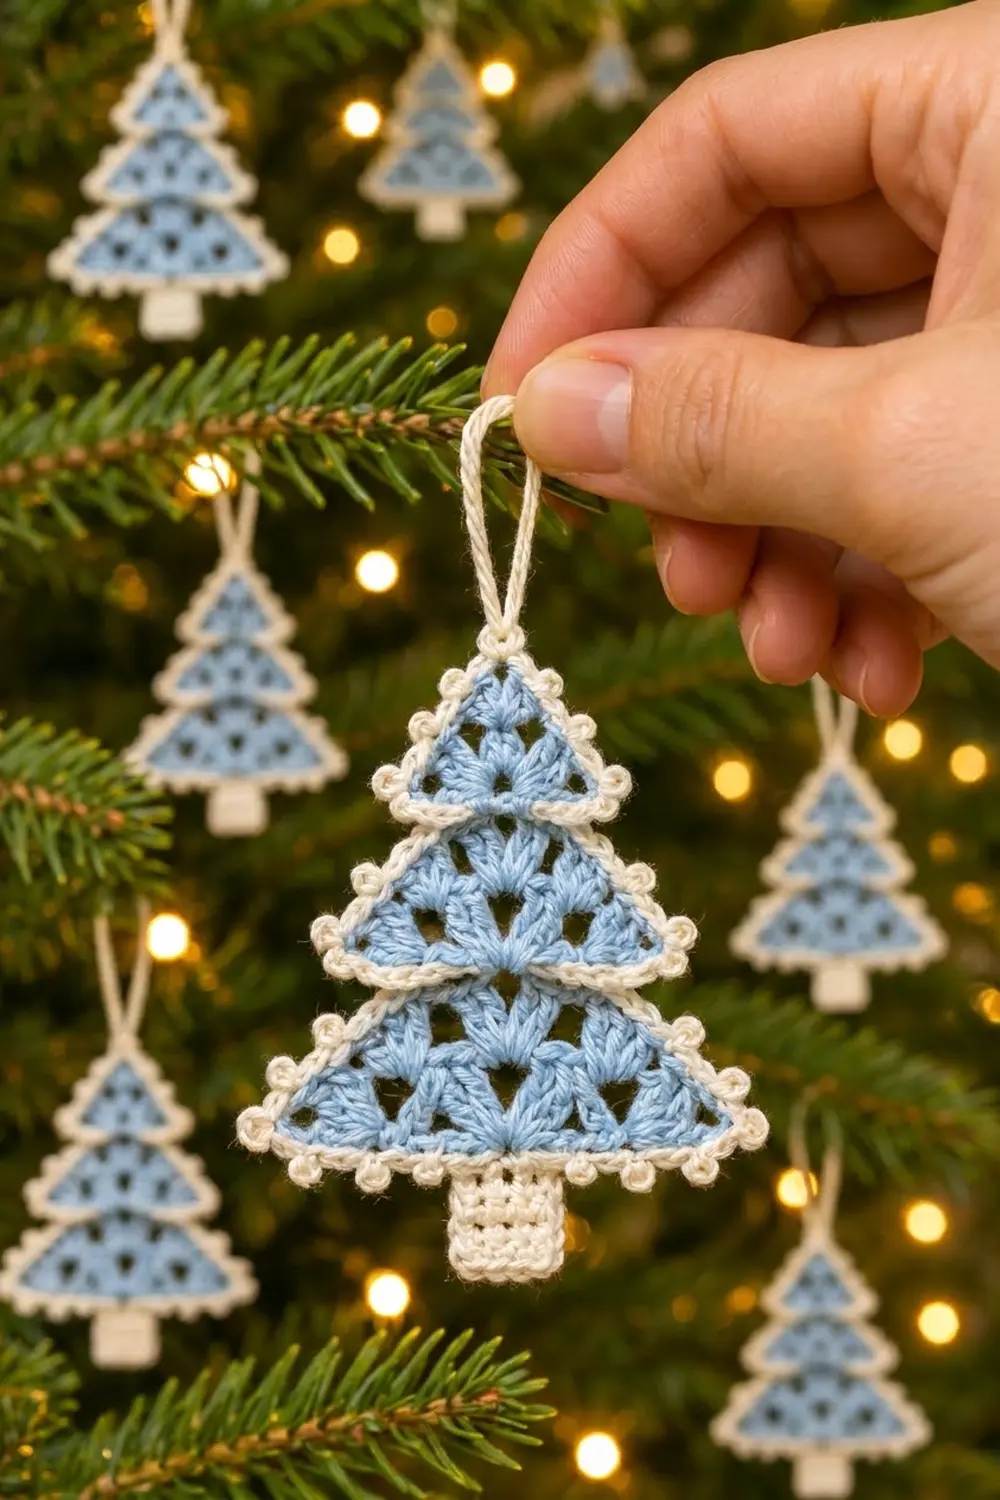
This little tree ornament is made from three stacked lace tiers in soft icy blue. Each tier is outlined in cream with a row of tiny picots. The upper tiers overlap the ones below, so every cream edge lies across the blue lace like a line of snow on a branch. A small cream trunk and a chain hanging loop finish it off.
The style is light and wintry. The blue tiers use open granny-style groups of double crochet with small ch-1 holes between them, which gives a fan-and-eyelet texture. The cream edging frames each tier so the shape reads clearly on a busy tree.
The pattern uses US crochet terms. The finished ornament measures 3.375 in (8.6 cm) wide and 4.25 in (10.8 cm) tall from the top tip to the bottom of the trunk. That height doesn’t include the 1.25 in (3.2 cm) hanging loop.
You’ll crochet three triangular tiers from the tip down in rows. Then you’ll edge each tier with two rounds of cream, make a small single crochet trunk, and sew everything into one ornament. The hanging loop is worked into the edging of the top tier.
Finished Size and Construction
- Finished size: 3.375 in (8.6 cm) wide x 4.25 in (10.8 cm) tall, plus a 1.25 in (3.2 cm) loop
- Skill level: Easy to intermediate
- Terminology: US crochet terms
- Yarn weight: Fingering (#1) cotton
- Hook: 2.5 mm
- Number of pieces: 4 parts (3 tiers and 1 trunk) sewn into one ornament
- Layout: Tiers stacked vertically, with each upper tier overlapping the one below by 0.5 in (1.3 cm). The trunk is centered under the bottom tier.
- Tier size before border (width x height): top 1.875 x 0.75 in (4.8 x 1.9 cm); middle 2.375 x 1 in (6.0 x 2.5 cm); bottom 2.875 x 1.25 in (7.3 x 3.2 cm)
- Tier width after border: top 2.375 in (6.0 cm); middle 2.875 in (7.3 cm); bottom 3.375 in (8.6 cm)
- Border depth: 0.25 in (0.6 cm) on every side. The picots stick out about 0.125 in (0.3 cm) beyond that.
Materials
Use a smooth, tightly plied cotton in fingering weight, about 170 m per 50 g. Cotton keeps the triangle points crisp and blocks flat, which matters on a small ornament.
- Color A, icy light blue: 5 g (about 17 m) for the three tiers
- Color B, cream: 6 g (about 20 m) for the edging, trunk and hanging loop
These amounts include a margin of about 30 percent for swatching and tails.
Tools:
- 2.5 mm crochet hook
- Tapestry needle
- Scissors
- Stitch marker
- Rustproof pins and a foam blocking mat
- Small spray bottle of water
- Ruler
Abbreviations (US Terms)
- ch: chain
- sl st: slip stitch
- sc: single crochet
- dc: double crochet
- sp(s): space(s)
- st(s): stitch(es)
- RS / WS: right side / wrong side
- rep: repeat
- group: 3 dc worked in the same space
Special stitch: picot. Ch 3, then sl st in the 3rd ch from the hook. The picot sits on top of the sc you just made and doesn’t count as a stitch.
Gauge and Checkpoints
Gauge: In the tier pattern, 8 sts and 4 dc rows = 1 in (2.5 cm). One 3-dc group plus its ch-1 measures 0.5 in (1.3 cm). In cream single crochet, 8 sc and 8 rows = 1 in (2.5 cm).
Make the top tier first and use it as your gauge swatch.
Tier checkpoints (measure flat, without stretching):
- After Row 1: 0.875 in (2.2 cm) wide
- After Row 2: 1.375 in (3.5 cm) wide
- After Row 3: 1.875 in (4.8 cm) wide and 0.75 in (1.9 cm) tall
- After Row 4: 2.375 in (6.0 cm) wide and 1 in (2.5 cm) tall
- After Row 5: 2.875 in (7.3 cm) wide and 1.25 in (3.2 cm) tall
Each row adds 0.5 in (1.3 cm) of width and 0.25 in (0.6 cm) of height, so the sides slope at an even 45 degrees.
If your tier is too big, switch to a 2.25 mm hook. If it’s too small, switch to a 2.75 mm hook. Fix gauge now: an error of 0.125 in (0.3 cm) on the top tier grows to about 0.25 in (0.6 cm) on the bottom tier.
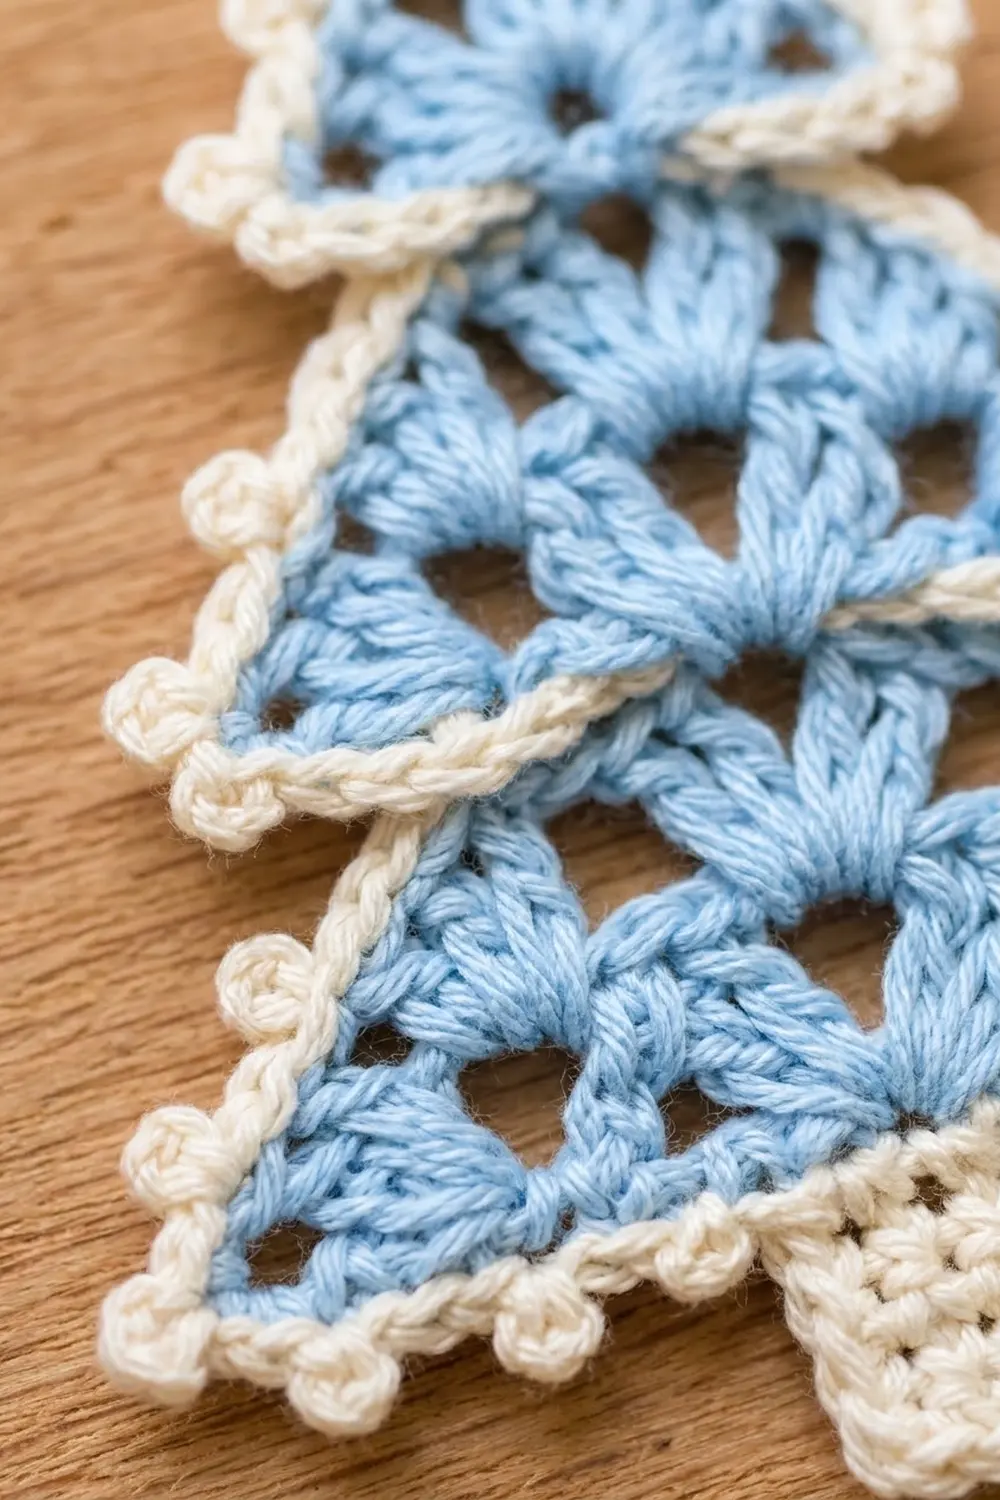
Tiers (Make 3 in Color A)
All three tiers use the same row pattern. Only the number of rows changes:
- Top tier: Rows 1–3
- Middle tier: Rows 1–4
- Bottom tier: Rows 1–5
Each tier starts at its tip and grows downward. In every row, the beginning ch-4 counts as 1 dc plus ch 1.
Foundation: With Color A, ch 4. Sl st in the first ch to form a ring.
Row 1 (RS): Ch 4 (counts as dc and ch 1), 3 dc in ring, ch 1, dc in ring. Turn. (1 group; 5 dc counting the turning ch; 2 ch-1 sps)
Row 2: Ch 4 (counts as dc and ch 1), 3 dc in the first ch-1 sp, ch 1, 3 dc in the next ch-1 sp (the sp formed by the previous row’s beginning ch-4), ch 1, dc in the 3rd ch of the beginning ch-4. Turn. (2 groups; 8 dc; 3 ch-1 sps)
Row 3: Ch 4 (counts as dc and ch 1), 3 dc in the first ch-1 sp. Ch 1, 3 dc in the next ch-1 sp; rep from * across, ending with a group in the sp formed by the beginning ch-4. Ch 1, dc in the 3rd ch of the beginning ch-4. Turn. (3 groups; 11 dc; 4 ch-1 sps)*
Top tier: fasten off here.
Row 4: Rep Row 3. (4 groups; 14 dc; 5 ch-1 sps)
Middle tier: fasten off here.
Row 5: Rep Row 3. (5 groups; 17 dc; 6 ch-1 sps)
Bottom tier: fasten off.
Count check: each row has one more group than the row before, because a group goes into every ch-1 sp, including the two edge sps. Row R has R groups, 3R + 2 dc and R + 1 ch-1 sps. Each group sits over a ch-1 of the row below, which forms the staggered fan-and-eyelet texture.
Weave in the Color A tails along the row ends on the WS.
Trunk (Make 1 in Color B)
Row 1: With Color B, ch 8. Sc in the 2nd ch from the hook and in each ch across. Turn. (7 sc)
Rows 2–10: Ch 1 (doesn’t count as a st), sc in each sc across. Turn. (7 sc)
Fasten off and leave an 8 in (20.3 cm) tail for sewing.
Checkpoint: The trunk is 0.875 in (2.2 cm) wide and 1.25 in (3.2 cm) long. The top 0.5 in (1.3 cm) hides behind the bottom tier, so 0.75 in (1.9 cm) shows.
Border: Cream Picot Edging
Every tier gets the same two-round edging. R is the number of rows in that tier: 3 for the top, 4 for the middle and 5 for the bottom.
Border gauge: 8 sc = 1 in (2.5 cm) along the edges. The edging adds 0.25 in (0.6 cm) on each side, so every tier ends up 0.5 in (1.3 cm) wider.
Round 1
Hold the tier RS facing with the last row along the top. With Color B, join with an sc in the first st at the right-hand end of the last row.
- Corner A: 2 more sc in the same st. (3 sc)
- Bottom edge: Sc in each dc and each ch-1 sp across to the last st. (4R + 1 sc)
- Corner B: 3 sc in the last st.
- Side B: Turn the tier and work along the row ends toward the ring, with 3 sc in each row end. (3R sc)
- Tip: (Sc, ch 2, sc) in the ring.
- Side A: Work along the other row ends with 3 sc in each row end. (3R sc)
Sl st in the first sc to join. Total: 10R + 9 sc and 1 ch-2 sp.
| Tier | Bottom edge | Each corner | Each side | Tip | Round 1 total |
|---|---|---|---|---|---|
| Top (R = 3) | 13 | 3 | 9 | 2 | 39 sc |
| Middle (R = 4) | 17 | 3 | 12 | 2 | 49 sc |
| Bottom (R = 5) | 21 | 3 | 15 | 2 | 59 sc |
Round 2
Ch 1, sc in the same sc as the join.
- Corner A: (Sc, picot, sc) in the next sc, which is the center corner sc.
- Bottom edge: Sc in each sc across to the center sc of Corner B. (4R + 3 sc)
- Corner B: (Sc, picot, sc) in the center corner sc.
- Side B: Sc in the next 2 sc. Picot, sc in the next 3 sc; rep from * for a total of R times. (3R + 2 sc, R picots)*
- Tip: (Sc, picot, sc) in the ch-2 sp. Top tier only: work (sc, ch 20, sc) in the ch-2 sp instead, to make the hanging loop.
- Side A: Sc in the next 3 sc, picot; rep from * for a total of R times. Sc in the next sc. (3R + 1 sc, R picots)*
Sl st in the first sc to join. Fasten off and weave in the ends. Total: 10R + 13 sc.
| Tier | Round 2 sc | Picots |
|---|---|---|
| Top (R = 3) | 43 | 8, plus the ch-20 loop |
| Middle (R = 4) | 53 | 11 |
| Bottom (R = 5) | 63 | 13 |
Why the Math Works
The last row has 3R + 2 dc and R + 1 ch-1 sps, which makes 4R + 3 places to work along the bottom. Round 1 works 1 sc into each of them. The two end stitches become corners with 3 sc each, which leaves 4R + 1 sc between them. The dc rows and the sc edging both work at 8 sts per inch, so the bottom edge stays the same width.
On the sides, each dc row rises 0.25 in (0.6 cm) and steps out 0.25 in (0.6 cm), so each row end is about 0.35 in (0.9 cm) long. Three sc at 8 sc per inch cover almost exactly that length, so the sides lie flat without ruffling or puckering.
Round 2 works 1 sc into every Round 1 sc. It adds 1 extra sc at each corner center and 2 sc in the tip sp, which is why the count goes from 10R + 9 to 10R + 13.
Checkpoint: The edged tiers measure 2.375 in (6.0 cm), 2.875 in (7.3 cm) and 3.375 in (8.6 cm) wide. They stand about 1.25 in (3.2 cm), 1.5 in (3.8 cm) and 1.75 in (4.4 cm) tall.
After the Border: Stack and Sew
- Lay the bottom tier RS up. Slide the top 0.5 in (1.3 cm) of the trunk behind the center of its bottom edge. Use the trunk tail to whipstitch the trunk to the back of the cream edging.
- Lay the middle tier on top so its lower cream edge sits 1.25 in (3.2 cm) above the bottom of the bottom tier. It now covers the top 0.5 in (1.3 cm) of the bottom tier, and its picot corners stick out past the bottom tier’s sides.
- From the back, sew the middle tier’s bottom edging to the blue fabric behind it with a length of Color A. Keep the stitches hidden so none show on the front.
- Repeat with the top tier, placing its lower edge 0.5 in (1.3 cm) below the tip of the middle tier.
- Tack each hidden tip to the back of the tier above it so it can’t flip forward.
Checkpoint: The ornament should measure 3.375 in (8.6 cm) wide and 4.25 in (10.8 cm) tall. The tiers add up to 1.75 + 1.5 + 1.25 in. Subtract the two 0.5 in overlaps, then add 0.75 in of trunk.
Final Blocking
- Mist the ornament with water until it’s damp but not wet.
- Lay it RS up on the blocking mat.
- Pin the two bottom corners and the tip of each tier so the sides run straight at 45 degrees.
- Pin out each picot so it stands clear of the edge.
- Check the size: 3.375 in (8.6 cm) wide and 4.25 in (10.8 cm) tall.
- Straighten the trunk into a neat rectangle and lay the loop flat above the tip.
- Let it dry completely, for at least 4 hours, before you unpin it.
Final Quality-Control Checklist
- The last rows of the tiers have 3, 4 and 5 groups.
- The ch-1 holes are staggered, with no missing groups.
- Round 1 totals are 39, 49 and 59 sc.
- Round 2 totals are 43, 53 and 63 sc.
- The picots are evenly spaced and match on both sides of each tier.
- The tiers and the trunk line up along one center line.
- No sewing stitches show on the RS.
- All tails are woven in and trimmed.
- The ornament hangs straight from its loop.
Troubleshooting
The tier cups. Your turning chains are tight or you skipped an edge sp. Count the groups: each row needs exactly one more group than the row before.
The sides ruffle after Round 1. Your sc are looser than gauge. Use a smaller hook for the edging.
The sides pucker. Your sc are too tight. Go up one hook size for the edging.
One side of a tier is shorter than the other. You missed the group in the turning-chain sp at the end of a row. Pull out your stitches back to that row and rework it.
The ornament tilts when hung. The loop is off center or one tier sits to the side. Re-tack the tiers along the center line.
The picots look flat. Pull each picot sl st snug, and pin the picots out during blocking.
Care
Hand wash in cool water with mild soap, roll it in a towel to press out the water, and dry it flat, pinned to shape. Store it flat or hanging so the tiers don’t get crushed.
Final Notes
Every size in this pattern comes from one gauge: 8 sts and 4 rows per inch. At that gauge, the blue tiers come out 1.875, 2.375 and 2.875 in (4.8, 6.0 and 7.3 cm) wide. The edging adds 0.25 in (0.6 cm) per side, which brings them to 2.375, 2.875 and 3.375 in (6.0, 7.3 and 8.6 cm). Stacked with 0.5 in (1.3 cm) overlaps and finished with the trunk, they make a 3.375 x 4.25 in (8.6 x 10.8 cm) ornament. Get the top tier right and the rest will follow.
Happy crocheting!