
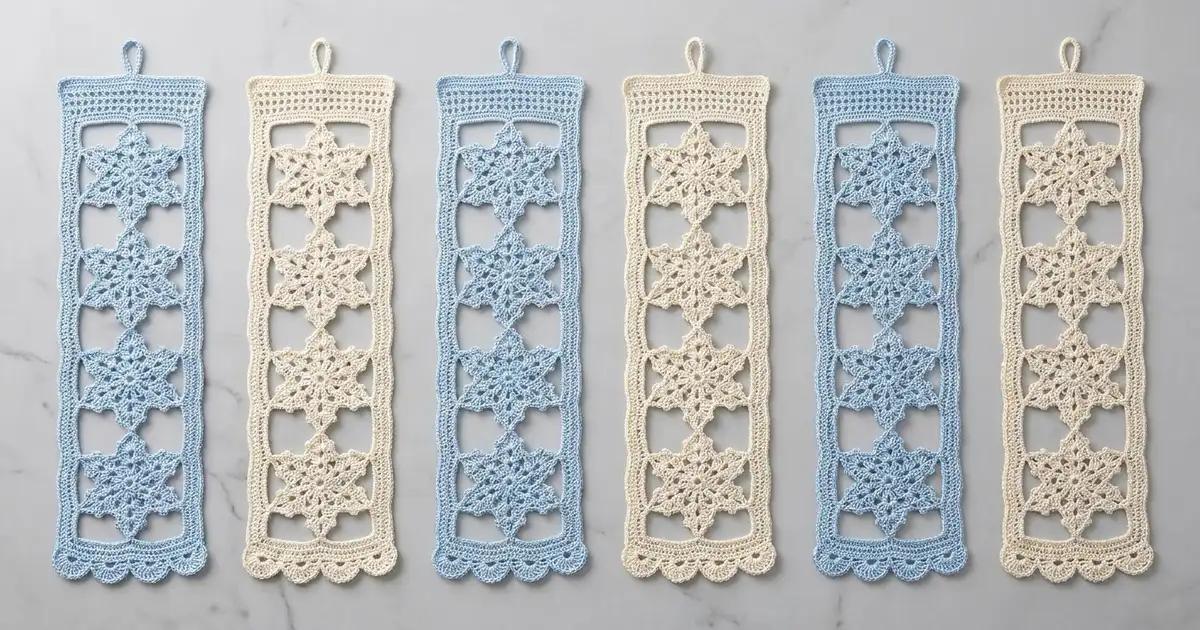
The Frosted Window curtain is made of six slim lace strips that hang side by side from a curtain rod. Each strip holds four six-armed snowflakes, joined tip to tip and framed by a neat line of single crochet. The strips alternate between powder blue and soft cream, so the curtain looks like frost on glass while still letting the light through.
Each snowflake has a small open center, short dc spokes, a scalloped shell round, and six long arms. Every arm ends in a three-prong tip and carries two V-shaped pairs of side branches. Every prong finishes in a tiny round picot “dot”.
This pattern uses US crochet terms. One finished strip measures about 5.8 in (14.7 cm) wide by 26.2 in (66.5 cm) long, not counting the hanging loop. Six strips hung with 0.5 in (1.3 cm) gaps cover about 37.3 in (94.7 cm) of rod.
Construction is simple and repetitive. You make each snowflake in the round, joining it to the one before at a single tip picot. Then you add a two-round chain-and-sc frame around each column, a header with a hanging loop, and bottom fans. The strips are never joined to each other.
Finished Size and Construction
- Finished strip: 5.8 in × 26.2 in (14.7 cm × 66.5 cm), plus the hanging loop
- Finished curtain: 6 strips, about 37.3 in (94.7 cm) wide when hung
- Skill level: Intermediate
- Terminology: US
- Yarn weight: #2 fine (sport) mercerized cotton
- Hook: 2.75 mm (C-2)
- Number of pieces: 24 snowflakes (12 blue, 12 cream)
- Layout: 6 strips × 4 snowflakes each
- Piece size: 6 in (15.2 cm) from tip to opposite tip, blocked
- Size before border: one joined column measures 5.2 in × 24 in (13.2 cm × 61.0 cm)
- Border depth: about 0.3 in (0.8 cm) of frame on each side
Materials
Choose a smooth, tightly plied mercerized cotton. It gives crisp picots, holds starch well and won’t fade quickly in window light. Avoid fuzzy or loosely spun yarns, because the dots will blur.
- Color A (powder blue): 100 g, about 330 m, for 3 strips
- Color B (cream): 100 g, about 330 m, for 3 strips
- 2.75 mm (C-2) crochet hook
- Tapestry needle
- Stitch markers (at least 4)
- Rust-proof pins and a blocking board
- Spray starch or a fabric stiffener
- Ruler or tape measure
- Curtain rod at least 40 in (101.6 cm) long and up to 1.25 in (3.2 cm) in diameter
One strip uses about 27 g. The amounts above include a margin for your gauge swatch and for weaving in ends.
Abbreviations (US Terms)
- ch – chain
- sl st – slip stitch
- sc – single crochet
- hdc – half double crochet
- dc – double crochet
- sk – skip
- sp – space
- st(s) – stitch(es)
- RS – right side
Special stitches
- Picot: Ch 3, sl st in 3rd ch from hook. This forms one round dot.
- Prong-n: Ch n, picot, sl st in each of the n ch just made, then sl st into the st the prong started from.
- Branch pair (BP-n): Work 2 Prong-n into the same st. During blocking, pin one to the left and one to the right so they form a V.
- Joining picot: Ch 2, sl st into the target picot on the finished snowflake, ch 1, sl st in 3rd ch from hook.
Gauge and Checkpoints
Make one snowflake first and block it before you start the rest.
- After Rnd 1: 1 in (2.5 cm) across
- After Rnd 2: 1.8 in (4.6 cm) across
- After Rnd 3: 2.4 in (6.1 cm) across
- Unblocked snowflake: about 5.5 in (14.0 cm) from tip to tip
- Blocked snowflake: 6 in (15.2 cm) from tip to tip
- Frame gauge: 6 sc = 1 in (2.5 cm)
If your blocked snowflake is smaller than 5.75 in (14.6 cm), go up half a hook size. If it is larger than 6.25 in (15.9 cm), go down half a size. Get the snowflake right first, then check the frame gauge on your first strip.
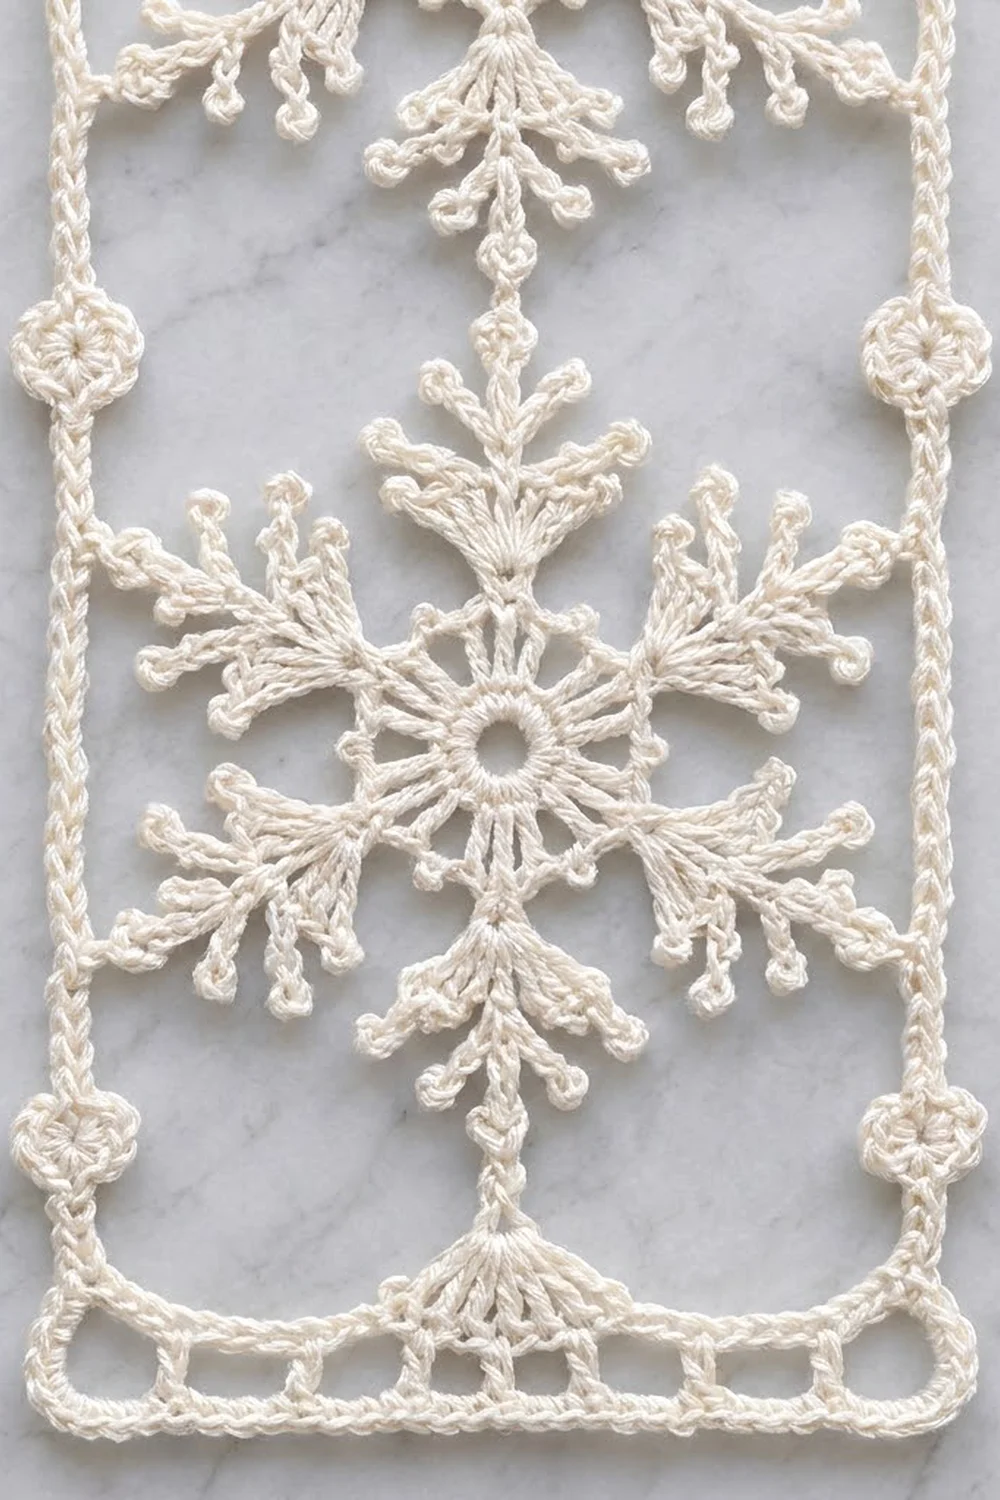
Snowflake (make 24)
Ch 6 and sl st to the first ch to form a ring.
Rnd 1: Ch 3 (counts as dc), work 17 dc in the ring, sl st to top of beg ch-3. (18 dc)
Rnd 2: Ch 3 (counts as dc), dc in next 2 dc, ch 3, dc in next 3 dc; repeat from * 4 more times, ch 3, sl st to top of beg ch-3. (18 dc in 6 groups, 6 ch-3 sps)
Rnd 3: Sl st in next dc (the middle dc of the group). Ch 1, sc in same dc. Sk 1 dc, work (2 dc, ch 2, 2 dc) in next ch-3 sp, sk 1 dc, sc in next dc. Repeat from * 4 more times, sk 1 dc, work (2 dc, ch 2, 2 dc) in last ch-3 sp, sk 1 dc, sl st to first sc. (6 sc, 6 shells: 24 dc and 6 ch-2 sps)
Rnd 4 (arms): Sl st in next 2 dc and into the ch-2 sp. Work the six arms as follows.
Arm: Sc in ch-2 sp, ch 14.
– Tip: Work 3 Prong-3 into the 14th ch, which is the last ch you made. This gives the three-prong tip.
– Back down the stem: Working down the chain toward the center: sl st in next 2 ch, BP-3, hdc in next 3 ch, BP-5, dc in next 4 ch, BP-4, dc in last 4 ch, sl st in the same ch-2 sp.
– Check: 2 + 3 + 4 + 4 = 13 stem sts, which uses every ch below the tip.
Between arms: Ch 4, sk 2 dc, sc in next sc, picot, ch 4, sk 2 dc, then work the next Arm in the next ch-2 sp.
Repeat until all 6 arms are done. Finish with ch 4, sk 2 dc, sc in next sc, picot, ch 4, sl st to first sc. Fasten off.
Rnd 4 totals: 78 stem sts, 42 prongs, 48 picots (7 per arm plus 6 between the arms).
Label the arms A through F in the order you worked them. Arm A points up and Arm D points down. The tip picots of Arms B, C, E and F become the side attachment points.
Make All Pieces
- Color A (blue): 12 snowflakes, for strips 1, 3 and 5
- Color B (cream): 12 snowflakes, for strips 2, 4 and 6
Layout as seen from the front (B = blue, C = cream):
Strip:  1   2   3   4   5   6
Row 1:  B   C   B   C   B   C
Row 2:  B   C   B   C   B   C
Row 3:  B   C   B   C   B   C
Row 4:  B   C   B   C   B   C
Make snowflake 1 of each strip complete. Make snowflakes 2–4 using the join below.
Joining
You join each column as you go, with one connection per pair of snowflakes.
On snowflakes 2, 3 and 4, work Arm A as written until you reach the center prong of the tip. In place of that prong’s picot, work a joining picot into the center tip picot of Arm D on the snowflake above. Finish the rest of the snowflake as written.
The two tip picots then form one shared dot on the center line. Each snowflake still has its 48 picots, and nothing is added at the seam.
Keep the joining sl st as loose as an ordinary picot. If it is tight, the column bends at that point.
Size checkpoint: Lay the column flat and pin it. It should measure 24 in (61.0 cm) from the top tip to the bottom tip, which is 4 × 6 in (15.2 cm). It should be 5.2 in (13.2 cm) across from side tip to side tip.
The side tips are 3 in (7.6 cm) apart within one snowflake. Across a join they are also 3 in (7.6 cm) apart, so the 8 side tips on each edge are evenly spaced.
Border (Frame, Header and Fans)
Border gauge: 6 sts = 1 in (2.5 cm). Each snowflake covers exactly 36 sts (6 in / 15.2 cm) of the long side.
Frame Round 1 (chain frame)
- Join yarn with sc in the free top tip picot of snowflake 1 (Arm A).
- Top, right half: Ch 15, then ch 1 for the corner and mark it.
- Right side, for each of the 4 snowflakes: Ch 8, sc in the upper side tip picot, ch 17, sc in the lower side tip picot, ch 9.
- Between snowflakes, the ch 9 and the next ch 8 run together. That gives 17 ch between tips, which matches the gap inside each snowflake.
- Ch 1 for the corner and mark it. Ch 15, sc in the bottom tip picot of snowflake 4 (Arm D). Ch 15, ch 1 for the corner and mark it.
- Left side: Work as for the right side, going upward.
- Ch 1 for the corner and mark it, ch 15, sl st to the first sc.
Counts
– Top and bottom: 15 + 1 + 15 = 31 sts each
– Each long side: 4 × (8 + 1 + 17 + 1 + 9) = 4 × 36 = 144 sts
– Corner chs: 4
Round total: 31 + 144 + 31 + 144 + 4 = 354 sts
Frame Round 2 (sc round, conversion)
Ch 1. Sc in each st around, and work 3 sc in each corner ch. Sl st to the first sc.
Round total: 354 sts worked once each + 8 added (2 per corner) = 362 sc
Per side, counting the middle corner sc at both ends:
– Top and bottom: 1 + 1 + 31 + 1 + 1 = 35 sts
– Long sides: 1 + 1 + 144 + 1 + 1 = 148 sts
– Check: (2 × 35) + (2 × 148) − 4 shared corners = 362
Why the math works: 148 / 6 = 24.7 in (62.7 cm) and 35 / 6 = 5.8 in (14.7 cm). The frame matches the pinned column plus about 0.3 in (0.8 cm) of frame on each edge.
Header (worked on the 35 top sts)
Row 1: With RS facing, join yarn in the top-right corner sc. Ch 3 (counts as dc), dc in each of next 34 sts. Turn. (35 dc)
Row 2: Ch 4 (counts as dc + ch 1). Sk 1 dc, dc in next dc, ch 1. Repeat from * across, ending with dc in the top of the turning ch with no ch 1 after it. Turn. (18 dc, 17 ch-1 sps = 35 sts)
Row 3: Ch 1, sc in each dc and each ch-1 sp across. (35 sc) Fasten off.
The header adds about 1 in (2.5 cm) to the length.
Hanging loop:
1. Join yarn in the 14th sc of Row 3. Sc 18 is the exact center, so sc 14 and sc 22 sit 4 sts either side of it.
2. Ch 36, sl st in sc 22, turn.
3. Work 45 sc into the loop, then sl st in sc 14. Fasten off.
The loop measures 6 in (15.2 cm) around and fits rods up to 1.25 in (3.2 cm) in diameter.
Bottom Fans (worked on the 31 bottom sts between corners)
With RS facing, join yarn with sc in the first st after the bottom-left corner sc. Sk 2, 5 dc in next st, sk 2, sc in next st. Repeat from * 4 more times; the last sc lands in the st just before the corner. Fasten off.
Count: 1 + (5 × 6) = 31 sts, making 5 fans with 6 anchoring sc
The fans add about 0.5 in (1.3 cm), so the strip measures 24.7 + 1 + 0.5 = 26.2 in (66.5 cm).
Final Blocking
- Weave in all ends along the dc stems, never through the picots.
- Soak each strip in cool water and roll it in a towel to remove excess water.
- Pin the frame flat to 5.8 in × 26.2 in (14.7 cm × 66.5 cm), with a pin in each corner first.
- Pin each snowflake’s center over the vertical center line, with the snowflakes 6 in (15.2 cm) apart, center to center.
- Open each branch pair into a V and pin each prong’s picot round.
- Spray with starch and let the strip dry completely before unpinning.
- Slide the loops onto the rod in blue–cream order, leaving 0.5 in (1.3 cm) between strips.
Final Quality-Control Checklist
- [ ] Each snowflake has 6 arms, 42 prongs and 48 picots
- [ ] Each strip has 3 tip-to-tip joins, all lying flat
- [ ] Frame Round 1 has 354 sts; Round 2 has 362 sc
- [ ] Each long side has 148 sts and each short side 35 sts, counting corners
- [ ] The header has 35 sts in every row, with the loop centered at sc 14–22
- [ ] There are 5 even fans along the bottom
- [ ] Each strip is 5.8 in × 26.2 in (14.7 cm × 66.5 cm)
- [ ] All six strips hang at the same length
Troubleshooting
- Arms curl or twist: The stem is too tight. Work the dc down the chain more loosely, or chain with a hook one size larger.
- Picots look flat, not round: Pull the sl st snug and then shape each dot with a pin while it’s wet.
- Frame ripples: Your chains are too loose. Check the frame against the 6 sts = 1 in (2.5 cm) gauge.
- Frame pulls the snowflakes oval: Your chains are too tight. Add a ch to each 17-ch gap and adjust the end chains to match.
- Fans don’t fit: Recount the bottom side. You need exactly 31 sts between the corner sc.
- Strips hang at different lengths: Re-block the shorter strip and pin it to 26.2 in (66.5 cm).
Care
Hand wash cool, roll in a towel and dry flat. Re-starch and re-pin after each wash, and keep the curtain out of harsh all-day sun so the blue keeps its color.

Final Notes
The whole curtain rests on a short chain of measurements:
- The snowflake blocks to 6 in (15.2 cm).
- Four joined snowflakes make a 24 in (61.0 cm) column.
- At 36 sts per snowflake, the frame comes out at 144 sts per side plus 4 corners: 148 by 35 sts, or 5.8 in × 24.7 in (14.7 cm × 62.7 cm).
- The header and fans bring each strip to 26.2 in (66.5 cm).
- Six strips cover 37.3 in (94.7 cm) of rod.
Check each link as you go and the curtain will hang straight and even.
Happy crocheting!