

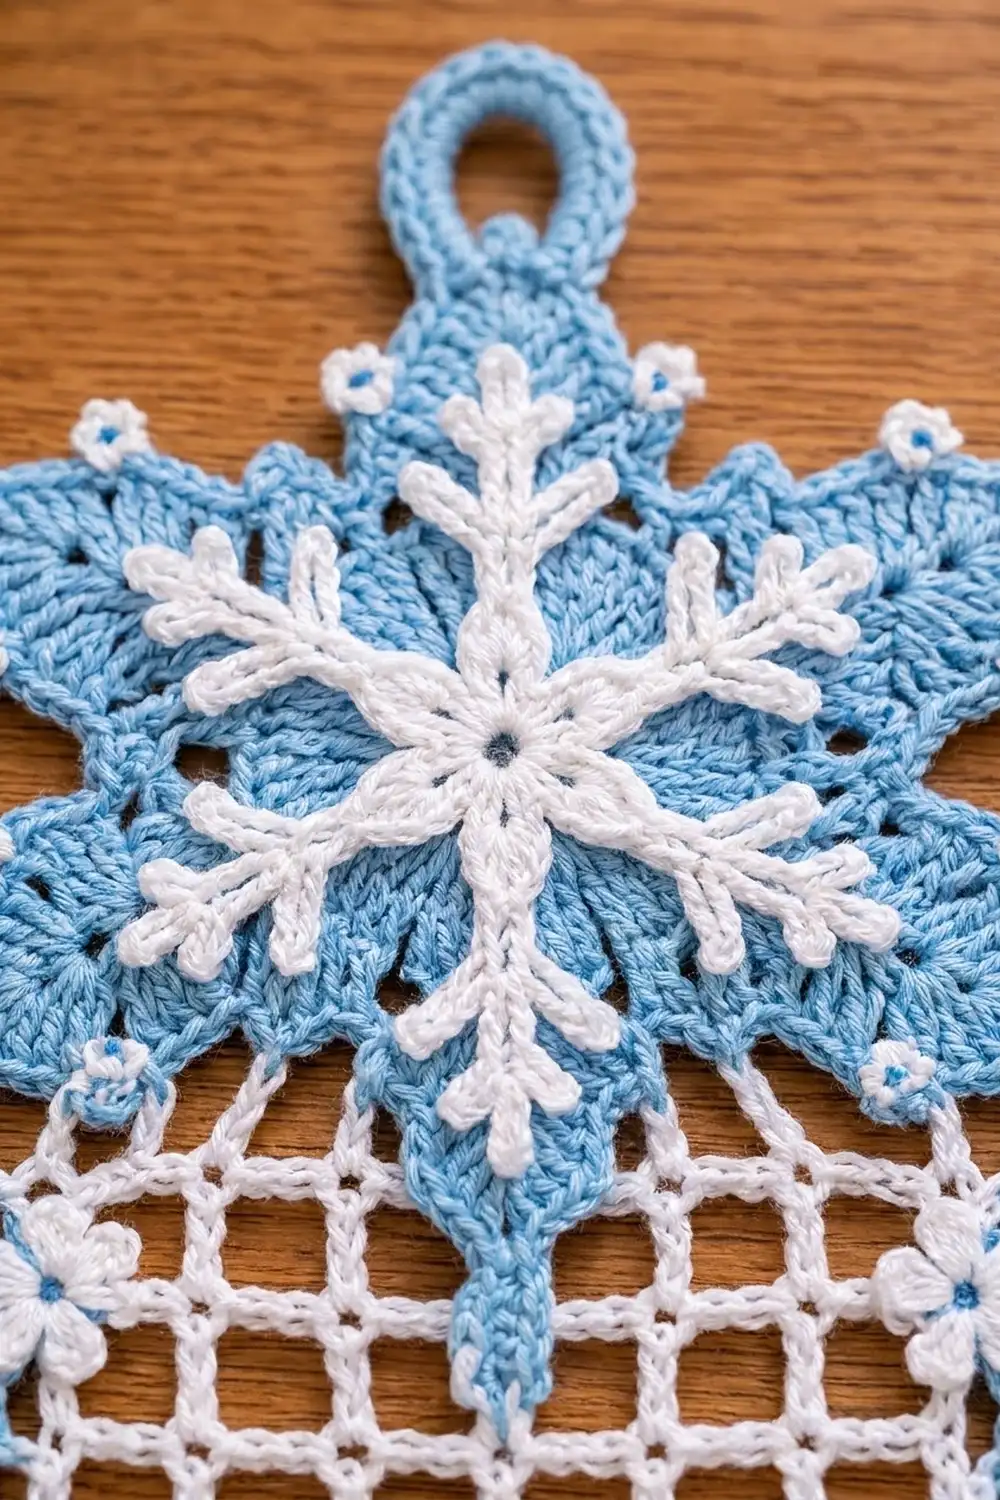
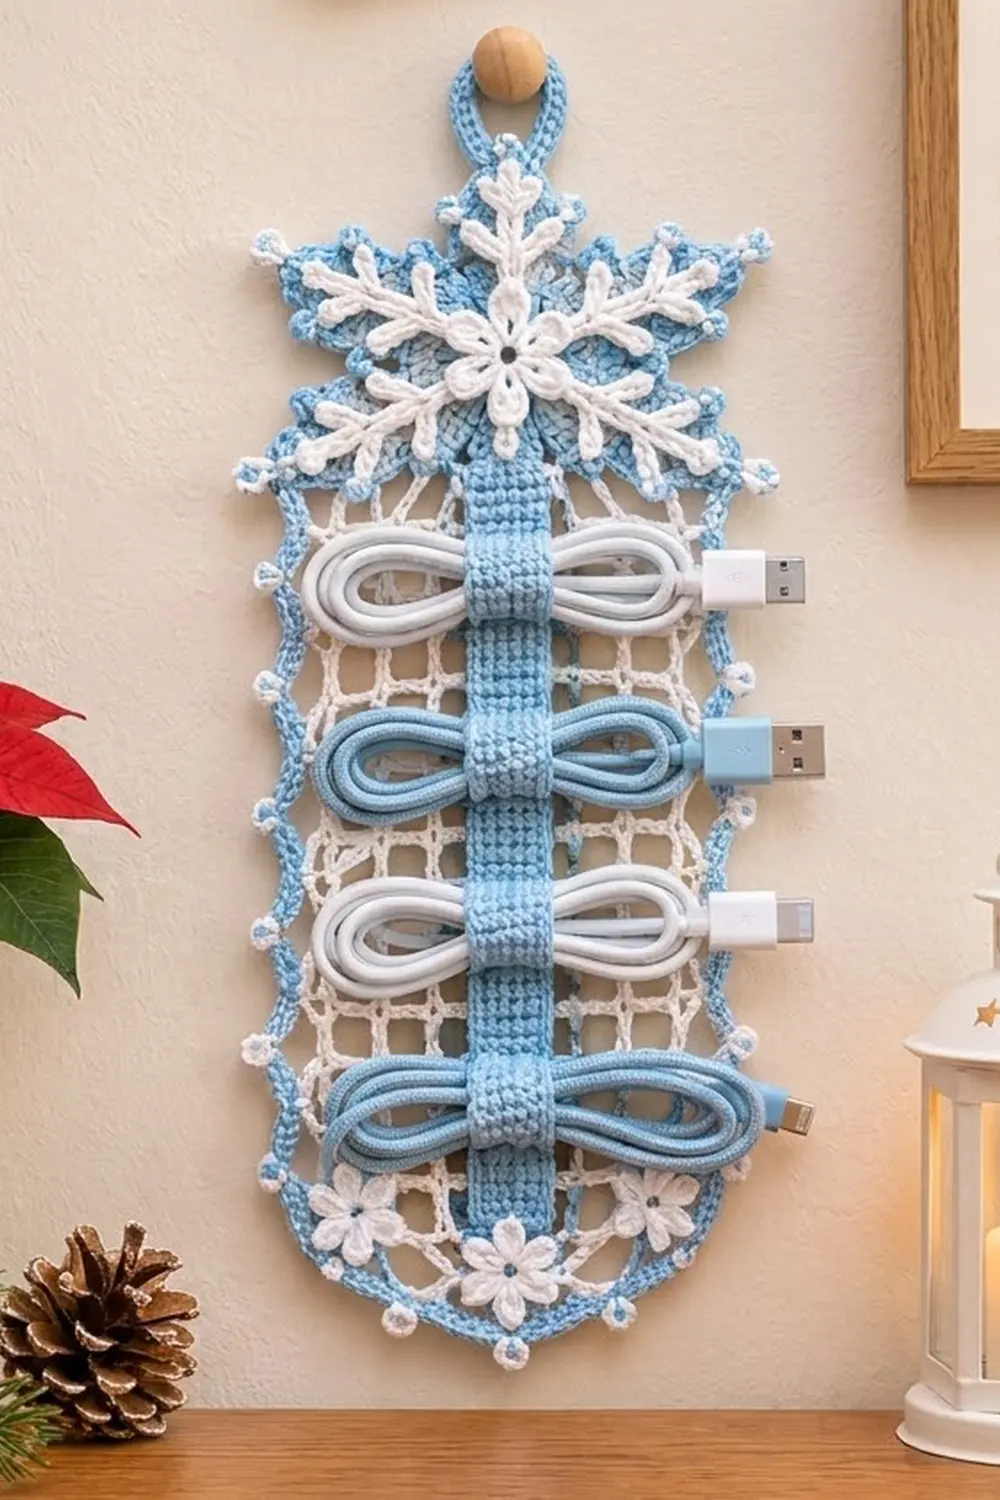
This hanging organizer turns a tangle of charging cables into a small winter decoration. A white filet-mesh panel is framed by a light blue picot border. A blue six-point star with a white snowflake stitched on top crowns the panel, and a blue strap with four loops runs down the center to hold coiled cables.
The colors are crisp white and soft ice blue. Seven small white flowers with blue centers sit around the frame, and a blue hanging loop rises from the star’s top point. The look is light and lacy, but the organizer is sturdy enough to use every day.
This pattern uses US crochet terms. The bordered panel measures 6.9 in (17.5 cm) wide by 14.7 in (37.3 cm) tall. With the star and hanging loop, the organizer is about 17.5 in (44.5 cm) tall.
You crochet a rectangular mesh panel in rows and add a three-round border. Then you make the star, snowflake, flowers, strap, four loops and hanging loop separately and sew them onto the panel to make one finished organizer.
Finished Size and Construction
- Bordered panel: 6.9 in x 14.7 in (17.5 cm x 37.3 cm)
- Overall height with star and loop: about 17.5 in (44.5 cm)
- Skill level: Intermediate
- Terminology: US
- Yarn weight: DK (3) cotton
- Hook: 3.5 mm (E-4)
- Number of pieces: 1 finished organizer, made from 1 mesh panel plus 15 small sewn-on parts (1 star, 1 snowflake, 7 flowers, 1 strap, 4 cable loops, 1 hanging loop)
- Layout: A single vertical panel, with the star at the top center and the strap down the middle
- Panel before border: 9 squares x 22 rows = 5.4 in x 13.2 in (13.7 cm x 33.5 cm)
- Border depth: 0.75 in (1.9 cm) per side, picots included
Materials
Use a smooth, mercerized or combed DK cotton. Cotton keeps the open mesh crisp and won’t stretch when the loops are full of cables. Avoid acrylic, which lets the mesh sag.
- White: 45 g (about 105 m). Used for the panel, border Round 1, the snowflake and the flowers.
- Light blue: 40 g (about 92 m). Used for border Rounds 2–3, the star, strap, cable loops, hanging loop and flower centers.
These amounts include about 15% extra for the gauge swatch and sewing tails.
Tools:
– 3.5 mm (E-4) crochet hook
– Tapestry needle
– 6 locking stitch markers
– Rust-proof pins and a blocking mat
– Spray bottle
– Measuring tape
– Scissors
Abbreviations (US Terms)
- ch: chain
- sl st: slip stitch
- sc: single crochet
- hdc: half double crochet
- dc: double crochet
- tr: treble crochet
- sp: space
- st(s): stitch(es)
- MR: magic ring
Picot: Ch 3, then sl st in the 3rd ch from the hook. Picots never count as stitches.
Mesh square: One dc post plus one ch-2 space. A row of 9 squares has 10 dc. The turning chain counts as the first dc.
Gauge and Checkpoints
Gauge: 1 mesh square is 0.6 in (1.5 cm) wide and 0.6 in (1.5 cm) tall. In the border, 5 sc = 1 in (2.5 cm).
Make one test piece first: work Rows 1–4 of the panel. It should measure 5.4 in (13.7 cm) wide and 2.4 in (6.1 cm) tall. Also make one flower and check that it is 1 in (2.5 cm) across. If both measure correctly, keep the swatch going as your panel.
Checkpoints:
– After Row 4: 5.4 in x 2.4 in (13.7 cm x 6.1 cm)
– After Row 11: 5.4 in x 6.6 in (13.7 cm x 16.8 cm)
– After Row 22: 5.4 in x 13.2 in (13.7 cm x 33.5 cm)
– After border Round 1: 5.9 in x 13.7 in (15.0 cm x 34.8 cm)
– After border Round 2: 6.4 in x 14.2 in (16.3 cm x 36.1 cm)
– After border Round 3: 6.9 in x 14.7 in (17.5 cm x 37.3 cm)
Too big? Go down to a 3.25 mm hook. Too small? Go up to a 3.75 mm hook. Change the hook, never the stitch counts, because the border math depends on exactly 9 squares and 22 rows.
Mesh Panel (White)
Foundation: Ch 32.
Row 1: Dc in the 8th ch from the hook. The skipped chains count as the first dc, a ch-2, and 2 skipped base chains. Ch 2, skip 2 ch, dc in next ch. Repeat from * to the end of the row. Turn. (10 dc, 9 ch-2 sps = 9 squares)
Row 2: Ch 5 (counts as dc + ch 2), skip the first ch-2 sp, dc in the next dc. Ch 2, dc in the next dc. Repeat from * across. Work the last dc in the 3rd ch of the turning chain. Turn. (9 squares)
Rows 3–22: Repeat Row 2. Every row has 9 squares. Do not fasten off.
The panel is now a flat rectangle of 9 x 22 open squares. The posts should stack in straight columns.
Border
Corners are worked into the corner dc tops and the foundation corners. Place a marker in each of the 4 corner center stitches, and move the markers up every round.
Border gauge: 5 sc = 1 in (2.5 cm). Each round adds about 0.25 in (0.6 cm) per side.
Round 1 (White)
Ch 1. Work around the panel in this order:
- Top right corner: 3 sc in the corner dc.
- Top edge: 2 sc in the ch-2 sp, sc in the next dc. Repeat 8 times, then work 2 sc in the last ch-2 sp. (26 sc between the corner groups)
- Top left corner: 3 sc in the corner turning chain.
- First side: 3 sc around the end post of each of the 22 rows. (66 sc)
- Bottom left corner: 3 sc at the base of the corner dc.
- Bottom edge (worked into the foundation chain): 2 sc around the ch-2 sp, sc at the base of the next dc. Repeat 8 times, then work 2 sc around the last sp. (26 sc)
- Bottom right corner: 3 sc at the last foundation corner.
- Second side: 3 sc around each of the 22 row ends. (66 sc)
Sl st to the first sc.
Round 1 total: 26 + 66 + 26 + 66 + (4 corners x 3) = 196 sc.
Counting both corner center stitches with each side, the short sides have 30 sc each and the long sides have 70 sc each. Check: 30 + 70 + 30 + 70 – 4 shared corners = 196.
On a 0.6 in (1.5 cm) square, 3 sc per square or row end works out to 5 sc per inch, which matches the border gauge. That is why the edges lie flat.
Round 2 (Light Blue)
Join blue in any corner center. Ch 1. Sc in each st around, working 3 sc in each corner center. Sl st to the first sc.
Round 2 total: 196 worked 1-per-stitch + 8 corner extras = 204 sc.
Counting corner centers with each side: 32 sc on each short side and 72 sc on each long side. Check: 32 + 72 + 32 + 72 – 4 = 204.
Round 3 (Light Blue Picot Edge)
Ch 1. Begin at a corner center and work the following around all 4 corners and 4 sides:
- Each corner center: (sc, picot, sc) in the corner center st.
- Each short side (30 sts between the corner centers): Sc in the next 3 sts, picot. Sc in the next 4 sts, picot. Repeat 6 times. Sc in the next 3 sts. (30 sc, 7 picots)
- Each long side (70 sts between the corner centers): Sc in the next 3 sts, picot. Sc in the next 4 sts, picot. Repeat 16 times. Sc in the next 3 sts. (70 sc, 17 picots)
Sl st to the first sc and fasten off.
Round 3 total: 204 worked 1-per-stitch + 4 extra (one more sc at each corner center) = 208 sc, plus 52 picots (7 + 17 + 7 + 17 + 4 corner picots).
Why the math works: The stitches between corner centers on each side equal (4 x number of picots) + 2. That gives 4 x 7 + 2 = 30 on the short sides and 4 x 17 + 2 = 70 on the long sides. Each side starts and ends with 3 sc, and each corner adds 1 sc on either side of its picot. So every picot is exactly 4 sc from the next one, even around the corners.
Star Backing (Light Blue)
Rnd 1: MR, ch 3 (counts as dc), 11 dc in the ring. Sl st to the top of the ch-3. (12 dc)
Rnd 2: Ch 3, dc in the same st, then 2 dc in each st around. Sl st to join. (24 dc)
Rnd 3: Ch 3, 2 dc in the next st. Dc in the next st, 2 dc in the next st. Repeat around. Sl st to join. (36 dc)
Rnd 4 (points): Sc in the next st, hdc in the next st, dc in the next st, (tr, ch 1, picot, ch 1, tr) in the next st, dc in the next st, hdc in the next st. Repeat 6 times. Sl st to the first sc. (6 points, 6 sts each, 36 sts used)
The star measures about 5 in (12.7 cm) from point to point. Leave a 12 in (30.5 cm) tail for sewing.
Snowflake (White)
Rnd 1: MR, ch 1, 12 sc in the ring. Sl st to the first sc. (12 sc)
Rnd 2: Ch 1. Sc in the next st, ch 3, skip the next st. Repeat 6 times. Sl st to the first sc. (6 sc, 6 ch-3 sps)
Rnd 3 (arms): Sl st into the first ch-3 sp. Make one arm in each of the 6 sps:
- Sc in the ch-3 sp, then ch 9.
- Sl st in the 3rd ch from the hook. Then work (ch 3, sl st in the same ch) twice. This makes the three-picot tip.
- Sl st in the next 2 ch down the arm.
- Work (ch 4, sl st in the 3rd ch from the hook, ch 1, sl st in the same arm ch) twice. This makes one short side branch on each side of the arm.
- Sl st in each of the remaining 4 ch, back to the base of the arm.
- Sc in the same ch-3 sp, then sl st in the next sc.
After the 6th arm, fasten off. (6 arms)
The snowflake measures about 4 in (10.2 cm) across.
Flowers (White, Make 7)
Rnd 1: MR, ch 1, 5 sc in the ring. Sl st to the first sc. (5 sc)
Rnd 2: (Sl st, ch 2, 2 dc, ch 2, sl st) in the next sc. Repeat 5 times. (5 petals)
Fasten off. Each flower is about 1 in (2.5 cm) wide. With blue yarn, work a French knot in the center of each flower.
Strap (Light Blue)
Foundation: Ch 6.
Row 1: Sc in the 2nd ch from the hook and in each ch across. Turn. (5 sc)
Rows 2–55: Ch 1, sc in each st across. Turn. (5 sc)
The finished strap measures 1 in x 11 in (2.5 cm x 27.9 cm).
Cable Loops (Light Blue, Make 4)
Foundation: Ch 8.
Row 1: Sc in the 2nd ch from the hook and in each ch across. Turn. (7 sc)
Rows 2–20: Ch 1, sc in each st across. Turn. (7 sc)
Each piece measures 1.4 in x 4 in (3.6 cm x 10.2 cm). Fold it into a band and sew the short ends together.
Hanging Loop (Light Blue)
Ch 22, then sl st in the 12th ch from the hook to form a ring. This leaves a stem of 10 ch. Work 18 sc in the ring, then sc in each of the 10 stem ch. (28 sc)
Assembly
- Lay the bordered panel flat, right side up.
- Center the star at the top so its center sits 1 in (2.5 cm) below the top edge of the border. The top point will rise about 1.5 in (3.8 cm) above the panel. Whipstitch around the star.
- Lay the snowflake on the star with each arm over a star point. Sew it down through the center ring and each arm tip.
- Sew the hanging loop stem to the back of the star’s top point so that 1.25 in (3.2 cm) of the ring shows above it.
- Slide the 4 bands onto the strap and space them 2.25 in (5.7 cm) apart. Turn each seam to the back and tack it to the strap.
- Tuck the top 1 in (2.5 cm) of the strap under the lower star points. Sew both long edges of the strap down the center of the mesh.
- Sew 5 flowers along the bottom border: one at each bottom corner and three evenly spaced between them. Sew the other 2 flowers to the sides, just below the star.
Final Blocking
- Mist the whole organizer until it is evenly damp.
- Pin the panel to 6.9 in x 14.7 in (17.5 cm x 37.3 cm), keeping the mesh columns straight.
- Ease the two bottom corners into a soft curve with a radius of about 1 in (2.5 cm).
- Pin out every picot and each star point.
- Flatten the snowflake tips with pins.
- Let it dry completely, about 12–24 hours, before unpinning.
Final Quality-Control Checklist
- The panel has 9 squares x 22 rows, with straight columns.
- The border rounds have 196, 204 and 208 sc, plus 52 picots.
- The bordered panel measures 6.9 in x 14.7 in (17.5 cm x 37.3 cm).
- The star and snowflake are centered, with each arm over a point.
- The strap is centered, and the 4 bands are evenly spaced.
- All 7 flowers are secure and all ends are woven in.
- The organizer hangs straight from its loop.
Troubleshooting
- The mesh slants: Your turning chain is too loose. Try ch 4 instead of ch 5.
- The border ruffles: Use a 3.25 mm hook for the border only.
- The border cups: Use a 3.75 mm hook for the border only.
- The picots are uneven: Recount. There should be 4 sc between every pair of picots.
- The star curls: Block it flat before you sew it on.
- The bands are too tight for cables: Add 4 rows to each band.
- The organizer tilts: Recenter the hanging loop stem.
Care
Hand wash in cool water with mild soap, then press the water out in a towel. Lay flat to dry, reshaping the picots while damp.
Final Notes
Each measurement builds on the one before. A 0.6 in (1.5 cm) square gives a 5.4 in x 13.2 in (13.7 cm x 33.5 cm) mesh panel. Three border rounds of 0.25 in (0.6 cm) each bring it to 6.9 in x 14.7 in (17.5 cm x 37.3 cm). The star and hanging loop make the organizer about 17.5 in (44.5 cm) tall. Check your swatch and count your border stitches, and the rest falls into place.
Happy crocheting!