

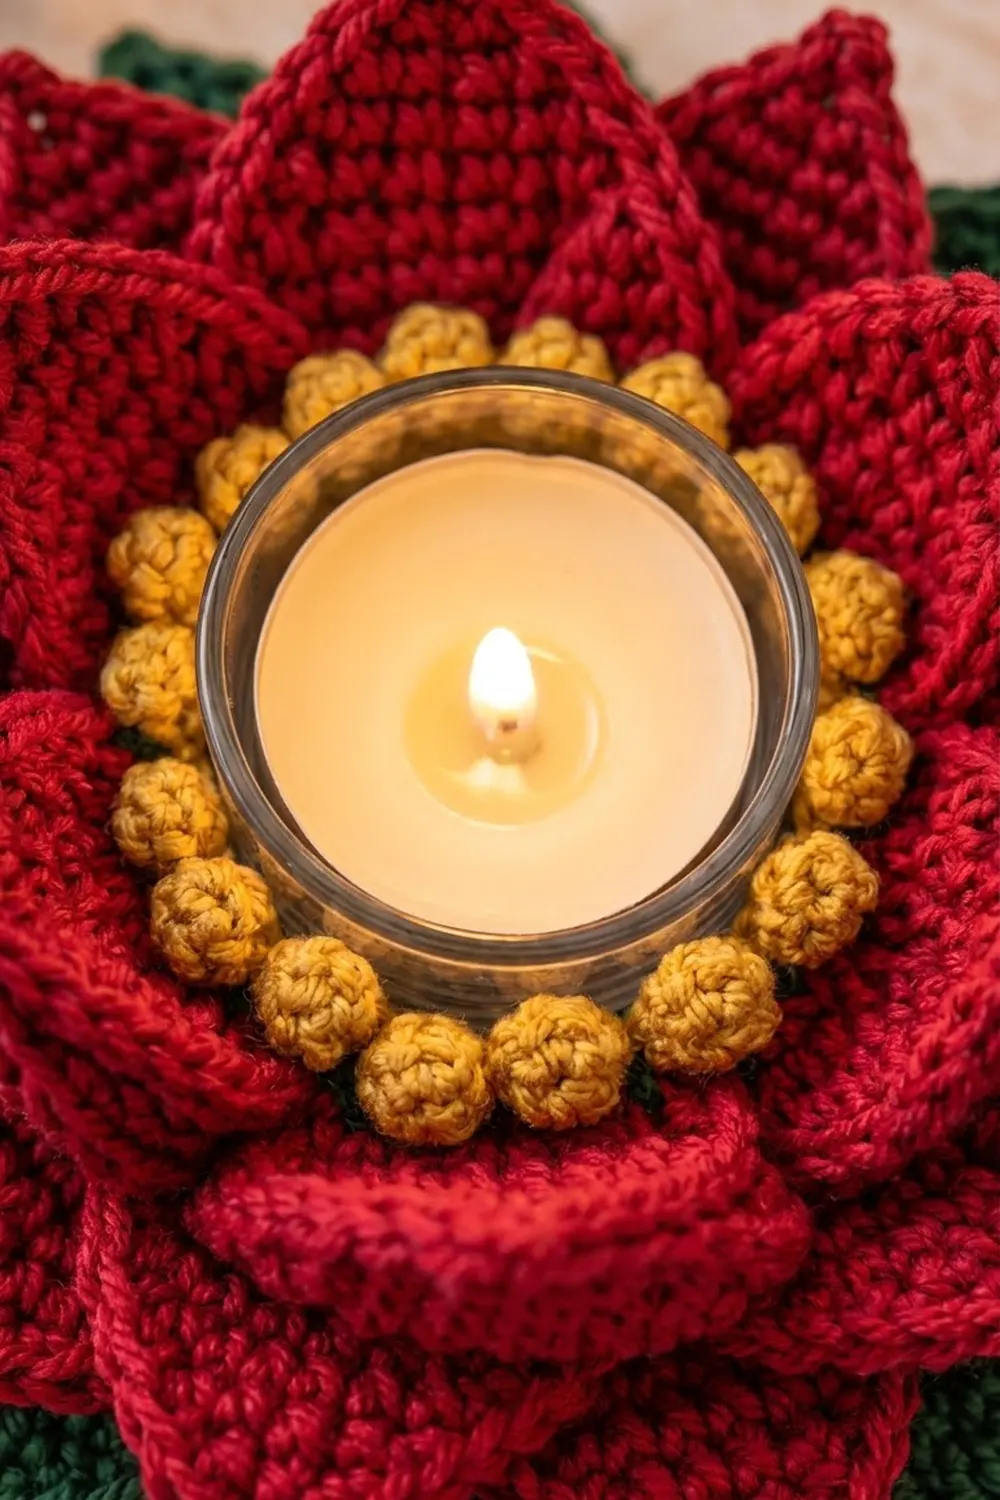
This poinsettia candle holder sits on the table like a flower in full bloom. A green star of leaves forms the base, and a small red cup holds a glass votive. Two layers of pointed red petals open around the cup. A ring of golden bobble “berries” circles the glass, like the yellow center of a real poinsettia.
The colors are classic Christmas: cranberry red, forest green and mustard gold. Every piece is worked in dense single crochet. Taller stitches appear only where the petals need width, so the flower keeps its shape without wire or stiffener.
The pattern uses US crochet terms. The finished holder is about 8 in (20.3 cm) across and about 2.5 in (6.4 cm) tall at the petal tips. The green star alone is 7.5 in (19.1 cm) from tip to tip.
You’ll make a flat green star base, a red cup, 8 large petals, 8 small petals and one gold berry ring. Then you sew everything together and finish with one edging round around the green star.
Finished Size and Construction
- Finished size: about 8 in (20.3 cm) across, 2.5 in (6.4 cm) tall
- Skill level: Intermediate
- Terminology: US
- Yarn weight: Worsted (#4)
- Hook: H-8 (5.0 mm)
- Number of pieces: 19 (1 base, 1 cup, 8 large petals, 8 small petals, 1 berry ring)
- Layout: in rings around the center; the cup sits in the middle of the base and the petals form two staggered layers
- Base circle before points: 4.5 in (11.4 cm)
- Star size before edging: about 7 in (17.8 cm) tip to tip
- Edging depth: 1 round, about 0.25 in (0.6 cm)
Materials
Choose a smooth worsted cotton or acrylic that shows the stitches clearly. Cotton gives the crispest petals. The amounts below assume about 190 m per 100 g.
- Red: 45 g, 85 m
- Green: 25 g, 47 m
- Gold/mustard: 10 g, 19 m
These amounts include about 25% extra for your gauge swatch and sewing tails.
Tools:
– H-8 (5.0 mm) hook
– Tapestry needle
– Stitch markers (at least 10)
– Scissors and pins
– Glass votive holder, about 2.5 in (6.4 cm) across
– LED tea light (never use a real flame near yarn)
Abbreviations (US Terms)
- ch – chain
- sl st – slip stitch
- sc – single crochet
- hdc – half double crochet
- dc – double crochet
- sc2tog – single crochet 2 together
- BLO – back loop only
- st(s) – stitch(es)
- sp – space
- MR – magic ring
Bobble: *Yarn over, insert hook in st, yarn over, pull up a loop, yarn over, draw through 2 loops; repeat from * 4 more times in the same st (6 loops on hook). Yarn over and draw through all 6 loops.
Gauge and Checkpoints
Gauge: 16 sc and 18 rows = 4 in (10.2 cm) with an H-8 (5.0 mm) hook.
Make the cup first. It’s small, and it has to fit your glass. Check these sizes as you go:
- Base Rnd 5: 2.25 in (5.7 cm) across
- Base Rnd 10: 4.5 in (11.4 cm) across
- Cup Rnd 8: 3.5 in (8.9 cm) across
- Large petal: 3.5 in (8.9 cm) long, 2 in (5.1 cm) wide
- Small petal: 2.5 in (6.4 cm) long, 1.5 in (3.8 cm) wide
If your pieces come out too big, go down half a hook size. If they’re too small, go up half a size. The cup floor needs about 0.5 in (1.3 cm) of space on every side of the glass, or the berry ring won’t fit.
Part 1: Green Star Base
Use green and work in joined rounds. Join each round with a sl st to the first sc. The ch 1 at the start of each round does not count as a stitch.
Rnd 1: 6 sc in MR. (6)
Rnd 2: 2 sc in each st around. (12)
Rnd 3: Sc in next st, 2 sc in next st; rep from * around. (18)
Rnd 4: Sc in next 2 sts, 2 sc in next st; rep from * around. (24)
Rnd 5: *Sc in next 3 sts, 2 sc in next st; rep from * around. (30)
Checkpoint: 2.25 in (5.7 cm) across.
Rnd 6: Sc in next 4 sts, 2 sc in next st; rep from * around. (36)
Rnd 7: Sc in next 5 sts, 2 sc in next st; rep from * around. (42)
Rnd 8: Sc in next 6 sts, 2 sc in next st; rep from * around. (48)
Rnd 9: Sc in next 7 sts, 2 sc in next st; rep from * around. (54)
Rnd 10: *Sc in next 8 sts, 2 sc in next st; rep from * around. (60)
Checkpoint: 4.5 in (11.4 cm) across. Place a marker every 6 sts to divide the round into 10 sections. Do not fasten off.
Star Points
Each point is worked in rows over 6 sts of Rnd 10.
Row 1: Ch 1, sc in next 6 sts, turn. (6)
Row 2: Ch 1, sc2tog, sc in next 2 sts, sc2tog, turn. (4)
Row 3: Ch 1, sc in each st across, turn. (4)
Row 4: Ch 1, sc2tog twice, turn. (2)
Row 5: Ch 1, sc in each st across, turn. (2)
Row 6: Ch 1, sc2tog. (1)
Don’t turn. Sl st down the side of the point that faces the unworked sts, working 1 sl st in the end of each row, until you reach Rnd 10. Start Row 1 of the next point in the next unworked st.
Repeat until you have 10 points. After the last point, sl st down to Rnd 10 and fasten off. Each point is about 1.25 in (3.2 cm) long, so the star now measures about 7 in (17.8 cm) from tip to tip.
Part 2: Red Cup
Use red and work Rnds 1–8 exactly like Base Rnds 1–8. (48)
Checkpoint: 3.5 in (8.9 cm) across. Set your glass on it; you should see about 0.5 in (1.3 cm) of space on every side.
Rnd 9: Ch 1, sc in BLO of each st around. (48) This turns the wall upward and leaves the front loops of Rnd 8 free for joining to the base.
Rnd 10: Ch 1, sc in each st around. (48)
Rnd 11: Ch 1, sc in BLO of each st around. (48) The free front loops of Rnd 10 form a ridge where the large petals will be sewn.
Rnds 12–14: Ch 1, sc in each st around. (48)
Fasten off. The wall is about 1.25 in (3.2 cm) tall.
Part 3: Large Petals (make 8)
Use red and ch 13.
Rnd 1: Sc in 2nd ch from hook, sc in next 10 ch, 3 sc in last ch. Turn the piece and work along the other side of the chain: sc in next 10 ch, 2 sc in the same ch as the first sc. Join. (26)
Count: 1 + 10 + 3 + 10 + 2 = 26. Each end has 3 sts: one end becomes the stem and the other becomes the tip.
Rnd 2: Ch 1, sc in first st, sc in next 2 sts, hdc in next 3 sts, dc in next 3 sts, hdc in next 2 sts, sc in next st, (sc, ch 2, sc) in next st (tip), sc in next st, hdc in next 2 sts, dc in next 3 sts, hdc in next 3 sts, sc in next 2 sts, sc in last 2 sts. Join. (27 sts and 1 ch-2 sp)
Count check: 3 sc at the stem, 10 sts on each side and 4 sts at the tip = 27. The dc sts make the widest part of the petal, and the ch-2 pulls the tip into a sharp point.
Rnd 3: Ch 1, sc in each st around, working (sc, ch 1, sc) in the ch-2 sp. Join. (29 sc and 1 ch-1 sp)
That’s 27 sc worked 1 per st, plus 2 sc added at the tip. Fasten off and leave a 12 in (30.5 cm) tail. For the center vein, work a line of surface sl sts along the foundation chain on the right side.
Part 4: Small Petals (make 8)
Use red and ch 9.
Rnd 1: Sc in 2nd ch from hook, sc in next 6 ch, 3 sc in last ch. Along the other side, sc in next 6 ch, 2 sc in same ch as first sc. Join. (18)
Rnd 2: Ch 1, sc in first st, sc in next st, hdc in next 2 sts, dc in next 2 sts, hdc in next st, sc in next st, (sc, ch 2, sc) in next st, sc in next st, hdc in next st, dc in next 2 sts, hdc in next 2 sts, sc in next st, sc in last 2 sts. Join. (19 sts and 1 ch-2 sp)
Count check: 3 sts at the stem, 6 on each side and 4 at the tip = 19.
Rnd 3: Ch 1, sc in each st around, (sc, ch 1, sc) in ch-2 sp. Join. (21 sc and 1 ch-1 sp)
That’s 19 sc worked 1 per st, plus 2 added at the tip. Fasten off and leave a 12 in (30.5 cm) tail. Add the surface sl st vein as for the large petals.
Part 5: Gold Berry Ring
Use gold and ch 40. Join with a sl st to the first ch, making sure the chain isn’t twisted.
Rnd 1: Ch 1, *sc in next ch, bobble in next ch; rep from * around. Join. (40 sts: 20 sc and 20 bobbles)
The bobbles pop out toward the back of the work, so that side is the right side of the ring. The ring is about 10 in (25.4 cm) around, or about 3.25 in (8.3 cm) across when laid in a circle. Fasten off and leave a long tail.
Make All Pieces
- Green: 1 star base
- Red: 1 cup, 8 large petals, 8 small petals
- Gold: 1 berry ring
Layout, seen from above:
          L   s   L
       s             s
     L     [  cup  ]   L
       s   [berries]   s
          L   s   L
   (green star points showing between)
L = large petal (outer layer). s = small petal (inner layer, placed halfway between two large petals).
Joining
Cup to base: Center the cup on the base. Line up the free front loops of cup Rnd 8 with base Rnd 8, along the line where Rnd 8 meets Rnd 9. Both rounds have 48 sts, so whipstitch 1 front loop to 1 base stitch all the way around. Pin at 4 points first, every 12 sts, to keep the cup centered.
Large petals: Place a marker in every 6th free front loop of cup Rnd 10 (48 ÷ 8 = 6). Sew the stem end of each large petal to a marked loop, covering about 3 sts. The tips should point outward and tilt up slightly.
Small petals: Mark every 6th st of cup Rnd 13, starting 3 sts over from the large-petal markers. Sew each small petal’s stem end through the posts of Rnd 13 so it sits between two large petals.
Berry ring: Set the ring inside the cup with the bobbles facing up and out. Tack each of its 20 sc to the inside of cup Rnd 14. The ring has 40 sts and the rim has 48, so space the tacks evenly as you go. Pin at the quarter points first.
Tension: Pull each sewing stitch snug but not tight. Tight seams pucker the base and make the cup tilt.
Checkpoint: The flower should measure about 8 in (20.3 cm) across and sit flat.
Border
Work the edging around the green star after assembly. Fold the petals up out of the way first.
Border gauge: 1 sc in the end of each row, so 6 sc on each side of every point.
Rnd 1: Join green in the end of Row 1 on the right side of any point. Ch 1, *sc in the same row end and in each of the next 5 row ends going up (6 sc), (sc, ch 2, sc) in the tip st, sc in each of the 6 row ends going down the other side. In the next point, sc in the end of Row 1 and the next 5 rows; rep from * around all 10 points. Join. (140 sc and 10 ch-2 sps)
Per point: 6 + 2 + 6 = 14 sc. Total: 10 × 14 = 140 sc.
Why the math works: Every point is exactly 6 rows tall, so every side gets exactly 6 sc. The tip gets 2 sc plus a ch-2 to keep it sharp. The dips between points don’t need decreases, because neighboring points begin in neighboring Rnd 10 sts. Fasten off. The star now measures 7.5 in (19.1 cm) from tip to tip.
Final Blocking
- Lightly mist the whole piece with water.
- Lay the base flat and pin each green point outward to a 7.5 in (19.1 cm) circle.
- Shape each red petal with your fingers and pinch the tips into points.
- Fill the cup with a small rolled towel so the wall dries straight.
- Let everything dry completely, for at least 12 hours.
- Remove the pins and towel, then put the glass in place.
Final Quality-Control Checklist
- The base has 60 sts at Rnd 10 and 10 even points
- The cup has 48 sts on every wall round
- All 8 large petals match in length, and all 8 small petals match
- Large and small petals alternate evenly
- The berry ring is tacked at all 20 sc
- The border has 140 sc and 10 sharp tips
- The glass sits level with room for the berries
- All tails are woven in securely
Troubleshooting
The base ruffles: Your stitches are loose on the increase rounds. Go down half a hook size.
The base cups upward: You’re missing increases or crocheting too tightly. Count every round again.
The petals are round, not pointed: Make sure you work the ch-2 in the middle tip st, not the st beside it.
The glass doesn’t fit: Remake the cup with a hook half a size larger so the floor gets wider.
The berries face inward: Turn the ring inside out before tacking it in.
The petals flop: Switch to cotton yarn, or sew each petal stem over 4 sts instead of 3.
Care
Take out the glass and tea light, hand wash in cool water and lay flat to dry. Reshape the petals while they’re still damp.

Final Notes
Check your gauge first. The base should measure 4.5 in (11.4 cm) at Rnd 10 and the cup 3.5 in (8.9 cm) at Rnd 8. The petals should measure 3.5 in (8.9 cm) and 2.5 in (6.4 cm). Sew the 48 cup sts to the 48 base sts one for one, then edge the star with 140 sc so it measures 7.5 in (19.1 cm). The finished flower is about 8 in (20.3 cm) across. Always use an LED tea light.
Happy crocheting!