

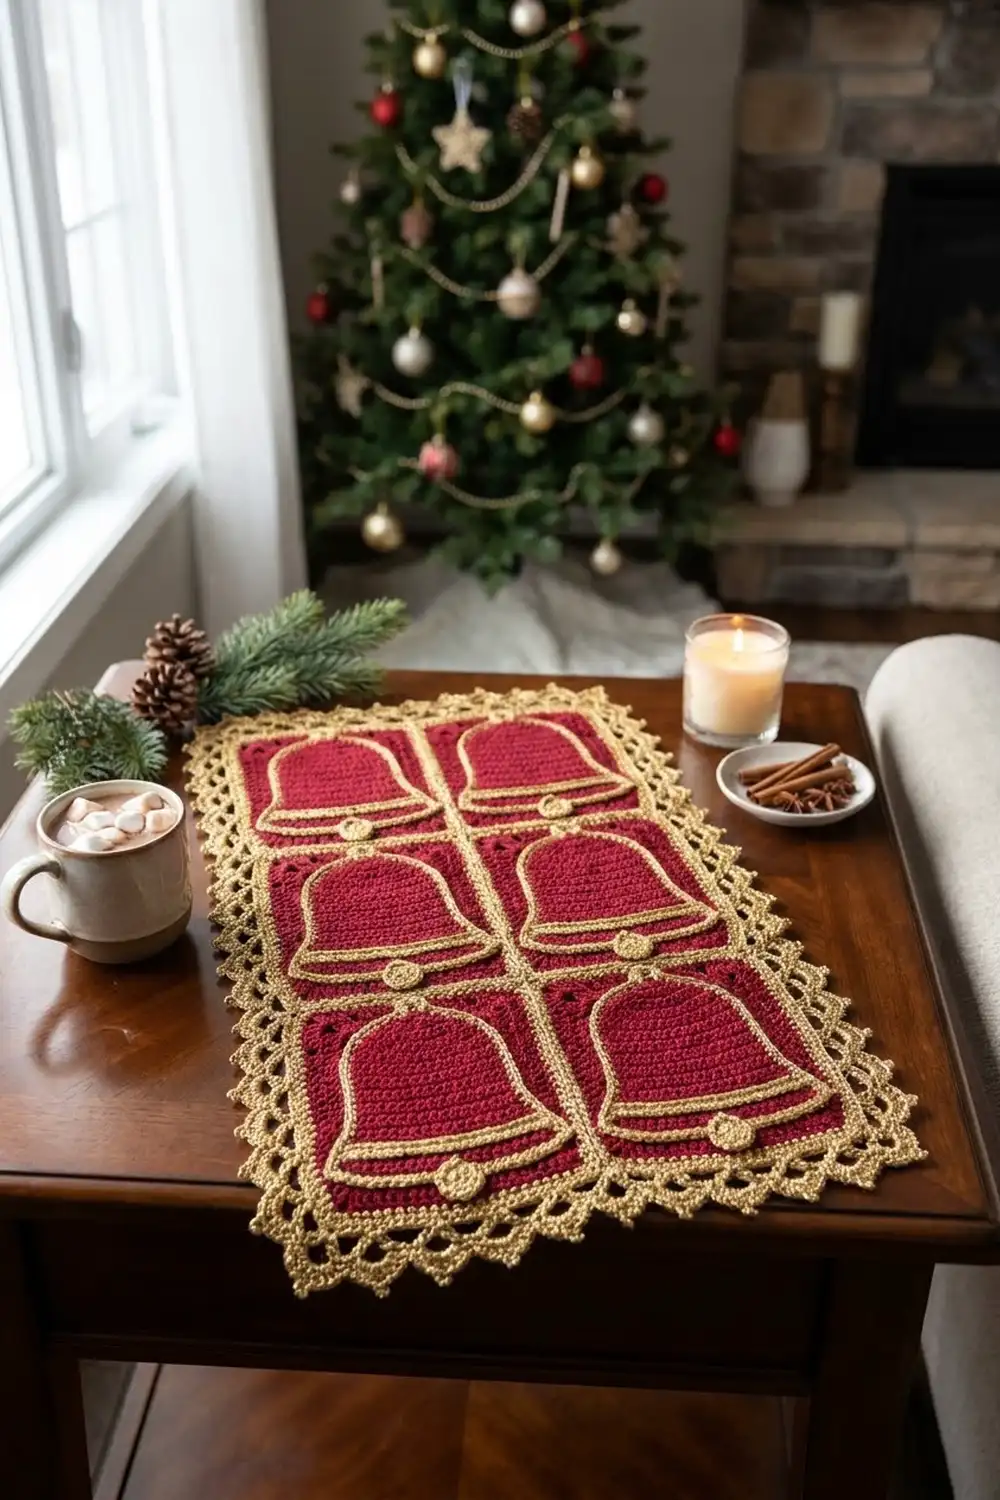
The Golden Chime panel is a tall rectangle made of six red bells, each set inside its own gold lace frame. The bells are worked in dense cranberry half double crochet. Each one gets a bright gold lip band, a crisp gold outline and a little round clapper, so every bell stands out clearly against the open lace behind it.
The style is classic holiday lace with a slightly vintage feel. It works as a door hanging, a tray liner, a small table centerpiece or a framed wall piece. The pattern uses US crochet terms throughout.
The finished panel measures 8.6″ x 16″ (21.8 x 40.6 cm) after blocking. It is made from six motifs, each 3.8″ x 5″ (9.7 x 12.7 cm), joined two across and three down. A three-round gold border finishes the edge.
The construction is simple to follow. For each motif you crochet a gold mesh rectangle and edge it with a lace round, then make a red bell and a gold clapper as separate appliqués. Sew the bell onto the frame, join the six motifs with slip stitches, and add the border.
Finished Size and Construction
- Finished size: 8.6″ x 16″ (21.8 x 40.6 cm)
- Skill level: Intermediate
- Terminology: US crochet terms
- Yarn weight: DK (light, #3), cotton or cotton blend
- Hook: 4.0 mm (US G-6)
- Number of pieces: 6 motifs (each with 1 bell appliqué and 1 clapper)
- Layout: 2 motifs across x 3 motifs down
- Motif size: 3.8″ x 5″ (9.7 x 12.7 cm); 19 sts x 25 sts per side
- Size before border: 7.6″ x 15″ (19.3 x 38.1 cm)
- Border depth: 0.5″ (1.3 cm) on every side
Materials
Use a smooth, mercerized DK cotton. It gives the bells sharp stitch definition and keeps the lace crisp. A gold yarn with a light sheen looks closest to the original, but avoid stiff metallic threads because they make the joining seams lumpy.
- Cranberry red: 30 g (72 m / 79 yd), for the bells
- Gold: 90 g (216 m / 236 yd), for the frames, lip bands, outlines, clappers, joining and border
These quantities include a margin of about 15%, enough for a test motif and for gauge differences.
Tools:
– 4.0 mm (US G-6) crochet hook
– Tapestry needle
– Scissors
– 4 locking stitch markers
– Rust-proof pins
– Blocking mat and spray bottle
– Ruler or tape measure
Abbreviations (US Terms)
- ch – chain
- sl st – slip stitch
- sc – single crochet
- hdc – half double crochet
- dc – double crochet
- sc2tog – single crochet 2 together
- sk – skip
- sp – space
- st(s) – stitch(es)
- RS / WS – right side / wrong side
- rep – repeat
Special stitch: picot – ch 3, sl st in the 3rd ch from the hook. Picots are never counted as stitches.
Corner center: wherever 3 sc go into one stitch, the middle sc of the three is the corner center. Every “per side” count in this pattern includes both corner centers of that side.
Gauge and Checkpoints
Gauge:
– 18 hdc x 13 rows = 4″ (10.2 cm)
– 18 dc (mesh) x 9 rows = 4″ (10.2 cm)
– 5 sc = 1″ (2.5 cm), measured along a finished edge
Make one complete motif before starting the others, block it lightly, then check it against these measurements:
- Bell, Row 8: 2.7″ wide x 2.5″ tall (6.9 x 6.4 cm)
- Bell with outline: 3.1″ x 2.9″ (7.9 x 7.4 cm)
- Mesh, Row 9: 2.9″ x 4″ (7.4 x 10.2 cm)
- Frame, Rnd 1: 3″ x 4.2″ (7.6 x 10.7 cm)
- Frame, Rnd 2: 3.4″ x 4.6″ (8.6 x 11.7 cm)
- Frame, Rnd 3: 3.8″ x 5″ (9.7 x 12.7 cm)
If your motif is too big, go down to a 3.5 mm hook. If it is too small, go up to a 4.5 mm hook. Change hooks before you make the remaining five motifs. A difference of 0.2″ (0.5 cm) per motif adds up to 0.6″ (1.5 cm) over the panel length.
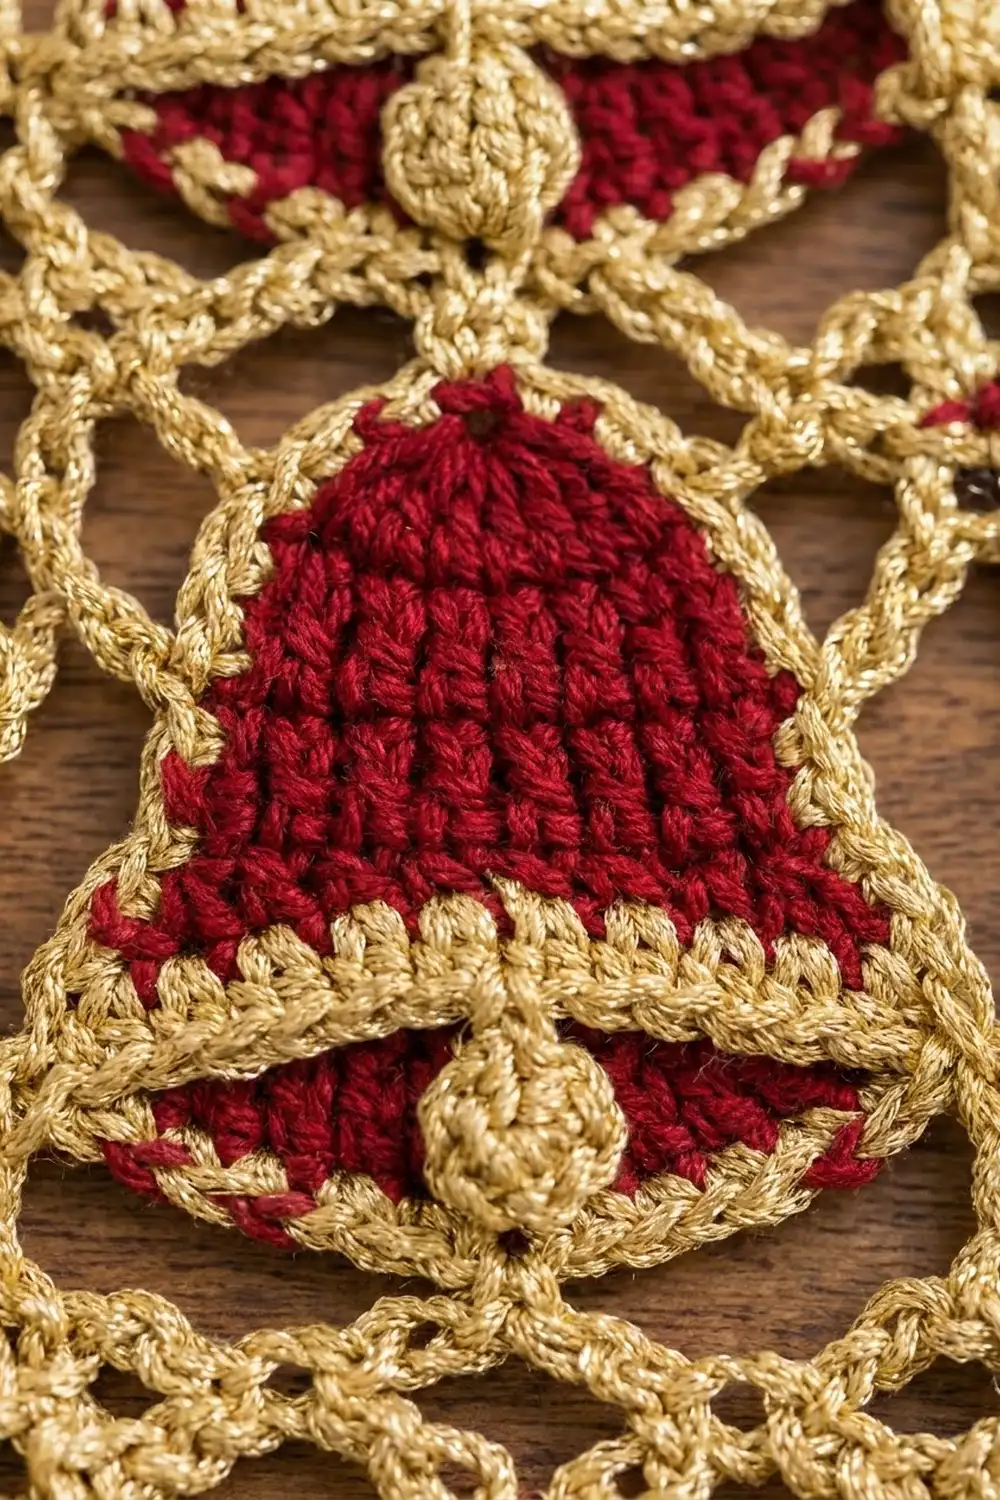
Part 1: Lace Frame (Gold, Make 6)
Mesh Center (worked in rows)
Row 1 (RS): Ch 16. Dc in 6th ch from hook (the skipped chs count as dc + ch 1). [Ch 1, sk 1 ch, dc in next ch] 5 times. Turn. (7 dc, 6 ch-1 sps = 13 sts)
Rows 2–9: Ch 4 (counts as dc + ch 1). Dc in next dc, [ch 1, dc in next dc] 4 times, ch 1, dc in top of turning ch. Turn. (13 sts per row)
At the end of Row 9, do not fasten off. Checkpoint: 2.9″ x 4″ (7.4 x 10.2 cm).
Edging Rounds
Rnd 1 (sc): Ch 1, turn.
– Top edge: 3 sc in first dc (corner), [sc in next ch-1 sp, sc in next dc] 5 times, sc in next ch-1 sp, 3 sc in last st (corner).
– First long edge: 2 sc in each row-end of Rows 8 to 2 (14 sc), then 3 sc in the Row 1 row-end (17 sc). The extra sc fills the height added by the foundation chain.
– Bottom edge: working in the free loops of the foundation, 3 sc in the first ch (corner), sc in each of the next 11 ch, 3 sc in the last ch (corner).
– Second long edge: 3 sc in the Row 1 row-end, then 2 sc in each row-end of Rows 2 to 8 (17 sc).
Join with a sl st to the first sc.
Per side: short sides 15 sts, long sides 21 sts (68 sts total).
Rnd 2 (lace): Sl st in the next sc (corner center). Ch 1, (sc, ch 3, sc) in the same st.
- Each short side: [ch 2, sk 1, sc in next st] 6 times, ch 2, sk 1, then (sc, ch 3, sc) in the next corner center.
- Each long side: [ch 2, sk 1, sc in next st] 9 times, ch 2, sk 1, then (sc, ch 3, sc) in the next corner center.
Leave out the last corner group and join with a sl st to the first sc.
Count: 7 ch-2 loops per short side, 10 per long side, 4 ch-3 corners.
Rnd 3 (sc): Sl st into the first ch-3 corner. Ch 1, 3 sc in the same corner. Around the rest of the frame, sc in each sc, 1 sc in each ch-2 loop and 3 sc in each ch-3 corner. Join and fasten off.
Per side: short 19 sts (1 + 1 + 1 + 7 x 2 + 1 + 1), long 25 sts (1 + 1 + 1 + 10 x 2 + 1 + 1). Total 84 sts.
Checkpoint: 3.8″ x 5″ (9.7 x 12.7 cm).
Part 2: Bell Appliqué (Make 6)
Work in red. The ch 1 or ch 2 at the start of a row never counts as a stitch.
Row 1 (crown): Ch 6. Hdc in 3rd ch from hook and in each of the next 3 ch. Turn. (4 hdc)
Row 2: Ch 1, 2 hdc in first st, hdc in next 2, 2 hdc in last st. Turn. (6 hdc)
Row 3: Ch 1, hdc in each st. Turn. (6 hdc)
Row 4: Ch 1, 2 hdc in first st, hdc in next 4, 2 hdc in last st. Turn. (8 hdc)
Row 5: Ch 1, hdc in each st. Turn. (8 hdc)
Row 6: Ch 1, 2 hdc in first st, hdc in next 6, 2 hdc in last st. Turn. (10 hdc)
Row 7 (flare): Ch 1, 2 hdc in first st, hdc in next 8, 2 hdc in last st. Fasten off red. (12 hdc)
Row 8 (gold lip band): Turn and join gold in the first st. Ch 1, hdc in each st. (12 hdc)
Do not fasten off. Checkpoint: 2.7″ x 2.5″ (6.9 x 6.4 cm).
Outline Rnd (gold): Ch 1, do not turn.
– First side: working down the row-ends, work 3 sc for every 2 rows (12 sc).
– Crown: working in the free loops of the foundation, 2 sc in the first ch, sc in the next 2 ch, 2 sc in the last ch (6 sc).
– Second side: working up the row-ends, 3 sc for every 2 rows (12 sc).
– Lip: across Row 8, 3 sc in the first st, sc in the next 10, 3 sc in the last st (16 sc).
Join and fasten off, leaving a 16″ (40.6 cm) tail. (46 sc)
The 3-sc lip corners make the flared bell edge. The 2-sc crown increases round off the top of the bell. Checkpoint: 3.1″ x 2.9″ (7.9 x 7.4 cm).
Part 3: Clapper (Gold, Make 6)
Magic ring, ch 1, 8 sc in the ring. Join with a sl st and pull the ring closed. Fasten off, leaving an 8″ (20.3 cm) tail. (8 sc; 0.6″ / 1.5 cm across)
Part 4: Assemble Each Motif
- Place the frame RS up with a short edge at the top.
- Center the bell from side to side. Its lip outline should sit 0.9″ (2.3 cm) above the bottom edge of the frame, which leaves about 1.2″ (3.0 cm) of lace showing above the crown.
- Pin the bell in place. Use the red-side tail to whipstitch through the back loops of the outline sts into the mesh behind.
- Pin the clapper over the center of the lip, between the 8th and 9th lip sc. Half of the clapper should hang below the lip edge.
- Sew around the upper half of the clapper only, so the lower half stays free.
Make All Pieces
- Red: 6 bells (Rows 1–7)
- Gold: 6 lace frames, 6 lip bands and outlines, 6 clappers
Layout (every motif with its short edges at top and bottom):
+--------+--------+
|   M1   |   M2   |
+--------+--------+
|   M3   |   M4   |
+--------+--------+
|   M5   |   M6   |
+--------+--------+
Joining
Method: Use gold yarn and a slip-stitch seam worked through the back loops only. Hold two motifs RS together and match their edges corner to corner, then sl st through the back loop of each matched pair of sts.
- Columns: Join M1 to M3 and M3 to M5 along their short edges, 19 sl sts per seam. Join M2, M4 and M6 the same way. Each column is now 75 sts long (3 x 25).
- Center seam: Hold the two columns RS together and sl st through all 75 matched pairs. Work straight across the corner sts where the short seams meet.
Each sl st goes into exactly one stitch from each motif. No stitches are added or skipped. The ridge forms on the WS, and the RS stays flat with the two outer loops lying side by side.
Tension: Keep each sl st as loose as one sc. Tight seams shorten the panel, so test that the seam stretches as much as the motif edge does.
Checkpoint: 7.6″ x 15″ (19.3 x 38.1 cm). The outer edges are 38 sts across the top and bottom (2 x 19) and 75 sts down each long side (3 x 25).
Border
Border gauge: 5 sc = 1″ (2.5 cm), the same as the motif edges.
Rnd 1 (sc): Join gold in a top corner st.
– Each outer corner: 3 sc in the corner st.
– Along every edge: sc in each st.
– At each seam: the two adjacent motif corner sts are worked as one sc2tog.
Join with a sl st.
- Short sides: 1 + 1 + 17 + 1 (sc2tog) + 17 + 1 + 1 = 39 sts
- Long sides: 1 + 1 + 23 + 1 + 23 + 1 + 23 + 1 + 1 = 75 sts
- Total: 39 + 75 + 39 + 75 − 4 = 224 sts
Checkpoint: 7.9″ x 15.3″ (20.1 x 38.9 cm).
Rnd 2 (lace): Sl st to the corner center. Ch 1, (sc, ch 3, sc) in the same st.
- Each short side: [ch 2, sk 1, sc in next st] 18 times, ch 2, sk 1, then (sc, ch 3, sc) in the corner center.
- Each long side: [ch 2, sk 1, sc in next st] 36 times, ch 2, sk 1, then (sc, ch 3, sc) in the corner center.
Leave out the last corner group and join.
Count: 19 ch-2 loops per short side, 37 per long side (112 total), plus 4 ch-3 corners.
Checkpoint: 8.3″ x 15.7″ (21.1 x 39.9 cm).
Rnd 3 (picot): Sl st into the corner sp.
– Each corner: (sc, hdc, picot, hdc, sc) in the ch-3 sp.
– Each ch-2 loop: (sc, picot, sc). Skip the sc between loops.
Join and fasten off.
Count: 19 picots per short side, 37 per long side, plus 4 corner picots (116 total).
Why the math works: A 2 x 3 layout gives 38 sts on the short sides and 75 on the long sides. One side count is even and the other is odd, so a 2-st lace repeat cannot fit both. The sc2tog at each seam removes 1 st per seam. The short sides lose 1 (39 including corners), and the long sides lose 2 (75 including corners).
The distance from one corner center to the next is then 38 on the short sides and 74 on the long sides. Both are even, so the 2-st lace repeat lands exactly on every corner. The sc2tog also closes the small gap where two corners meet. In Rnd 3, 2 sc per loop sit over 2 sts, so the edge stays flat while the picots stand out.
Final Blocking
- Weave in all ends along same-color stitches. Hide the gold ends inside the outlines.
- Spray the panel until it is evenly damp, without soaking it.
- Pin the four outer corners to 8.6″ x 16″ (21.8 x 40.6 cm), checking that the corners are square.
- Pin the midpoint of each side, then pin every 1″ (2.5 cm) along the edges.
- Pin each picot out so it points away from the panel.
- Press the bells flat with your palm, nudging each clapper so it sits centered.
- Let the panel dry completely, 6–12 hours, before you unpin it.
Final Quality-Control Checklist
- [ ] All 6 motifs measure 3.8″ x 5″ (9.7 x 12.7 cm)
- [ ] Each frame Rnd 3 has 19 / 25 / 19 / 25 sts per side
- [ ] Each bell is centered, with its lip 0.9″ (2.3 cm) above the bottom edge
- [ ] Each clapper hangs half below the lip
- [ ] Seams are flat on the RS and match corner to corner
- [ ] Border Rnd 1 has 39 / 75 sts per side
- [ ] Border Rnd 2 has 19 / 37 loops per side
- [ ] The finished panel is 8.6″ x 16″ (21.8 x 40.6 cm)
- [ ] No loose ends show on the RS
Troubleshooting
- The bell cups or curls: the outline is too tight. Redo it with a larger hook, or make sure you work 3 sc for every 2 rows.
- The bell lip waves: you added extra hdc in Row 8. It needs exactly 12.
- The frame is too tall: the mesh rows are too loose. Pull the turning chains snug.
- The Rnd 2 loops don’t land on the corners: your Rnd 1 count is off. Recount to 15 / 21.
- The panel bows at the seams: loosen your slip stitches, or join with a hook one size larger.
- The border ruffles: check that you skip the sc between loops in Rnd 3.
- The border pulls in: loosen the ch-2 loops in Rnd 2.
Care
Hand wash in cool water with a mild detergent, roll the panel in a towel to remove water, and dry it flat, re-pinning it to size if needed. Do not tumble dry.
Final Notes
Each stage builds on the measurement before it. The mesh, at 2.9″ x 4″ (7.4 x 10.2 cm), grows to a 3.8″ x 5″ (9.7 x 12.7 cm) motif with 19 x 25 sts per side.
Six motifs joined 2 x 3 make a 7.6″ x 15″ (19.3 x 38.1 cm) panel with 38 x 75 sts per side. The 0.5″ (1.3 cm) border brings it to 8.6″ x 16″ (21.8 x 40.6 cm). Check your measurements at each stage and the bells will line up neatly.
Happy crocheting!