

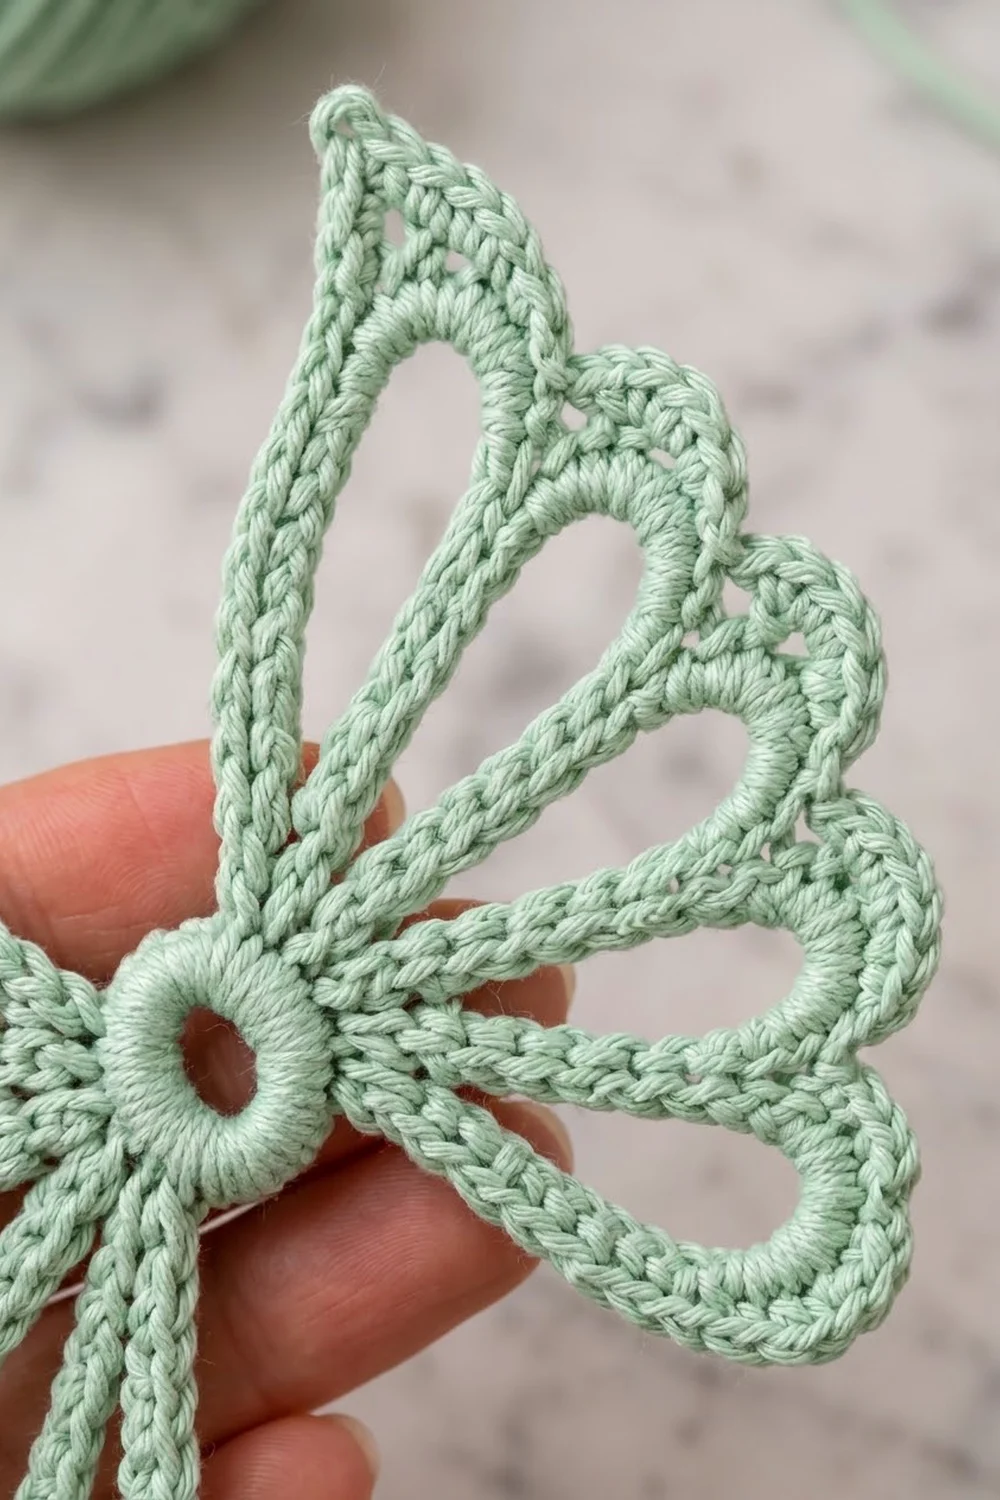
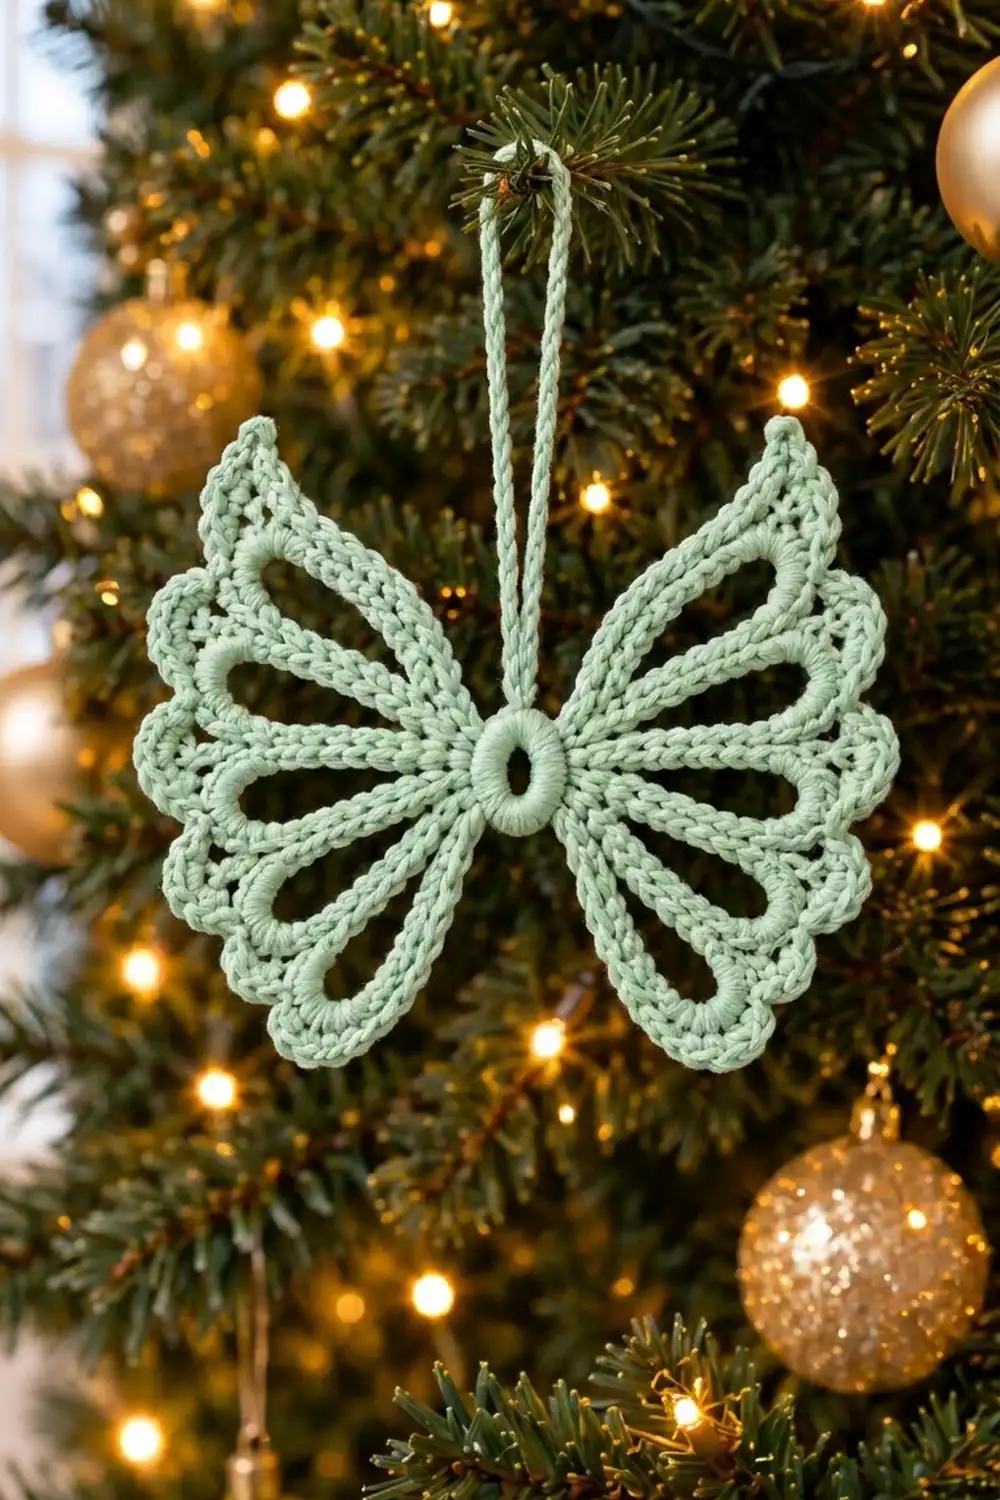
The Mint Frost Butterfly is a light, lacy ornament with a soft vintage feel. Eight open petal loops fan out from a small round center. Each wing ends in a crisp point at the top and a row of tiny scallops along its outer edge.
It is worked in one color, a cool mint green cotton. That color looks fresh against dark fir branches and warm fairy lights, and it is just as pretty on a gift tag or in a window.
This pattern uses US crochet terms. The finished ornament measures about 5.5 in (14.0 cm) wide and 4.25 in (10.8 cm) tall, not counting the hanging loop.
Construction is simple and fast. You crochet a ring and make all eight chain loops off it, covering each loop with single crochet as you go. Then you add a scalloped edging to each wing and finish with a chain hanging loop. The whole ornament is one piece.
Finished Size and Construction
- Finished size: 5.5 in (14.0 cm) wide × 4.25 in (10.8 cm) tall
- Hanging loop: about 3 in (7.6 cm) extra
- Skill level: Easy–Intermediate
- Terminology: US
- Yarn weight: DK (3), mercerized cotton
- Hook: 3.75 mm (F-5)
- Number of pieces: 1
- Layout: one symmetrical motif, two wings of 4 loops each
- Size before edging (after Round 2): 5 in (12.7 cm) × 3.75 in (9.5 cm)
- Edging depth: about 0.25 in (0.6 cm) on each outer edge
Materials
Yarn: Use a smooth, mercerized DK cotton or cotton blend. Cotton gives the crisp, rope-like stitch definition you see on the loops, and it blocks flat and holds its shape on the tree. Avoid fuzzy or very stretchy yarns because they blur the open petals.
- Mint green: 10 g / about 22 m (24 yd) per ornament
One 50 g ball (about 110 m / 120 yd) makes 5 ornaments with some yarn to spare.
Tools:
- 3.75 mm (F-5) crochet hook
- 4 locking stitch markers
- Tapestry needle
- Scissors
- Blocking mat, rust-proof pins, and spray bottle
- Optional: fabric stiffener or diluted craft glue
Yarn quantities include a margin of about 15% for the gauge swatch and weaving in ends.
Abbreviations (US Terms)
- ch – chain
- sl st – slip stitch
- sc – single crochet
- hdc – half double crochet
- sc2tog – single crochet 2 together
- st(s) – stitch(es)
- sp – space
Special stitches:
- Standing sc: With a slip knot on the hook, insert the hook into the stated stitch, yarn over, pull up a loop, yarn over, and pull through both loops.
- Scallop: Sk 1 st, 5 hdc in next st, sk 1 st, sc in next st. Each scallop uses 4 stitches.
- Loop join (sc2tog across two loops): Insert the hook into the stated stitch of the first loop, yarn over, and pull up a loop. Insert the hook into the stated stitch of the next loop, yarn over, and pull up a loop. Yarn over and pull through all 3 loops. This joins two neighboring petals into 1 stitch.
Gauge and Checkpoints
Gauge: 18 sc = 4 in (10.2 cm). Gauge is not critical for an ornament, but it does affect size and how much yarn you use.
Make one full ornament as your test piece and check it at each stage:
- After Round 1: the ring measures about 1 in (2.5 cm) across, outer edge to outer edge.
- After Loop A: the covered loop reaches about 2.5 in (6.4 cm) from the edge of the ring.
- After Loops B and C: each is about 2 in (5.1 cm) long.
- After Loop D: it is about 2.3 in (5.8 cm) long.
- After Round 2: the motif is about 5 in (12.7 cm) × 3.75 in (9.5 cm).
- After Round 3: the motif is about 5.5 in (14.0 cm) × 4.25 in (10.8 cm).
If your piece is too big, go down to a 3.5 mm (E-4) hook, or pull the chain loops slightly tighter. If it is too small, go up to a 4 mm (G-6) hook. Keep the chain counts the same either way. The sc counts are matched to the chain counts, so changing them will make the loops ruffle or pucker.
Pattern
Round 1: Center Ring
Ch 8, sl st in first ch to form a ring.
Round 1: Ch 1, work 16 sc into the ring, sl st in first sc. (16 sc)
Number the sc 1 to 16 in the order you made them. Place a marker in sc 1. This is the top center of the ornament, where the hanging loop goes. Sc 9, directly opposite, is the bottom center.
Pull the tail snug so the ring closes into a small, firm oval. The sc should be packed tightly enough that they look like a padded cord.
Round 2: Petal Loops
In this round you make each chain loop and cover it with sc right away, then move along the ring to the next anchor stitch. The loops are anchored in the even-numbered sc: 2, 4, 6, and 8 for Wing 1, and 10, 12, 14, and 16 for Wing 2.
How to cover a loop: After you make the chain and sl st back into the anchor stitch, work sc into the chain space, keep going in the same direction you are traveling around the ring, then sl st back into the anchor stitch. Work tightly and evenly. The sc should fill the chain completely and leave an open, teardrop-shaped center.
Count each loop’s sc in the order you work them. Place a marker in sc 1 of Loop A on each wing.
Wing 1 (loops worked from top to bottom):
- Sl st in sc 2. Loop A: Ch 24, sl st in same sc 2. Work 32 sc into the ch-24 loop, sl st in sc 2.
- Sl st in sc 3, sl st in sc 4. Loop B: Ch 18, sl st in same sc 4. Work 24 sc into the loop, sl st in sc 4.
- Sl st in sc 5, sl st in sc 6. Loop C: Ch 18, sl st in same sc 6. Work 24 sc into the loop, sl st in sc 6.
- Sl st in sc 7, sl st in sc 8. Loop D: Ch 21, sl st in same sc 8. Work 28 sc into the loop, sl st in sc 8.
- Sl st in sc 9 (bottom center).
Wing 2 (loops worked from bottom to top):
- Sl st in sc 10. Loop D: Ch 21, sl st in same sc 10. Work 28 sc into the loop, sl st in sc 10.
- Sl st in sc 11, sl st in sc 12. Loop C: Ch 18, sl st in same sc 12. Work 24 sc, sl st in sc 12.
- Sl st in sc 13, sl st in sc 14. Loop B: Ch 18, sl st in same sc 14. Work 24 sc, sl st in sc 14.
- Sl st in sc 15, sl st in sc 16. Loop A: Ch 24, sl st in same sc 16. Work 32 sc, sl st in sc 16.
- Sl st in sc 1. Fasten off.
Stitch count: Each wing has 32 + 24 + 24 + 28 = 108 sc. The whole motif has 216 sc on 8 loops.
The loops use the same ratio of 4 sc to every 3 ch: 24 ch → 32 sc, 18 ch → 24 sc, and 21 ch → 28 sc. That ratio is what keeps every petal flat.
Numbering for Round 3: On Wing 1, each loop’s sc count starts on its upper side, the side nearer the top. On Wing 2, each loop’s count starts on its lower side. Each loop’s tip falls at its halfway point: between sts 16 and 17 on Loop A, sts 12 and 13 on Loops B and C, and sts 14 and 15 on Loop D.
Lay the piece flat. Fan Loop A up and out at about 45°, set B and C roughly level, and point D down and out. Check that it measures about 5 in (12.7 cm) × 3.75 in (9.5 cm).
Hanging Loop
Join the yarn with a sl st in sc 1 of the ring (top center). Ch 32, sl st in the same sc 1. Fasten off. The loop hangs about 3 in (7.6 cm) above the ring.
Border: Scalloped Wing Edging
Border gauge: One scallop is about 0.5 in (1.3 cm) wide and 0.25 in (0.6 cm) deep.
The edging runs only along the outer edge of each wing. The inner sides of the loops, where they face the ring, are left as plain sc. That contrast between plain inner lines and scalloped outer edges gives the ornament its look.
Round 3, Wing 1 (start at Loop A, work toward Loop D)
- Loop A: Join with a standing sc in st 4. Sc in sts 5–15. (12 sc)
- Tip: (Sc, ch 2, sc) in st 16. Sc in st 17.
- Loop A, continued: 2 scallops over sts 18–25.
- Join A–B: Loop join in st 26 of A and st 8 of B.
- Loop B: 2 scallops over sts 9–16.
- Join B–C: Loop join in st 17 of B and st 8 of C.
- Loop C: 2 scallops over sts 9–16.
- Join C–D: Loop join in st 17 of C and st 8 of D.
- Loop D: 3 scallops over sts 9–20, then sc in sts 21–24. Fasten off.
Round 3, Wing 2 (start at Loop D, work toward Loop A)
- Loop D: Join with a standing sc in st 5. Sc in sts 6–8. (4 sc) Then work 3 scallops over sts 9–20.
- Join D–C: Loop join in st 21 of D and st 8 of C.
- Loop C: 2 scallops over sts 9–16.
- Join C–B: Loop join in st 17 of C and st 8 of B.
- Loop B: 2 scallops over sts 9–16.
- Join B–A: Loop join in st 17 of B and st 7 of A.
- Loop A: 2 scallops over sts 8–15. Sc in st 16.
- Tip: (Sc, ch 2, sc) in st 17.
- Loop A, continued: Sc in sts 18–29. (12 sc) Fasten off.
Count for each wing: 9 scallops (45 hdc + 9 sc), 19 plain sc, 3 loop joins, and 1 ch-2 tip. That is 76 stitches plus the ch-2 tip.
Why the Math Works
Each loop’s stitches are fully accounted for:
- Loop A: 22 stitches are used (sts 4–25 on Wing 1, sts 8–29 on Wing 2). That is 12 plain sc + 1 tip stitch + 1 sc + 8 scallop stitches. Then 1 more stitch goes into the loop join.
- Loops B and C: 8 scallop stitches each (sts 9–16). Stitches 8 and 17 go into the joins on either side.
- Loop D: 12 scallop stitches + 4 plain sc + 1 join stitch.
Every scallop uses exactly 4 stitches, so each scalloped section must be a multiple of 4: 8, 8, 8, and 12. They are.
Wing 2 is an exact mirror of Wing 1. On a loop of n stitches, stitch k on one wing matches stitch n + 1 − k on the other. That is why Wing 2’s numbers (st 5 on D, st 7 on A) differ from Wing 1’s but land in the same place on the motif.
Final Blocking
- Weave in all ends along the inner sc lines. Do not trim them yet.
- Soak the ornament in cool water for 5 minutes, then press out the water in a towel.
- Pin the ring flat on the blocking mat.
- Pin the tip of each Loop A up and out so the wing points are 5.5 in (14.0 cm) apart, measured across the widest point of the wings.
- Pin each loop’s tip and each scallop, keeping the open centers of the loops smooth and even.
- Check the height: 4.25 in (10.8 cm) from the top of Loop A to the bottom of Loop D.
- If you want, mist with fabric stiffener for a crisp ornament.
- Let it dry completely, at least 12 hours. Unpin and trim the ends.
Final Quality-Control Checklist
- Ring has 16 sc and is closed firmly.
- There are 8 loops, anchored in sc 2, 4, 6, 8, 10, 12, 14, and 16.
- Loop sc counts are 32 / 24 / 24 / 28 on each wing.
- Each wing has 9 scallops, 3 loop joins, and 1 pointed tip.
- The wings mirror each other exactly.
- The hanging loop sits at sc 1, directly above the bottom center (sc 9).
- Size is 5.5 in (14.0 cm) × 4.25 in (10.8 cm).
- No ends show on the front.
Troubleshooting
- Loops ruffle: Too many sc for the chain. Recount to 32 / 24 / 24 / 28 and keep the 4 sc per 3 ch ratio.
- Loops cup or curl: The chains are too loose or the sc are too tight. Chain more firmly, or go up a hook size for the sc only.
- Wings are lopsided: The anchors slipped. Every loop must sit on an even-numbered ring sc.
- Scallops won’t lie flat: Check that you skipped 1 stitch on each side of the 5 hdc.
- Gaps between petals: The loop joins went into the wrong stitches. Recount from st 1 of each loop.
- Ornament tilts when hung: Move the hanging loop to exactly sc 1, the top center.
Care
Hand wash in cool water, press dry in a towel, and reshape flat. Store ornaments flat between sheets of tissue paper so the tips and scallops keep their shape.
Final Notes
Here is the measurement chain:
- 16 sc ring, about 1 in (2.5 cm) across
- Loops of 32 / 24 / 24 / 28 sc, from 2 in to 2.5 in (5.1–6.4 cm) long
- Motif after Round 2: 5 in (12.7 cm) × 3.75 in (9.5 cm)
- Scalloped edging 0.25 in (0.6 cm) deep
- Finished ornament: 5.5 in (14.0 cm) × 4.25 in (10.8 cm), plus a 3 in (7.6 cm) hanging loop
Once your first butterfly matches these numbers, the rest go quickly. One 50 g ball is enough for five.
Happy crocheting!